Painting your bedroom furniture can completely transform the look and feel of your space. Instead of spending a lot of money on new furniture, you can create a fresh atmosphere with just a few cans of paint and some effort.
But to get that professional, long-lasting finish, you need the right steps, materials, and a bit of patience. Many people rush or skip key details, and then feel disappointed when paint peels or looks uneven. In this guide, you’ll learn how to paint your bedroom furniture from start to finish, with practical tips, common mistakes to avoid, and expert advice for a flawless result—even if you’re a beginner.
Why Paint Bedroom Furniture?
Fresh paint does more than change the color. It can hide scratches, chips, and stains. It also protects wood or other materials from moisture and wear. Painting is a sustainable choice, letting you reuse quality pieces instead of sending them to a landfill.
Plus, you get to personalize your furniture to match your unique style. For example, a plain brown dresser can become a bold blue accent piece, or a chipped nightstand can be restored to look brand new.
Planning Your Furniture Painting Project
Before you buy paint or pick up a brush, planning is critical. Rushing can lead to uneven results or damaged furniture.
Choose The Right Furniture
Not all furniture is suitable for painting. Solid wood, wood veneer, and MDF (medium-density fiberboard) can be painted. Laminate pieces are trickier—paint may not stick well unless you use special primers.
Check your furniture for:
- Stability: Wobbly or broken items need fixing first.
- Surface damage: Deep cracks or water damage may need extra repair.
- Value: Antique or high-value pieces may lose value if painted.
Select Your Look
Decide if you want a smooth modern finish, a distressed vintage look, or something bold and colorful. This choice affects the kind of paint and tools you’ll use.
Gather Inspiration
Look at home décor magazines, Pinterest, or Instagram for color ideas and techniques. Sometimes, seeing a finished piece helps you imagine your own project more clearly.
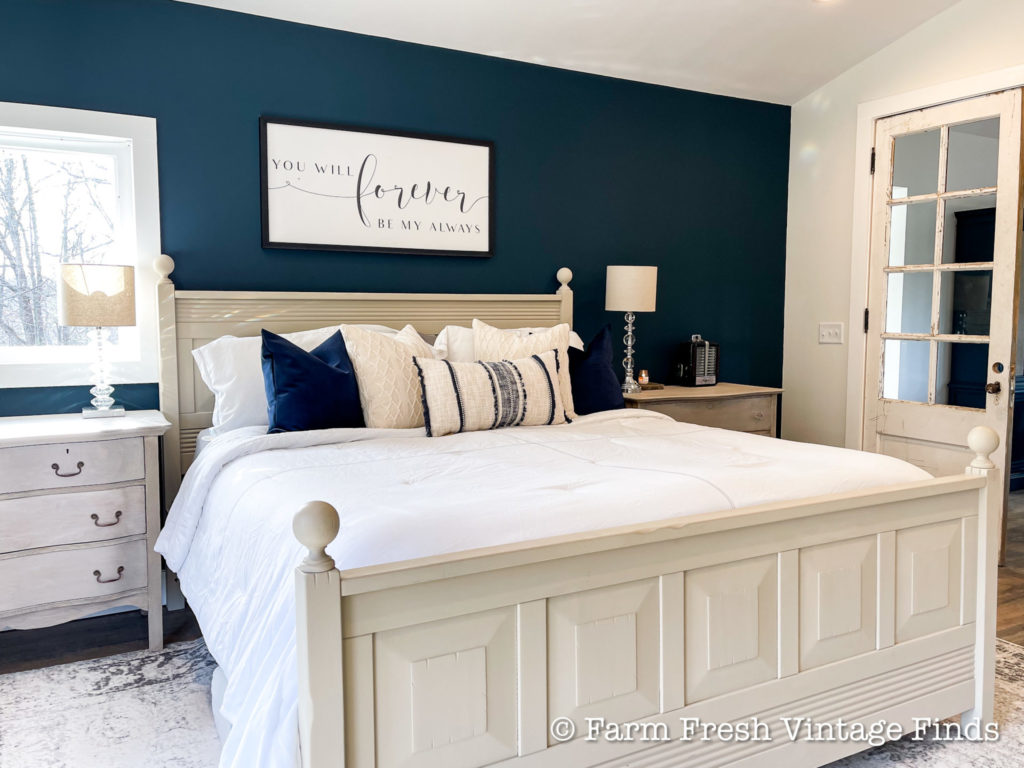
Credit: farmfreshvintagefinds.com
Tools And Materials You Need
Having the right materials makes painting easier and the results better. Here’s what you’ll need for most bedroom furniture projects:
- Screwdriver: For removing hardware and drawers
- Cleaner: Degreaser or mild soap
- Sandpaper: Fine (180–220 grit) and medium (120–150 grit)
- Sanding block or electric sander: For bigger pieces
- Tack cloth or microfiber cloth
- Painter’s tape
- Drop cloths or old sheets
- Primer: Stain-blocking for wood, bonding for laminate
- Paint: Latex, acrylic, chalk, or spray paint
- Brushes: Quality synthetic brushes for smooth paint
- Foam roller: For flat surfaces
- Paint tray
- Sealer or topcoat: Polycrylic, polyurethane, or wax for durability
- Protective gear: Gloves, mask, and goggles
If you want a metallic, high-gloss, or chalky finish, check if you need special paints or additives.
Table: Paint Types Vs. Furniture Materials
Here’s a quick guide for choosing paint based on what your furniture is made of:
| Furniture Material | Best Paint Type | Primer Needed? |
|---|---|---|
| Solid Wood | Latex, Acrylic, Chalk | Yes |
| Wood Veneer | Latex, Acrylic, Chalk | Yes |
| MDF | Latex, Acrylic | Yes |
| Laminate | Bonding Latex/Acrylic | Special Bonding Primer |
| Metal | Spray Paint, Oil-based | Metal Primer |
Preparing Your Bedroom Furniture
Preparation is the most important—and often skipped—step. Rushed prep leads to chipping, stains bleeding through, or a gritty finish. Here’s how to do it right:
1. Empty And Disassemble
Remove all items from inside the furniture. Take off handles, knobs, and hinges with your screwdriver. For drawers, remove them completely. Label hardware with tape if needed.
2. Clean Thoroughly
Paint won’t stick to dust, oil, or old wax. Wash all surfaces with a degreaser or a mix of mild soap and water. For sticky spots, use vinegar or a cleaner like TSP (trisodium phosphate). Rinse and let dry fully.
3. Repair Damage
Fill cracks, dents, or holes with wood filler. Let it dry and sand smooth. For loose joints, add wood glue and clamp until set. If you skip repairs, flaws will show through your paint.
4. Sand Surfaces
Sanding removes gloss and roughs up the surface so paint can grip. Use medium-grit sandpaper (120–150) for the first pass, then fine-grit (180–220) for a smooth finish. Always sand in the direction of the wood grain.
For furniture with curves or details, use a sanding sponge or sandpaper by hand. Wipe away dust with a tack cloth.
Key Insight: Many Beginners Don’t Sand Enough, Especially With Shiny Or Laminate Surfaces. Even Light Sanding Makes A Big Difference In How Well Your Paint Sticks.
5. Tape Off And Protect
Cover any parts you don’t want painted (like inside drawers or glass panels) with painter’s tape. Lay down drop cloths to protect your floor.
Priming For Best Results
Primer is your secret weapon for a smooth, long-lasting finish. It blocks stains, helps paint stick, and can prevent wood tannins from bleeding through.
- Use a stain-blocking primer for wood with knots, old stains, or if you’re painting a light color over dark wood.
- For laminate or slick surfaces, use a bonding primer made for tricky materials.
Apply one or two thin coats of primer, letting each dry as directed. Sand lightly with fine sandpaper between coats for extra smoothness.
Table: Primer Types And Their Uses
| Primer Type | Best For | Dry Time |
|---|---|---|
| Stain-blocking | Wood, dark stains, knots | 1–2 hours |
| Bonding | Laminate, glossy finishes | 2–4 hours |
| Shellac-based | Heavy stains, odors | 30–60 minutes |
Choosing The Right Paint
Your paint choice affects how your furniture looks, feels, and lasts. Here’s what you need to know:
Paint Types
- Latex paint: Water-based, easy to use, low odor, dries fast. Good for most furniture.
- Acrylic paint: Also water-based, but stronger and more flexible. Great for furniture that gets a lot of use.
- Chalk paint: Matte finish, very trendy for a vintage look. Needs a topcoat for durability.
- Oil-based paint: Very durable but slow to dry and strong-smelling. Less popular for bedrooms due to fumes.
- Spray paint: Great for metal, plastic, or small pieces. Gives a smooth finish with practice.
Finish Levels
- Matte/flat: Hides flaws but scuffs easily
- Satin/eggshell: Slight sheen, easy to clean, popular for bedrooms
- Semi-gloss/gloss: Shiny and durable, shows imperfections more
Key Insight: For Bedroom Furniture, Satin Or Semi-gloss Latex Or Acrylic Paints Are Usually The Best Balance Between Appearance And Cleanability.
Color Selection Tips
- Light colors make rooms look bigger and brighter
- Dark colors feel cozy but can show dust more
- Bold colors make a statement but can feel overwhelming in small rooms
- Test paint samples on a hidden area before committing
Credit: www.confessionsofaserialdiyer.com
Painting Techniques: Step-by-step
Now comes the fun part: painting! Take your time and follow each step for a flawless finish.
1. Stir And Prepare Paint
Open your paint and stir well with a stick. Pour a small amount into a paint tray.
2. Apply Thin, Even Coats
Use a quality brush for edges, corners, and details. Rollers are perfect for flat surfaces. Always paint in the direction of the wood grain.
- Apply thin coats rather than thick ones—thick paint drips and takes longer to dry.
- Let each coat dry fully before adding another (check your paint can for exact times).
Most furniture needs 2–3 coats for even coverage, especially if you’re painting a light color over dark wood.
3. Sand Between Coats
For a super-smooth finish, lightly sand with fine-grit sandpaper between coats. Wipe away dust with a tack cloth. This step is easy to skip, but it makes a big difference in how your furniture feels to the touch.
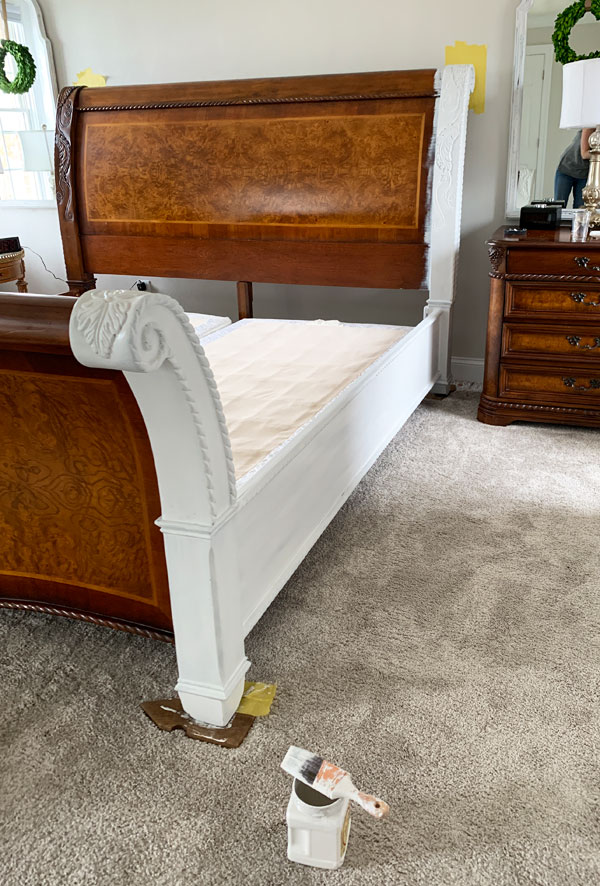
4. Paint Drawers And Doors Separately
If your piece has drawers or doors, paint them apart from the main structure. This helps you avoid drips or paint marks around hinges and edges.
5. Check For Drips
Look for drips or heavy spots as you paint. Smooth them out right away with your brush or roller.
Pro Tip: For Small Details Or Intricate Designs, Try Artist Brushes Or Foam Brushes For Better Control.
Specialty Techniques And Effects
Once you master basic painting, you can add special effects to make your furniture unique.
Distressing
Distressing gives furniture a vintage or shabby-chic look. After your final coat dries, gently sand edges and raised areas to reveal the wood or base color underneath.
Two-tone And Color Blocking
Paint drawers and the main frame in different colors, or tape off sections for bold geometric designs.
Stenciling And Patterns
Use stencils to add patterns, words, or shapes. Spray adhesive keeps stencils in place, and foam brushes help prevent paint bleed.
Metallic Or Pearl Finishes
Special metallic paints or waxes can add shine to handles, edges, or the whole piece. These require careful application and sometimes a special primer.
Sealing And Protecting Your Painted Furniture
Paint alone isn’t always enough for durability. Sealing adds protection, especially for furniture that gets touched, moved, or cleaned often.
- Polycrylic: Water-based, dries clear, low odor. Good for light colors.
- Polyurethane: Oil-based, very tough. Can yellow over time, so best for dark colors.
- Wax: Used with chalk paint for a soft, natural finish.
Apply the sealer in thin, even coats with a clean brush. Let each coat dry fully. Most pieces need 2–3 coats for best protection.
Let furniture cure for several days before heavy use. Curing means the paint and sealer have fully hardened—not just dried.
Reassembling And Final Touches
Once your paint and sealer are fully dry, carefully peel off painter’s tape. Reattach handles, knobs, and other hardware. Slide drawers back in place.
If you want a new look, consider replacing hardware with modern or vintage options. This small change can make your painted furniture even more unique.
Clean your work area and step back to admire your work. You’ve created a custom piece that can last for years.
Common Mistakes And How To Avoid Them
Even experienced DIYers can slip up. Here are mistakes beginners often make, plus how to avoid them:
- Skipping sanding or priming: Leads to paint peeling or chipping.
- Using cheap brushes or rollers: Leaves bristles or roller marks in the finish.
- Painting thick coats: Drips, uneven drying, and sticky surfaces.
- Not waiting between coats: Paint can smudge or pull away.
- Painting in a dusty or humid room: Dust sticks to paint or it dries unevenly.
- Not sealing: Painted surface wears out quickly.
- Forgetting to test paint: Sometimes, paint looks different when dry or in your room’s lighting.
Pro Insight: Always Do A Test Patch First, Especially With New Materials Or Colors. This Small Step Can Save You Time And Frustration Later.
Cleaning Up And Caring For Painted Furniture
Painting is messy, but cleaning up the right way keeps your tools and space in good shape.
- Wash brushes and rollers right after use with warm soapy water (for latex/acrylic) or mineral spirits (for oil-based).
- Store leftover paint in a tightly closed can for touch-ups.
- Dispose of paint and chemicals safely—check your local guidelines.
To care for painted furniture:
- Clean with a soft, damp cloth—avoid harsh chemicals.
- Use coasters or pads to prevent scratches and water rings.
- Touch up chips with leftover paint as needed.
Well-painted and sealed furniture can look beautiful for years with basic care.
Real-world Example: Transforming A Bedroom Dresser
Let’s look at a practical example. Sarah had an old, scratched wooden dresser. Instead of throwing it away, she decided to paint it.
- She cleaned the dresser with TSP, removed all hardware, and filled deep scratches with wood filler.
- Sarah sanded the whole dresser, starting with 120-grit and finishing with 220-grit sandpaper.
- She applied a stain-blocking primer and let it dry overnight.
- For paint, she chose a satin latex in pale gray and used a quality brush and roller for smooth coverage.
- After two coats of paint (with light sanding between), she sealed the dresser with two coats of polycrylic.
- Once dry, Sarah replaced the old knobs with new brass ones.
The result: Her old dresser looked brand new, matched her updated bedding, and cost less than $50 in supplies.
Troubleshooting: Fixing Common Painting Problems
Even with the best prep, issues can pop up. Here’s how to solve them:
- Brush marks: Use a foam roller for large surfaces, and always sand lightly between coats.
- Paint not sticking: Check if you used the right primer, and sand more if needed.
- Bubbles or blisters: Usually caused by painting in high humidity or over greasy spots. Sand and repaint after fixing the problem.
- Bleed-through stains: Use a shellac-based primer and repaint.
- Sticky finish: Paint or sealer may need more drying time, especially in humid conditions.
Safety Tips For Painting Indoors
Painting furniture is safe if you take basic precautions:
- Work in a well-ventilated area. Open windows or use a fan to move fumes outside.
- Wear gloves and a mask, especially when sanding or using oil-based products.
- Keep paint and chemicals away from children and pets.
- Store unused materials in a cool, dry place.
If you’re using spray paint, consider working outside, as fumes are stronger.
How Much Does It Cost To Paint Bedroom Furniture?
Painting your own furniture is usually much cheaper than buying new. Here’s a cost comparison:
| Item | Typical Price Range |
|---|---|
| Paint (1 quart) | $10–$25 |
| Primer (1 quart) | $10–$20 |
| Brushes/Rollers | $8–$20 |
| Sealer | $12–$30 |
| Sandpaper, Tape, Drop Cloth | $10–$20 |
| Total (for one dresser) | $50–$100 |
| New Dresser | $200–$800 |
You save money, reduce waste, and get a piece that fits your style.
When To Call A Professional
Most people can paint bedroom furniture themselves with patience and the right tools. But if you have a valuable antique, a large project, or need a specialty finish (like high-gloss lacquer), a professional may be worth it. They have special tools and experience for flawless results.
For more guidance on furniture painting and finishes, you can visit the Spruce’s guide to painting furniture.
Frequently Asked Questions
How Long Should I Wait Before Using My Painted Furniture?
Wait at least 24–48 hours after the final coat of paint or sealer before light use. For heavy use (like setting items on top or moving drawers), let it cure for 5–7 days. This ensures the finish is hard and durable.
Do I Always Have To Sand Before Painting?
Sanding is important for most surfaces, especially glossy or laminate ones. It helps paint stick and prevents peeling. Only skip sanding if your paint and primer are specifically made for no-sand application (read the label).
What Type Of Paint Is Safest For Bedroom Furniture?
Low-VOC (volatile organic compound) latex or acrylic paints are safest, especially for bedrooms. They have less odor and fewer chemicals, making them better for indoor air quality.
Can I Paint Over Painted Furniture?
Yes, you can paint over old paint. Clean and sand the surface first, and use a primer if you’re switching from oil-based to water-based paint, or if the old finish is glossy or damaged.
How Do I Prevent Brush Marks And Streaks?
Use high-quality brushes and foam rollers, apply thin coats, and sand lightly between coats. Work in long, even strokes in the direction of the grain. Don’t overload your brush with paint.
Bringing new life to your bedroom furniture is rewarding and fun. With careful preparation, the right products, and a bit of creativity, you can achieve professional-looking results that reflect your style and save you money. Start small, enjoy the process, and soon your bedroom will feel refreshed and truly yours.

Credit: mrswebersneighborhood.com