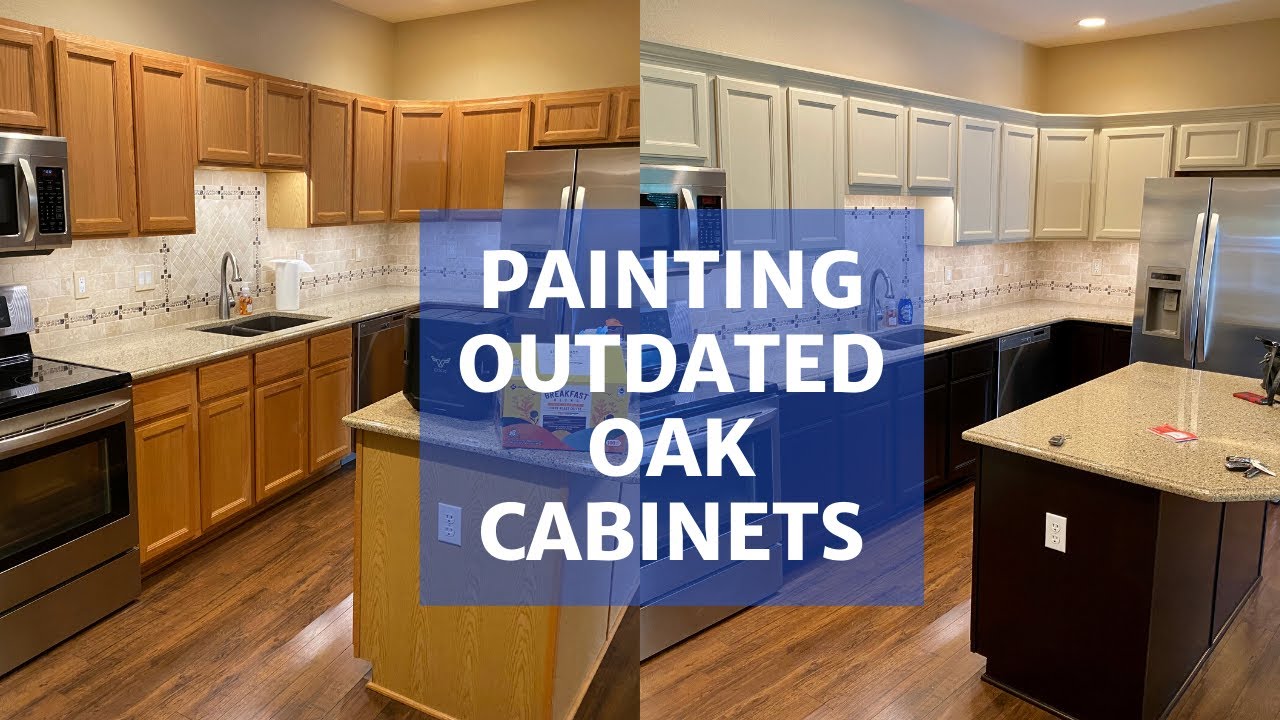
Painting an oak cabinet can transform an old, dark piece of furniture into something bright and modern. Many homeowners want to update their kitchens or bathrooms, but buying new cabinets is expensive. Painting is a cost-effective way to get a fresh look and add value to your home.
While it’s not difficult, painting oak cabinets requires careful planning, patience, and the right techniques. If you miss a step or use the wrong products, you may end up with chipped paint or visible wood grain. This guide will show you exactly how to paint an oak cabinet, from start to finish, with tips to help you avoid common mistakes.
Understanding Oak Cabinets
Before you start, it’s important to know why oak cabinets need special attention. Oak is a strong, open-grain wood. This means it has a textured surface with visible lines and pores. When you paint over it, the grain can show through unless you prepare the surface well. Some people like this look, but most want a smooth, professional finish. Oak is often coated with a hard, glossy finish that resists paint. You need to remove this finish and smooth the grain to get the best results.
Tools And Materials Needed
Having the right tools makes the job easier and improves the results. Here’s what you need for painting oak cabinets:
- Screwdriver (to remove doors and hardware)
- Drop cloths or plastic sheeting
- Painter’s tape
- Degreaser (like TSP or Krud Kutter)
- Sandpaper (100, 150, and 220 grit)
- Sanding block or electric sander
- Wood filler or grain filler
- Putty knife
- Vacuum or tack cloth
- High-quality primer (stain-blocking, bonding)
- Cabinet paint (acrylic enamel or alkyd)
- Paintbrushes (angled sash for details)
- Mini foam rollers (for smooth finish)
- Paint tray
- Clean rags
- Disposable gloves
- Mask and eye protection
It’s worth investing in good brushes and rollers. Cheap tools can leave streaks and hairs in the paint. For most kitchens, you’ll need about 1 gallon of primer and 1 gallon of paint for two coats, but measure your cabinets first.
Credit: www.youtube.com
Preparation: The Foundation For Success
1. Clear And Protect The Area
Painting cabinets is messy, so start by clearing your workspace. Remove everything from the cabinets. Protect the floor and nearby counters with drop cloths or plastic. Tape off walls, backsplashes, and any appliances you can’t move. This step may feel boring, but it saves hours of cleanup.
2. Remove Doors, Drawers, And Hardware
Take off all doors, drawer fronts, and hardware (handles, hinges, knobs). Use a screwdriver for this step. Number each piece with masking tape so you remember where it goes later. Put all screws and hardware in labeled bags. Painting cabinets in place is possible, but removing them gives a much better result.
3. Clean Thoroughly
Kitchens are greasy. Even if cabinets look clean, there’s likely oil and dirt on the surface. Use a degreaser and scrub every part you’ll paint. Pay extra attention to areas near the stove and handles. Rinse with water and let everything dry completely.
4. Sand The Surfaces
Oak cabinets usually have a glossy finish that paint won’t stick to. Sand every surface with 100- or 150-grit sandpaper. The goal is to dull the shine, not remove all the old finish. Use a sanding block for flat areas and hand-sand details. Wipe away dust with a vacuum and tack cloth. Don’t skip this step: paint will peel if you don’t sand.
5. Fill The Grain (optional)
Oak’s open grain creates a textured look. If you want a smooth, modern finish, use a grain filler. Apply with a putty knife, working it into the pores. Let it dry, then sand lightly with 220-grit paper. Clean off the dust. This step takes extra time but makes a huge difference in the final look.
6. Repair Damage
Check for dents, holes, or cracks. Use wood filler to patch them. Apply with a putty knife, let it dry, then sand smooth. Don’t rush—repairs show through paint if not done well.
Choosing The Right Primer And Paint
Not all primers and paints are the same. Oak cabinets need products that stick well, block stains, and cover dark grain.
Primer
Choose a stain-blocking, bonding primer. Oil-based primers are best for blocking stains and sealing wood grain, but water-based (acrylic) options are less smelly and work well too. Some popular brands are Zinsser BIN, Kilz Original, and Sherwin-Williams Extreme Bond. If the cabinets have heavy grain or stains, use two coats of primer.
Paint
Cabinet paint needs to be durable and washable. The best choices are acrylic enamel or alkyd paint. These dry hard, resist chips, and are easy to clean. Satin or semi-gloss finishes are ideal for kitchens and bathrooms. Avoid wall paint or chalk paint—they won’t last on cabinets.
Here’s a quick comparison to help you pick:
| Type | Durability | Finish | Dry Time | Best For |
|---|---|---|---|---|
| Acrylic Enamel | High | Satin/Semi-gloss | Fast (2-4 hrs) | DIY, Low Odor |
| Alkyd (Water-based) | Very High | Satin/Semi-gloss | Medium (6-8 hrs) | Professional, Hard Finish |
| Oil-Based | Very High | Semi-gloss/Gloss | Slow (8-24 hrs) | Heavy-duty Areas |

Credit: averageinspired.com
Step-by-step Painting Process
1. Prime The Cabinets
Stir the primer well. Use a brush for corners and details, and a small foam roller for flat areas. Apply a thin, even coat. Don’t overload the brush—thick coats cause drips. Let the primer dry fully (check the label, usually 2-4 hours).
Sand lightly with 220-grit sandpaper for a smooth finish. Wipe off dust.
If the grain or stains still show, apply a second coat of primer. This extra step is often needed with oak.
2. Paint The Frames
Start with the cabinet frames (the parts attached to the wall). Use an angled brush for corners and edges. Roll flat areas with a mini foam roller. Work in sections to keep a “wet edge,” which avoids lap marks. Thin, even coats are better than one thick coat.
Let the first coat dry completely (usually 4-6 hours).
Sand lightly between coats with 220-grit sandpaper. This step feels slow but gives a smooth, professional look. Wipe away all dust before the next coat.
3. Paint Doors And Drawers
Lay doors and drawers flat on a work surface. Paint the back side first, let it dry, then flip and paint the front. This avoids smudges. Use the brush and roller method as above. Let each coat dry fully before sanding lightly and adding another coat.
Most oak cabinets need two coats of paint. Dark colors or heavy grain may need three. Patience pays off here—rushing leads to drips and brush marks.
4. Let The Paint Cure
Even after paint feels dry, it’s soft and easy to scratch for a few days. Let painted pieces cure for at least 48 hours before handling. If possible, wait a week before reattaching hardware and using the cabinets heavily.
Reassembly And Final Touches
1. Reattach Hardware And Doors
Install handles, knobs, and hinges. Use your labeled bags to match each piece to its original spot. Be gentle to avoid scratching the new paint. If hardware is old or mismatched, this is a good time to replace it for a fresh look.
2. Check For Touch-ups
Inspect everything closely. Use a small brush to fix any chips or thin spots. Clean up paint lines or edges if needed.
3. Clean Up
Remove all painter’s tape and drop cloths. Vacuum or sweep the area. Wash brushes and rollers according to the paint type. Store leftover paint for future touch-ups.
Common Mistakes And How To Avoid Them
Painting oak cabinets is not hard, but some mistakes can ruin the results. Here’s what to watch for:
- Skipping Prep: Not cleaning or sanding leads to peeling paint.
- Not Using Primer: Primer is essential for blocking stains and hiding grain.
- Thick Coats: Thick layers drip and take longer to dry. Use thin coats.
- Rushing Dry Time: Let each coat dry fully. Patience leads to a smoother finish.
- Ignoring Grain: If you want a smooth look, use grain filler. Otherwise, grain will always show.
- Cheap Tools: Low-quality brushes and rollers leave marks and shed hairs.
- Painting in Bad Conditions: High humidity or dust can ruin the finish. Paint in a clean, dry space.
An often-missed detail: oak’s grain can “telegraph” through paint even after priming. If perfection is your goal, filling the grain is worth the time. Also, be aware that many professional painters use a sprayer for ultra-smooth results. If you want the best finish and have a lot of cabinets, consider renting a sprayer or hiring a pro.
Paint Color Tips For Oak Cabinets
Choosing a paint color can be overwhelming. Here are some ideas and trends:
- White: Brightens the room and works with most countertops.
- Gray: Modern, hides dirt better than white.
- Navy Blue: Trendy and dramatic, pairs well with gold hardware.
- Sage Green: Calming and on-trend for kitchens.
- Black: Bold and elegant, works best in large, bright spaces.
Lighter colors need more coats to cover oak’s dark grain. Always test your chosen color on a small area before painting everything.
How Long Does It Take To Paint Oak Cabinets?
Many people underestimate the time required. Here’s a typical timeline for a medium-sized kitchen:
| Step | Time Required |
|---|---|
| Preparation (clean, sand, remove doors) | 4-6 hours |
| Priming (2 coats) | 4-8 hours (plus drying time) |
| Painting (2-3 coats) | 6-10 hours (plus drying time) |
| Reassembly | 2-3 hours |
| Total (excluding overnight drying) | 16-27 hours |
If you work after your day job, plan for about a week from start to finish. Rushing leads to mistakes.
Maintenance Tips For Painted Oak Cabinets
A freshly painted cabinet looks fantastic, but keeping it that way takes a little care:
- Clean gently with a soft, damp cloth. Avoid harsh cleaners.
- Wipe up spills quickly to prevent stains.
- Avoid hanging wet towels on doors.
- Add felt pads to doors and drawers to reduce chips.
- Check for chips and touch up as needed.
Painted cabinets are durable but not indestructible. With some care, your finish can last many years.
When To Hire A Professional
DIY painting saves money, but some situations call for a pro:
- Large kitchens with many cabinets
- Very damaged or warped wood
- High-end finishes (lacquer, glazed)
- If you want a factory-smooth spray finish
Professionals have sprayers and experience to deliver flawless results. For most people, a careful DIY job looks great and costs much less.
Cost Comparison: Diy Vs Hiring A Pro
Let’s compare costs for a medium-sized kitchen (about 30 cabinet doors):
| Option | Materials | Labor | Total Cost |
|---|---|---|---|
| DIY | $200-$350 | $0 | $200-$350 |
| Professional | $300-$500 | $1,000-$3,000 | $1,300-$3,500 |
DIY is much cheaper, but requires time and patience. If your budget allows and you want perfect results, hiring a pro can be worth it.
Real-world Example
Sarah wanted to update her 1990s oak kitchen. She followed the steps above, spending about $250 on paint and supplies. She chose a soft white enamel and filled the grain for a smooth look. It took two weekends of work, but the cabinets looked brand new.
Sarah’s kitchen now feels brighter and more modern, and she saved thousands compared to new cabinets.
The most common surprise for beginners is how much prep work is needed. Sarah spent more time cleaning and sanding than actually painting. She also learned that labeling doors and hardware made reassembly much easier.
Safety Considerations
Painting is safe, but you should:
- Work in a well-ventilated area
- Wear a mask when sanding or using strong primers
- Keep paint and chemicals away from children and pets
- Dispose of rags and paint cans properly
Oil-based products are flammable. Store them safely and follow the label instructions.

Credit: hanashappyhome.com
Frequently Asked Questions
How Do I Get A Smooth Finish On Oak Cabinets?
The key to a smooth finish is using grain filler and sanding between every coat of primer and paint. Use high-quality brushes or a mini foam roller. Don’t rush drying times. Some people also use a paint sprayer for the smoothest surface.
Can I Paint Oak Cabinets Without Sanding?
Sanding is essential for good adhesion. If you skip sanding, paint may peel. Some “no-sand” primers exist, but a light sanding is still recommended for best results.
What Type Of Paint Is Best For Oak Cabinets?
Acrylic enamel or water-based alkyd paints are best. They dry hard, resist chips, and are easy to clean. Avoid basic wall paint or chalk paint, which will not last in kitchens or bathrooms.
How Long Does Painted Oak Cabinets Last?
With good prep and care, painted cabinets can last 5-10 years or more. High-traffic areas may need touch-ups sooner. Use gentle cleaning methods and avoid banging doors to extend the life.
Where Can I Find More Information On Painting Techniques?
The This Old House guide offers more tips and videos on painting cabinets. It’s a good resource for troubleshooting and advanced techniques.
Painting oak cabinets takes time, but the results are worth it. With patience and attention to detail, you can give your cabinets—and your whole room—a fresh, modern look for a fraction of the cost of replacement. If you follow these steps and avoid common pitfalls, you’ll be proud of your new cabinets for years to come.