Refinishing rattan furniture can turn worn-out pieces into beautiful features for your home or patio. Many people think restoring rattan is difficult, but with the right steps and some patience, you can bring new life to chairs, tables, or sofas.
Rattan is a strong, flexible material made from palm stems, and it’s popular for its natural look and lightweight feel. Over time, though, rattan can fade, crack, or collect dust. Learning how to refinish rattan furniture not only saves money but also helps you keep a unique style in your living space.
The process involves cleaning, repairing, sanding, staining or painting, and sealing. Each step is important for a smooth, long-lasting finish. You don’t need to be a professional—just follow clear instructions and pay attention to details. Many beginners miss common issues like hidden mold or weak joints, which can ruin the final result.
In this guide, you’ll learn how to spot these problems and fix them before they get worse. You’ll also see how to choose the right products and tools for the job, so you avoid mistakes like using the wrong paint or damaging the rattan fibers.
Whether your goal is to restore a vintage find or freshen up modern patio furniture, refinishing rattan is a rewarding project. Let’s look at each stage in detail, so you can confidently transform your rattan pieces and enjoy them for years to come.
Understanding Rattan Furniture
Before starting, it’s important to know what rattan is and why it’s special. Rattan is a type of vine that grows in tropical areas, mainly in Asia. It’s different from bamboo, which is hollow and stiffer. Rattan is solid inside, making it easier to bend and shape. This flexibility allows for creative designs, from tight weaves to open patterns.
Rattan furniture is popular for both indoor and outdoor settings. However, it’s not waterproof. Too much moisture can cause mold or make the fibers swell. Sunlight can also fade the color over time. Knowing this helps you choose the best refinishing methods and protect your furniture after you’re done.
Tools And Materials You’ll Need
Gather all the tools and supplies before you start. This saves time and helps you avoid mistakes halfway through.
Basic Tools:
- Soft brush or vacuum with a brush attachment
- Mild soap or wood cleaner
- Sponge and clean cloths
- Sandpaper (medium and fine grit)
- Small paintbrushes (for detailed areas)
- Larger brush or spray gun (for painting or sealing)
- Putty knife or small scraper
- Scissors (for trimming loose fibers)
- Screwdriver (if you need to remove parts)
Materials:
- Wood glue (for repairs)
- Wood filler (for small cracks or holes)
- Rattan stain or wood dye
- Exterior or interior paint (if painting)
- Clear sealer (varnish, shellac, or polyurethane)
- Painter’s tape and drop cloths
Safety Equipment:
- Gloves
- Mask (for sanding or using chemicals)
- Safety glasses
Many beginners forget to use the right type of sealer—for outdoor rattan, choose a waterproof sealer for longer protection.

Credit: www.youtube.com
Step 1: Inspect And Prepare Your Furniture
Start by giving your rattan piece a thorough check. Look for broken strands, loose joints, or signs of mold. If you skip this step, small problems can get worse after refinishing.
- Place the furniture in a well-lit area.
- Run your hands over the surface to feel for rough spots or cracks.
- Check underneath and inside corners for hidden damage or mold. Use a flashlight if needed.
- Take photos of any problem areas. This helps you remember where to repair later.
If you see mold, don’t panic. Mix equal parts water and white vinegar, and gently wipe the area with a cloth. Let it dry completely before moving on. Mold can return if the rattan stays damp, so make sure the room is dry and airy.
Step 2: Cleaning The Rattan
Dust and dirt can make paint or stain stick poorly. Cleaning is a must before any other work.
- Use a soft brush or vacuum with a brush attachment to remove loose dust.
- Mix a small amount of mild soap with warm water.
- Dip a sponge in the soapy water, wring it out well, and gently wipe the rattan.
- For tight weaves or crevices, use a soft toothbrush.
- Rinse with a clean, damp cloth to remove soap residue.
- Dry the furniture with towels and let it air dry for at least 24 hours.
Never soak rattan in water. Too much moisture can weaken the fibers and cause warping. If you are working outside, keep the furniture in the shade to avoid sun damage during drying.
Step 3: Repairing Damage
Now that your furniture is clean, you can repair any cracks, loose strands, or weak joints.
Fixing Loose Strands
- Apply a small amount of wood glue under the loose piece.
- Press the strand back into place and hold for a few minutes.
- Use painter’s tape to keep it secure while the glue dries (about 1-2 hours).
Filling Small Cracks Or Holes
- For tiny cracks, rub in a matching wood filler using your finger or a putty knife.
- Smooth the surface and let it dry according to the instructions (usually 30-60 minutes).
- Sand lightly with fine-grit sandpaper to blend the repair.
Securing Loose Joints
- If a leg or arm feels wobbly, tighten any screws or bolts.
- For glued joints, add a bit of fresh wood glue, press together, and clamp if possible.
Replacing Broken Pieces
If a strand is missing or too damaged, you may need to weave in a new one. Rattan can be bought at craft stores, but matching color and size is important.
- Cut a replacement piece to match the length and thickness.
- Soak it in warm water for 15-20 minutes to soften.
- Weave it into the gap, following the original pattern.
- Secure ends with glue and trim any excess.
Many people skip repairs, thinking paint will hide the problems. In reality, these issues often get worse and ruin the final look.
Step 4: Sanding The Surface
Sanding smooths out rough patches and helps paint or stain stick. It also removes any old finish that might block new color.
- Use medium-grit sandpaper (100-150 grit) for the first pass. Work gently to avoid damaging the fibers.
- Switch to fine-grit (220 grit) for a smooth finish.
- Sand in the direction of the rattan, not across it.
- For curved or woven areas, wrap sandpaper around a sponge or use a sanding sponge.
- Wipe with a clean, damp cloth to remove dust.
Be patient with sanding. If you rush, you can scratch or tear the rattan.
Step 5: Choosing Stain Or Paint
You can stain for a natural look or paint for a bold color. Each has benefits and drawbacks.
| Finish Type | Pros | Cons | Best For |
|---|---|---|---|
| Stain | Shows natural texture, easy to touch up | Limited color choices, less protection | Classic or natural styles |
| Paint | Bold colors, covers stains or repairs | May hide texture, chips over time | Modern or updated looks |
If you’re unsure, try a small test area on the bottom or back.
Non-obvious tip: For outdoor use, always pick exterior-grade products. Indoor products won’t last in sun or rain.
Step 6: Applying Stain
If you want a natural look, staining is best. Rattan is a porous material, so stain goes on easily.
- Wear gloves and a mask.
- Stir the stain well. Do not shake—it creates bubbles.
- Use a small brush for tight spots and a larger brush for flat surfaces.
- Work in small sections, brushing the stain evenly into the rattan.
- Wipe off excess with a clean cloth after a few minutes. The longer you leave it, the darker it gets.
- Allow to dry for at least 24 hours before applying a second coat or sealer.
Practical tip: Rattan can soak up stain unevenly. To prevent blotches, use a pre-stain wood conditioner if the manufacturer recommends it.
Step 7: Painting Rattan Furniture
Painting gives a fresh, modern look. Spray paint or brush-on paint are both options.
Using Spray Paint
- Choose a high-quality spray paint designed for wood or wicker.
- Shake the can well and test spray on cardboard first.
- Hold the can 8-10 inches from the surface.
- Apply several thin coats, letting each dry for at least 15 minutes.
- Turn the furniture to reach all angles.
Using Brush-on Paint
- Use a small brush for detailed areas and a larger one for bigger surfaces.
- Apply paint in thin, even layers.
- Let each coat dry completely before adding another (usually 2-4 hours).
- Lightly sand between coats for the smoothest finish.
Non-obvious insight: Many people forget to paint underneath and inside corners, which can leave the furniture unprotected from moisture or pests.
Step 8: Sealing And Protecting
A good sealer protects your hard work from scratches, spills, and sunlight. There are different options:
| Sealer Type | Durability | Shine Level | Best Use |
|---|---|---|---|
| Varnish | High | Satin/Gloss | Outdoor or heavy use |
| Shellac | Medium | Gloss | Indoor pieces |
| Polyurethane | Very High | Matte/Satin/Gloss | Most uses |
- Use a brush or spray to apply the sealer.
- Let each coat dry fully (4-24 hours, depending on product).
- Add 1-2 more coats for the best protection.
- Wait at least 48 hours before using the furniture.
Practical tip: For outdoor rattan, reapply sealer every 1-2 years to keep it looking new.
Step 9: Reassembling And Final Touches
If you removed any parts, now is the time to put them back.
- Tighten all screws and fittings.
- Touch up any missed spots with stain or paint.
- Add felt pads under legs to protect floors.
- Clean up any glue marks or paint drips before they harden.
Let the furniture sit in a well-ventilated area for a few days to allow smells and chemicals to fade.
Step 10: Maintenance Tips For Long Life
Proper care keeps your refinished rattan looking beautiful longer.
- Dust regularly with a soft cloth or brush.
- Wipe spills quickly to prevent stains.
- Keep out of direct sunlight when possible.
- For outdoor use, bring inside during heavy rain or cover with a waterproof tarp.
- Check for loose strands or joints every few months and repair quickly.
Non-obvious insight: Humidity is a silent enemy. Use a dehumidifier in humid climates, or place silica gel packs under cushions to reduce moisture.
Common Mistakes And How To Avoid Them
Many people make avoidable errors when refinishing rattan.
- Using too much water during cleaning. Rattan absorbs water fast and can swell or rot.
- Skipping repairs. Paint or stain does not hide structural problems.
- Not sanding enough. Rough patches will show through the finish.
- Using indoor-only products outside. These finishes break down quickly in weather.
- Applying thick coats of paint or sealer. This leads to drips and a sticky feel.
Patience and careful steps are key to a professional-looking result.
When To Call A Professional
Some rattan pieces are valuable antiques or have serious damage. If you see:
- Large sections missing
- Deep mold that returns after cleaning
- Broken frames or heavy rot
- Complex weaves that are hard to match
Consider calling a furniture restorer. They have special tools and experience to save rare or delicate items.
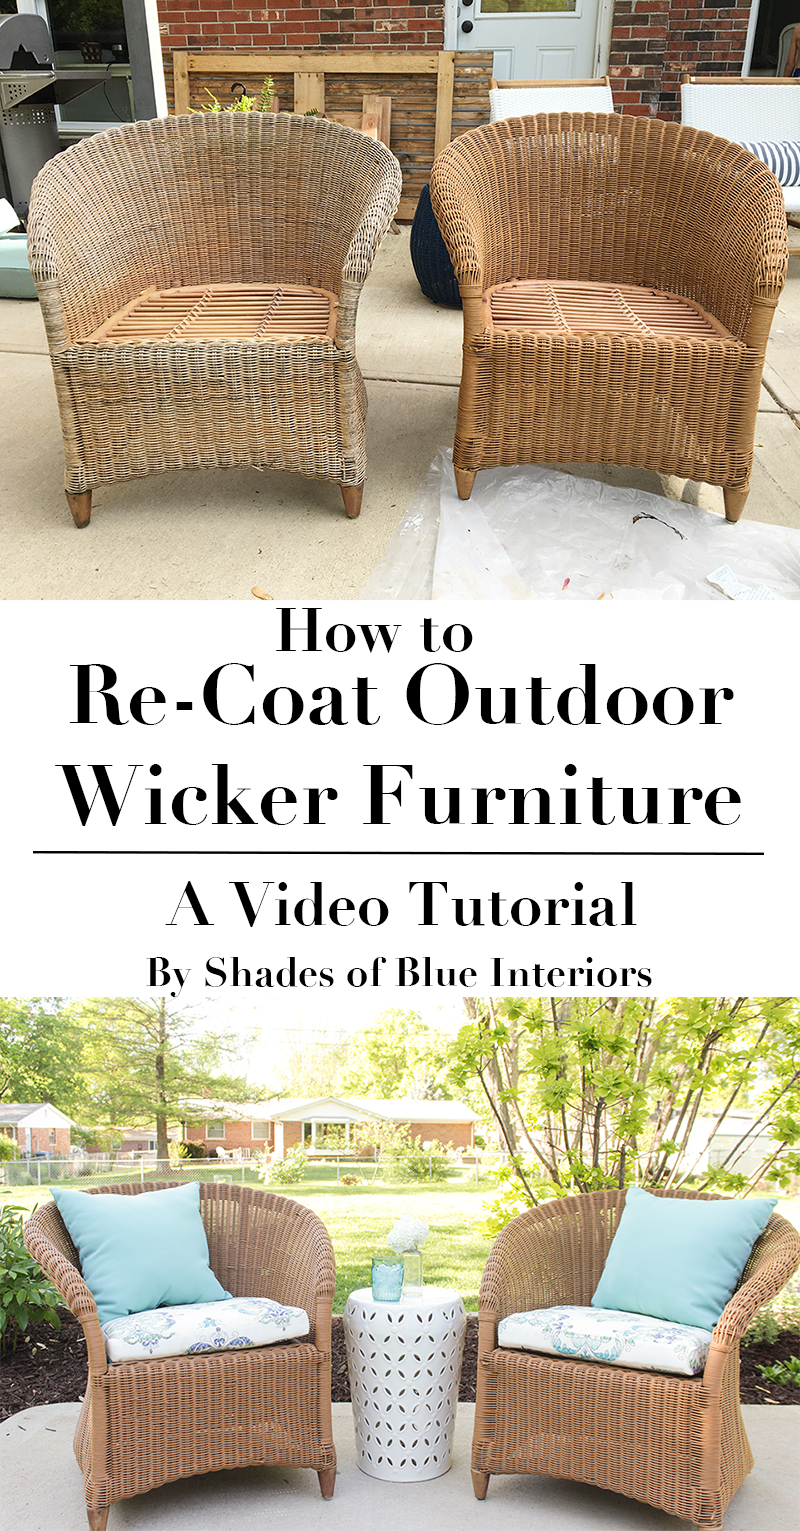
Example: Reviving A Vintage Rattan Chair
Let’s look at a real-world example. A reader found a 1960s rattan chair at a thrift store for $20. It was faded, dusty, and one leg was loose. They followed these steps:
- Cleaned with mild soap and dried completely.
- Tightened the leg joint with wood glue and clamps.
- Sanded carefully to remove old varnish.
- Applied a walnut-colored stain for a richer look.
- Sealed with two coats of satin polyurethane.
- Added new cushions for comfort.
The chair now looks almost new and is a favorite reading spot. This process took about three days, with most time spent waiting for products to dry.
Cost Comparison: Diy Vs. Buying New
Many people wonder if refinishing is worth it compared to buying new. Here’s a quick comparison:
| Option | Average Cost | Time Needed | Pros | Cons |
|---|---|---|---|---|
| Refinishing (DIY) | $40–$80 (supplies) | 2–4 days | Personalized finish, saves money, eco-friendly | Time and effort required |
| Buying New | $150–$800 | Immediate | No work needed, latest styles | Higher cost, less unique |
Refinishing is usually cheaper and lets you choose your own color and finish. It also feels rewarding to save a piece from the landfill.
Credit: www.shadesofblueinteriors.com
Where To Find Rattan For Repairs
If you need to replace broken strands, try these sources:
- Craft stores (look for “reed” or “cane”)
- Online retailers that sell rattan supplies
- Local furniture repair shops
Match thickness and color as closely as possible. If you can’t find a perfect match, stain or paint can help blend new pieces with the old.
Environmental Benefits Of Refinishing
Restoring rattan furniture is better for the planet than buying new. It saves natural resources, reduces waste, and keeps unique pieces in use. According to the EPA, Americans throw away over 9 million tons of furniture every year. By refinishing, you help lower this number and support a more sustainable lifestyle.
Safety Reminders
Always work in a well-ventilated space, especially when using cleaners, stains, or sealers. Wear gloves and a mask when sanding or spraying. Store paints and chemicals safely, away from children and pets. If you feel dizzy or get a headache, take a break and get fresh air.
Further Learning
If you want more details or advanced techniques, the Wikipedia page on rattan is a good place to start. You’ll find info on different types, uses, and care tips.
Bringing old rattan furniture back to life is more than a weekend project—it’s a way to add personality to your home while being kind to the environment. With a careful, patient approach, you can enjoy beautiful, durable furniture for years to come.

Credit: arayofsunlight.com
Frequently Asked Questions
How Long Does It Take To Refinish Rattan Furniture?
The whole process, including cleaning, repairs, sanding, painting or staining, and drying, usually takes 2 to 4 days. Drying time for stain or sealer is the longest part, so plan for extra time if you want several coats.
Can I Use Regular Paint On Rattan?
It’s best to use paint made for wood or wicker. Regular wall paint may not stick well and can chip. For outdoor pieces, pick exterior paint or spray paint designed for outdoor use.
What’s The Best Way To Clean Rattan Before Refinishing?
Use a soft brush or vacuum, followed by wiping with a damp cloth and mild soap. Avoid soaking the rattan, as too much water can cause damage.
How Do I Fix A Broken Rattan Strand?
Cut a matching piece of rattan, soak it to soften, and weave it into the damaged spot. Secure the ends with glue and trim the excess. Try to match the color and size for a seamless repair.
How Often Should I Refinish Outdoor Rattan Furniture?
Every 1 to 2 years is a good rule, depending on sun and rain exposure. Regular cleaning and quick repairs will help extend the time between full refinish jobs.
With these steps and tips, you’re ready to tackle your rattan refinishing project with confidence. Enjoy transforming your furniture and making it last for years to come!