Installing hardwood flooring over concrete can completely change the look and feel of a room. Many people think it’s impossible to put real wood floors on top of concrete, but with the right steps, it can be done successfully and last for decades.
This process requires careful preparation, the right materials, and attention to detail. If you want floors that are beautiful, strong, and comfortable, learning how to put hardwood floor on concrete will give you exactly that—without making expensive mistakes.
This guide walks you through every part of the process. You’ll learn how to check your concrete, choose the best hardwood, install barriers, and lay the boards the right way. Whether you’re redoing a basement, a first-floor slab, or any room with concrete underneath, you’ll find clear steps here.
We’ll also cover common problems, real tips from professionals, and answers to questions most beginners don’t think to ask. Let’s get started on transforming your space with real wood flooring.
Understanding The Challenge: Hardwood On Concrete
Concrete is hard, stable, and long-lasting—but it’s not naturally friendly to wood. Moisture is the biggest challenge. Concrete can absorb water from the ground or air. If that moisture touches hardwood, it can cause warping, swelling, and mold. This is why preparation is more important than the installation itself.
Another challenge is that concrete is not perfectly flat. Even small bumps or dips can create problems for your new floor. You also need to choose the right type of hardwood—some types work better on concrete than others. The good news is that with modern materials and careful work, you can get a beautiful, lasting result.
Choosing The Right Hardwood Flooring
Not all hardwood works well over concrete. The two main options are solid hardwood and engineered hardwood.
| Type | Best For Concrete? | Pros | Cons |
|---|---|---|---|
| Solid Hardwood | Rarely | Can be refinished many times; classic look | Not moisture-resistant; may warp |
| Engineered Hardwood | Yes | Stable, resists moisture, many styles | Can be refinished only 1-2 times |
Engineered hardwood is the best choice for concrete. It’s made from layers of wood with a real hardwood top layer. The layered design helps it resist moisture and temperature changes. Solid hardwood is only an option if the concrete is above grade (not a basement) and you’re absolutely sure there’s no moisture.
When choosing your flooring, look for:
- Thickness: 3/8” to 3/4” engineered boards work best.
- Locking system: Click-lock or tongue-and-groove.
- Finish: Pre-finished is easier for DIY.
- Species: Oak, maple, and hickory are popular for durability.
Tools And Materials Needed
Before starting, gather all the materials and tools you’ll need. This will save time and help avoid mistakes.
Materials:
- Engineered hardwood planks (plus 10% extra for cuts)
- Moisture barrier (6 mil plastic or specialized underlayment)
- Wood adhesive (if gluing down)
- Plywood (if using floating or nailed method)
- Underlayment pad (sound and comfort)
- Transition strips
- Wood putty, spacers, and trim
Tools:
- Tape measure, chalk line, and pencil
- Circular saw or miter saw
- Hammer, pry bar, and tapping block
- Level, moisture meter, and straightedge
- Trowel (for adhesive)
- Utility knife
- Safety gear (gloves, eye protection, mask)
Pro tip: Rent a flooring nailer or stapler if you choose the nail-down method over a plywood subfloor.
Preparing The Concrete Subfloor
Most installation failures happen because of poor preparation. Spend extra time on this step.
1. Clean The Concrete
Remove all carpet, tile, or old adhesive. Sweep and vacuum the floor. Use a scraper for any glue. For greasy spots, use a degreaser. The floor must be completely clean so nothing gets between the concrete and your new hardwood.
2. Check For Moisture
This is the most important step. Even if the concrete looks dry, hidden moisture can ruin your floor.
- Tape a 2’x2’ square of clear plastic tightly to the concrete. Leave for 24–48 hours.
- If water appears under the plastic, the floor is too wet for wood.
- Use a concrete moisture meter for a more accurate reading. For engineered hardwood, the moisture content should be below 4%.
If you find moisture, stop. Fix leaks, improve drainage, or install a vapor barrier before going further.
3. Level The Surface
A flat floor is essential. Use a long level or straightedge. Mark any spots higher or lower than 1/8” over 6 feet.
- For high spots: Grind down with a concrete grinder.
- For low spots: Fill with a self-leveling compound. Let dry completely.
4. Repair Cracks And Holes
Small cracks are normal, but fill them with concrete patch. Large cracks may signal structural problems—call a professional before continuing.
Credit: www.sustainablelumberco.com
Moisture Barriers And Underlayments
Never skip the moisture barrier. This thin layer is your floor’s main protection against water.
Common options:
- 6-mil polyethylene plastic: The most basic and affordable. Roll it out in overlapping sheets, tape seams.
- Foam underlayment with built-in barrier: Some high-end underlayments combine soundproofing and moisture blocking.
- Liquid-applied membrane: Painted on and dries to a waterproof layer. Good for tricky shapes.
Lay the barrier up the wall 2-3” (to protect edges), then trim after floor is done.
If you want extra sound or comfort, add a foam underlayment on top of the moisture barrier. Some engineered woods come with attached underlayment—check before buying extra.
Installation Methods For Hardwood On Concrete
There are three main ways to install hardwood over concrete. Each has its own pros and cons.
| Method | Best For | Difficulty | Moisture Resistance |
|---|---|---|---|
| Floating Floor | DIY, basements | Easy | High |
| Glue-Down | Low ceilings, permanent | Medium | Good |
| Plywood Subfloor + Nail Down | Above grade, classic look | Hard | Fair |
Floating Floor Method
This is the most popular and beginner-friendly way. The boards are not attached to the concrete. Instead, they lock together and “float” over the underlayment.
Steps:
- Lay the moisture barrier and foam underlayment.
- Start in one corner, leaving a 1/2” gap at walls for expansion.
- Connect boards end-to-end and side-to-side. Use spacers to keep the gap.
- Stagger joints by at least 6”.
- Cut boards at the end of rows to fit.
- Repeat row by row.
- Remove spacers and add baseboards to cover gaps.
Advantages: Easy to install, easy to remove or repair, good for uneven concrete.
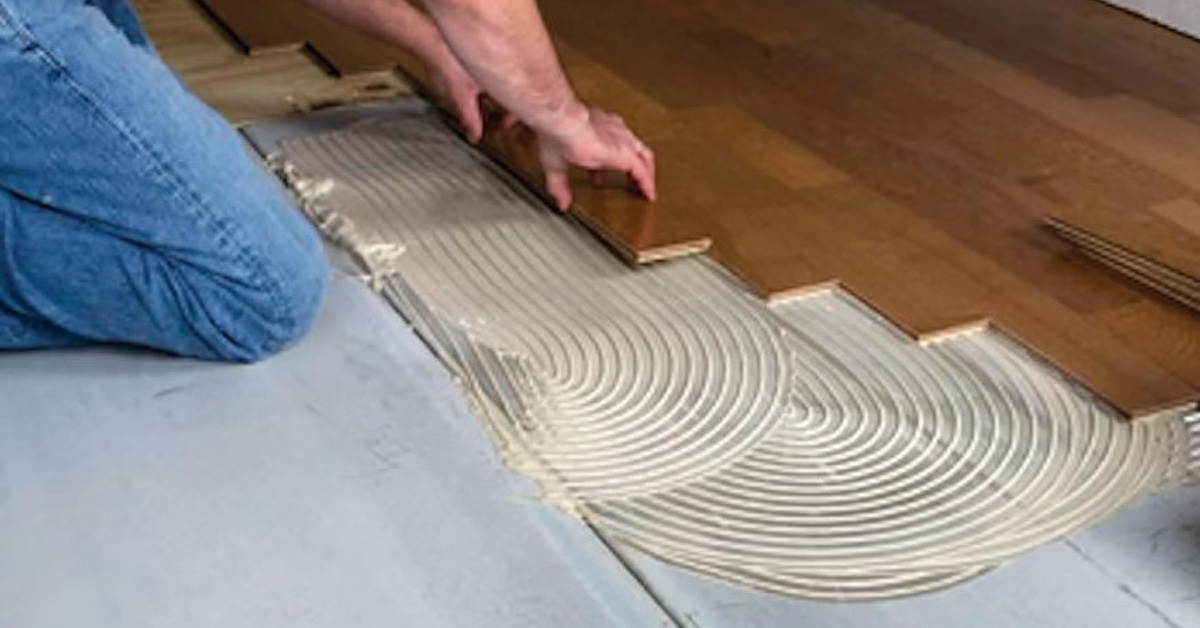
Glue-down Method
This method attaches the hardwood directly to the concrete using strong adhesive.
Steps:
- Lay a moisture barrier or use glue with built-in moisture protection.
- Spread adhesive with the right trowel (check manufacturer’s instructions).
- Lay boards into glue, pressing down.
- Use spacers for expansion gap.
- Clean glue from surface before it dries.
- Let cure 24–48 hours before walking on floor.
Advantages: Solid feel, quieter. Harder to remove if you make a mistake.
Tip: Work in small sections so the glue doesn’t dry before boards are in place.
Plywood Subfloor + Nail-down Method
For the traditional hardwood look and feel, you can build a plywood subfloor over concrete.
Steps:
- Lay moisture barrier plastic over concrete.
- Place 3/4” plywood panels on top. Leave 1/8” between panels.
- Fasten plywood with concrete screws or special glue.
- Nail or staple engineered wood planks to plywood as you would over a wood subfloor.
Advantages: Allows nailing, feels more solid. Adds height to floor (not for low ceilings).
Downsides: More work, more cost, raises floor height.

Credit: bigbrohardwood.com
Step-by-step Guide: How To Put Hardwood Floor On Concrete
Now that you know your options, here is a complete walkthrough:
1. Acclimate Your Flooring
Bring the engineered hardwood into the room and let it sit (in opened boxes) for at least 48 hours. This lets the wood adjust to the room’s temperature and humidity, reducing the risk of gaps or warping later.
2. Plan Your Layout
Decide which direction to lay the boards. Most people lay boards parallel to the longest wall or toward windows for the best look. Dry-fit a few rows to see how the pattern will look.
Check room width and plan so you don’t end up with a tiny strip at one wall. If needed, trim the first row so the last row will be at least half a board wide.
3. Install Moisture Barrier And Underlayment
- Roll out your chosen moisture barrier, overlapping seams by at least 8”.
- Tape seams with waterproof tape.
- Run the barrier up the wall 2–3”, then trim after flooring is finished.
- Lay foam underlayment (if using), tightly butting seams together.
4. Lay The First Row
- Snap a chalk line to keep the first row straight.
- Place spacers between the boards and the wall for expansion.
- Lay the first row with the groove side facing the wall.
- If floating, connect boards end to end.
- If gluing, spread adhesive for the first row only, then lay boards.
- If using plywood, nail boards through the tongue into the plywood.
5. Continue Installation
- Stagger end joints by at least 6”.
- Cut boards as needed at ends of rows.
- Use a tapping block to fit boards snugly.
- Check for tight seams but don’t force boards together.
- For glue-down, wipe excess glue quickly with a damp cloth.
6. Trim The Last Row
- Measure and cut the last row to fit, leaving an expansion gap.
- If the last row is narrow, use glue to help hold it in place.
7. Finish The Edges
- Remove all spacers.
- Install baseboards or quarter-round molding to cover expansion gaps.
- Install transition strips at doorways.
8. Clean Up And Inspect
- Vacuum floor gently.
- Inspect all seams and edges.
- Don’t walk on glued floors for 24–48 hours (check glue instructions).
Extra insight: Many beginners forget to check door clearance. If your new floor is higher than before, you may need to trim the bottom of doors so they open smoothly.
Common Mistakes To Avoid
Even with good instructions, mistakes can happen. Here are some to watch for:
- Skipping the moisture test: Always check moisture, even if concrete looks dry.
- Forgetting expansion gaps: Wood expands and contracts. No gap means buckling.
- Not acclimating wood: Boards can shrink or swell after installation.
- Poorly staggered joints: This weakens the floor and looks bad.
- Walking on glue too soon: This can shift boards and leave gaps.
- Using the wrong adhesive: Only use glue made for engineered wood and concrete.
Non-obvious tip: Take photos of each stage, especially moisture tests and underlayment. If you ever sell your home, buyers may ask how the floor was installed—photos can prove you followed best practices.
Credit: www.youtube.com
Maintenance Tips For Hardwood On Concrete
Your floor will last for many years if you care for it properly. Here’s how:
- Wipe spills immediately: Standing water is the enemy of wood.
- Use felt pads: Place under furniture legs to prevent scratches.
- Sweep or vacuum: Grit can scratch the finish.
- Limit wet mopping: Use a barely damp mop for cleaning.
- Keep humidity stable: Use a humidifier or dehumidifier to keep indoor humidity between 35%–55%.
Pro insight: Basements are naturally damper than upper floors. Consider a dehumidifier in basement rooms to extend the life of your hardwood.
Cost And Time Estimates
Many people ask how much time and money this project will take. Here’s what you can expect for a 300 sq ft room:
- Materials: $4–$10 per sq ft for engineered hardwood
- Moisture barrier and underlayment: $0.50–$1.50 per sq ft
- Tools (rental or purchase): $100–$300
- Professional installation: $2–$5 per sq ft (optional)
- DIY installation time: 1–2 days for most beginners
Total DIY cost: $1,500–$3,500 for a typical room.
Fact: According to the National Wood Flooring Association, engineered hardwood over concrete can last 30+ years with proper installation and care.
When To Call A Professional
Some projects are too difficult or risky for DIY:
- If you find high moisture: You may need professional moisture control or a sump pump.
- If the concrete is very uneven: Grinding or leveling large areas is best left to pros.
- If you want a warranty: Some manufacturers require professional installation for the warranty to be valid.
A professional can also finish the project faster and with fewer mistakes.
Real-world Example
Sara wanted to add hardwood flooring to her basement playroom. She chose engineered oak planks with a click-lock system. After testing for moisture and using a 6-mil plastic barrier, she floated the floor over a foam underlayment. The toughest part was leveling a low spot near the door, which she fixed with a self-leveling compound.
The floor has been in place for three years with no warping or mold, and her kids love playing on the warm, wood surface.
Lesson: Careful preparation and the right materials can turn even a basement into a cozy, beautiful space.
Recommended Brands And Where To Buy
Some trusted brands for engineered hardwood that work well on concrete:
- Shaw Floors
- Bruce
- Mohawk
- Armstrong
- Mullican
Shop at local flooring stores for expert advice or trusted online retailers. Always check product specs to be sure they are rated for use over concrete.
Frequently Asked Questions
What Is The Best Hardwood Flooring For Concrete?
Engineered hardwood is the best choice. It resists moisture, handles temperature changes, and can be installed as a floating or glue-down floor. Choose planks at least 3/8” thick with a click-lock or tongue-and-groove system for easiest installation.
Do I Need A Moisture Barrier Over Concrete?
Yes, always use a moisture barrier over concrete. Even dry-looking concrete can release moisture that damages wood. Use 6-mil polyethylene plastic or a specialized underlayment with a built-in moisture barrier.
Can I Nail Hardwood Directly To Concrete?
No. You cannot nail hardwood directly to concrete. If you want a nail-down floor, you must first install a plywood subfloor over a moisture barrier. Otherwise, choose a floating or glue-down installation.
How Long Should I Wait Before Installing Hardwood On New Concrete?
Wait at least 60 days for new concrete to cure and dry. Test for moisture before installing any wood flooring. If you install too soon, trapped moisture can ruin your floor.
What’s The Difference Between Floating And Glue-down Hardwood Floors?
A floating floor uses boards that lock together and rest on top of underlayment—no glue or nails are needed. A glue-down floor attaches boards to the concrete with adhesive. Floating floors are easier for DIY and repair, while glue-down feels more solid and permanent.
If you want to dive deeper into hardwood flooring over concrete, check the expert guidelines at the National Wood Flooring Association.
Hardwood flooring on concrete is a project that rewards careful planning. With the right steps, you’ll enjoy beautiful, comfortable floors that add value and style to your home for many years.