Recovering a wing back chair can transform an old, worn-out piece into a stunning highlight for your home. Many people feel nervous about taking on this kind of project, but with the right guidance, patience, and tools, you can breathe new life into your favorite chair.
Whether you want to refresh a family heirloom or simply change your décor, learning how to recover a wing back chair is a rewarding and cost-effective skill.
You might think reupholstering is only for professionals. The truth is, with some care and attention, even beginners can achieve impressive results. This guide will walk you through every step, from preparation to final touches. Along the way, you’ll find practical advice, tips from experienced upholsterers, and solutions to common problems that can save you time and frustration.
Understanding The Basics Of Chair Recovery
Before you start, it’s important to know what recovering a wing back chair involves. Unlike dining chairs, a wing back chair has complex shapes, curves, and often deep tufts. This means you’ll need to plan carefully and allow more time for each step.
Chair recovery means removing the old fabric and padding, making repairs if needed, and adding new materials to give the chair a fresh look and feel. This process can also include replacing or fixing springs and tightening the frame.
Why Recover Instead Of Replace?
There are several reasons people choose to recover a wing back chair:
- Sentimental value: Some chairs have family history or memories attached.
- Quality: Older chairs are often better made than new, budget furniture.
- Customization: You can choose any fabric and style you like.
- Cost: Professional reupholstery is expensive; DIY saves money.
Recovering your own chair also gives you a sense of accomplishment and a unique piece that reflects your style.
Tools And Materials Needed
Having the right tools and materials will make your project smoother and more enjoyable. Some items are essential, while others simply make the job easier.
Essential Tools
- Flathead screwdriver and pliers – For removing staples and tacks.
- Staple remover or tack lifter – Specialized for pulling out stubborn fasteners.
- Heavy-duty staple gun – Electric or manual, for attaching new fabric.
- Sharp scissors and utility knife – For cutting fabric and foam.
- Measuring tape – To measure fabric and chair parts.
- Chalk or fabric marker – To mark cutting lines on fabric.
- Hammer – For reattaching any loose parts.
- Sewing machine (optional but helpful) – For piping, pleats, or complex seams.
- Rubber mallet – For gently tapping parts back into place.
- Glue gun – For securing small details.
Materials
- Upholstery fabric – Choose a durable fabric, usually 7 to 9 yards for a wing back chair.
- Batting – Soft padding placed under the fabric for a smooth finish.
- Upholstery foam – Replaces old, worn foam for seat and backrest comfort.
- Upholstery tacks or decorative nails – For a classic finish (optional).
- Dust cover fabric (cambric) – Placed under the chair.
- Piping/cording – For neat edges (optional).
- Spray adhesive – For attaching foam and batting.
- New webbing or springs – If the seat support is sagging.
Safety Gear
- Protective gloves – To avoid cuts from staples or sharp tools.
- Safety glasses – When using staple guns or removing tacks.
A common mistake is starting before gathering all tools. This leads to frustration and delays. Take time to assemble everything before you begin.

Credit: www.plattar.com
Planning And Measuring
Preparation is a critical part of recovering a wing back chair. Rushing through this stage often leads to wasted material or poorly fitted fabric.
Evaluating The Chair
Start by inspecting your chair. Look for:
- Loose joints or wobbly arms
- Sagging seat or back support
- Broken springs or webbing
- Damaged wood
If you find problems, decide if you need to make repairs before moving on. For example, if the frame is loose, fix it with wood glue and clamps. If springs are broken, you may need to replace them.
Measuring For Fabric
Most wing back chairs need between 7 and 9 yards of upholstery fabric, depending on size, pattern matching, and style.
To measure:
- Measure the widest and longest parts of the chair (arms, back, seat, wings).
- Add extra inches for tucking, folding, and pattern matching.
- If your fabric has a pattern, allow more material to align the design.
Experienced upholsterers often use the old fabric pieces as templates for cutting new fabric. Beginners sometimes forget to leave enough extra fabric around edges—always add at least 2-3 inches to your measurements.
Choosing Fabric And Other Materials
Pick a durable fabric made for upholstery. Avoid thin or stretchy materials, as they won’t last. Good choices include:
- Cotton canvas
- Linen blends
- Microfiber
- Chenille
- Velvet (for a luxury look)
If children or pets use the chair, consider stain-resistant or easy-clean options.
Check the fabric’s rub count (Martindale or Wyzenbeek test). Upholstery fabrics should have at least 15,000 double rubs for long-term use.
Removing The Old Fabric
Taking off the old fabric is one of the most time-consuming steps, but it’s also one of the most important. It helps you understand how the chair was built and how to put it back together.
Step-by-step Removal
- Take photos from all angles before you start. These will help you later.
- Begin at the bottom. Flip the chair over and remove the dust cover (the thin fabric underneath).
- Use your staple remover or flathead screwdriver to lift staples or tacks.
- Work slowly, removing fabric layer by layer. Try not to rip the pieces; you’ll use them as templates.
- Label each piece with chalk or a sticky note (seat, inside back, outside arm, etc. ).
- Remove old batting or foam. Inspect for mold or bugs—dispose of anything dirty or smelly.
Beginners often rush this step, damaging the fabric. Take your time and keep your work area organized. Some professionals even pin removed pieces onto a board to keep track.
Tips For Removing Stubborn Staples
Old staples can be tough. If they break or get stuck:
- Use pliers to pull them out.
- Tap gently with a rubber mallet if needed.
- Wear gloves to avoid cuts.
Making Repairs
Once the chair is stripped, check the frame, springs, and padding. This is your chance to fix problems and ensure the chair will last for years.
Tightening The Frame
Wobbly arms or legs are common in older chairs. Tighten screws or bolts, or add wood glue to loose joints. Clamp and let dry overnight.
Fixing Springs And Webbing
If you notice the seat is sagging:
- Replace or tighten webbing with a webbing stretcher.
- Replace broken springs with new ones, using pliers and strong twine to tie them in place.
Replacing Foam And Batting
If the old foam is flat, crumbly, or smelly, replace it with new upholstery foam. High-density foam (at least 1.8 pounds per cubic foot) gives good support. Cover foam with batting for a smooth finish.
Many beginners skip replacing old padding, but new foam makes a huge difference in comfort and appearance.
Cutting And Prepping New Fabric
With your chair repaired and clean, you’re ready to cut the new fabric. This step requires patience and accuracy.
Using Old Fabric As Templates
Lay each old fabric piece flat on your new upholstery fabric. Pin or weight them down, and trace around each piece with chalk or a fabric marker. Remember to add an extra 2-3 inches all around for tucking and stapling.
- Mark each piece with its location (e.g., “inside arm”).
- If using patterned fabric, line up the design carefully for a professional look.
- Cut pieces with sharp scissors for clean edges.
Tips For Pattern Matching
If your fabric has stripes or a bold pattern:
- Plan how the pattern will flow across the chair.
- Match patterns at visible seams (such as the front of the seat and the inside back).
- Lay out all pieces before cutting to check alignment.
Poor pattern matching is a common beginner mistake. Take time to check before cutting.
Recovering The Chair: Step-by-step
Now it’s time for the most satisfying part—attaching the new fabric and seeing your chair come to life. This process works best if you proceed in the same order the original fabric was removed.
1. Attach The Inside Back
Start with the inside back of the chair.
- Smooth the fabric over the foam and batting.
- Pull it tight and staple along the top edge.
- Work down the sides, stapling every 1-2 inches.
- Keep the fabric smooth—no wrinkles or sagging.
2. Cover The Seat
Next, fit the seat piece.
- Pull the front edge tight and staple underneath.
- Staple along the sides, tucking fabric into corners.
- Cut small slits as needed for corners, but don’t cut too much.
3. Attach The Arms And Wings
Cover each arm and wing:
- Drape fabric, smooth it, and pull tight.
- Tuck excess fabric into gaps between the arms and seat.
- Staple under the arms and along the back edge.
- Fold fabric neatly at corners before stapling.
Some chairs have separate pieces for the inside and outside arms. Always follow the original construction.
4. Cover The Outside Back And Sides
The outside back and outside arms come next.
- Lay fabric over each section.
- Fold the edges under for a clean finish.
- Staple along the bottom and sides, keeping fabric tight.
- Trim excess fabric.
5. Add Piping Or Decorative Trim
If you want a more finished look, add piping or decorative nails along the edges. This hides staples and gives a classic touch.
- Make piping by sewing fabric strips around cord, or buy ready-made.
- Attach with a staple gun or glue.
6. Replace The Dust Cover
Finally, cut a new dust cover (cambric) to fit the bottom of the chair. Staple it in place to hide raw edges and protect the fabric.
7. Check And Touch Up
Go over the entire chair:
- Check for loose staples or fabric.
- Smooth any wrinkles.
- Touch up wood with polish or paint as needed.
Working With Tricky Areas
Wing back chairs have curves, wings, and sometimes tufted buttons. These parts can be challenging, even for experienced DIYers.
Dealing With Curves
- Cut slits in the seam allowance to help fabric curve smoothly.
- Use lots of small staples rather than a few large ones.
- Pull fabric evenly to avoid puckering.
Working Around Arms And Wings
- Tuck fabric into narrow gaps with a spatula or blunt tool.
- Be patient—redo areas if the fabric looks loose.
Tufted Backs
If your chair has tufted buttons:
- Mark button locations on your new fabric.
- Use a long needle to thread buttons through foam and fabric.
- Pull tight and secure on the back with knots or staples.
Tufting takes practice. Try on scrap fabric first if you are new to the technique.
Comparing Diy Vs. Professional Recovery
You might wonder if doing it yourself is really worth the effort. Here’s a look at the main differences:
| Aspect | DIY Recovery | Professional Recovery |
|---|---|---|
| Cost | $100–$400 (materials only) | $700–$1,500 (including labor) |
| Time Required | 15–30 hours (first project) | 1–2 weeks (depends on shop) |
| Skill Needed | Beginner to intermediate | Expert |
| Customization | Full control | Depends on shop |
| Quality | Varies by effort | Consistently high |
An important insight: DIY recovery is not always about saving money. Many people enjoy the creative process and the ability to customize their chair exactly how they want.
Common Problems And How To Solve Them
Even with careful planning, you might run into some challenges. Here are solutions to frequent issues:
Fabric Wrinkles Or Sagging
- Pull fabric tighter before stapling.
- If you notice wrinkles after stapling, remove and redo that section.
- Use batting to smooth out the surface before applying fabric.
Visible Staples
- Place staples where they’ll be covered by piping or trim.
- Use decorative tacks for a classic look.
Pattern Misalignment
- Lay out all pieces before cutting.
- Mark key lines on both the chair and fabric to keep patterns straight.
Not Enough Fabric
- Double-check measurements before cutting.
- Use leftover pieces for hidden areas (like under the seat).
Loose Joints
- Fix all frame issues before adding new fabric.
- Don’t rely on fabric to hold the chair together.
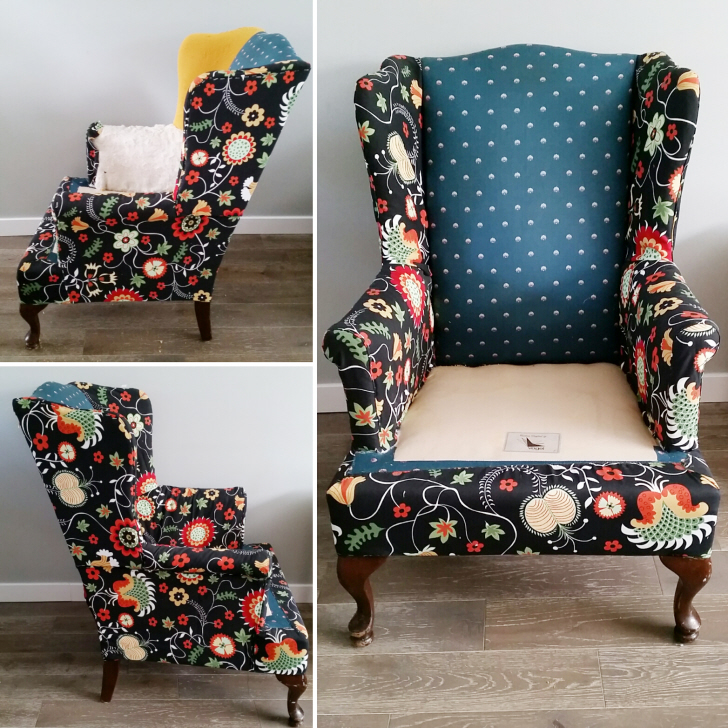
Real-life Example: A Chair Transformation
Emily, a homeowner in Ohio, decided to recover her grandmother’s wing back chair. The chair had a sturdy frame but faded, torn fabric and sagging springs.
She spent about $220 on fabric and materials and dedicated three weekends to the project. Emily took off the old fabric carefully, repaired the seat webbing, and chose a bold blue velvet for a modern look. She made her own piping for the edges and replaced the dust cover.
The result? A stunning, comfortable chair that became her living room’s centerpiece. Emily says the hardest part was aligning the velvet so it looked smooth, but the satisfaction of saving a family heirloom was worth every hour.
Estimated Time And Cost
Wing back chair recovery is not a quick weekend project, especially for beginners. Here’s what you can expect:
| Task | Estimated Time | Estimated Cost |
|---|---|---|
| Removing old fabric | 4–6 hours | $0 |
| Repairs (frame, springs) | 2–4 hours | $20–$60 |
| Cutting and prepping fabric | 2–3 hours | $0 |
| Recovering chair | 6–12 hours | $150–$350 (fabric, foam, trim) |
| Finishing touches | 1–2 hours | $10–$40 (trim, dust cover) |
| Total | 15–27 hours | $180–$450 |
Professional work often costs $700 or more, depending on your location and fabric choice. DIY recovery gives you both value and pride.
Credit: notinggrace.com
Tips For Success And Avoiding Mistakes
Recovering a wing back chair can seem overwhelming. Here are some tips that make a big difference:
- Take lots of photos as you disassemble. These help when you put everything back together.
- Label each fabric piece as you remove it.
- Don’t rush. Give yourself extra time, especially for the first project.
- Test your staple gun on scrap wood and fabric before starting.
- Watch for hidden staples in old chairs—they can damage scissors.
- Keep fabric tight, but not overstretched, to avoid damage.
- Practice on a small chair or cushion if this is your first upholstery project.
- Ask for help when handling large fabric pieces or heavy chairs.
One non-obvious insight: Use a spray bottle with water to lightly mist fabric before stapling. This allows the fabric to stretch slightly and then tighten as it dries, reducing wrinkles.
Maintaining Your Recovered Chair
Once your chair is complete, a little care will keep it looking great for years.
- Vacuum regularly using a brush attachment.
- Spot clean spills immediately with mild soap and water.
- Rotate cushions if possible to prevent uneven wear.
- Avoid direct sunlight to prevent fading.
- Check and tighten screws or bolts every few months.
Proper maintenance extends the life of your work and keeps the chair comfortable and attractive.
When To Call A Professional
Some projects are more complicated than expected. Consider hiring a professional if:
- The frame is seriously damaged.
- The chair has complex tufting, curves, or shapes you’re unsure about.
- You want a high-end fabric (like leather or silk) that is hard to handle.
- You simply don’t have time.
A professional upholsterer can handle tricky repairs and ensure a flawless finish. If you decide to go this route, check reviews and ask to see examples of their work.
For more information about upholstery techniques and fabric choices, visit the Upholstery Wikipedia page.
Frequently Asked Questions
How Much Fabric Do I Need To Recover A Wing Back Chair?
Most wing back chairs need 7 to 9 yards of upholstery fabric. Always measure your chair, and add extra for pattern matching and mistakes.
What Type Of Fabric Is Best For A Wing Back Chair?
Choose a durable upholstery fabric like cotton canvas, microfiber, linen blend, or velvet. Look for a high rub count (at least 15,000 double rubs) for long life.
Can I Recover A Wing Back Chair Without Removing The Old Fabric?
It’s not recommended. Old fabric can hide damage, smells, or loose padding. Removing it ensures a better fit and longer-lasting result.
How Long Does It Take To Recover A Wing Back Chair?
For beginners, plan for 15 to 30 hours over several days or weekends. Professionals may finish faster, but careful work gives the best results.
Is It Worth Recovering An Old Chair?
If the frame is solid and you like the style, recovering is often worth it. You get a custom look, save money, and can keep a piece with sentimental value.
Recovering a wing back chair is a challenge, but it’s also a chance to learn new skills and create something truly unique. With careful planning, the right tools, and a bit of patience, you’ll enjoy a beautiful, comfortable chair for years to come.
Credit: awesomesauceasshattery.com