As an Amazon Associate I earn from qualifying purchases.
Painting metal chairs can completely change the look of your home or garden. Whether you want to refresh an old piece or match your decor, painting metal chairs is a project almost anyone can do. But getting a smooth, long-lasting finish is not as simple as grabbing a can of spray paint.
If you want your chairs to look professional, resist rust, and last for years, there are important steps to follow.
Many people rush the process or skip key steps, only to see peeling paint and rust a few months later. The good news: with the right preparation, materials, and techniques, you can get results that rival what you see in furniture stores. This article will guide you through every part of painting metal chairs, from choosing the right paint to fixing common mistakes. You’ll also learn what many beginners overlook, like how weather and chair design affect your results.
Let’s dive in and learn how to paint metal chairs—so they look great and stay that way.
Why Paint Metal Chairs?
Metal chairs are strong and stylish, but over time, their paint can fade, chip, or rust. Painting does more than make them look good. It also protects the metal from weather, moisture, and wear. Here are some reasons why painting metal chairs is a smart move:
- Extend the chair’s life: Fresh paint acts as a shield, keeping out water and air that cause rust.
- Personalize your space: Choose colors that match your style, from bold reds to classic black.
- Save money: Painting is much cheaper than buying new chairs.
- Eco-friendly: Reusing old chairs instead of throwing them away reduces waste.
Types Of Metal Chairs
Before you start, it’s helpful to know what type of metal chair you have. Different metals need different prep and paint. Here are the most common types:
- Steel: Heavy, strong, often used for outdoor furniture. Can rust if not protected.
- Aluminum: Light, doesn’t rust, but paint can flake if not prepped well.
- Wrought iron: Classic garden chairs, often with curves and scrolls. Prone to rust and pitting.
- Stainless steel: Modern look, resists rust, but paint may not stick without special primer.
If you’re not sure what your chair is made of, use a magnet. It will stick to steel and wrought iron, but not to aluminum or stainless steel.
What You’ll Need: Tools And Materials
Having the right tools is key to a good result. Here’s what you’ll need to paint metal chairs:
Essential tools:
- Drop cloth or plastic sheeting (to protect the floor)
- Wire brush or steel wool
- Sandpaper (medium and fine grit)
- Clean rags or tack cloth
- Painter’s tape
- Screwdriver or wrench (to remove parts if needed)
For cleaning:
- Mild dish soap and water
- White vinegar (for tough rust or grease)
- Degreaser (optional)
For painting:
- Rust-inhibiting primer (spray or brush-on)
- Metal spray paint or exterior enamel paint
- Topcoat or sealer (optional but recommended)
Safety gear:
- Gloves
- Dust mask or respirator
- Safety glasses
Having these ready will save you time and frustration.
Step 1: Prepare The Workspace
A good workspace makes painting easier and safer. Choose an area with:
- Good ventilation (outdoors is best)
- Enough space to walk around the chair
- A flat, stable surface
Lay down a drop cloth to protect your floor or grass. Remove anything nearby you don’t want paint on. If you must work indoors, open windows and use a fan to move fumes outside.
Pro tip: Humidity and temperature affect paint drying. The best range is 50–85°F (10–29°C) and low humidity.
Step 2: Remove Old Paint And Rust
Proper surface prep is the most important step. Paint will not stick to dirt, rust, or loose paint. Here’s how to do it right:
- Remove cushions or covers from the chair.
- Clean with soap and water. Scrub off dirt, bird droppings, or oil.
- Use a wire brush or steel wool to remove rust and flaking paint. Spend extra time on rusty spots—if you leave rust, it will spread under the new paint.
- Sand the surface. Use medium-grit sandpaper (80–120 grit) to smooth rough areas. For a glossy old finish, sand with fine grit (220) to make the surface dull.
- Wipe with a tack cloth or damp rag to remove dust.
Non-obvious insight: Even if your chair looks clean, old paint can have a slippery finish that new paint won’t stick to. Always sand to give the new paint something to grip.
Step 3: Fix Dents, Holes, Or Deep Rust
If your chair has dents, holes, or pitted rust, fix these before painting.
- For small dents or holes, use metal filler or automotive body filler. Mix as directed, apply with a putty knife, and let dry.
- Sand the filler smooth with fine sandpaper.
- For severe rust, consider using a rust converter. This turns rust into a paintable surface and prevents it from spreading.
Be patient. Fixing flaws now means your finished chair will look much better and last longer.
Step 4: Apply Primer
Primer is not optional for metal chairs. It helps paint stick and blocks rust. Here’s how to do it:
- Choose a rust-inhibiting primer made for metal. Spray primer is easiest for detailed chairs, but brush-on works too.
- Shake the can well. Spray 8–10 inches from the surface, using short, even passes.
- Light, thin coats are better than one thick coat. This prevents drips and helps the primer dry smoothly.
- Let the primer dry as the label says, usually 1–2 hours.
- Check for bare spots. Add more primer if needed.
Pro tip: If your chair has a lot of curves or scrolls, turn it upside down and spray from different angles.
Step 5: Choose The Right Paint
Not all paint works on metal. The right choice means your chairs will resist weather, scratches, and UV fading. Here are your main options:
Spray Paint For Metal
- Pros: Fast, covers curves well, smooth finish
- Cons: More expensive for large areas, needs good ventilation
Brush-on Paint
- Pros: Thicker coating, easy to touch up, less overspray
- Cons: Can leave brush marks, slower for details
Powder Coating (for Advanced Users)
- Pros: Super-durable, used in factories
- Cons: Expensive, special tools needed, not a DIY job
What to look for: Choose an enamel or acrylic paint labeled for outdoor metal. If your chairs will sit outside, pick a paint with UV resistance.
Non-obvious insight: Dark colors hide dirt and last longer in the sun. Light colors may show stains and fade faster.
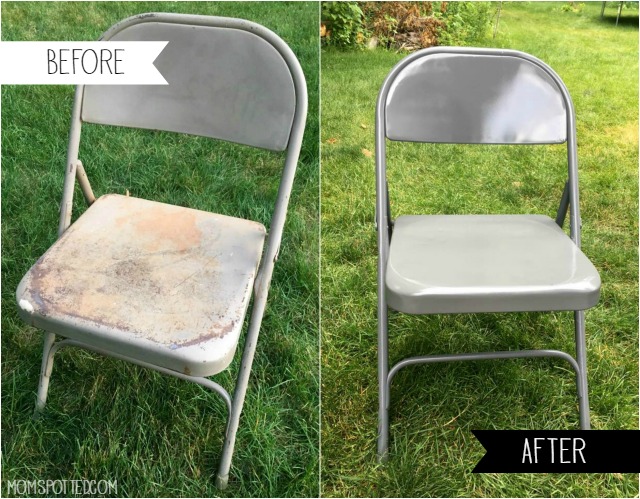
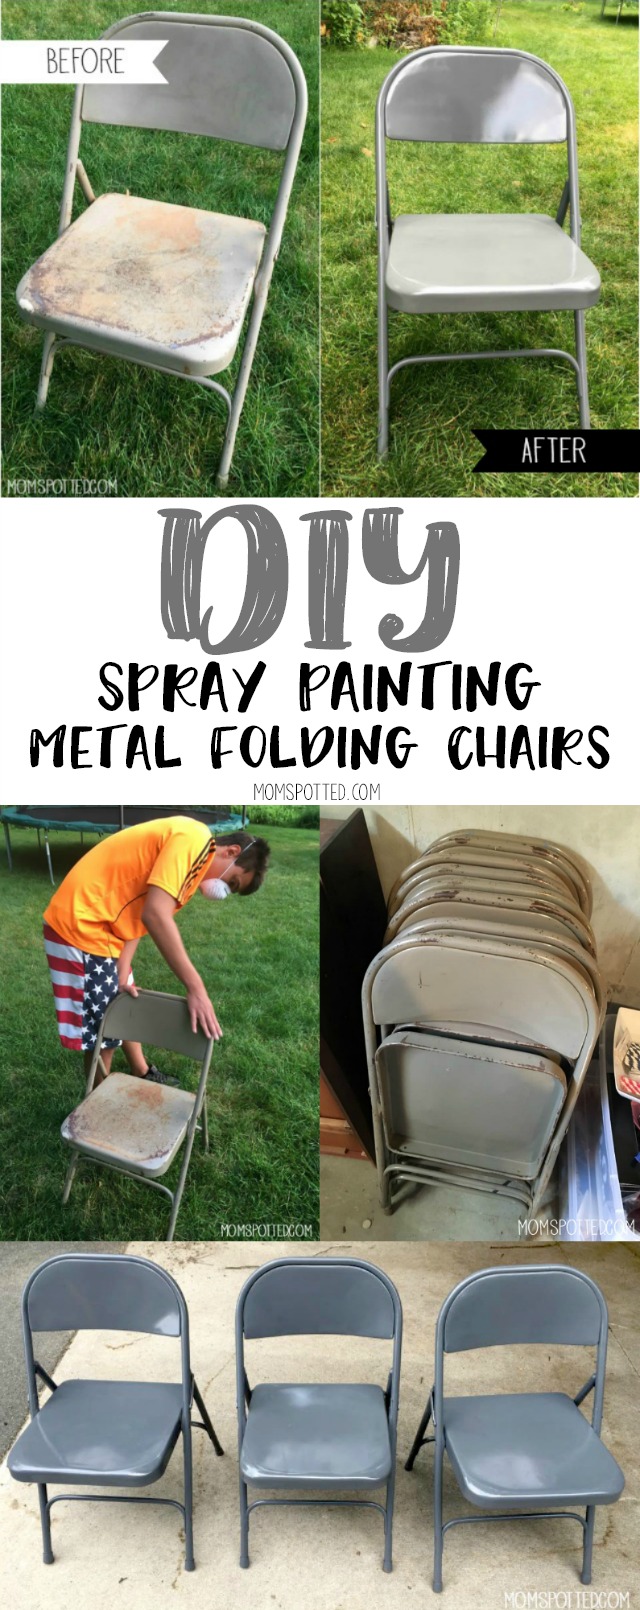
Credit: momspotted.com
Step 6: Paint The Chairs
Now you’re ready for the fun part. Painting metal chairs is all about patience and even coverage.
- Shake or stir the paint well before starting.
- Test your spray or brush on cardboard first. This helps avoid splatters.
- Spray or brush on thin coats. Don’t try to cover everything at once. Overlapping passes are best.
- Let each coat dry completely (usually 20–30 minutes for spray, 2–4 hours for brush-on).
- Apply 2–3 coats for best coverage and durability.
Tip: If you see drips, wait for them to dry, then sand lightly and repaint.
Step 7: Apply A Topcoat (optional But Recommended)
A clear topcoat adds extra protection, especially for outdoor chairs. It seals the paint, blocks UV rays, and makes cleaning easier.
- Use a clear enamel or urethane spray made for metal.
- Apply after the last paint coat is fully dry.
- 1–2 thin coats are usually enough.
This step is easy to skip, but it pays off with longer-lasting results.
Step 8: Let The Paint Cure
Paint dries to the touch in hours, but it takes longer to fully “cure” and harden.
- Avoid using the chairs for at least 24–48 hours.
- For outdoor use, wait up to a week before heavy use or rain exposure.
Non-obvious insight: Even if paint feels dry, it can scratch easily in the first few days. Be patient for a tough, chip-resistant finish.
Step 9: Reassemble And Enjoy
Once the paint is fully cured:
- Remove painter’s tape.
- Reattach cushions or hardware.
- Move the chairs to their final spot.
You now have metal chairs that look like new—maybe even better than before.
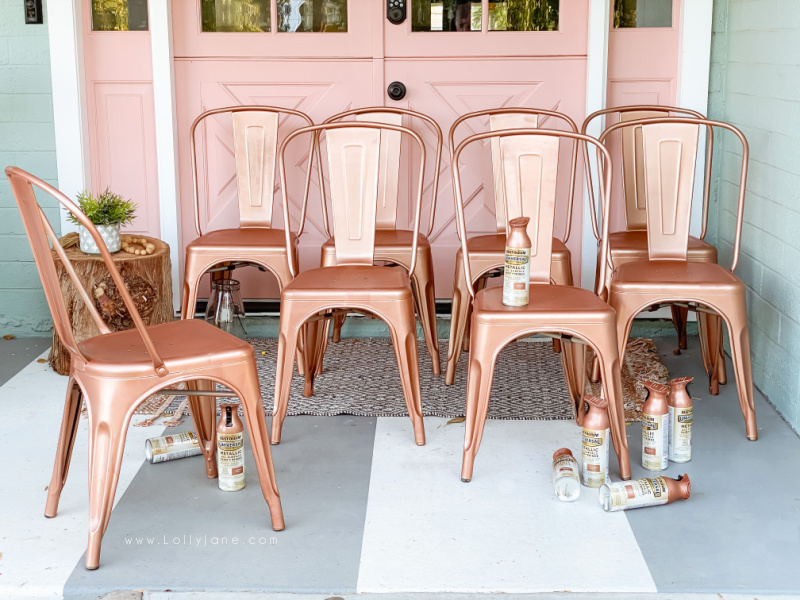
Credit: lollyjane.com
Common Mistakes And How To Avoid Them
Many people make small errors that ruin the finish or waste time. Here’s how to avoid the most common mistakes:
- Skipping prep: Failing to clean, sand, or remove rust leads to peeling paint.
- Painting too thick: Thick coats drip and take longer to dry.
- Not priming: Paint won’t stick or will rust underneath.
- Painting in bad weather: High humidity or cold slows drying and causes bubbles.
- Rushing to use: Sitting on chairs before paint cures leads to marks or chips.
Take your time on each step—good prep and patience are more important than fancy paint.
Weather, Location, And Longevity
Metal chairs can last for years with proper painting, but weather plays a big role. Here’s what to consider:
- Rain: Always use outdoor paint and topcoat for garden furniture.
- Sun: UV rays fade cheap paint quickly—choose paints labeled UV-resistant.
- Salt air: Near the ocean? Use extra rust protection. Salt speeds up corrosion.
- Indoor vs. outdoor: Indoor chairs need less protection, but it’s still smart to use a primer.
Maintenance tip: Check your chairs each season. Clean, touch up chips, and recoat as needed.
How Design Affects Painting
Not all chairs are created equal. Some designs need extra attention:
- Simple frames: Easy to paint with brush or spray.
- Scrolls and cutouts: Spray paint works best, but use slow, sweeping passes to avoid drips.
- Mesh seats: Hold the can at an angle to get all sides.
- Foldable chairs: Open and close during painting to cover all moving parts.
Take apart what you can. Painting around bolts or hinges can lead to paint sticking parts together.
Comparing Paint Types For Metal Chairs
To help you choose, here’s a comparison of common paint types for metal chairs:
| Paint Type | Best For | Durability | Ease of Use | Cost |
|---|---|---|---|---|
| Spray Paint | Detailed, curved designs | Good | Easy | $$ |
| Brush-On Enamel | Flat surfaces, touch-ups | Very Good | Moderate | $ |
| Powder Coating | Professional/Factory finish | Excellent | Hard (not DIY) | $$$ |
Tip: For most home projects, spray paint or brush-on enamel is the best mix of cost and results.
Paint Brands And Cost Guide
You might wonder which brands work well and how much you’ll need to spend. Here’s a quick guide:
| Brand | Type | Average Price (US) | Coverage per Can | Outdoor Use |
|---|---|---|---|---|
| Rust-Oleum | Spray/Brush-on | $5–$8 | 8–10 sq ft | Yes |
| Krylon | Spray | $6–$9 | 8–10 sq ft | Yes |
| Valspar | Spray/Brush-on | $7–$10 | 10–12 sq ft | Yes |
Tip: One can of spray paint covers 1–2 chairs, depending on size and style.
How To Paint Metal Chairs With Patterns Or Two-tone Colors
Want a custom look? You can add stripes, patterns, or two-tone effects. Here’s how:
- Paint the whole chair your base color and let it dry.
- Use painter’s tape to mask off areas for stripes or shapes.
- Paint the second color over the exposed areas.
- Remove tape carefully while paint is still a bit wet for crisp lines.
Non-obvious insight: For stencils or fine details, spray paint works better than brushes. Hold the stencil close to the surface to avoid blurry edges.
Safety And Clean-up Tips
Safety matters when painting. Paint fumes and dust can be harmful. Here’s how to protect yourself:
- Always wear a mask and gloves.
- Work outdoors or in a well-ventilated area.
- Clean up spills right away.
- Store paint and chemicals out of reach of children.
For clean-up:
- Wash brushes with mineral spirits or water, as the paint label says.
- Let spray cans empty before throwing away.
- Dispose of old paint at a recycling center—don’t pour it down the drain.
Real-life Example: Outdoor Patio Chairs
Let’s say you have four rusty steel patio chairs. Here’s a quick summary of how the process works:
- You clean and sand all surfaces.
- Use a rust-converting primer to block leftover rust.
- Spray with two coats of outdoor enamel paint.
- Seal with a clear topcoat.
- Wait 48 hours before use.
After a year outside, the chairs still look great and have no rust—proof that prep and good products matter.
How Often Should You Repaint Metal Chairs?
With good prep and paint, outdoor metal chairs should last 3–5 years before needing a touch-up. Indoor chairs can last even longer. Inspect each season and fix chips early to avoid big repairs later.
Environmental Tips
If you want to reduce your impact, look for low-VOC or water-based paints. These are safer for you and the planet. Also, reusing old chairs keeps metal out of landfills.
For more on eco-friendly painting and disposal, check the EPA Safer Choice program.
Credit: momspotted.com
Frequently Asked Questions
What Is The Best Paint For Metal Chairs?
The best paint is a rust-inhibiting enamel or acrylic spray paint made for metal. These paints stick well, resist weather, and are easy to apply. For outdoor use, look for UV-resistant labels.
Do I Need To Remove All Old Paint Before Repainting?
You don’t need to remove every bit of old paint, but you must remove any loose, flaking, or rusty areas. Smooth, well-adhered paint can be sanded and painted over.
Can I Paint Metal Chairs Without Priming?
It’s not recommended. Primer helps the paint stick and protects against rust. Skipping primer often leads to peeling and faster rust, especially outdoors.
How Long Should I Wait Before Using Painted Chairs?
Wait at least 24–48 hours after the last coat before using the chairs. For best results, let the paint cure for up to one week before putting them outside or using them heavily.
Is Spray Paint Or Brush-on Paint Better For Metal Chairs?
Spray paint is usually better for chairs with curves or details, as it gives a smoother finish and gets into hard-to-reach areas. Brush-on paint works well for flat surfaces and touch-ups.
Painting metal chairs is a project that rewards effort and patience. By following each step and using the right products, you’ll enjoy beautiful, durable chairs—made your way—for years to come.
