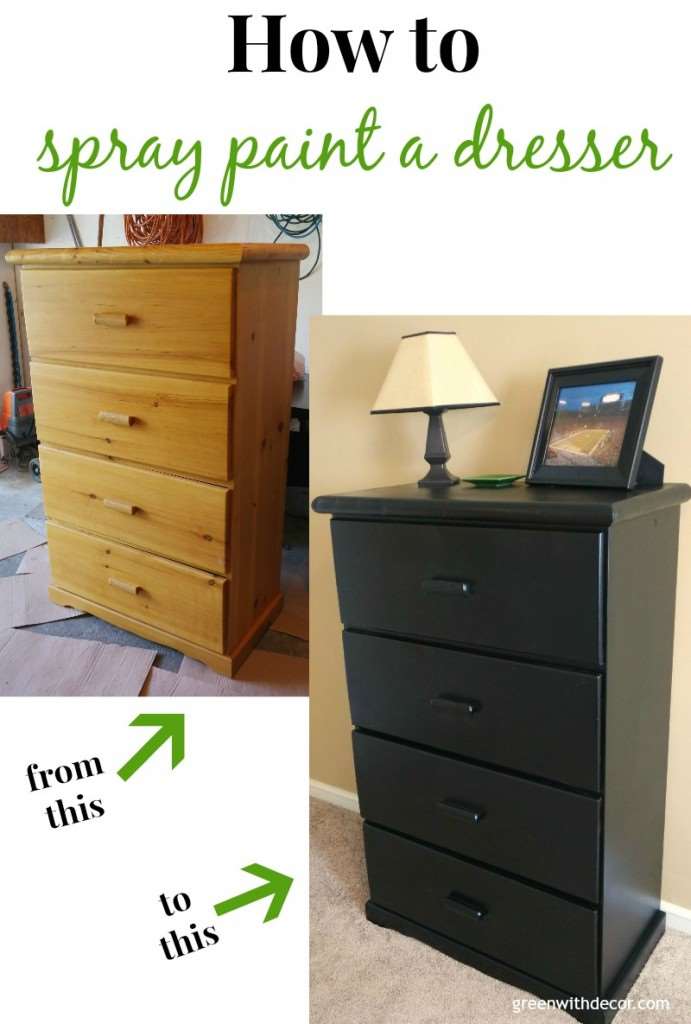
Painting a dresser with spray paint can turn an old, tired piece of furniture into a stunning, modern feature in your home. Many people feel nervous about using spray paint on furniture, worrying about drips, uneven color, or damage to the wood.
But with the right steps, tools, and a bit of patience, even beginners can get a smooth, professional result. Whether you want to refresh a thrift store find or give new life to a family heirloom, spray painting is a fast and creative way to update your space without spending much money.
In this guide, you will learn how to paint a dresser with spray paint from start to finish. You’ll discover all the materials you need, the best prep techniques, safety musts, how to spray for even coverage, and tips for a durable finish.
You’ll also find out why some dressers look great for years while others chip or fade quickly. Along the way, you’ll get advice that most first-timers miss, like how weather and humidity affect your results and why primer really matters.
By the end, you’ll have the confidence and know-how to transform any dresser into a showpiece.
Why Spray Paint A Dresser?
Spray painting a dresser is popular for several reasons. First, spray paint offers a smooth, streak-free finish that is hard to achieve with brushes or rollers. This is especially important for dressers with lots of curves, carvings, or handles. Spray paint also dries quickly, so you can often finish the entire project in a single weekend.
Compared to other painting methods, spray painting is less physically demanding. You don’t have to push a heavy brush or roller across the wood. Instead, you use light, even passes with a can. Spray paint can reach into cracks and details easily, making it ideal for vintage or ornate furniture.
Finally, spray painting gives you access to a huge range of colors and finishes—matte, gloss, satin, metallic, and more. You can match almost any décor style, from modern to farmhouse to boho.
Choosing The Right Dresser For Spray Painting
Not every dresser is a good candidate for spray paint. Consider these factors:
- Material: Spray paint works best on wood, MDF, and laminate. Avoid heavily waxed or oily surfaces unless you plan to sand and prime thoroughly.
- Condition: Look for a dresser that is structurally sound. Small scratches or dents are okay, but large cracks, loose joints, or deep gouges may need repair first.
- Details: Dressers with lots of carvings or hardware are ideal, as spray paint can reach into small spaces.
- Finish: Highly glossy surfaces will require extra prep. Peeling paint or bubbling varnish should be removed before spraying.
Pro Tip: If you’re unsure, test spray a small, hidden area first to see how the paint adheres and dries.
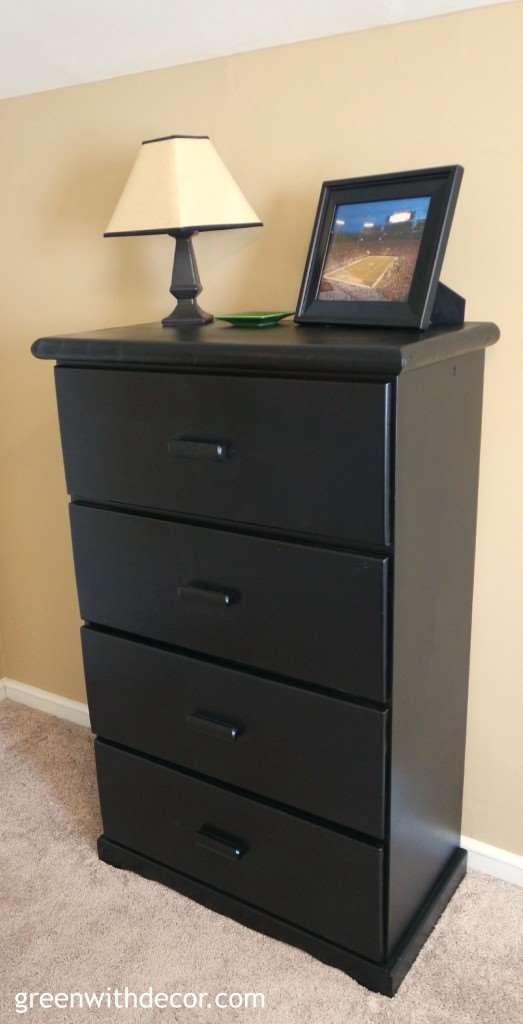
Credit: greenwithdecor.com
Tools And Materials You’ll Need
A successful spray paint job starts with the right supplies. Gather everything before you begin:
- Spray paint: Choose a high-quality brand designed for furniture. Most dressers need 3–6 cans, depending on size and color.
- Primer: Essential for bare wood, laminate, or if you’re making a dramatic color change.
- Sandpaper: Medium (120–150 grit) and fine (220 grit).
- Tack cloth: Removes fine dust before painting.
- Drop cloths or plastic sheeting: Protects floors and nearby items.
- Painter’s tape: Masks off areas you don’t want painted.
- Screwdriver: For removing hardware and drawers.
- Respirator mask: Protects your lungs from fumes.
- Gloves and safety glasses: Extra safety when sanding or spraying.
- Mild detergent and sponge: For cleaning the dresser.
- Wood filler: Optional, for fixing dents or scratches.
- Stir sticks and paint stirrer: For mixing primer if using a liquid type.
Non-Obvious Insight: Don’t use ordinary dust masks—spray paint fumes are finer and require a proper respirator rated for paint.
Preparing Your Workspace
Good prep is half the battle with spray painting. Follow these steps for best results:
- Work Outside or in a Well-Ventilated Area: Fumes from spray paint are strong and can be harmful. If you must work indoors, open windows and use fans to move air out.
- Protect Surfaces: Lay down drop cloths or plastic sheeting. Spray paint travels farther than you think, so cover anything within 6–8 feet.
- Set Up the Dresser: Place the dresser on blocks or bricks to raise it off the ground. This allows you to spray the lower edges easily.
- Organize Your Tools: Keep your paint, primer, sandpaper, and rags within easy reach to avoid scrambling mid-project.
Pro Tip: Temperature and humidity matter. Spray paint works best between 50°F and 80°F and in low humidity. Too cold, and the paint won’t dry well; too hot, and it can bubble.
Removing Hardware And Prepping The Dresser
Before you paint, you need to strip down the dresser:
- Take Off All Hardware: Remove knobs, handles, and drawer pulls with a screwdriver. Place them in a bag so you don’t lose them.
- Remove Drawers: Pull out all drawers and set them aside. Spray them separately for even coverage.
- Clean Thoroughly: Use a mild detergent and water to clean all surfaces. Grease, dust, and fingerprints can cause paint to peel or bubble.
- Repair Damage: Fill any dents or scratches with wood filler. Let it dry, then sand smooth.
- Sand the Surfaces: Lightly sand all surfaces with medium-grit sandpaper. If the finish is glossy, sand enough to dull the shine. Wipe off dust with a tack cloth.
Non-Obvious Insight: Even “no-sand” spray paints benefit from a quick sanding. This helps the paint grip the surface for a longer-lasting finish.
Masking Off Areas
Some parts of the dresser should not be painted, such as drawer runners, inside edges, or decorative metal features.
- Use painter’s tape to cover these areas. Press the tape down well to prevent paint from seeping underneath.
- For larger sections, tape down sheets of paper or plastic.
- Don’t forget to mask the inside of drawers if you want them to stay clean.
Pro Tip: Label each drawer and its slot with tape so you can put them back in the same position later.

Credit: www.youtube.com
Priming The Dresser
Primer is the secret to a smooth, durable finish. It blocks stains, prevents wood tannins from bleeding through, and helps the paint stick better.
- Choose the Right Primer: Use a spray primer designed for your dresser’s material—wood, laminate, or MDF.
- Apply Light Coats: Shake the can for at least 1 minute, then spray in light, even passes. Hold the can 10–16 inches from the surface.
- Let Dry Fully: Wait the recommended time (usually 1 hour) before sanding or painting.
- Sand Lightly After Priming: Use fine-grit sandpaper to smooth out any roughness. Wipe with a tack cloth.
Pro Tip: If you’re going from dark to light colors, a second coat of primer may be needed for even coverage.
Primer Comparison
Here’s a quick look at popular primer types for furniture:
| Primer Type | Best For | Dry Time | Notes |
|---|---|---|---|
| Shellac-based | Wood, stain blocking | 30–60 min | Strong odor, excellent adhesion |
| Oil-based | Glossy or damaged surfaces | 1–2 hours | Durable, but longer cleanup |
| Water-based | MDF, bare wood | 30–45 min | Low odor, easy cleanup |
Choosing The Best Spray Paint For Your Dresser
Not all spray paints are created equal. The right paint will give you beautiful color, smooth texture, and lasting durability.
- Enamel Spray Paint: Best for dressers. Hard finish, resists chipping and scratches.
- Acrylic Spray Paint: Good for quick projects. Fast drying, but less durable.
- Chalky Finish Spray Paint: Soft, matte look. Needs a topcoat for protection.
- Metallic and Specialty Sprays: Great for accent details or a modern look.
Comparing Spray Paint Types
| Paint Type | Finish | Durability | Best Uses |
|---|---|---|---|
| Enamel | Gloss, Satin | High | Main surfaces |
| Acrylic | Matte, Satin | Medium | Temporary color |
| Chalky | Matte | Low | Vintage look |
| Metallic | Shiny | Medium | Accents |
Pro Tip: Always check the label for “furniture-safe” or “indoor use” to avoid fumes or finishes that are not meant for home furniture.
How To Spray Paint A Dresser: Step-by-step
With your dresser prepped and primed, you’re ready to paint. Here’s how to get a perfect finish:
- Shake the Can Well: At least 1–2 minutes. Listen for the mixing ball inside.
- Test Spray: Spray on cardboard or scrap wood to check color and spray pattern.
- Hold Can 10–16 Inches Away: Closer causes drips; farther gives thin, even coverage.
- Use Light, Even Strokes: Move side to side, starting and ending each pass off the edge of the dresser. Overlap each pass by about 50%.
- Apply Multiple Thin Coats: Usually 2–4 coats are enough. Wait 10–20 minutes between coats, or as directed by the paint brand.
- Rotate Drawers: Spray drawers separately, standing them up or laying flat as needed.
- Check for Drips: If you spot any, let them dry, then sand lightly and touch up.
Non-Obvious Insight: Changing spray direction with each coat (horizontal, then vertical) helps cover edges and corners more evenly.
Tips For A Flawless Finish
- Work in Good Light: Shadows can hide drips or missed spots. Natural daylight is best.
- Avoid Wind: Even a gentle breeze can blow paint dust and cause uneven coverage.
- Keep the Can Moving: Never stop in one spot, or you’ll get thick, sticky patches.
- Let Each Coat Dry: Rushing leads to fingerprints or smudges.
- Inspect Between Coats: Run your hand lightly over the surface. If it feels rough, sand with fine grit and wipe with tack cloth.
How Many Cans Of Spray Paint Do You Need?
This depends on dresser size, the number of drawers, and paint color. Here’s a rough guide:
- Small Dresser (3–4 drawers): 3–4 cans
- Medium Dresser (5–6 drawers): 4–6 cans
- Large/Buffet Dresser (7+ drawers): 6–8 cans
If you’re painting from dark to light, you may need one extra can for full coverage.
Pro Tip: Always buy one more can than you think you’ll need. Paint colors and finishes can vary between batches, so buying at once ensures a perfect match.
Drying And Curing
Spray paint dries quickly to the touch (10–30 minutes), but full curing takes longer.
- Dry to Touch: 20–30 minutes
- Ready for Light Handling: 1–2 hours
- Full Cure (hard finish): 24–72 hours
Do not reassemble or use the dresser until the paint is fully cured. Setting objects on the surface too soon can cause marks or dents.
Drying Times Comparison
| Paint Type | Touch Dry | Handle Time | Full Cure |
|---|---|---|---|
| Enamel | 30 min | 2 hours | 48–72 hours |
| Acrylic | 20 min | 1 hour | 24–48 hours |
| Chalky | 15 min | 45 min | 24 hours |
Adding A Topcoat For Durability
A clear topcoat protects your dresser from scratches, water rings, and fading. It’s especially important for dressers in high-traffic areas or kids’ rooms.
- Choose the Right Topcoat: For most dressers, use a clear acrylic or polyurethane spray. Pick matte, satin, or gloss to match your paint finish.
- Apply Light Coats: Spray lightly, as topcoats can drip easily. Two thin coats are better than one heavy one.
- Let Cure Fully: Wait at least 24 hours before using the dresser.
Pro Tip: Some topcoats can yellow over time, especially on white or light colors. Test on a hidden area first.
Reassembling Your Dresser
Once the paint and topcoat are fully cured, you can put your dresser back together.
- Remove All Tape and Masking: Peel carefully to avoid lifting fresh paint.
- Install Hardware: Reattach knobs, handles, and drawer pulls. Consider updating hardware for a new look.
- Replace Drawers: Slide each drawer into its original slot, using your labels as a guide.
- Clean Up: Dispose of used cans, rags, and drop cloths safely.
Pro Tip: If paint sticks to the sides of drawers, rub a candle or bar of soap on the runners for smoother sliding.
Common Mistakes To Avoid
Even experienced DIYers can make errors with spray paint. Watch out for these pitfalls:
- Skipping Primer: Leads to peeling and uneven color.
- Spraying Too Close: Causes drips, bubbles, and sticky patches.
- Not Sanding Between Coats: Leaves a rough, bumpy surface.
- Painting in Bad Weather: Humidity or cold can ruin the finish.
- Reassembling Too Soon: Paint can stick, scratch, or peel if not fully cured.
Pro Tip: Always read the instructions on your spray paint and primer cans. Brands vary in drying times and best practices.
Maintenance And Care Of Your Painted Dresser
A newly spray-painted dresser is easy to keep clean and beautiful if you follow a few simple rules:
- Dust Regularly: Use a soft, dry cloth. Avoid abrasive dusters that can scratch.
- Clean Spills Promptly: Wipe up water or other liquids right away to prevent staining.
- Avoid Harsh Chemicals: Only use mild soap and water for cleaning.
- Protect the Surface: Use coasters, mats, or runners to avoid scratches and heat marks.
- Touch Up as Needed: Keep an extra can of your spray paint for quick fixes if chips occur.
Non-Obvious Insight: Sunlight can fade spray paint over time, especially on bright or dark colors. Place your dresser away from direct sun for longer-lasting color.
Creative Ideas: Customizing Your Spray-painted Dresser
Spray painting isn’t just about changing the color. You can use spray paint for unique looks and effects:
- Two-Tone Dressers: Paint the frame one color and drawers another for contrast.
- Ombre Effect: Blend two or three shades from light to dark for a gradient look.
- Stencil Patterns: Use stencils and painter’s tape to add geometric or floral designs.
- Metallic Accents: Spray handles or legs with gold, copper, or silver paint.
- Chalkboard Drawers: Use chalkboard spray paint on drawer fronts for a fun, writable surface.
Pro Tip: Always test new techniques on scrap wood or the back of a drawer before trying them on the main dresser.
When To Call A Professional
If your dresser is a valuable antique or has heavy water or mold damage, consider consulting a furniture restorer. Some restoration jobs require special tools or finishes that spray paint cannot provide. For most DIY projects, however, spray painting is safe, effective, and rewarding.
Credit: greenwithdecor.com
Extra Resources
For more tips on painting furniture, you can visit Family Handyman, which offers step-by-step guides for all skill levels.
Frequently Asked Questions
How Long Does Spray Paint Last On A Dresser?
With proper prep, primer, and a topcoat, spray paint can last 5–10 years or longer on a dresser. Avoid harsh cleaners and keep the dresser out of direct sunlight for best results.
Can I Spray Paint A Laminate Dresser?
Yes, but laminate requires extra prep. Sand lightly, use a bonding primer, and let each coat dry fully. This helps the paint stick and prevents peeling.
Do I Have To Sand The Dresser Before Spray Painting?
Light sanding is almost always recommended, even for “no prep” paints. It helps the paint and primer bond better for a smooth, durable finish.
Is Spray Painting Better Than Brush Painting For Furniture?
Spray painting gives a smoother, more even finish and is faster for dressers with lots of details. Brush painting allows for more control but can leave brush marks.
How Do I Avoid Spray Paint Drips?
Use light, even coats and keep the can moving. Hold the can 10–16 inches from the surface. If drips occur, let them dry, sand smooth, and touch up.
Painting a dresser with spray paint is a satisfying project that can give old furniture a brand-new look. With the right tools, good prep, and a bit of creativity, you can achieve a result that looks as good as store-bought—often for a fraction of the cost.
Take your time, follow these steps, and soon you’ll have a dresser that makes your room shine.