Measuring floor registers may sound simple, but there’s more to it than grabbing a tape measure and jotting down numbers. The right measurement ensures your registers fit perfectly, look good, and help your HVAC system work better. If you get it wrong, you could waste money, time, and even cause problems with airflow in your home.
This guide takes you through every detail, whether you’re replacing an old register, upgrading to a new style, or just making sure your heating and cooling system works efficiently.
You’ll discover how to measure floor registers correctly, why the measurements matter, and what mistakes homeowners often make. You’ll also learn about register sizing standards, the difference between duct and grill sizes, and how to handle tricky situations like custom or irregular openings.
Let’s clear up the confusion and help you get the perfect fit every time.
Why Accurate Measurement Matters
Floor registers do more than cover a hole in the floor. They direct air from your HVAC system into a room, help control temperature, and impact your home’s comfort. If a register is too small, it can block airflow, making your system work harder.
Too large, and it won’t sit securely, letting debris fall into the ducts. Even a small mistake can create drafts, energy loss, or noisy operation.
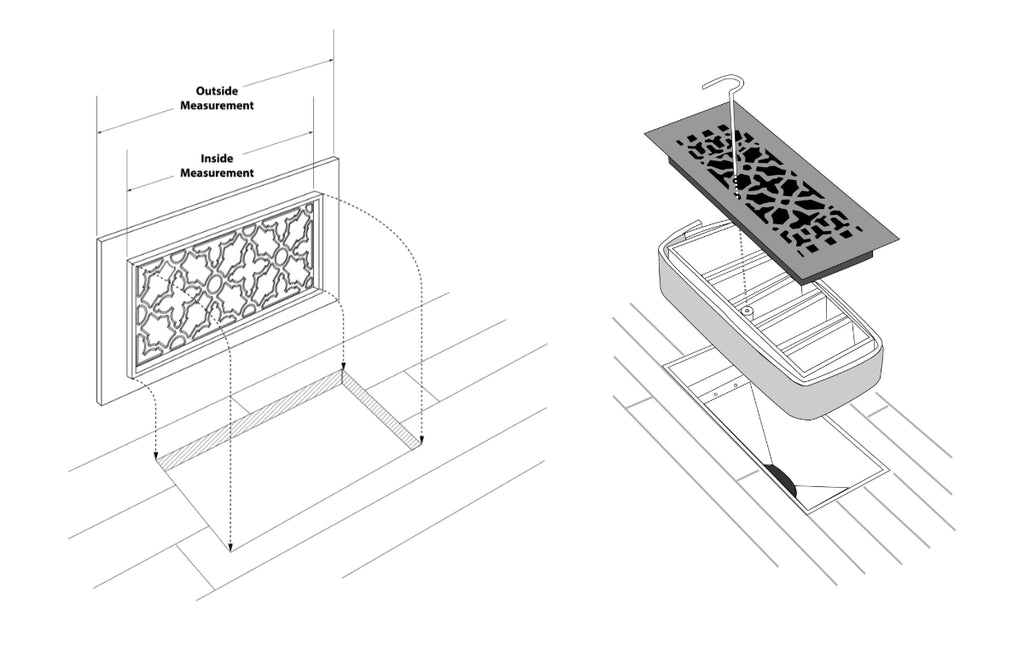
Many homeowners think they can just measure the outside of their old register, but that almost always leads to the wrong size. Most registers are labeled and sold based on the *duct opening size*, not the outer edges of the grill.
Understanding this difference is key to ordering the right replacement.
Understanding Floor Register Sizing
Before you pick up a tape measure, it’s important to know how sizing works for floor registers. This is where many people get confused.
Register size refers to the *size of the duct opening*, not the size of the visible faceplate or grill. For example, a register labeled “4 x 10” fits an opening that’s 4 inches wide and 10 inches long. The actual grill may be slightly larger to cover the opening and rest on the floor.
Key points to remember:
- Always measure the duct opening, not the grill.
- Sizes are given as width x length (width is always first).
Let’s look at a comparison between the opening and grill size:
| Duct Opening Size (inches) | Typical Register Grill Size (inches) |
|---|---|
| 4 x 10 | 5.5 x 11.5 |
| 4 x 12 | 5.5 x 13.5 |
| 6 x 10 | 7.5 x 11.5 |
Insight: Register grill sizes are always larger than the duct opening to provide overlap and secure placement. This is why measuring the opening—not the grill—is essential.
Tools You Need For Measuring
You don’t need advanced tools, but having the right ones makes the process much easier and more accurate.
- Tape measure: A standard metal tape measure works best. Digital ones are fine, but not necessary.
- Notepad and pen: Write down measurements immediately to avoid confusion later.
- Flashlight: Helpful if the opening is dark or hard to see.
- Vacuum: Optional, but cleaning out dust and debris gives you a clearer view and better fit.
- Camera or phone: Take a photo of the opening, especially for custom or irregular sizes.
Pro tip: Always double-check your measurements before buying. Even a half-inch mistake can cause frustration.
Step-by-step Guide: How To Measure Floor Registers
Let’s break down the process into simple, practical steps.
Step 1: Remove The Existing Register (if Present)
If there’s already a register covering the opening, you’ll need to take it out first. Most registers simply lift out, but some are screwed down. Use a screwdriver if needed. Be careful not to drop screws into the duct.
Why this step matters: You need direct access to the *duct opening*—not the outer grill—for a true measurement.
Step 2: Measure The Duct Opening
This is the most important step. Place the tape measure inside the opening, against the metal or wood edge.
- Width: Measure the shorter side first (usually left to right).
- Length: Measure the longer side (front to back).
Write down both numbers in inches, such as 4 x 10 or 6 x 12.
Example: If the opening is 4 inches wide and 10 inches long, you need a 4 x 10 register.
Step 3: Note The Depth (if Required)
Most floor registers don’t need depth measurement because they’re made for standard duct depths. However, some registers (like those with deep damper boxes) may require you to check how much space is below the floor.
Insert the tape measure vertically into the duct and note the depth. Compare this to the register’s specifications if you’re buying a damper or filter style.
Step 4: Check For Obstructions
Look for nails, screws, wires, or floor irregularities around the opening. These can affect how the new register sits. Remove or adjust as needed.
Step 5: Measure The Floor Overlap Area
If you want to match the look or size of your old register, measure the outer dimensions of the old grill. This is optional but can help if you want the new register to cover the same area.
Write down both the *duct opening size* and the *grill face size*.
Insight: Register faceplates are typically 1.5 to 2 inches larger in both dimensions than the duct opening.
Step 6: Record And Double-check All Measurements
Mistakes often happen when writing numbers down wrong or mixing up width and length. Always re-measure and confirm your notes before shopping.
Types Of Floor Registers And Their Measurement Needs
Not all registers are created equal. The type you choose can affect how and what you measure. Here’s a breakdown of common types:
Standard Floor Registers
These are the most common. They sit on top of the floor with small “feet” that rest over the duct opening.
- Measure: Duct opening only (width x length).
Drop-in Registers
These have a small lip that fits down into the duct, helping them stay in place.
- Measure: Duct opening size. Double-check that the register’s drop-in portion fits into your duct.
Flush-mount Registers
These are installed level with the floor, often during new construction or when replacing flooring.
- Measure: Duct opening size and the thickness of the flooring. Some may need a custom size.
Filter Registers
These include a filter to trap dust and debris.
- Measure: Duct opening size, and check for enough depth below the floor for the filter box.
Custom Or Irregular Registers
Older homes or custom-built houses may have non-standard opening sizes.
- Measure: Exact duct opening size (width and length), and consider custom ordering if you can’t find a match.
Key insight: Custom sizes are more expensive and may require longer wait times for delivery.
Common Register Sizes In The Us
Most homes use a few standard floor register sizes. Knowing these can help you check what’s common and find replacements easily.
Here are the most popular sizes:
- 4 x 10 inches
- 4 x 12 inches
- 6 x 10 inches
- 6 x 12 inches
- 8 x 10 inches
- 8 x 12 inches
If your measurements match these, you’ll have many options. If not, you may need to special order.
Here’s a quick overview of how common sizes compare in opening and grill dimensions:
| Register Size (inches) | Best Room Type | Typical Grill Size (inches) |
|---|---|---|
| 4 x 10 | Bedroom, hallway | 5.5 x 11.5 |
| 4 x 12 | Living room, kitchen | 5.5 x 13.5 |
| 6 x 12 | Large living area | 7.5 x 13.5 |
Non-obvious tip: If you have a 4 x 10 register but want more airflow, check if your duct can be safely enlarged before switching to a bigger size. Never force a larger register into a small opening.

Credit: www.youtube.com
Mistakes People Often Make When Measuring
Even experienced DIYers can make errors. Here are the most common mistakes:
- Measuring the grill, not the duct opening: This leads to ordering registers that won’t fit.
- Mixing up width and length: Always list width first, then length.
- Not checking for obstructions: Nearby wires, nails, or uneven flooring can block proper seating.
- Assuming all registers are the same: Registers for walls, ceilings, and floors are not interchangeable.
- Ignoring depth: Some filter or damper registers need more space below the floor.
- Not double-checking measurements: A simple re-check can save you time and money.
Pro insight: Even professional contractors sometimes forget to measure the opening if the old register is missing. Always measure the *physical opening* in the floor.
Special Situations: How To Measure For Unique Cases
Sometimes, you’ll run into situations that require extra care or different steps.
Measuring For Carpeted Floors
Carpet can make the duct opening seem smaller than it is. Press the tape measure gently through the carpet fibers to get the true opening size.
Tip: If you’re installing new carpet, remove the register during installation and measure the bare opening.
Measuring For Wood Or Tile Floors
Hard flooring sometimes overlaps the edge of the duct. Make sure you’re measuring the *true opening*, not just the visible hole.
Tip: If the register sits above the floor, standard sizes usually fit. If it’s flush, you may need a custom register.
Measuring For Irregular Or Damaged Openings
If the opening isn’t a perfect rectangle, measure the longest width and length. You may need a custom register or use a slightly larger grill to cover gaps.
Tip: Don’t try to force a register into a hole that’s too small—enlarge the opening if needed, but check for structural issues first.
Measuring For Historic Or Vintage Homes
Old homes often have non-standard register sizes. Carefully measure both width and length, and consider custom solutions.
Insight: Some vintage registers are valuable. If possible, restore rather than replace.

Credit: floor-resources.blogspot.com
How To Choose The Right Floor Register After Measuring
Once you have your measurements, you’ll need to pick a register that matches your needs. Here’s what to consider:
Material
Common options include:
- Steel: Durable and affordable.
- Aluminum: Lightweight, resists rust.
- Wood: Attractive, matches floors, but less durable.
- Plastic: Budget-friendly, but may not last as long.
Pro tip: For high-traffic areas, metal is usually best.
Style And Finish
Registers come in many designs—simple, ornate, modern, and more. Choose a finish that matches your décor (white, brown, black, brushed nickel, etc. ).
Airflow Control
Some registers have adjustable dampers to control airflow. Others are fixed grills.
- Adjustable: Good for rooms that get too hot or cold.
- Fixed: Simpler, but no airflow control.
Ease Of Cleaning
Registers with removable grills or filters are easier to clean, which helps with allergies and dust.
Price
Standard sizes and materials are cheaper. Custom, ornate, or wood registers cost more.
Non-obvious tip: Don’t sacrifice airflow for looks. Some decorative registers block more air, making your HVAC system less efficient.
Installation: Tips For A Perfect Fit
Measuring correctly is only part of the process. Installing your register the right way is just as important.
- Clean the opening: Remove dust, debris, and old screws.
- Check the fit: Place the new register in the opening before final installation.
- Secure if needed: Some registers have holes for screws; others simply drop in.
- Test the damper: If your register has an adjustable vent, make sure it opens and closes smoothly.
- Check for gaps: The register should cover the opening completely with no large gaps.
Expert insight: If the register rocks or moves, add a thin weatherstrip underneath the grill edge for a tighter fit.
How To Measure For Wall And Ceiling Registers (bonus Section)
Although the focus here is floor registers, many homes have wall or ceiling registers. The measurement process is similar, but there are a few extra tips.
- Remove the old register and measure the wall or ceiling opening.
- Check the depth—some wall registers need a deeper box.
- Note the screw hole placement if you want to reuse existing holes.
Caution: Never install a floor register in a wall or ceiling location. They are built differently and may not attach securely.
For more details on HVAC standards, visit the HVAC Wikipedia page.
Maintaining Your Floor Registers
After installation, keeping your registers clean and in good shape will help your HVAC system last longer.
- Vacuum regularly: Dust and pet hair can block airflow.
- Wipe with a damp cloth: For metal or plastic grills.
- Check for rust or damage: Replace damaged registers to avoid injury or poor performance.
- Replace filters: If your register includes a filter, change it as recommended.
Non-obvious tip: Registers in high-humidity areas (like bathrooms) should be checked for rust or mold regularly.
Quick Reference: Measuring Floor Registers Checklist
Here’s a simple summary for quick reference:
- Remove the old register (if present).
- Measure the duct opening (width x length).
- Note the depth if using a damper or filter register.
- Check for obstructions or floor issues.
- Measure the grill face (optional).
- Double-check and record all measurements.
- Choose material, style, and features based on your needs.
Frequently Asked Questions
How Do I Know If I Measured My Floor Register Correctly?
Always measure the *duct opening*—not the outer grill. Use a tape measure, write down width first, then length. Double-check both numbers. If your measurement matches a standard size (like 4 x 10), you’re likely correct.
Can I Use A Wall Or Ceiling Register For The Floor?
No. Wall and ceiling registers are not designed to handle foot traffic and may not fit securely in the floor. Always use registers made for floor use.
What If My Duct Opening Is Not A Standard Size?
You may need to order a custom register. Measure the exact width and length, then contact a manufacturer or local hardware store for custom options. Be ready for a higher price and longer wait time.
Do I Need To Measure The Depth Of The Duct Opening?
Usually not, unless you’re buying a filter or damper register that sits inside the opening. For most standard registers, only width and length matter.
How Often Should I Replace Or Clean My Floor Registers?
Clean registers every few months or more often if you have pets or allergies. Replace registers if they are damaged, rusty, or if the damper no longer works.
Measuring floor registers correctly saves you time, money, and energy. By following these steps and avoiding common mistakes, you’ll enjoy better comfort and efficiency in your home for years to come.
Credit: www.reggioregister.com