Making your refrigerator flush with your cabinets can transform your kitchen’s look. This design gives your kitchen a seamless, modern feel and makes the space look larger and more organized. However, achieving this effect is not as simple as just pushing the fridge back. It involves careful planning, the right tools, and sometimes even construction work. Many people start this project, only to find out halfway that their refrigerator sticks out, the doors can’t open properly, or the cabinet trim gets in the way. If you want a truly built-in look, you need to know what steps to take and what mistakes to avoid.
This guide will help you understand every part of the process, from choosing the right fridge and measuring your space, to modifying cabinets and installing your refrigerator. Whether you are remodeling your kitchen or planning a new one, these steps will show you how to achieve a flush look that is both beautiful and functional.
Why Make Your Refrigerator Flush With Cabinets?
A refrigerator that sits flush with your cabinets doesn’t just look good—it can also add value and convenience to your home. Here’s why many homeowners choose this upgrade:
- Clean, modern appearance: Flush refrigerators line up with the cabinets, creating a smooth, built-in look.
- More usable space: With less protrusion, there’s more room to move and work in your kitchen.
- Easier to clean: No awkward gaps for dust and crumbs to collect.
- Potential resale value: Kitchens are a major selling point. A flush installation can impress buyers and increase your home’s value.
But achieving a perfect fit requires planning. Some refrigerators are designed for this, while others are not. The cabinets may need to be adjusted, and ventilation must be considered to protect your fridge and cabinets from heat.
Choosing The Right Refrigerator
Not every refrigerator can be made flush with cabinets. Picking the right model is the foundation of your project.
Types Of Refrigerators
There are three main refrigerator types to consider:
- Freestanding refrigerators: Most common. These usually stick out past cabinets.
- Counter-depth refrigerators: Shallower than standard models, designed to align with standard cabinets.
- Built-in refrigerators: Made to fit flush or even fully integrated with cabinetry.
| Type | Depth (inches) | Flush Fit Possible? | Cost Range |
|---|---|---|---|
| Freestanding | 30–36 | Difficult | $800–$3,000 |
| Counter-depth | 24–30 | Yes | $1,500–$4,000 |
| Built-in | 24–27 | Yes | $4,000–$10,000+ |
What To Look For
- Cabinet-depth compatibility: Standard cabinets are 24 inches deep. Your fridge must match or be slightly less.
- Door style: French doors, side-by-side, and single-door models open differently. Some need more space to swing.
- Ventilation needs: Built-in fridges often vent at the top or front. Freestanding models usually vent at the back.
- Width and height: Measure your opening carefully. Fridges come in different sizes, so pick one that fits your space.
Non-obvious insight: Some counter-depth fridges still stick out if you don’t count the handles or doors, which can be thicker than the case. Always check the full dimensions, not just the “depth” listed.
Measuring Your Space
Before buying or installing a refrigerator, measure everything carefully—twice. Even a small error can ruin the flush look.
Steps For Accurate Measurement
- Cabinet depth: Standard is 24 inches from the wall to the cabinet front.
- Cabinet opening width: Fridges need some clearance on both sides. Check the manufacturer’s recommendation (usually 0.5–1 inch).
- Opening height: Leave a bit of space at the top for ventilation and installation (typically 1–2 inches).
- Distance to walls: Make sure the doors can open fully without hitting walls or other cabinets.
Measuring Tips
- Use a metal tape measure for accuracy.
- Measure at multiple points (top, middle, bottom) since walls can bow or cabinets may not be perfectly square.
- Note the position of electrical outlets and water lines.
Non-obvious insight: Don’t forget baseboards, crown molding, or under-cabinet lighting, which can eat into your usable space and cause the fridge to stick out unexpectedly.
Preparing Your Cabinets
Getting cabinets ready for a flush refrigerator is often the hardest part. It may involve moving or modifying existing cabinetry.
Adjusting Cabinet Depth
If your cabinets are less than 24 inches deep, you may need to add a filler panel or extend them. If they are deeper, you may need to build out the wall behind the fridge.
- Extending cabinets: Add plywood strips (called “furring strips”) to the wall, then move the cabinets forward.
- Building out the wall: Add drywall or wood panels to the wall behind the fridge.
Modifying Surrounding Cabinets
- Cutting cabinet sides: If the opening is too narrow, remove or trim the side panels.
- Raising the upper cabinet: If the fridge is taller, move or remove the cabinet above it.
- Adding a cabinet above: For a finished look, add a custom cabinet above the fridge. This can also hide ventilation grilles.
Dealing With Floors And Baseboards
Floors are sometimes uneven, or baseboards may block the fridge from sliding back.
- Remove or notch baseboards where the fridge will go.
- Add shims under the fridge if the floor is not level.
Non-obvious insight: Many kitchens have a small step in the floor under the fridge area (such as a subfloor drop). Check before installing, or your fridge could tilt or wobble.
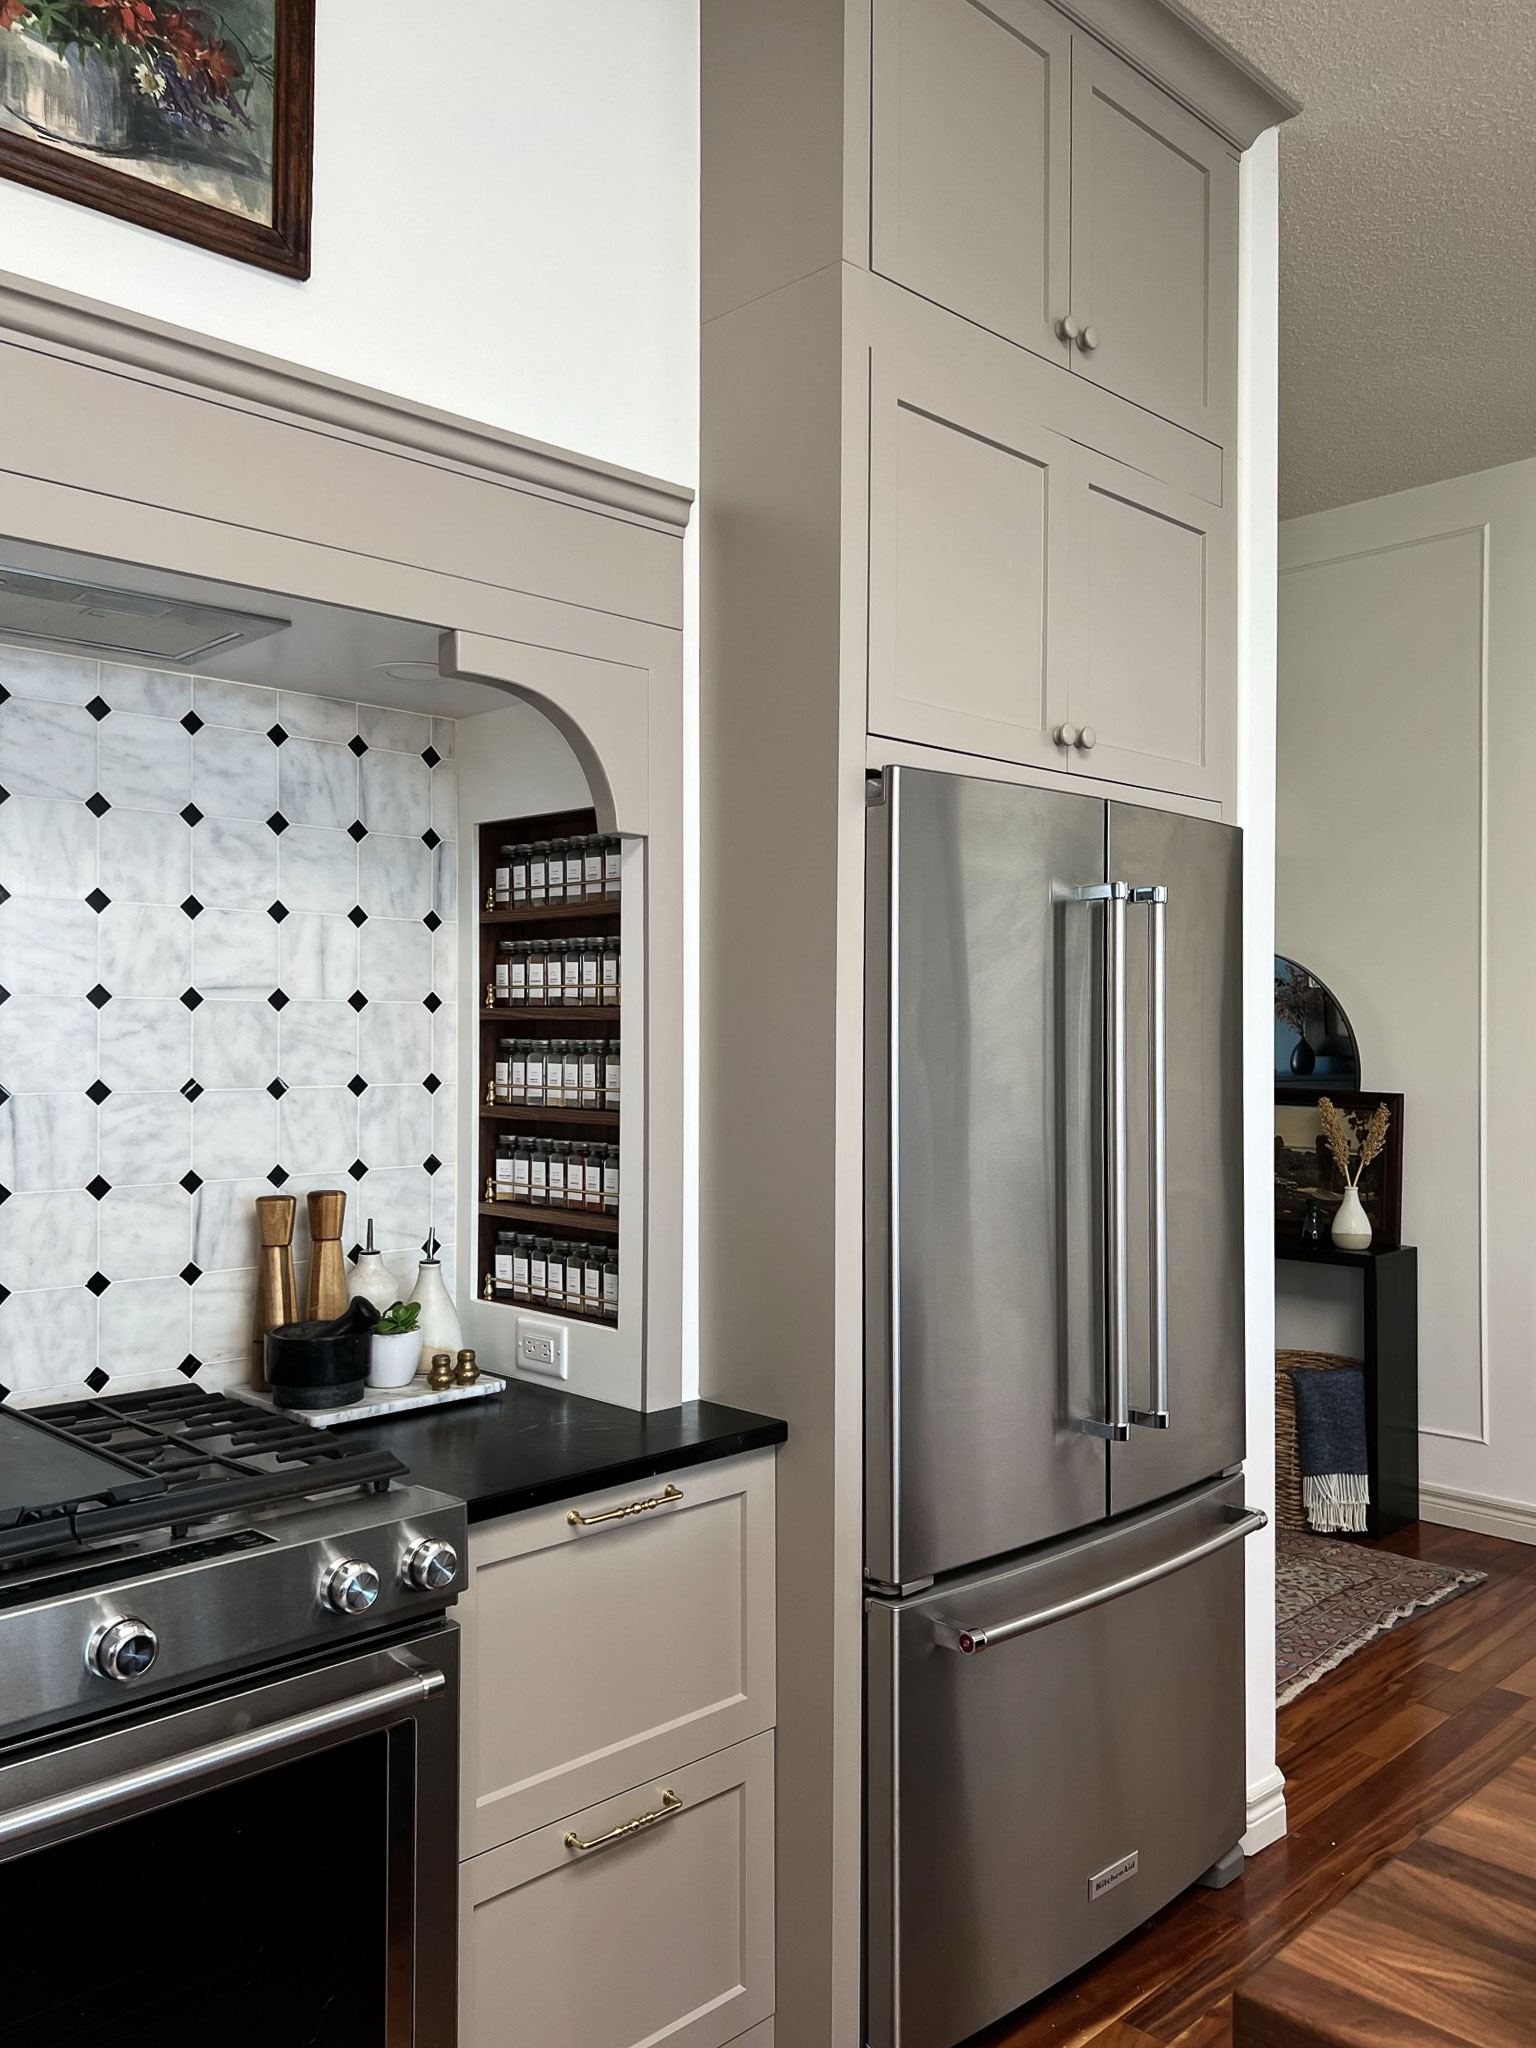
Credit: erinzubotdesign.com
Making Space For Ventilation
All refrigerators need ventilation to avoid overheating. Without proper airflow, the fridge will work harder, use more energy, and may break down early.
Where To Provide Ventilation
- Top: Built-in fridges often need a grille above.
- Sides: Leave a small gap (usually 0.5–1 inch) on each side.
- Back: Freestanding models vent from the back and need more space.
- Front: Some pro-style models vent at the base in front.
Manufacturer Guidelines
Always read your refrigerator’s installation guide. It will specify the minimum clearances for safety and performance.
| Area | Typical Clearance Needed | Reason |
|---|---|---|
| Top | 1–2 inches | Heat rises; allows warm air to escape |
| Sides | 0.5–1 inch | Prevents cabinet rubbing and heat buildup |
| Back | 1–2 inches (freestanding) | Critical for rear-vented units |
| Front | Open grille | Some built-ins vent here |
Pro tip: If your kitchen is very tight, choose a model with front ventilation.
Handling Water And Electrical Connections
Your refrigerator needs power and, if it has an ice maker or water dispenser, a water line. These connections must be easy to reach but also hidden for a clean look.
Planning Connections
- Electrical outlet: Should be behind or next to the fridge, not directly behind the unit where it blocks the fridge from sitting flush. Place it low on the wall or in a side cabinet.
- Water line: Run a flexible water line to a shutoff valve within reach, usually under the sink or in an adjacent cabinet.
Common Mistakes
- Placing the outlet high on the wall, causing the fridge to stick out.
- Using rigid water lines that can kink or break when moving the fridge.
- Not leaving enough slack in the lines for easy maintenance.
Pro tip: Install a recessed electrical box. This allows the plug to sit inside the wall, letting your fridge slide back fully.
How To Install A Refrigerator Flush With Cabinets
Now comes the hands-on part: installing your refrigerator so it is perfectly flush with your cabinets.
Step 1: Prepare The Opening
- Remove all obstacles: Baseboards, trim, old cabinets, and debris.
- Check that the floor is level. Use a long level and shims if needed.
- Make sure the opening is the right size, with proper clearances.
Step 2: Move The Refrigerator Into Place
- Use a furniture dolly or have helpers; refrigerators are heavy and awkward.
- Slide the fridge into the opening, watching for water and power lines.
- Stop when the fridge is about 6 inches from the wall.
Step 3: Connect Water And Power
- Attach the water line, checking for leaks.
- Plug in the fridge. Make sure cords and hoses do not get pinched.
Step 4: Slide The Fridge Back
- Carefully push the fridge back until it is flush with the cabinets.
- Check that it is level (side-to-side and front-to-back).
- Adjust the feet as needed. Most fridges have adjustable legs or rollers.
Step 5: Test The Doors
- Open both doors fully. Make sure they do not hit walls or cabinets.
- Check that all drawers and shelves inside can slide out easily.
Step 6: Install Cabinet Trim
- Add side panels or filler strips if needed for a finished look.
- If you have a cabinet above, install it now.
Step 7: Add Vent Grilles (if Needed)
- Install any required top or bottom grilles for ventilation, as specified by the manufacturer.
Pro tip: Leave a small gap (about the thickness of a credit card) between the fridge and the cabinets. This prevents squeaks and allows for expansion.
Custom Cabinet Solutions
If you want the most seamless look, custom cabinetry is the way to go. This can hide almost all traces of the refrigerator.
Panel-ready Refrigerators
Some built-in fridges are “panel-ready,” meaning you can attach cabinet doors to the front. This makes the refrigerator look like part of the cabinetry.
- Pros: Ultimate seamless look, matches cabinets perfectly.
- Cons: Expensive, requires professional installation.
Custom Side Panels
Custom wood panels can cover the sides of the refrigerator, closing any gaps. These are especially useful if your fridge is slightly narrower than the opening.
Upper Cabinets And Trim
A custom cabinet above the fridge hides the top gap and can hold ventilation grilles or extra storage. Matching trim around the fridge can cover small gaps and create a finished look.
Non-obvious insight: Even with custom cabinets, always leave the manufacturer’s recommended ventilation space. Sealing the fridge too tightly can ruin both the fridge and the cabinets.
Comparing Diy Vs. Professional Installation
Should you install your refrigerator flush yourself or hire a pro? Here’s how they compare:
| Aspect | DIY | Professional |
|---|---|---|
| Cost | Lower (just tools and materials) | Higher (labor + expertise) |
| Skill Needed | Moderate to high (measuring, carpentry, plumbing, electrical) | Low (they handle everything) |
| Time | Can take a full weekend or longer | Often done in a day |
| Risk of Mistakes | Higher (incorrect fit, leaks, damage) | Lower (backed by warranty) |
| Result | Can be excellent if skilled | Usually perfect, professional finish |
Pro tip: If your kitchen is high-end or you want a truly built-in look, professional installation is often worth the cost.
Common Mistakes And How To Avoid Them
Even experienced DIYers can make mistakes when trying to make their refrigerator flush with cabinets.
Overlooking Door Clearance
Some fridges need extra space for the doors to swing open. Not allowing for this can block shelves or drawers inside.
Solution: Check the manufacturer’s specs for door swing and add extra space if needed.
Ignoring Ventilation
Blocking the fridge vents can cause overheating, damage, and void your warranty.
Solution: Always follow the clearance recommendations in your fridge’s manual.
Poor Measurement
A quarter-inch error can ruin your project.
Solution: Measure multiple times and in different spots. If in doubt, make the opening slightly bigger and use trim to cover gaps.
Wrong Electrical/water Placement
Placing outlets or water lines directly behind the fridge can stop it from fitting flush.
Solution: Install outlets and water lines off to the side or in a recessed box.
Using The Wrong Refrigerator Type
Trying to make a deep, freestanding fridge flush will almost always fail.
Solution: Use a counter-depth or built-in model designed for flush installation.

Credit: www.reddit.com
Maintenance Tips For Flush Refrigerators
A flush refrigerator needs a little extra care to keep it running well and looking good.
Keeping Vents Clean
Dust and grease can collect on top and bottom vents, reducing cooling efficiency.
- Vacuum or wipe vents every few months.
- Check that nothing is blocking airflow.
Checking Gaps
Small shifts over time can cause the fridge to rub or make noise.
- Inspect gaps around the fridge once a year.
- Adjust the fridge’s feet or add felt pads if needed.
Protecting Cabinets
Moisture from the fridge can damage wood cabinets.
- Install a drip pan if your fridge makes ice or has a water dispenser.
- Wipe up spills immediately.
Pro tip: For peace of mind, consider a water leak detector under the fridge. These small devices can alert you to leaks before they cause major damage.
Cost Breakdown
Making a refrigerator flush with cabinets has a wide price range depending on the approach.
Typical Costs
- Counter-depth refrigerator: $1,500–$4,000
- Built-in refrigerator: $4,000–$10,000+
- Custom cabinetry/panels: $500–$3,000
- Professional installation: $200–$1,000
Saving Money
- Use a counter-depth fridge instead of a full built-in.
- Do the cabinet modifications yourself if you have carpentry skills.
- Reuse existing upper cabinets by moving them rather than buying new ones.
Non-obvious insight: Some appliance stores offer free delivery and basic installation, which can save you $100–$200.
Is It Worth It?
Making your refrigerator flush with cabinets is a big project, but it can completely change your kitchen. For those who love a modern, clean look or want to increase their home’s value, it is often worth the investment. However, be prepared for the work involved, especially if retrofitting an older kitchen.
If you want more information on kitchen design standards, the National Kitchen & Bath Association offers detailed guidelines for appliances and cabinetry.
Frequently Asked Questions
How Deep Should A Refrigerator Be To Sit Flush With Cabinets?
For a flush fit, the fridge’s case depth (excluding doors and handles) should be about 24 inches, matching standard cabinets. Some doors and handles may stick out a bit, so always check the full depth measurement, not just the case. Built-in or counter-depth models are best for a true flush look.
Can I Make A Regular Refrigerator Flush With Cabinets?
It is difficult. Most freestanding fridges are too deep (30–36 inches) to sit flush with 24-inch cabinets. Trying to push them back may block the doors, vents, or even damage the fridge. It’s better to use a counter-depth or built-in model.
Do I Need A Special Type Of Refrigerator?
Yes, you need a counter-depth or built-in refrigerator. These are designed to line up with cabinets and usually have the right ventilation system for a flush fit. Regular, deep fridges rarely work.
What If My Cabinets Are Not Deep Enough For My Fridge?
You have two options: extend the cabinets using filler panels or build out the wall behind the fridge. Both methods can help, but it is usually easier and better-looking to choose a fridge that matches your cabinet depth.
How Do I Hide The Sides Of My Refrigerator?
You can install custom side panels made from the same material as your cabinets. Some fridges are “panel-ready,” so you can attach matching doors. For a seamless look, use both side panels and upper cabinets or trim.
Making your refrigerator flush with your cabinets is a challenging but rewarding project. With careful planning, the right refrigerator, and attention to detail, you can create a kitchen that looks professionally designed and feels just right for your home.

Credit: www.youtube.com