Building your own dresser drawers can be both satisfying and cost-effective. You get to design a piece that matches your space, choose quality materials, and learn new woodworking skills. Many people think making dresser drawers is difficult, but with clear steps and the right tools, it becomes much easier. In this guide, you’ll learn everything from planning and measuring to assembling, installing, and finishing your dresser drawers. Whether you’re a DIY beginner or someone with some woodworking experience, this article will help you create sturdy and beautiful dresser drawers.
Planning Your Dresser Drawers
Before you begin working with wood, take time to plan. Good planning will save you from mistakes and wasted materials later.
Deciding On Size And Style
First, measure the space where your dresser will go. Think about the height, width, and depth you want. Most dressers have a standard depth of 16 to 20 inches, but you can adjust this to fit your needs. Also, decide how many drawers you want and how deep each one should be. Deeper drawers are good for clothes, while shallow drawers work well for small items like socks or accessories.
When deciding on size, consider who will use the dresser and what will go inside. For example, children’s dressers should not be too tall for safety. If you’re storing bulky sweaters, opt for fewer but deeper drawers. For a bedroom shared by two people, you might want drawers of equal size for easy organization.
Also, think about the style. Do you want a modern, clean look, or something more classic with decorative trim or legs? Sometimes, even small choices, like the edge profile of your drawer fronts or the type of handles, make a big difference in the final appearance.
Choosing A Drawer Construction Method
There are several ways to build drawers. The most common methods are:
- Butt joints: Simple and good for beginners. Two pieces of wood are joined at a 90-degree angle.
- Dovetail joints: Strong and beautiful, but take more time and skill.
- Rabbet joints: Offers a little more strength and a cleaner look than a butt joint.
For most people, butt joints or rabbet joints are enough for dresser drawers. If you want a more professional look, try dovetail joints.
Take into account your available tools and skill level. Dovetail joints, for example, require a jig or careful handwork, and are often used for heirloom or high-use drawers. Butt joints can be completed quickly with just screws and glue. If you decide to try rabbet joints, practice a few cuts on scrap wood first.
Sketching Your Design
Draw a simple sketch of your dresser, including the drawers. Mark all key measurements. This helps you buy the right amount of material and avoid mistakes.
Include details like the thickness of your wood, the size of the handles, and where the slides will go. Even a rough sketch gives you a reference point during cutting and assembly.
Insight: Many beginners skip the sketch, but a clear drawing prevents confusion during building. Even a basic sketch on paper will help you visualize your project.
If you want to go further, use free online design tools or graph paper to draw your dresser to scale. This helps if you plan to build more furniture in the future, as you’ll have a record of what worked.
Materials And Tools You Need
Having the right materials and tools makes building dresser drawers easier and safer.
Wood Selection
Choose a wood that fits your budget and style. Here’s a quick comparison of common options:
| Wood Type | Cost | Strength | Best For |
|---|---|---|---|
| Plywood | Low/Medium | Good | Drawer sides, bottoms |
| Solid Pine | Medium | Good | Drawer fronts, sides |
| Oak or Maple | High | Excellent | Premium drawers |
| MDF | Low | Moderate | Drawer bottoms (not for heavy loads) |
Tip: For most dressers, 1/2” or 3/4” plywood works well for the sides, and 1/4” plywood is good for the bottom.
If you want a painted finish, MDF or poplar can be a good choice for the drawer fronts because it paints smoothly. For a stained look, hardwoods like oak, maple, or cherry show off the grain but cost more.
Hardware
You will need:
- Drawer slides or runners: Metal slides make drawers open smoothly.
- Screws: 1-1/4” or 1-1/2” wood screws are common.
- Wood glue: Adds strength to joints.
- Drawer pulls or knobs: For opening the drawers.
Don’t forget other small items like finishing nails (for attaching bottoms), brads, or felt pads for the base of the dresser. Consider buying extra screws in case some strip or get lost.
Tools
Basic tools:
- Measuring tape
- Pencil
- Square
- Saw (circular saw or table saw)
- Drill/driver
- Clamps
- Screwdriver
- Sander or sandpaper
Optional but helpful:
- Router: For cutting grooves or decorative edges.
- Chisel: For cleaning joints.
- Pocket hole jig: For hidden screws.
Non-obvious insight: Many beginners forget clamps. Clamps are essential for holding parts together while glue dries, leading to stronger joints.
If you don’t own a table saw, some home improvement stores will cut plywood to size for you, which saves time and effort.
Measuring And Cutting The Parts
Accurate measurements and cuts are key to making dresser drawers that fit well and slide smoothly.
Measuring Drawer Parts
For each drawer, you need:
- Front and back pieces
- Two side pieces
- Bottom panel
How To Calculate Drawer Size
Measure the opening where the drawer will fit. Subtract the thickness of the drawer slides (usually 1/2” on each side) from the overall width. For the height, leave a small gap (about 1/8” to 1/4”) so drawers don’t rub.
Example: If your opening is 20” wide and the slides are 1/2” thick each:
- Drawer width = 20” – 1” = 19”
- If your opening is 6” tall, make the drawer about 5-3/4” tall.
It’s important to check the manufacturer’s instructions for your drawer slides. Some require extra room or have a different recommended gap. Always measure twice before cutting, and consider dry-fitting the pieces before assembly.
Cutting The Wood
Mark each piece clearly. Double-check measurements before cutting. A table saw gives straight, accurate cuts, but a circular saw works if you use a guide.
When cutting plywood, use painter’s tape along your cut lines to reduce splintering. Cut slowly and support the wood on both sides to avoid chipping.
Tip: Cut all drawer sides first, then the bottoms. This keeps parts consistent.
If you’re making several drawers, stack the sides together and clamp them before cutting. This helps ensure they are exactly the same length, which leads to smoother installation.
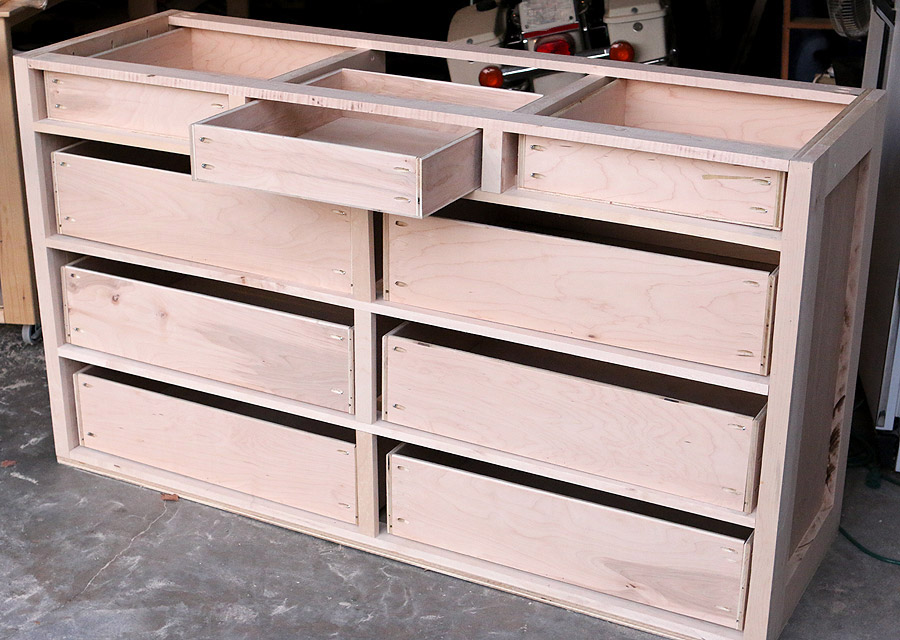
Building The Drawer Box
Now, assemble the parts into a strong, square box.
Making The Box
- Lay out the pieces: Place sides, front, and back on a flat surface.
- Apply wood glue to the ends of the sides.
- Join the front and back pieces to the sides, forming a box.
- Clamp the box and make sure it’s square using a carpenter’s square.
- Drill pilot holes (small holes for screws) to prevent splitting.
- Drive screws through the front and back into the sides.
Take your time squaring the box. Measure from corner to corner in both directions; if the numbers match, your box is square. If not, adjust the clamps before the glue sets.
For rabbet joints, use a router or table saw to cut a small notch at the ends of the sides. For dovetails, use a dovetail jig (this is advanced).
Fitting The Drawer Bottom
Most dresser drawers have the bottom panel set in a groove (called a dado) around the inside of the box.
- Cut a groove (about 1/4” wide and 1/4” deep) along the lower inside edge of the sides, front, and back.
- Slide the bottom panel into the grooves before attaching the final side.
- For heavy loads, consider gluing and nailing the bottom to the box for extra strength.
If you don’t have a router, you can attach the bottom directly to the underside of the box with glue and small nails. This is simpler but not as strong as a groove.
Common mistake: Many beginners try to glue the bottom to the very edge of the drawer. This is weaker and may fail over time. Always use grooves for a longer-lasting drawer.
A helpful detail: Don’t glue the drawer bottom into the grooves on all four sides. Leave one short edge unglued so the panel can expand and contract with changes in humidity, preventing cracks.
Installing Drawer Slides
Drawer slides are important for smooth operation. There are three main types:
| Slide Type | Mount Location | Smoothness | Weight Capacity |
|---|---|---|---|
| Side-mount | Sides of drawer | High | Medium/High |
| Under-mount | Bottom of drawer | Very High | High |
| Center-mount | Center bottom | Moderate | Low/Medium |
Side-mount slides are easiest for beginners. Under-mount slides look cleaner but are more expensive.
How To Install Slides
- Mark the position of the slides inside the dresser. Use a level to keep them straight.
- Screw the slides to the inside walls of the dresser.
- Attach the other part of the slides to the drawer box, lining up with the bottom edge.
- Test fit the drawer. Adjust if needed so it opens and closes smoothly.
Take your time with this step. If the slides are not parallel, the drawer will bind or wobble. Sometimes, it helps to use a wooden spacer or a piece of scrap wood as a guide to keep the slides at the same height for every drawer.
Non-obvious insight: Even a small tilt can make drawers stick. Use a level and spacer blocks for consistent placement.
If you’re installing under-mount slides, you may need to notch the back of the drawer box and drill special holes. Always read the instructions that come with your slides for best results.
Making And Installing Drawer Fronts
The drawer front is the visible part. It can be made from solid wood or plywood.
Cutting The Drawer Front
Cut the front slightly wider and taller than the drawer box. This covers small gaps and gives a clean look. Usually, a 1/8” to 1/4” overhang on all sides works well.
If you want a “flush” look, cut the front exactly the size of the opening. For a more traditional look, let the front overlap the opening slightly.
Attaching The Front
- Drill holes for handles or pulls before attaching the front.
- Center the front on the drawer box. Use playing cards or shims to keep even gaps.
- Clamp the front to the box.
- Screw from inside the drawer box into the drawer front.
- Check alignment with other drawers before tightening all screws.
When installing multiple drawers, start with the bottom drawer and work your way up. This makes it easier to keep gaps even. If you’re using a painted finish, fill screw holes with wood filler before painting.
Adding Handles Or Pulls
Install handles or knobs after the fronts are attached. Measure carefully to keep each pull in the same place.
Tip: For multiple drawers, use a template (a piece of cardboard with holes) to mark handle locations quickly.
If you want to try a modern look, try edge pulls (mounted on the top edge of the drawer front) or recessed pulls.
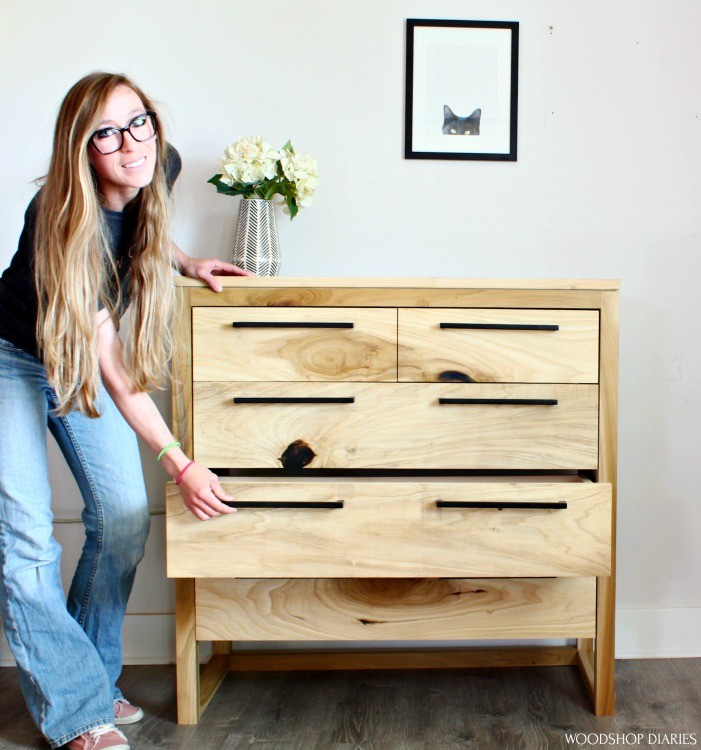
Credit: www.woodshopdiaries.com
Sanding And Finishing
Sanding and finishing protect your drawers and give them a professional look.
Sanding Steps
- Start with coarse sandpaper (80-100 grit) to remove rough spots.
- Move to finer grits (150-220 grit) for a smooth surface.
- Sand all edges to remove sharp corners.
Tip: Sand with the grain of the wood for best results.
Pay special attention to the drawer fronts and top edges, as these are most visible and touched often. A sanding block helps keep surfaces flat and prevents uneven spots.
Finishing Options
- Stain: Brings out wood color and grain.
- Paint: Covers wood completely, offers color choices.
- Clear coat: Protects wood without changing its color (polyurethane is common).
Apply finish with a brush or cloth. Let it dry, then sand lightly and add another coat for a smooth finish.
Practical insight: Always test stain or paint on a scrap piece first. Woods take stain differently, and a test prevents surprises.
For drawers, consider finishing the inside with a clear coat to protect against moisture and stains. Avoid heavy stain or paint inside the drawer, as it can cause clothes to pick up color or odor.
Common Problems And How To Solve Them
Even experienced builders face challenges. Here’s how to handle the most common issues.
Drawer Doesn’t Slide Smoothly
- Check for level slides: Use a level to adjust.
- Wax the slides: Rubbing candle wax or soap helps wood slides glide.
- Check for tight spots: Sand edges if the fit is too snug.
Sometimes, a drawer will stick only when loaded. Test with some weight inside, and sand or adjust as needed.
Drawer Bottom Sags
- Use thicker plywood: Upgrade from 1/4” to 3/8” or add a center support.
- Add glue and brads: Secure the bottom more firmly to the sides.
If you store heavy items, like books, consider a solid wood or thicker plywood bottom for extra strength.
Drawer Isn’t Square
- Re-check measurements: Use a square during assembly.
- Adjust clamps: Clamp the box square before screwing.
If you notice the drawer is out of square after assembly, try loosening the screws slightly and adjusting before the glue fully sets.
Front Isn’t Aligned
- Loosen screws: Realign before tightening.
- Use shims: Playing cards are good for adjusting gaps.
A small gap looks better than a tight fit that causes rubbing. Take your time with alignment, as it affects the final look.
Safety Tips For Making Dresser Drawers
Woodworking is safe if you follow simple rules:
- Wear safety glasses to protect your eyes.
- Keep fingers clear of saw blades and drills.
- Work in a clean area to avoid tripping or knocking over tools.
- Unplug power tools when changing blades or bits.
- Use hearing protection if tools are loud.
Non-obvious insight: Dust from sanding can be harmful. Wear a dust mask and keep your work area well-ventilated.
Keep a first-aid kit nearby, and never rush when using sharp or spinning tools.
Customizing Your Dresser Drawers
Making your own dresser drawers means you can add features that store-bought furniture doesn’t offer.
Soft-close Slides
Install soft-close slides for a luxury feel. These make drawers close quietly and gently.
Soft-close slides are especially useful in bedrooms or kids’ rooms, where you want to avoid slamming.
Dividers And Organizers
Add dividers inside drawers to keep things organized. Use thin strips of wood or buy ready-made organizers.
For example, create sections for socks, jewelry, or office supplies. Removable dividers allow you to reconfigure as your needs change.
Decorative Fronts
Try adding trim, molding, or different finishes to the drawer fronts for a unique look.
Mixing two colors or stains can create a modern or vintage style. You can also rout decorative edges or add wallpaper to the front panels.
Hidden Drawers
Make a shallow drawer behind a regular drawer front for valuables or small items.
Hidden compartments are great for jewelry or important documents. Plan the space carefully so it doesn’t interfere with the main drawer’s function.
Insight: Custom features often cost little extra but make your dresser far more useful and attractive.

Credit: www.woodgears.ca
Cost And Time Estimates
Knowing what to expect helps you plan your project.
| Item | Estimated Cost | Time Needed |
|---|---|---|
| Materials (wood, hardware, finish) | $80 – $200 | – |
| Basic tools (if not owned) | $100 – $250 | – |
| Build one drawer | – | 2 – 4 hours |
| Build full dresser (5-6 drawers) | – | 1 – 2 weekends |
Building your own dresser drawers is usually cheaper than buying a high-quality dresser, especially if you already own some tools.
Remember, time estimates depend on your skill level and the number of features you add. Custom details or finishing can add a few more hours, but the final result is worth it.
Practical Tips For Success
- Buy extra wood: Mistakes happen, so get a little more than you need.
- Label parts: Mark each piece to avoid confusion during assembly.
- Double-check measurements: “Measure twice, cut once” saves time and money.
- Work slowly: Rushing leads to mistakes.
- Ask for help: Heavy parts or large dressers are easier with a second person.
Another tip is to keep a notebook of your process, especially if you plan to build more furniture. Write down what worked and what didn’t, and keep your sketches for future reference.
Final Checks Before Use
Before filling your new dresser drawers, check:
- All screws are tight.
- Drawers open and close smoothly.
- Finish is completely dry.
- Handles and pulls are secure.
If everything works well, your dresser is ready for use.
Pro tip: Place felt pads on the bottom corners of your dresser to protect floors and make moving easier.
For extra safety, especially in homes with children, anchor your dresser to the wall to prevent tipping.
Where To Learn More
If you want to see video tutorials or explore different joinery methods, websites like Woodworker’s Journal offer excellent guides for all skill levels.
Watching others build can give you ideas and help you avoid mistakes. Don’t hesitate to join online forums or local woodworking groups for advice and support.
Credit: jenwoodhouse.com
Frequently Asked Questions
How Thick Should Dresser Drawer Sides Be?
For most dressers, 1/2” to 3/4” thick wood is best for drawer sides. Thicker sides add strength, but 1/2” plywood is enough for most home use. If you want heavy-duty drawers, use 3/4”.
Can I Use Mdf For Dresser Drawers?
MDF (medium-density fiberboard) is okay for drawer bottoms or drawer sides in light-duty furniture. However, it’s not as strong as plywood or solid wood, especially for large or heavy drawers. Use plywood for best results.
What’s The Easiest Drawer Joint For Beginners?
A butt joint with wood glue and screws is easiest for beginners. It’s quick, strong enough for most dressers, and doesn’t require special tools. If you want to try something stronger, rabbet joints are a simple upgrade.
How Do I Fix A Drawer That Wobbles Or Tilts?
Check that the drawer slides are installed level and evenly spaced. A wobbly drawer often means one slide is higher or lower than the other. Adjust the screws and test again. If the drawer box is not square, loosen the screws, square it up, then retighten.
What Kind Of Finish Is Best For Dresser Drawers?
A clear polyurethane finish is best for protecting wood from scratches and stains. If you want to add color, use wood stain before clear coat. For painted dressers, use a high-quality furniture paint and finish with a clear topcoat.
Building your own dresser drawers is a rewarding project. It saves money, gives you custom storage, and builds your woodworking skills. With careful planning and attention to detail, you’ll have drawers that last for years and look great in any room.