
Building storage that fits under your bed can transform a cluttered room into an organized space. Many people feel they lack enough storage, especially in small apartments or bedrooms. But what if you could use the space under your bed—not just for hiding things, but for neat, easy-to-access drawers? Making underbed storage drawers is a smart project, even for beginners. With careful planning, you can create sturdy, custom-sized drawers that help you manage clothes, shoes, toys, bedding, or anything you want out of sight but close at hand.
This guide walks you through everything you need to know, from measuring your space and choosing materials, to building, finishing, and using your drawers. You’ll learn practical tips, avoid common mistakes, and discover a few insights that most beginners overlook.
Whether you have a twin, queen, or king bed, you’ll see how to build drawers that fit perfectly. Let’s get started on making your bedroom feel bigger and more organized—one drawer at a time.
Understanding Underbed Storage Drawers
Before you pick up any tools, it’s important to understand what underbed storage drawers are and what they can do for you. These are low-profile, pull-out drawers that fit underneath your bed’s frame. Unlike rolling bins or plastic containers, these drawers can be matched to your bed’s size and your room’s style.
Well-made underbed drawers:
- Maximize unused space beneath your bed
- Help organize seasonal clothing, shoes, linens, and more
- Keep dust off your items better than open bins
- Make cleaning under the bed easier (just pull out the drawers!)
- Can be customized with handles, dividers, or even locks
Many store-bought solutions are either too flimsy, too small, or don’t fit your bed. By building your own, you control the quality, size, and look—and you can save money.
Planning Your Project
Success starts with good planning. Skipping this step is one reason DIY drawers sometimes fail. Here’s how to start:
Measure Your Bed And Space
Grab a tape measure and note the following:
- Height from floor to underside of your bed rail or slats
- Distance from one bed leg to the next (length and width)
- Any center supports or crossbars under the bed
Write these numbers down. Remember to leave at least ½ inch (1.3 cm) of clearance above your planned drawer height—wood, wheels, and handles add bulk.
Decide What You’ll Store
Knowing what you want to store helps you pick the right drawer size and number. For example:
- Shoes need shallow drawers (5-6 inches tall)
- Bedding or bulky items need deeper drawers (8-10 inches)
- Toys may need dividers
Stack your items in piles to visualize how much room you’ll need.
Choose The Drawer Configuration
Do you want one long drawer, two side-by-side, or even more? Here’s a quick comparison:
| Option | Best For | Pros | Cons |
|---|---|---|---|
| One Long Drawer | Storing large items | Max space per drawer | Can be heavy to pull |
| Two Drawers | General use | Easier to handle | Less space per drawer |
| Four+ Drawers | Small items, more organization | Lots of sorting options | More building time |
Most people find two drawers per side (for a queen/king) or one per side (for a twin) works best.
Select Materials
Most DIYers use ¾-inch plywood for durability. You can also use MDF, solid wood, or even repurpose old furniture panels. Plywood resists warping and is easy to cut. Don’t forget wheels (casters), screws, wood glue, handles, and paint or stain if you want a polished look.
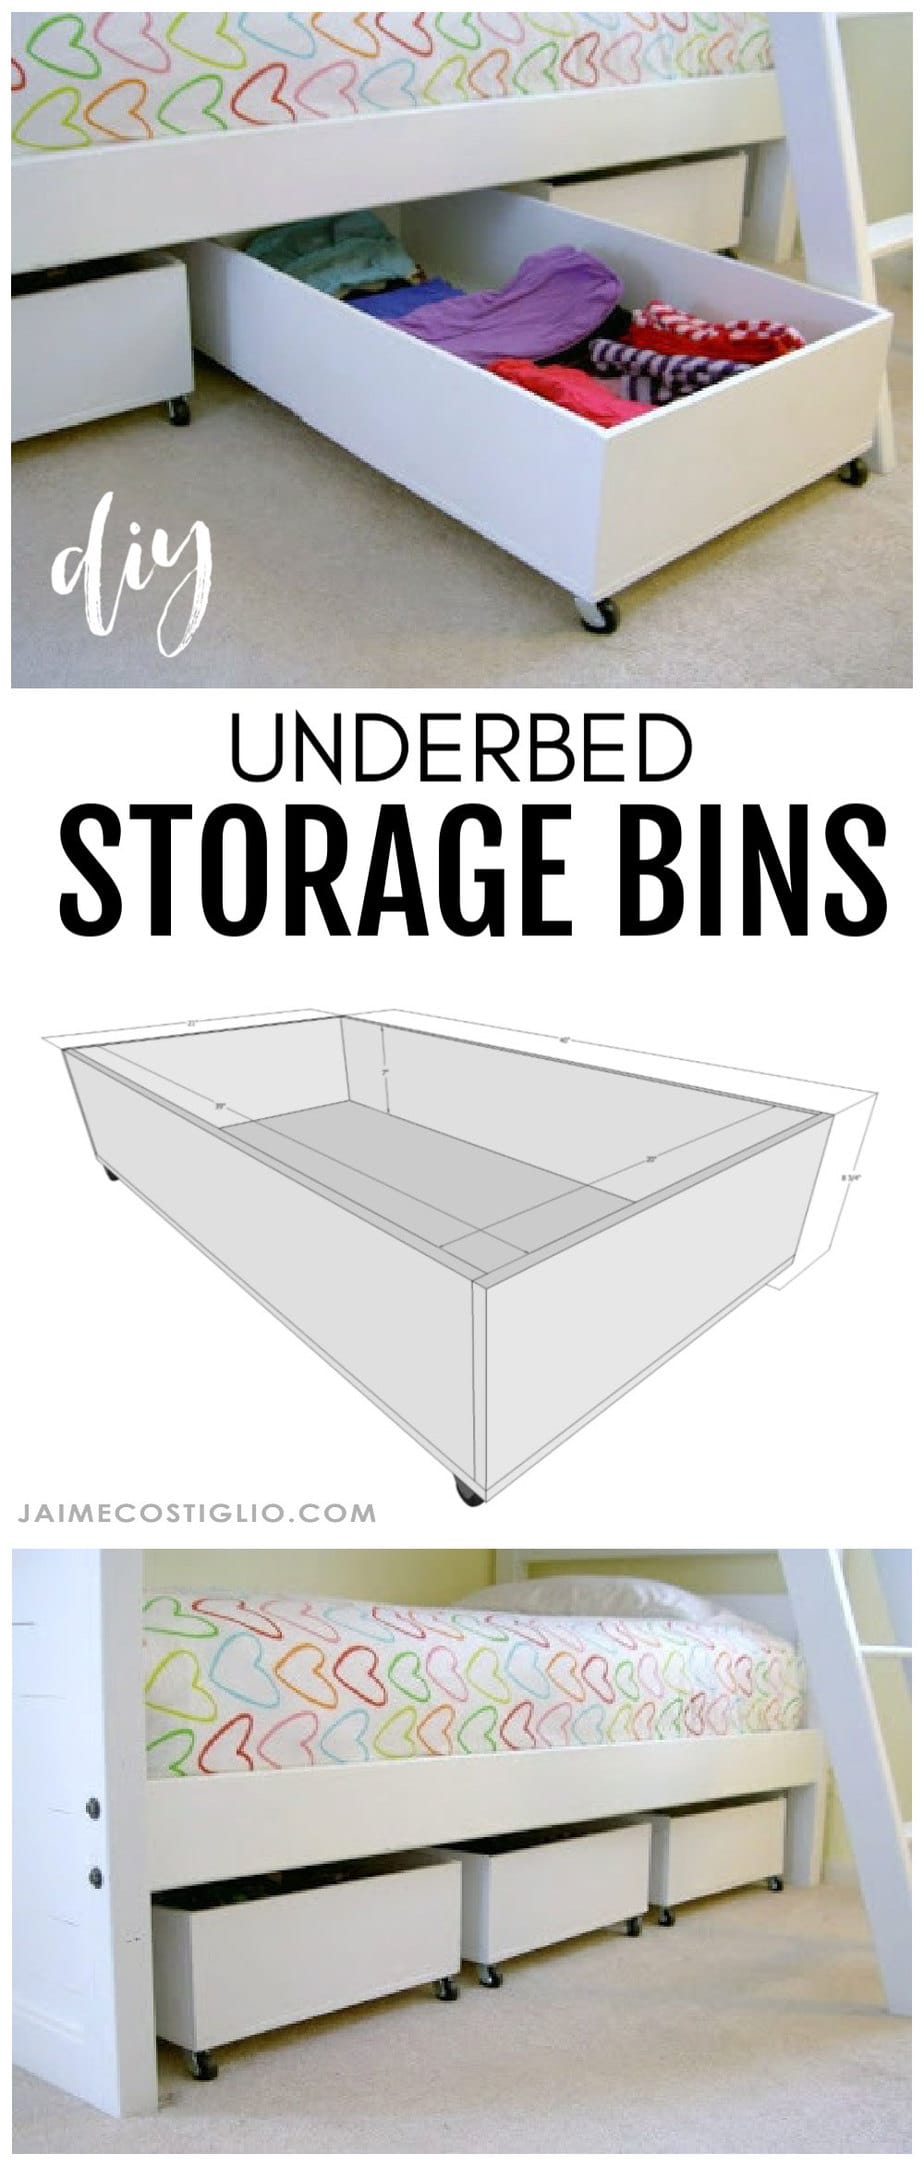
A simple material list for two drawers (each about 36″ L x 24″ W x 7″ H):
- 1 sheet of ¾-inch plywood (4′ x 8′)
- 8 small swivel casters (2 per corner)
- Wood screws (1¼” or 1½”)
- Wood glue
- Sandpaper (120 and 220 grit)
- Paint or stain + brush/roller
- 2 drawer handles
- Drill, saw (circular or table), measuring tape, pencil
Gathering Tools And Supplies
Having the right tools makes the project faster and safer. Here’s what you’ll need:
- Tape measure
- Pencil and straightedge
- Circular saw or table saw (for straight cuts)
- Drill and drill bits
- Screwdriver or drill driver
- Clamps (for holding pieces while gluing)
- Sandpaper or power sander
- Paintbrush or roller
- Safety gear (gloves, goggles, mask)
If you don’t have all these, many home improvement stores offer tool rentals.
Comparing Material Options
Let’s look at three common choices for the drawer box:
| Material | Cost | Durability | Finish Quality |
|---|---|---|---|
| Plywood | $$ | High | Good, easy to paint/stain |
| MDF | $ | Medium | Very smooth, best for paint |
| Solid Wood | $$$ | High | Best, but can warp |
For most people, plywood is the best balance of price, strength, and appearance.
Cutting Your Drawer Pieces
Now it’s time to cut your wood. This step is where precise measuring pays off.
- Mark your cuts: Use your measurements to mark the bottom panel, two side panels, front, and back. For example, for a 36″ x 24″ x 7″ drawer:
- Bottom: 36″ x 24″
- Sides: 24″ x 7″ (two pieces)
- Front/Back: 36″ x 7″ (two pieces)
- Double-check before cutting. Mistakes here are hard to fix later.
- Cut panels: Use a circular saw with a straightedge, or a table saw for best results.
- Sand edges: Smooth all cut edges to prevent splinters.
Non-obvious tip: If your bed has a center support or legs close to the edge, cut the drawers a few inches shorter so they don’t hit anything when pulled out.
Credit: grillo-designs.com
Assembling The Drawer Box
You’re ready to put the box together. This is where your drawer takes shape.
- Lay the bottom panel flat.
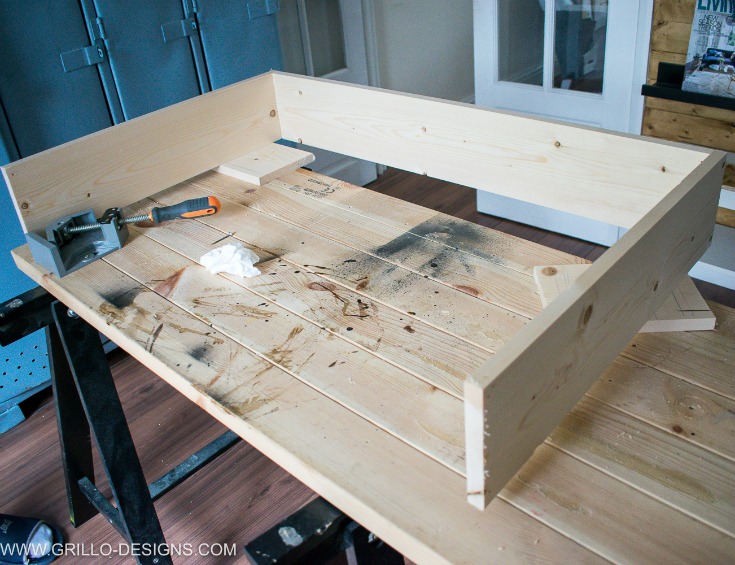
- Attach side panels: Run a line of wood glue along the bottom and ends of the side pieces. Stand them up along each long edge of the bottom panel.
- Attach front and back: Glue and screw these to the ends of the side panels, completing the box shape.
- Secure with screws: Use clamps to hold everything square. Drill pilot holes to prevent splitting, then drive in wood screws every 6-8 inches.
- Wipe off extra glue before it dries.
Let everything dry for at least 30 minutes.
Beginner insight: Always check for “square” by measuring the diagonals—both should be the same. If not, nudge the box until they are before the glue dries.
Installing Wheels (casters)
Wheels make your drawers easy to pull out and push in. Here’s how to add them:
- Flip the drawer box over.
- Mark each corner about 1 inch from each edge.
- Pre-drill holes for the caster screws. This prevents wood from splitting.
- Attach casters with short screws (¾” is ideal). Use at least 2 casters per side; for very long drawers, add a third in the center.
Pro tip: Swivel casters are best—they let the drawer roll straight or at an angle, which helps if your bed isn’t perfectly centered.
Adding The Drawer Front And Handle
For a clean look, you can add a slightly larger front panel that covers the drawer opening, or simply attach a handle to the front edge.
- Cut a front panel about 1 inch taller and wider than the drawer face (if you want an overlay).
- Center it on the box and attach with glue and screws from inside the drawer.
- Drill holes and attach the handle or pull.
Some people skip the handle and cut a “finger hole” instead, but a handle is easier, especially for heavy drawers.
Finishing The Drawer
A smooth finish protects your wood and matches your room’s style.
- Sand all surfaces with 120-grit, then 220-grit sandpaper.
- Wipe away dust with a damp cloth.
- Apply paint, stain, or clear sealer.
- For paint, use primer first.
- For stain, brush on, wait, then wipe off extra.
- For sealer, use two thin coats for durability.
- Let dry fully before using the drawers.
If you want to match your bed or other furniture, bring a sample to the store for the best color match.
Sliding Vs. Rolling: Drawer Movement Choices
There are two main ways your drawers can move—rolling on casters or sliding on felt pads.
- Casters are best for carpet or hard floors; they’re easy to install and roll smoothly.
- Felt pads work for very low beds or when you want a “hidden” look with no wheels. Just stick them to the drawer bottom.
Here’s a quick comparison:
| Movement Type | Best Floor | Noise | Durability |
|---|---|---|---|
| Casters | Carpet/Hardwood | Low | High |
| Felt Pads | Hardwood/Tile | Very low | Medium |
Non-obvious insight: On rough floors, use “soft rubber” casters to protect your wood and make movement quieter.
Making Dividers And Organizers
Want more organization inside your drawers? Add dividers. Cut thin strips of plywood or buy ready-made plastic organizers. Arrange them before attaching—don’t glue until you’re sure you like the setup.
Dividers are especially useful for:
- Shoes (keep pairs together)
- Socks/underwear
- Toys
- Office supplies
Attach with small screws or wood glue, or make them removable for flexibility.
Credit: jaimecostiglio.com
Safety Tips
Even a simple project like this needs safe habits.
- Wear safety goggles when cutting or sanding.
- Use gloves to avoid splinters.
- Always cut on a stable surface.
- Keep your workspace clear of clutter.
- Be careful with power tools and sharp blades.
If you’re working with children, have them help with sanding, painting, or organizing—not cutting or drilling.
Common Mistakes And How To Avoid Them
DIYers often repeat the same errors. Here’s how to sidestep them:
- Measuring wrong: Double-check space under the bed, including any uneven floors.
- Making drawers too big: Leave at least ½ inch clearance on all sides so drawers don’t get stuck.
- Skipping sanding: Rough edges damage sheets and catch on clothing.
- Using weak wood: Thin plywood or particleboard can sag or break.
- Choosing the wrong wheels: Hard plastic casters can scratch floors.
- Not checking for obstacles: Bed legs, center supports, or floor vents can block movement.
- Ignoring finish: Unsealed wood absorbs dust and stains.
Taking your time during each step saves hours of frustration later.
Personalizing Your Drawers
Your drawers don’t have to look boring. Here are ways to add style:
- Paint in bold colors or patterns
- Apply peel-and-stick wallpaper to the front
- Add labels for easy sorting
- Use decorative handles
- Stencil names or icons for kids’ rooms
Personal touches make your drawers feel like a real part of your room, not just an add-on.
Alternative Designs
If you want more features, consider these upgrades:
- Drawer slides: For a “floating” look, install heavy-duty side-mount slides (more work, but very smooth).
- Locking lids: Great for shared spaces or valuables.
- Fabric-lined bottoms: Protects delicate items.
- Soft-close hardware: Prevents slamming.
Each upgrade adds cost and complexity, but also increases usefulness and style.
Caring For Your Underbed Drawers
To keep your drawers working well:
- Vacuum under the bed regularly so wheels don’t pick up dust.
- Check screws and wheels every few months for tightness.
- Repaint or touch up scratches as needed.
- Don’t overload—spread heavy items across multiple drawers.
Well-built drawers can last as long as your bed, or longer.
Example: Building Two Drawers For A Queen Bed
Let’s walk through a real-world example.
- Measure: Under a queen bed, you find 8 inches of height and 80 inches of length.
- Plan: You decide on two drawers, each about 36″ long (allowing for bed legs).
- Cut wood: From one 4×8’ plywood sheet, you cut two bottoms, four sides, four ends, and two fronts.
- Assemble: Glue and screw each box, checking for square.
- Add casters: Four per drawer, 1 inch from each corner.
- Finish: Sand, prime, and paint to match bed.
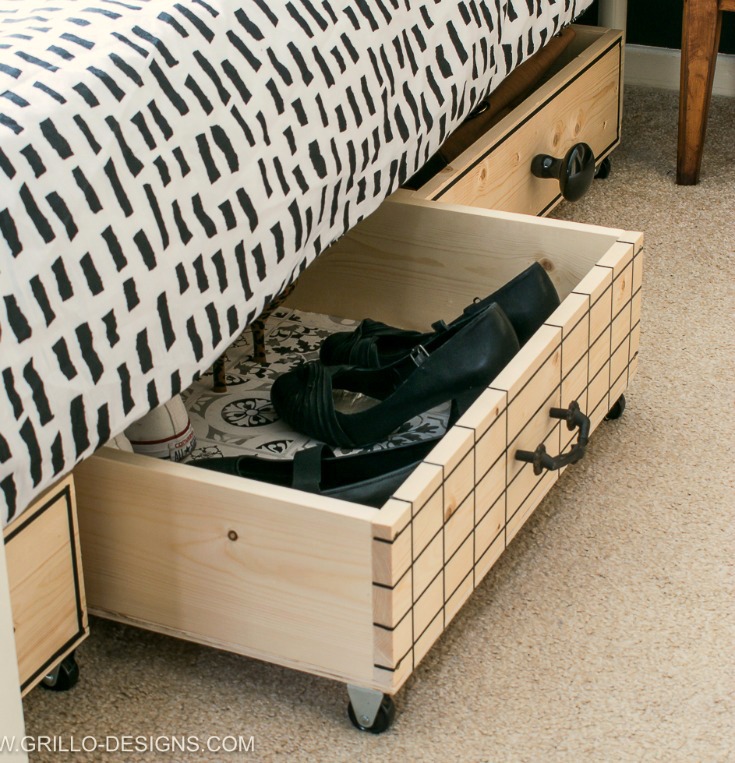
- Install handles: Screw into fronts.
- Organize: Add removable dividers for shoes and bedding.
Result: Neat, sturdy drawers that roll smoothly and keep your room tidy.
Credit: grillo-designs.com
When To Buy Instead Of Build
Sometimes, buying ready-made drawers is smarter. If you lack tools, time, or space to build, search for solid wood or metal drawers online. Look for these features:
- Real wood or heavy-duty plastic
- Smooth-rolling wheels
- Size that matches your bed
- Good reviews for durability
Avoid thin or flimsy drawers—they usually break within a year.
For more info on pre-made options, check reputable sources like Good Housekeeping.
Environmental And Cost Benefits
Making your own underbed drawers is often more eco-friendly. You can use leftover wood, recycled handles, or even repurpose old cabinet parts. DIY also means less packaging waste.
Cost-wise, even with paint and wheels, most people spend $40–$70 for two large drawers—much less than most store-bought options of similar quality.
Frequently Asked Questions
How Much Weight Can Underbed Storage Drawers Hold?
Most homemade underbed storage drawers can hold 50–80 pounds each if built with ¾-inch plywood and quality wheels. The exact weight depends on the wood, wheel type, and how well the drawer is assembled. For very heavy items, add extra casters in the center for support.
Do I Need Special Tools To Build Underbed Drawers?
You only need basic tools: a saw, drill, screwdriver, and tape measure. Power tools make the job faster, but you can do most steps by hand if you’re patient. Renting tools from a hardware store is a good option if you don’t own them.
Can I Build Drawers For Any Bed Size?
Yes, you can make underbed drawers for twin, full, queen, or king beds. Just measure the space under your specific bed and adjust the drawer size accordingly. Always check for any obstacles like center supports or low footboards.
What If My Bed Is Very Low To The Ground?
If your bed is less than 7 inches off the floor, drawers with wheels may not fit. In this case, use felt pads or low-profile sliders instead of casters, or raise your bed with risers. Keep the drawer height lower and avoid bulky handles.
How Do I Keep My Drawers From Collecting Dust?
Drawers with tight-fitting fronts and sealed edges collect less dust than open bins. You can add weatherstrip foam along the top edges for extra protection. Regular cleaning under the bed with a vacuum or mop also helps keep dust away.
With the right plan and careful building, underbed storage drawers can make your bedroom cleaner, more organized, and even more beautiful. Enjoy your new space and the satisfaction of making it yourself!