Making your own kitchen island from base cabinets is an exciting way to add style, extra storage, and more workspace to your kitchen. Many homeowners dream of a kitchen island, but hiring a contractor or buying a custom piece can be expensive.
The good news is, with some planning and basic DIY skills, you can transform standard base cabinets into a beautiful, functional island that fits your space and your needs. This approach saves money, lets you customize every detail, and gives a real sense of accomplishment when you’re done.
This guide walks you through each step, from choosing the right cabinets to adding the finishing touches. You’ll learn important planning tips, discover common mistakes to avoid, and see how small choices can make a big difference. Even if you’re new to DIY projects, this article explains everything in simple language, with practical advice and real examples.
Whether you want a small mobile cart or a large gathering spot, you’ll find all the information you need to make your dream kitchen island a reality.
Why Build A Kitchen Island From Base Cabinets?
A kitchen island built from base cabinets offers several big benefits. First, it’s much cheaper than buying a pre-made island or hiring someone to build one. You can often use stock cabinets from home improvement stores, or even reuse old cabinets left over from a remodel.
This keeps costs low while giving you plenty of design options.
Second, using base cabinets means you can customize the size, layout, and storage. Want deep drawers for pots and pans? Need space for a trash can? Prefer a spot for stools? You decide everything. Many store-bought islands are one-size-fits-all, but building your own lets you create something that works perfectly for your kitchen.
Finally, the DIY approach lets you match your island to your existing cabinets, or try a bold new color and style. You can add a butcher block top, a granite slab, or even a simple laminate counter. With the right finish and hardware, your island will look like it’s always been part of your kitchen.
Planning Your Kitchen Island Project
Before you pick up a tool, careful planning is key. Many people jump in too quickly and run into problems later. Here’s what you need to consider before you start building.
Measure Your Space
Measure your kitchen carefully. The island should fit comfortably, leaving enough room to walk around all sides. A good rule is to leave at least 36 inches of open space on every side of the island. For kitchens where people pass by often, 42-48 inches is even better. This makes cooking, cleaning, and gathering easier and safer.
Take note of doorways, appliances, and cabinets that open. Check if your refrigerator, oven, or dishwasher doors will hit the island when opened. If you want to add seating, make sure there’s enough room to pull out stools and sit comfortably.
Decide On Island Size And Shape
Kitchen islands come in all shapes and sizes. The best size depends on your kitchen’s layout and what you want the island to do. Common sizes for DIY islands include:
- Small: 24-36 inches long, 24 inches deep (great for tiny kitchens)
- Medium: 48-60 inches long, 30-36 inches deep (fits most kitchens)
- Large: 72+ inches long, 36+ inches deep (for big open spaces)
The height of standard base cabinets is 34.5 inches. With a countertop, the finished height is about 36 inches, which is comfortable for most tasks.
If you want a place to sit, you’ll need an overhang on one side. For counter-height seating, plan for a 12-inch overhang.
Pick The Right Cabinets
Most kitchen base cabinets are 24 inches deep and 34.5 inches high. They come in widths from 9 to 48 inches. You can mix and match to fit your space.
- Drawer base cabinets: Great for storing utensils, tools, and small items.
- Door base cabinets: Offer larger spaces for pots, pans, or pull-out organizers.
- Corner base cabinets: Useful for L-shaped or large islands.
Think about how you’ll use your island. If you want it to hold a trash can, recycling, or cleaning supplies, choose a cabinet with enough room. If you want open shelves or display space, mix in an open cabinet or leave one side unfinished.
Choose A Countertop
Your countertop sets the style and function of your island. Popular options include:
- Butcher block: Warm, classic, and great for chopping. Needs regular oiling.
- Laminate: Affordable, easy to install, many colors and patterns.
- Stone (granite, quartz): Durable, stylish, but heavy and expensive.
- Stainless steel: Modern, easy to clean, but can scratch.
Choose a countertop that matches your needs and budget. Remember, stone and heavy tops may need extra support.
Plan For Power And Lighting
Many people forget about electrical outlets when building an island. Having power in your island is handy for small appliances, charging devices, or using mixers and blenders. Check your local building codes—some places require at least one outlet.
For lighting, consider pendant lights or recessed fixtures above the island. Good lighting makes cooking and prep work easier and safer.
Sketch Your Design
Draw a rough sketch of your island, showing the cabinets, countertop, and overhangs. This helps you see the final look and avoid surprises. Some people use online design tools, but graph paper and a pencil work fine.
Include:
- Cabinet sizes and arrangement
- Countertop size and shape
- Location of outlets (if any)
- Seating area (if needed)
Gathering Materials And Tools
Once your plan is set, it’s time to gather everything you’ll need. Here’s a list of common materials and tools for building a kitchen island from base cabinets.
Materials
- Base cabinets (new or recycled, to fit your design)
- Countertop (butcher block, laminate, stone, etc.)
- Filler strips or panels (to cover gaps or exposed sides)
- Toe kick boards (for a finished look at the bottom)
- Screws (wood screws, cabinet screws)
- Wood glue
- L-brackets or corner braces (for extra support)
- Trim or molding (optional, for a custom look)
- Paint or stain (if changing cabinet color)
- Handles or knobs (if updating hardware)
- Leveling feet or shims (for uneven floors)
- Electrical boxes and outlets (if adding power)
Tools
- Drill and bits
- Screwdriver
- Tape measure
- Level
- Stud finder
- Circular saw or jigsaw (for cutting panels or countertop)
- Clamps
- Pencil
- Caulk gun
- Paintbrush or roller (if painting)
- Safety gear (gloves, goggles)
Having the right tools on hand saves time and frustration. Borrow or rent larger tools if you don’t own them.
Step-by-step Guide To Building A Kitchen Island
Now it’s time to build! Follow these steps for a solid, professional-looking kitchen island.
1. Prepare The Cabinets
Start by assembling your base cabinets if they are flat-packed. Remove any old hardware or doors if you plan to paint or refinish them. Clean and sand all surfaces for better paint or stain adhesion.
If your cabinets are different depths or heights, adjust them now. It’s important for the top surfaces to be level, so your countertop sits flat.
2. Arrange The Cabinets
Move the cabinets to the kitchen. Arrange them in the final layout, checking your measurements. Make sure doors and drawers open fully. Use a level to check that all cabinets are even. If your floor is uneven, use shims or leveling feet under the cabinets.
Leave space for any end panels, filler strips, or overhangs you planned. If you’re adding seating, double-check the space is comfortable.
3. Join The Cabinets
With the cabinets in place, fasten them together. Open the doors and drill small pilot holes through the inside walls where the cabinets touch. Use wood screws to connect the cabinets, tightening carefully so they stay aligned.
For extra strength, add L-brackets inside the cabinets at the top and bottom. This keeps the island solid, especially if people lean or sit on it.
4. Secure The Island To The Floor (if Needed)
If your island is large or fixed in place, anchor it to the floor. This prevents tipping and keeps it safe. Find the floor joists with a stud finder. Drill through the cabinet bottom into the joists, using long screws. Don’t anchor to tile or floating floors alone—secure into wood for best results.
For mobile or small islands, you may skip this step. Some people add locking caster wheels for a movable island.
5. Add End Panels, Filler Strips, And Trim
Most cabinets have unfinished sides and backs. Cover these with end panels or pieces of plywood, cut to size. Attach with glue and finish nails for a seamless look.
If there are small gaps between cabinets or walls, use filler strips. Match them to your cabinets for a custom look.
Add trim or molding around the base or top if you want a more finished appearance. This step helps your island blend with the rest of your kitchen.
6. Install The Countertop
Lay your countertop upside down on a soft surface. Mark and cut it to the correct size, allowing for any overhangs. Double-check all measurements before cutting—mistakes can be expensive.
Place the countertop on the cabinets. Check that everything is straight and level. Secure the top from inside the cabinets with short screws or brackets. Be careful not to use screws that are too long, or they may poke through the surface.
For heavy countertops like granite, you may need help lifting and positioning. Some tops require adhesive instead of screws—follow the manufacturer’s instructions.
7. Finish The Base
Install the toe kick at the bottom front of the island. This covers the cabinet legs and gives a polished look. Attach with glue or small finishing nails.
Caulk any gaps where panels meet, and touch up with paint for a clean finish. If you changed hardware, attach the new handles or knobs.
8. Add Electrical Outlets (optional)
If you’re adding electrical outlets, now is the time. This step can be tricky and may require a licensed electrician, depending on your local codes. Plan where you want the outlets and cut openings in the panels.
Run wiring according to code, install the boxes, and secure the outlets. Test everything before using your island. A professional can help ensure safety and code compliance.
9. Paint, Stain, Or Finish
Finally, paint or stain the island to match your kitchen or make it stand out. Use high-quality kitchen paint or a durable stain for best results. Let everything dry completely before using the island.
Add any final touches—decorative panels, hooks for towels, or open shelves for cookbooks.
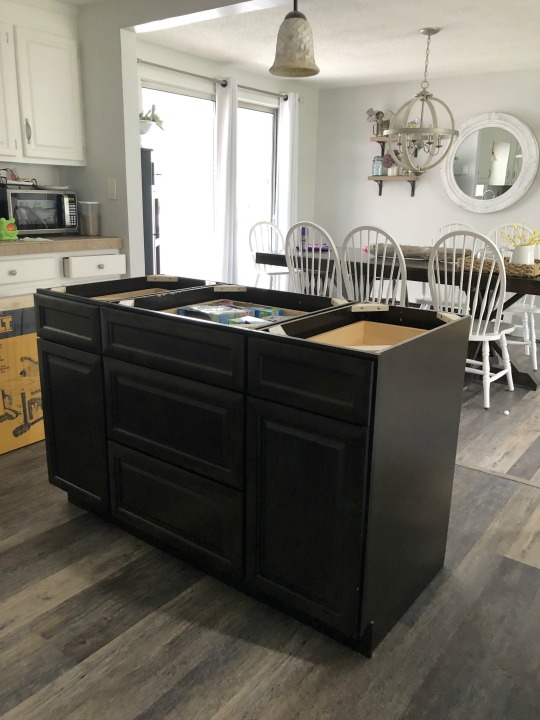
Credit: justcallmehomegirl.com
Comparison: Diy Island Vs Pre-made And Custom Islands
When choosing how to add an island, you have three main options. Here’s how building an island from base cabinets compares to buying a pre-made or custom island.
| Feature | DIY Base Cabinets | Pre-Made Island | Custom Island (Contractor) |
|---|---|---|---|
| Cost | $$ (Affordable) | $$$ (Moderate) | $$$$ (Expensive) |
| Customization | High | Low-Medium | Very High |
| Skill Needed | Basic DIY | None | None |
| Time Needed | 1-3 days | 1 day | 1-2 weeks |
| Style Options | Unlimited | Limited | Unlimited |
| Value Added | High | Medium | High |
DIY islands offer the best balance of cost and customization. Pre-made islands are fastest but may not fit your space or needs. Custom islands offer the most options but are expensive.
Design Ideas And Inspiration
One of the best parts of a DIY kitchen island is making it your own. Here are some creative ideas to make your island unique.
Add Seating
Include an overhang for stools, turning your island into a breakfast bar or homework station. Use contrasting countertop materials, like a wood top with painted cabinets, for a bold look.
Open Shelving
Use one side of the island for open shelves to display cookbooks, bowls, or baskets. This breaks up solid cabinets and adds personality.
Two-tone Design
Paint the island a different color from your main cabinets for a modern feel. Many designers use navy blue, green, or black for islands, paired with white kitchen cabinets.
Built-in Appliances
For advanced DIYers, add a microwave drawer, wine fridge, or small dishwasher. These upgrades need careful planning and sometimes professional help.
Rolling Or Mobile Islands
Install locking caster wheels for a moveable island. Great for small kitchens or renters who want flexibility.
Recycling And Trash Pull-outs
Add a cabinet with pull-out bins for trash and recycling. This keeps the kitchen tidy and organized.
Extra Storage
Use deep drawers, pull-out shelves, or spice racks to maximize every inch of space. Custom organizers can turn a simple island into a powerhouse.
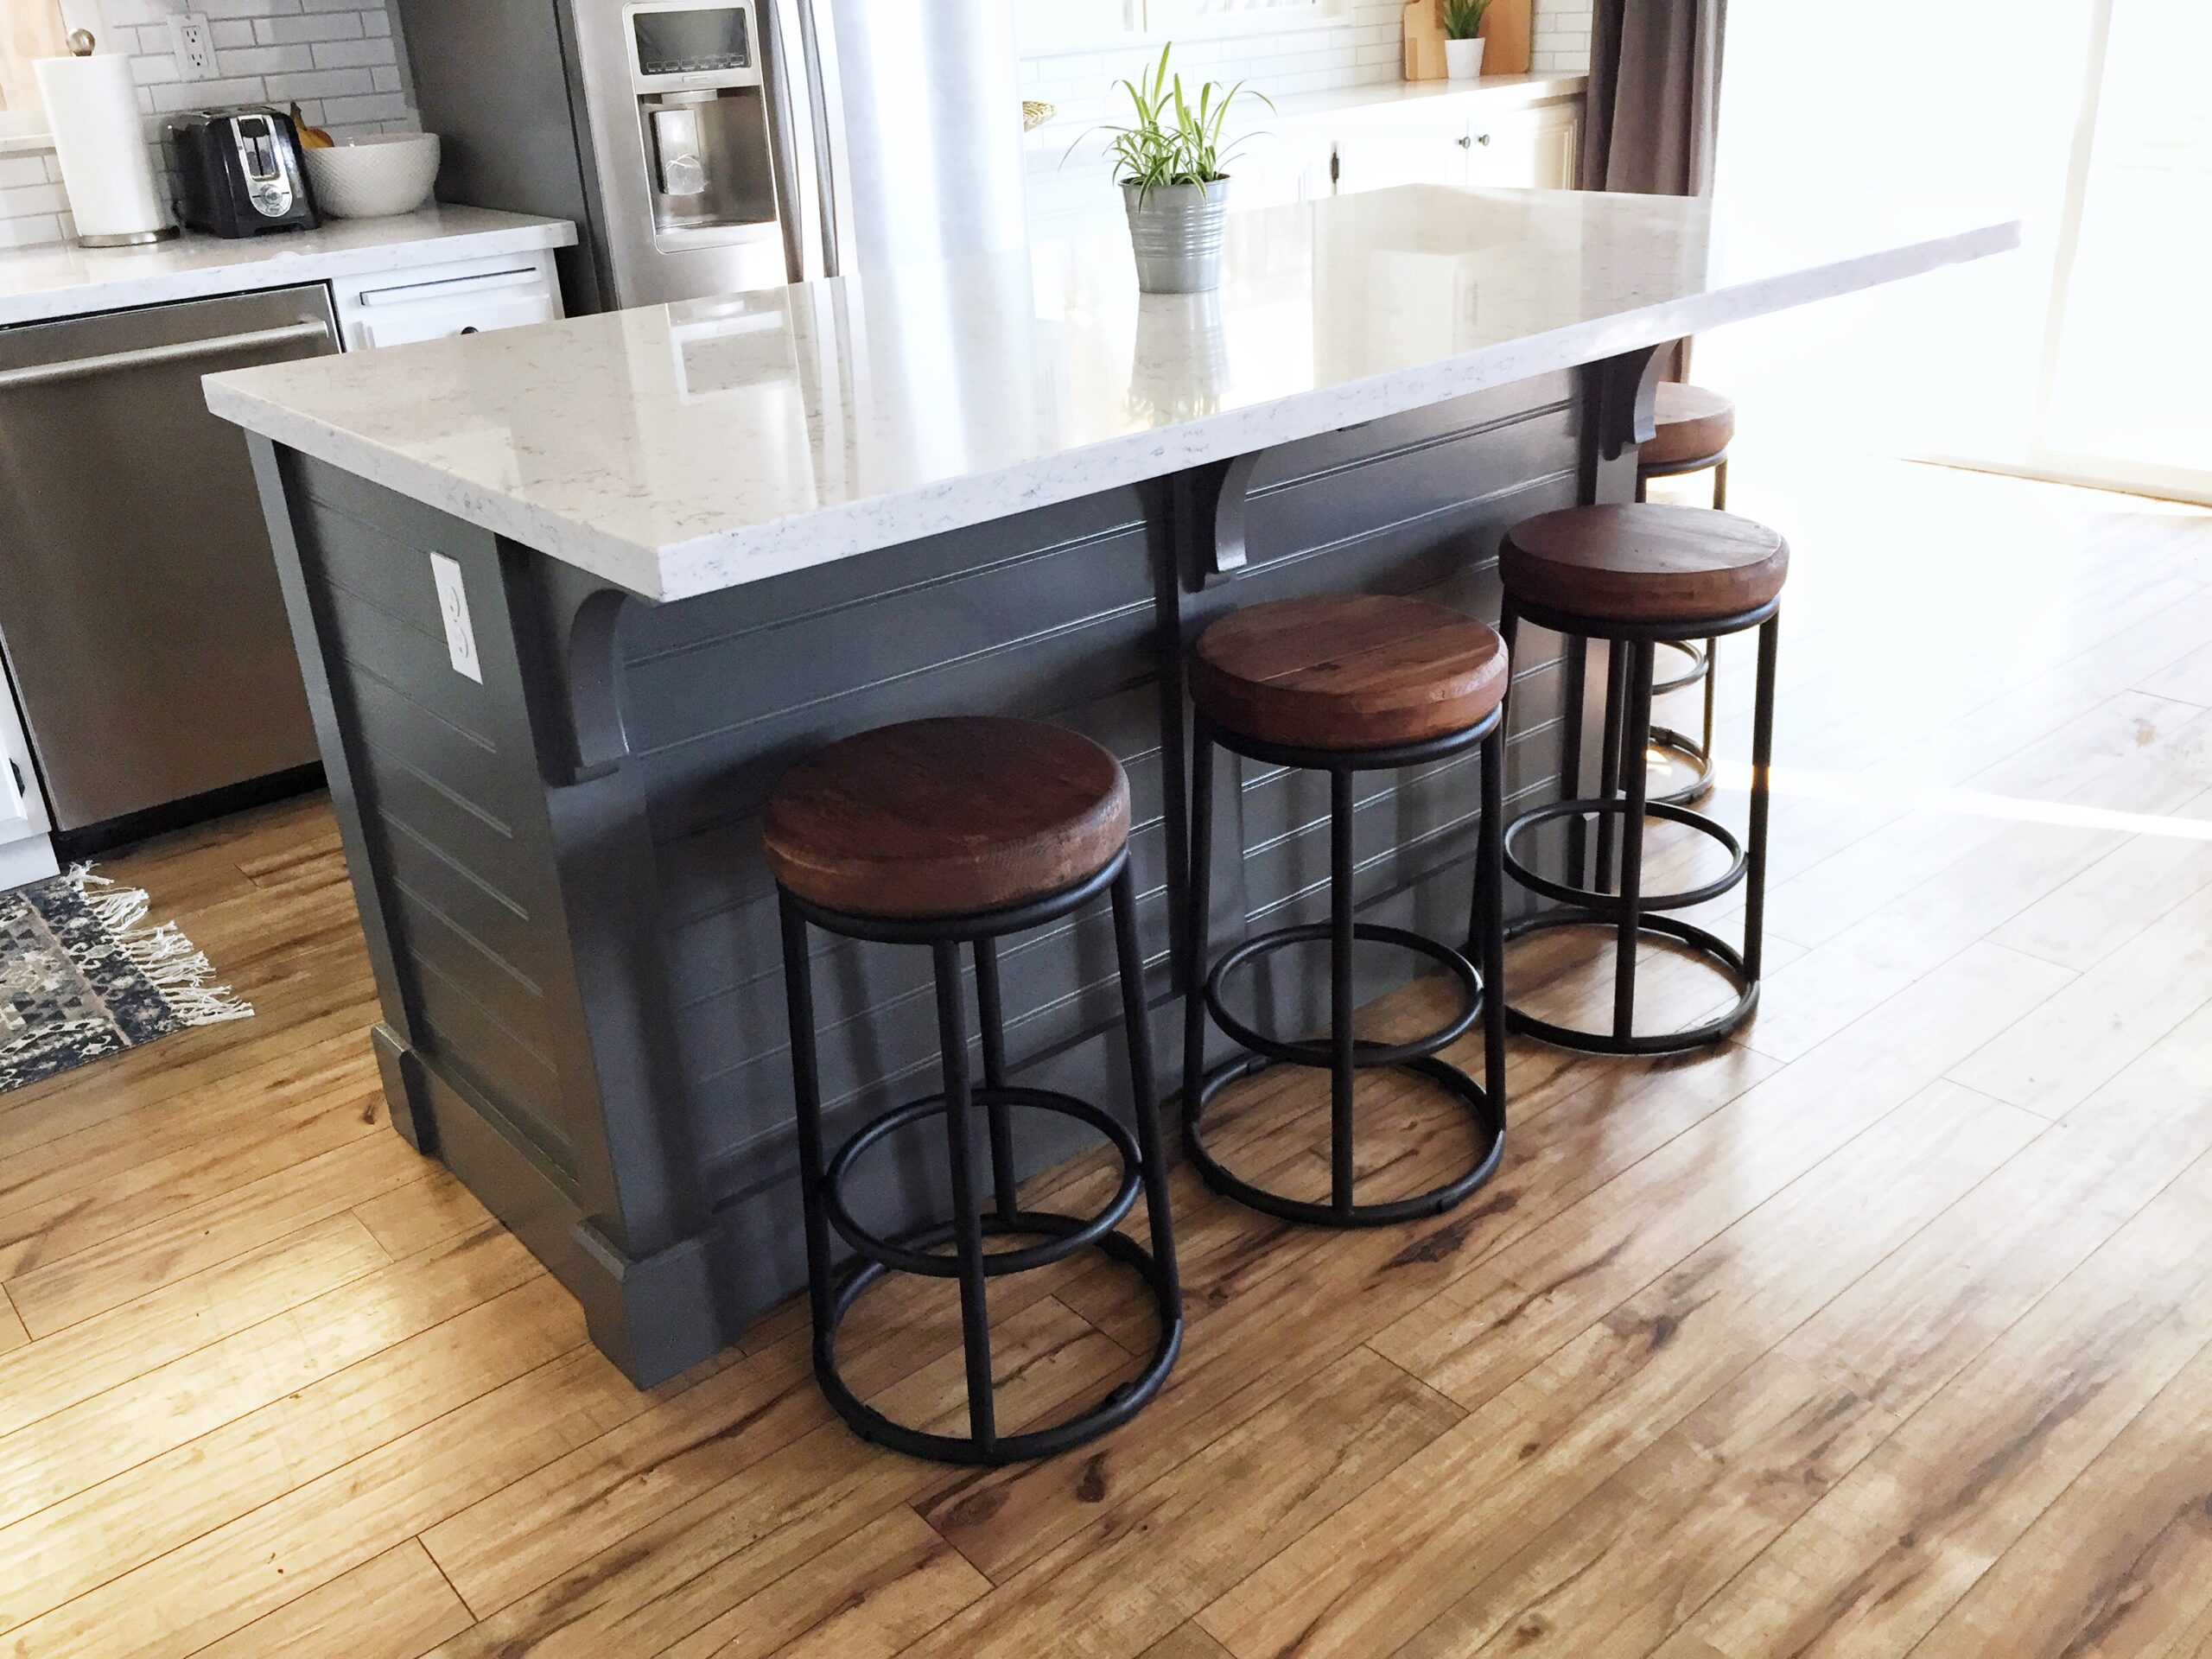
Credit: domesticblonde.com
Common Mistakes And How To Avoid Them
Even experienced DIYers make mistakes. Here are some common problems and how to prevent them.
Not Measuring Correctly
Incorrect measurements lead to islands that don’t fit or block doors. Always measure twice and check clearances for doors and appliances.
Skipping Floor Anchoring
A large island can tip if not anchored, especially with heavy countertops or kids climbing on it. Always secure fixed islands to the floor joists.
Using The Wrong Countertop
Heavy stone tops need strong cabinets and extra support. Don’t use thin or weak cabinets for granite or quartz. For butcher block, seal the top well to prevent stains.
Poor Electrical Planning
Forgetting outlets is a common regret. Plan for power early, and follow code for safety. It’s easier to add outlets before finishing the panels.
Ignoring Style
A mismatched island can look out of place. Take time to match or contrast colors and finishes in a way that feels intentional.
Forgetting Function
An island that looks great but blocks flow or lacks storage won’t be used. Focus on how you cook, eat, and gather in your kitchen.
Estimated Costs For A Diy Kitchen Island
How much will your island cost? Here’s a sample breakdown for a medium-sized island (about 5 feet long):
| Item | Estimated Cost (USD) |
|---|---|
| Base Cabinets (2-3 units) | $300 – $600 |
| Countertop (laminate/butcher block) | $150 – $500 |
| Filler Panels & Trim | $50 – $150 |
| Paint or Stain | $30 – $80 |
| Hardware (pulls, hinges) | $30 – $100 |
| Electrical Outlets (optional) | $50 – $200 |
| Miscellaneous (screws, glue, caulk) | $40 – $70 |
| Total | $600 – $1,700 |
Using recycled cabinets or leftover materials can cut costs further. Stone countertops, built-in appliances, or custom features will increase the budget.
Diy Tips For A Professional Finish
Many beginners miss small details that make a big difference. Here are two key tips:
- Use filler strips and end panels: Don’t skip these! They hide seams, cover raw cabinet edges, and make your island look custom-built.
- Level everything carefully: An uneven island is frustrating to use and can cause countertop cracks. Take time to adjust shims and check with a level from all sides.
A third insight: Pre-finish cabinets and panels before final assembly. It’s easier to paint or stain flat pieces, then touch up seams once installed.
How To Reuse Old Cabinets For An Island
If you’re remodeling, using old base cabinets saves money and reduces waste. Here’s how to get great results:
- Check cabinets for damage or water stains. Replace weak bottoms or warped doors.
- Sand all surfaces well before painting. Old finishes may not hold new paint.
- Add plywood to the back or sides for extra strength. Older cabinets may be less sturdy.
- Upgrade hardware for a fresh look.
With care, old cabinets can become a showpiece in your new island.
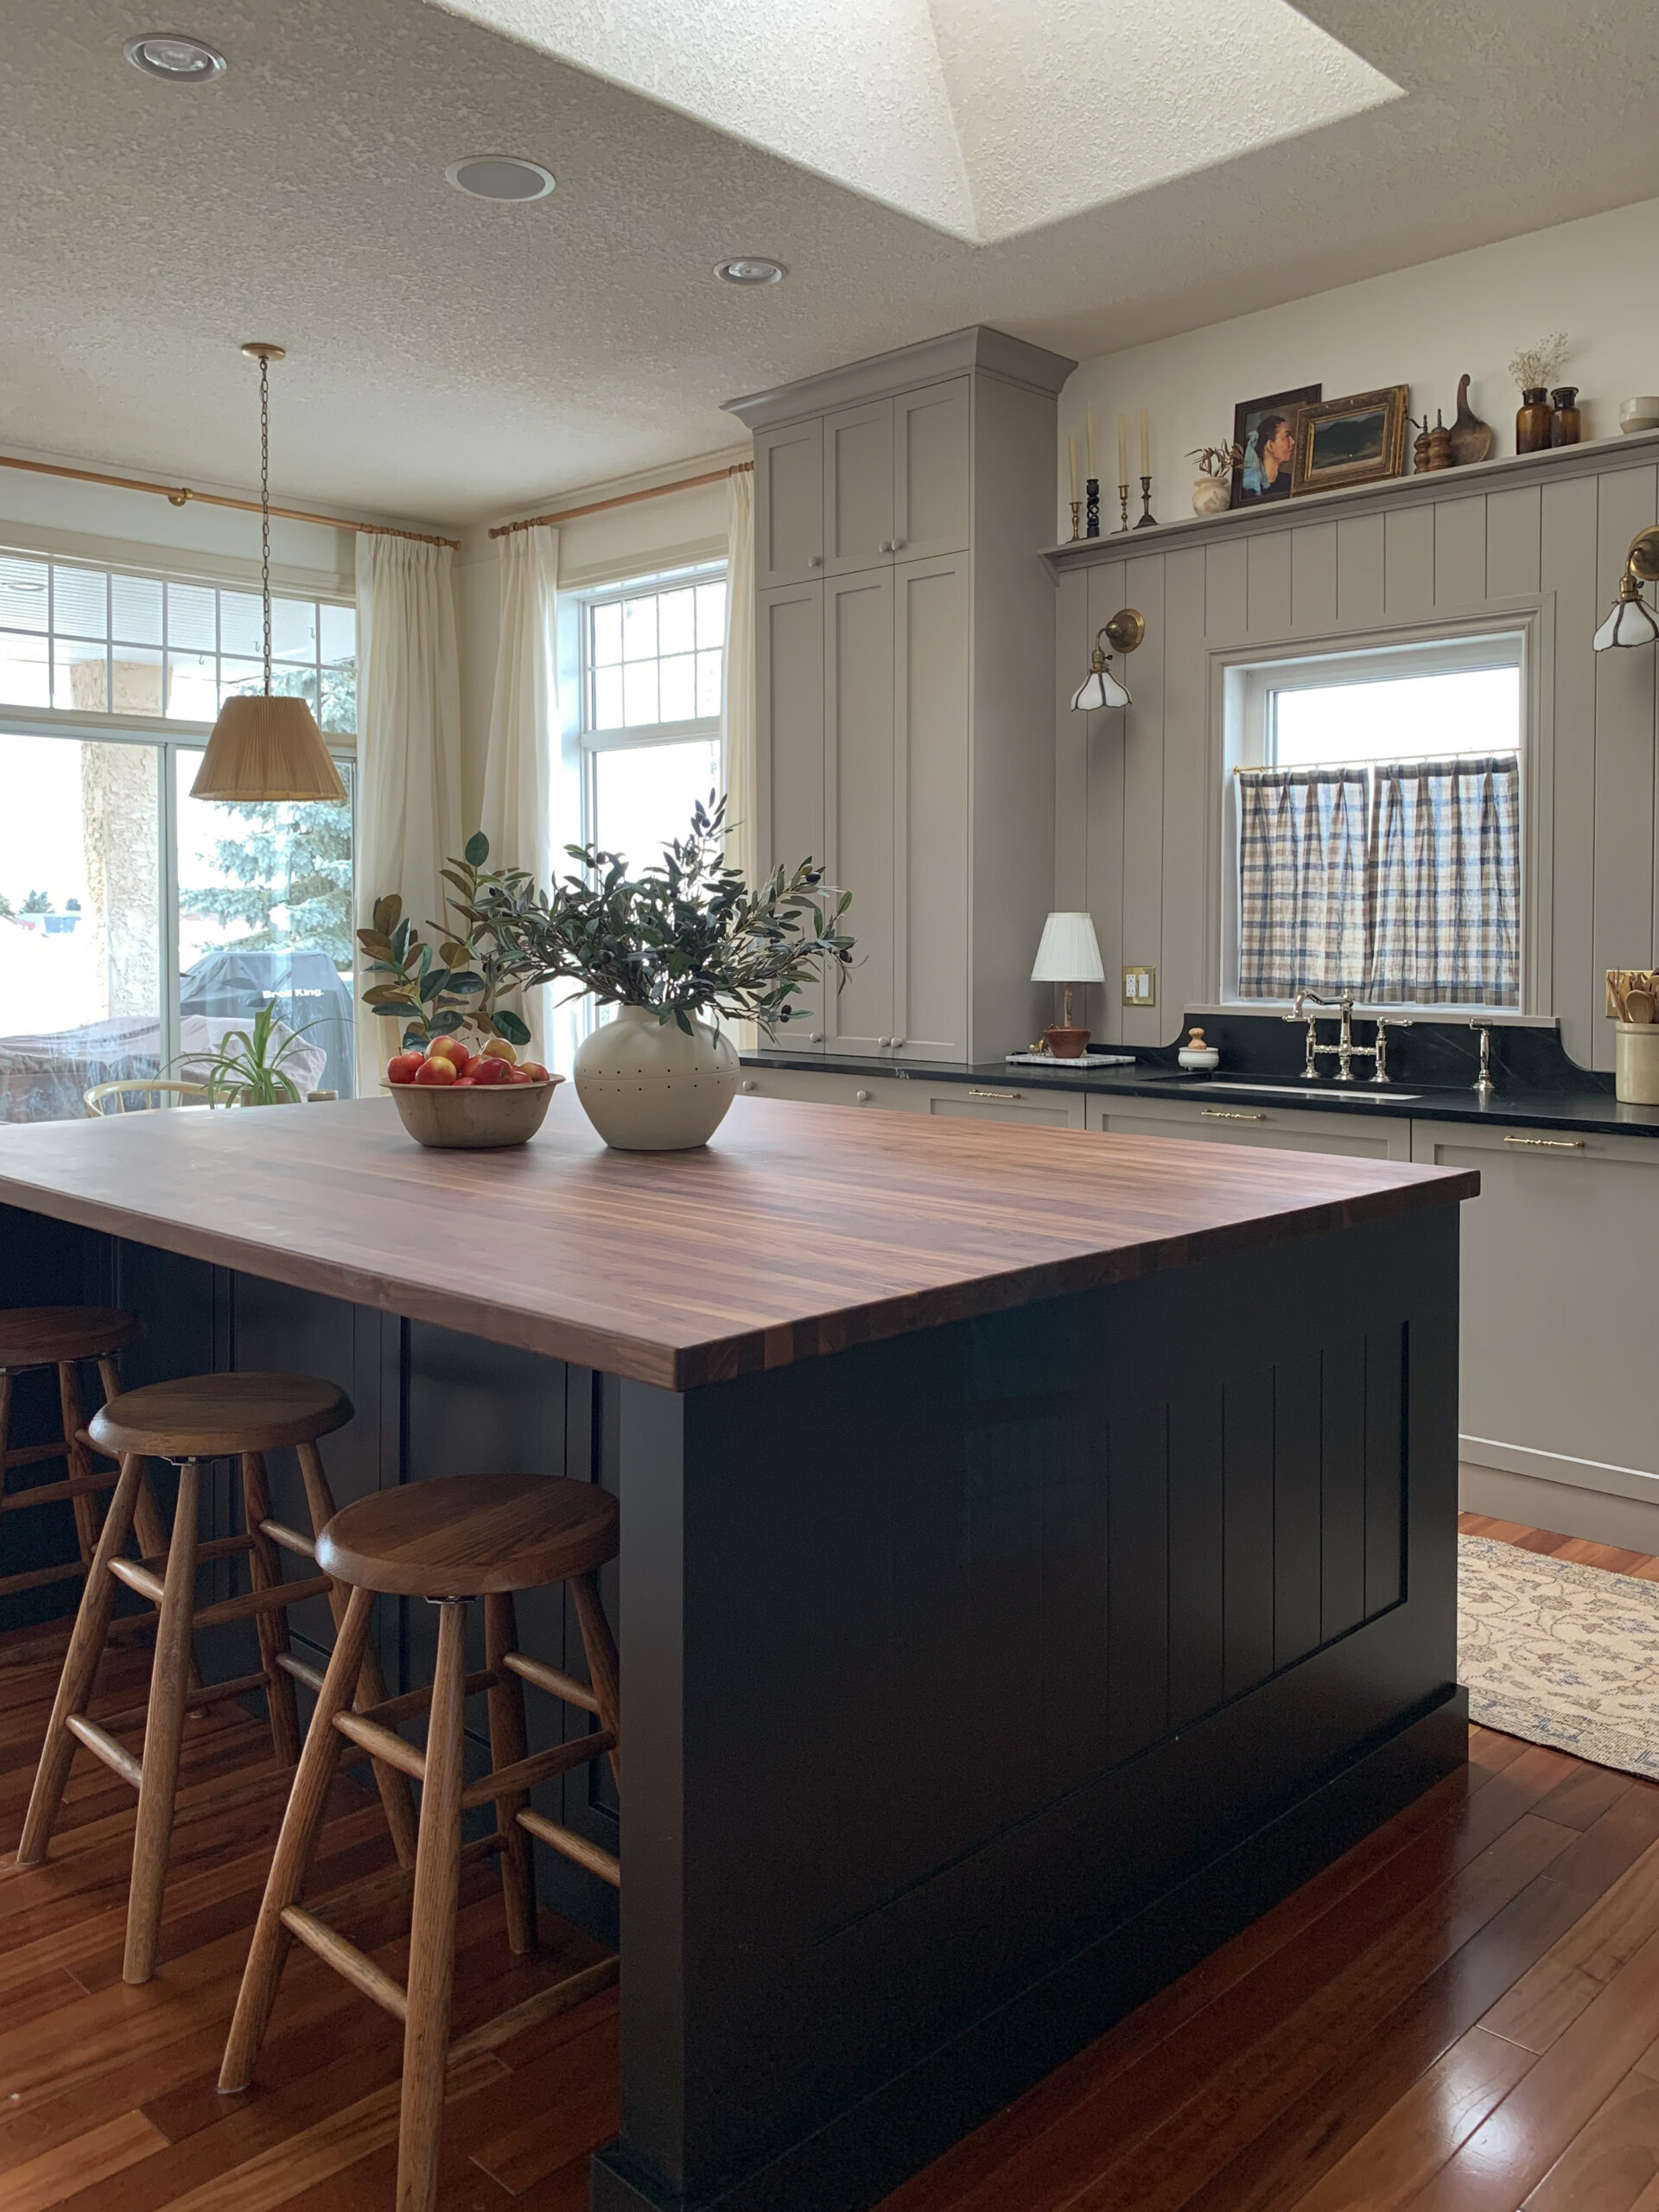
Credit: erinzubotdesign.com
When To Hire A Professional
Most people can build a basic island with patience and simple tools. However, consider hiring help if:
- You want to add plumbing (sink or dishwasher)
- You need to move gas or electric lines
- Your countertop is very heavy or needs special cutting
- Local codes require a licensed electrician for outlets
Professionals can handle these tasks safely and up to code.
Maintenance And Care
A DIY kitchen island is easy to keep looking good. For wood tops, oil or seal regularly to prevent stains. Wipe spills right away, especially with butcher block. For painted cabinets, use gentle cleaners and touch up chips as needed.
Check hardware and screws every few months. Tighten any loose handles or hinges. If you added outlets, test them often to ensure safety.
Real-life Example
Maria, a homeowner in Ohio, turned two leftover base cabinets into a practical kitchen island. She added a butcher block top, painted the cabinets navy blue, and installed open shelves on one side. The project cost under $800 and took two weekends.
Maria says the island is now the center of her kitchen, used for everything from baking to doing homework.
This kind of project isn’t just about saving money. It brings pride and a personal touch to your home.
Additional Resources
For more ideas and step-by-step images, check out the guides on the Family Handyman website.
Frequently Asked Questions
How Do I Choose The Right Size For My Kitchen Island?
Measure your kitchen and make sure to leave at least 36 inches of walkway on all sides of the island. If you want seating, allow more space for stools. Sketching the layout helps you see what fits best.
Can I Add A Sink Or Cooktop To My Diy Island?
Yes, but adding plumbing or gas lines is complicated. It’s best for advanced DIYers or with professional help. Make sure your island has enough space and proper support for appliances.
What’s The Best Countertop Material For A Diy Island?
Butcher block is easy to install and affordable. Laminate is low-cost and comes in many styles. Stone (granite, quartz) is durable but heavier and more expensive. Pick what fits your budget and kitchen style.
Do I Need Permits To Build A Kitchen Island?
Most simple islands don’t need permits, but electrical or plumbing work may require them. Always check with your local building office before starting.
How Can I Make My Island Look Custom And Professional?
Use filler strips, end panels, and quality trim for a seamless look. Paint or stain before final assembly, and choose stylish hardware. Take your time with measurements and finishing for the best result.
Making a kitchen island from base cabinets is one of the most rewarding DIY projects you can do. With careful planning and a bit of effort, you’ll create a space that’s both beautiful and practical for years to come.