If you want to add warmth and style to your home, fake ceiling beams are a smart solution. Real wood beams are heavy and expensive, but faux beams can give you the same dramatic effect for less money and less effort. Many homeowners love this upgrade because it works with almost any room style, from rustic to modern. You can also install fake beams without needing a contractor or special tools. This guide will walk you through every step, help you avoid common mistakes, and give you tips to make your beams look as real as possible. Even if you’ve never worked on a DIY project before, you’ll feel confident by the end of this article.
What Are Fake Beams And Why Use Them?
Fake beams (also called faux beams or box beams) are decorative ceiling features made from lightweight materials. They mimic the look of solid wood beams but are much easier to handle and install. Most fake beams are hollow inside, which means they can cover pipes, wires, or ugly seams on your ceiling.
Benefits Of Using Fake Beams
- Lightweight: Fake beams are usually made from materials like polyurethane or MDF, making them easy to lift and install.
- Affordable: They cost much less than real wood beams, especially when you include installation and shipping.
- Customizable: You can paint or stain faux beams any color you want.
- Hides Imperfections: They can cover up ceiling flaws, cracks, or cables.
- Easy Installation: No special tools or heavy-duty supports are needed.
When Are Fake Beams A Good Choice?
If your ceiling cannot hold heavy weight, or you want a quick way to improve your room’s look, fake beams are a great option. They are popular in living rooms, kitchens, bedrooms, and even basements. You can use them to create a farmhouse style, add texture, or simply make your ceiling more interesting.
Planning Your Ceiling Beams Project
Before buying materials or picking up tools, you need a clear plan. Careful planning ensures your fake beams look natural and fit your space perfectly.
Step 1: Decide On Your Beam Layout
Think about the ceiling design you want. Most people choose one of these layouts:
- Single beam: A single beam running across the width or length of the room.
- Parallel beams: Several beams spaced evenly, running parallel to each other.
- Grid or coffered: Beams crossing each other to create squares or rectangles.
- Frame: Beams outlining the room’s edges.
Look at photos online or in magazines for inspiration. Make a simple sketch of your ceiling and draw your planned layout.
Step 2: Measure Your Ceiling
Accurate measurements are key. Use a tape measure to find:
- The length of each beam you want.
- The width of the room (to decide on beam size and spacing).
- The height of the ceiling (so beams don’t make the room feel too low).
Write down all measurements and double-check them.
Example Ceiling Beam Layout
| Room Size (ft) | Number of Beams | Beam Length (ft) | Spacing Between Beams (ft) |
|---|---|---|---|
| 12 x 16 | 3 | 12 | 5 |
| 14 x 20 | 4 | 14 | 4 |
Step 3: Choose Beam Dimensions
Fake beams come in many sizes. For most rooms, a beam that is 4–6 inches wide and 6–8 inches tall looks realistic. Very large rooms may need wider or taller beams.
If you go too big, beams can make the room look smaller. Too thin, and they may not stand out. Use painter’s tape on the ceiling to outline the size and see how it feels.
Step 4: Select Materials
The most common materials for fake beams are:
- Polyurethane: Lightweight, often molded to look like real wood. Easy to install and doesn’t warp.
- MDF (Medium Density Fiberboard): Smooth and strong. Good for painted beams.
- Plywood and pine: Used for building DIY box beams that you can stain or paint.
- Vinyl or PVC: Waterproof, best for bathrooms or outdoor spaces.
Polyurethane beams are the easiest for beginners, but building your own box beams from plywood can save money.
Material Comparison
| Material | Weight | Finish Options | Cost (per ft) | Best For |
|---|---|---|---|---|
| Polyurethane | Very Light | Stain, Paint | $8–$20 | Quick Installs |
| MDF | Light | Paint | $5–$12 | Modern Looks |
| Plywood/Pine | Medium | Stain, Paint | $3–$8 | DIY Projects |
| PVC | Very Light | Paint | $10–$25 | Bathrooms |
Tools And Materials You’ll Need
Gather all tools and materials before you start. This avoids delays and makes the project smoother.
Main Materials
- Fake beam kits (pre-made) or wood boards for DIY box beams
- Wood glue (for building box beams)
- Wood screws or nails
- Stain or paint
- Clear finish (polyurethane, if staining)
- Blocking material (2×4 boards for ceiling supports)
Tools
- Measuring tape
- Stud finder
- Level
- Pencil
- Miter saw or circular saw
- Drill/driver
- Nail gun (optional)
- Sanding block or sandpaper
- Paintbrushes or rollers
- Ladder or scaffold
Tip: If you’re making beams from scratch, rent a miter saw for clean, straight cuts.
How To Make Fake Beams For Ceiling: Step-by-step
Whether you buy ready-made beams or build your own, the installation steps are similar. This guide covers both paths, so you can choose what fits your budget and skills.
Step 1: Prepare The Ceiling
Start with a clean, flat ceiling. Remove dust or cobwebs. If there are any bumps or cracks, patch them and let dry. Mark the exact location of each beam on the ceiling with a pencil and a level. Double-check all lines—they are your guide for the rest of the project.
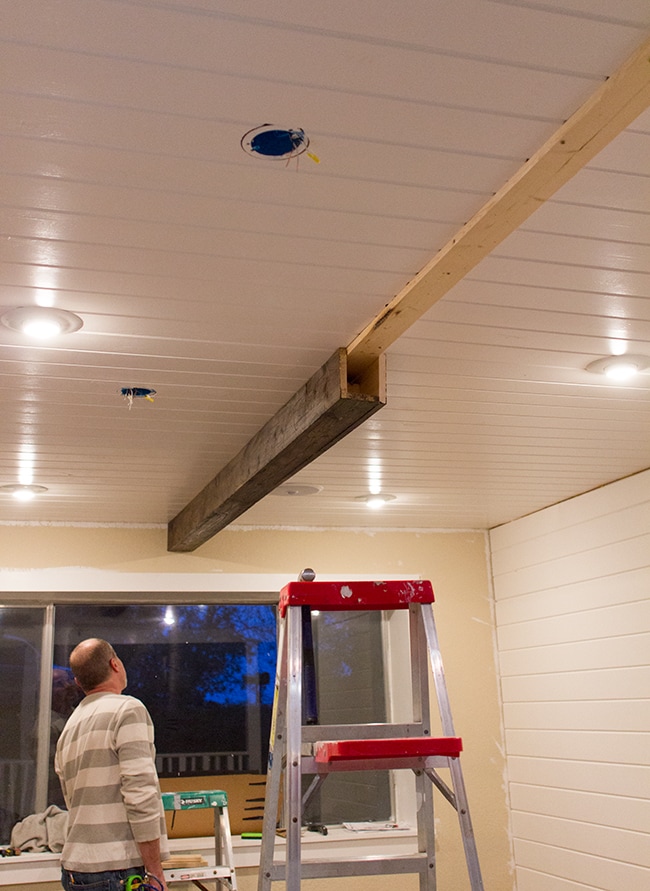
Step 2: Install Blocking For Support
Fake beams need something solid to attach to. That’s why you add blocking—short lengths of 2×4 board—across the ceiling where each beam will go.
- Use a stud finder to locate ceiling joists. Mark them.
- Cut 2x4s to fit between the joists. These are your blocking pieces.
- Screw the blocking into the joists at each beam location. The blocking should run perpendicular to your planned beams.
- Check that each piece is level.
Non-obvious insight: Even though fake beams are light, solid blocking prevents sagging over time—especially in humid rooms.
Step 3: Build Your Box Beams (diy Option)
If you’re making your own beams from wood, follow these steps:
- Cut three boards for each beam: One wide (bottom) and two narrow (sides).
- Lay the boards on a flat surface. Apply wood glue to the edges.
- Clamp the boards together in a “U” shape. Nail or screw along the edges for extra strength.
- Fill any gaps with wood filler. Sand smooth when dry.
- Stain or paint your beams. Let dry completely before installing.
Tip: For a rustic look, distress the wood with a chain or hammer before staining.
Step 4: Paint Or Stain The Beams
If you bought pre-made polyurethane beams, you can paint or stain them to match your style. Use a high-quality brush and apply thin, even coats. For a wood look, use a gel stain and brush in the direction of the “grain.
”
Practical advice: Always test your color on a small piece before coating the whole beam.
Step 5: Attach The Beams To The Ceiling
Once your blocking is in place and your beams are finished:
- Lift the beam up to the ceiling (you may need a helper).
- Slide the beam over the blocking. Check that it fits snugly.
- Drill pilot holes through the sides of the beam into the blocking.
- Screw or nail the beam to the blocking.
- Fill screw holes with wood filler or color-matched putty for a clean look.
If using polyurethane beams, use construction adhesive along with screws for a stronger hold.
Non-obvious insight: Hide seams between beam sections by placing them over support blocking, then covering with wood putty.
Step 6: Add Finishing Touches
- Caulk along the edges where the beam meets the ceiling to hide gaps.
- Touch up paint or stain as needed.
- Wipe beams clean with a damp cloth.
If your design includes cross beams (a grid), repeat the process for each section.

Credit: withlovemercedes.com
Common Mistakes To Avoid
It’s easy to make small errors that spoil the final look. Here are common mistakes and how to avoid them:
- Poor Measurements: Double-check all lengths and widths before cutting. Small errors show up quickly, especially with multiple beams.
- No Blocking: Skipping blocking makes beams wobbly and unsafe.
- Wrong Beam Size: Oversized beams can make ceilings feel lower; too small, and they look fake.
- Visible Seams: Hide joints over blocking and use filler for a seamless look.
- Messy Finish: Rushing paint or stain leads to drips and uneven color.
Pro tip: If you have uneven ceilings, use caulk to fill gaps for a perfect fit.
How To Make Beams Look Real
The best fake beams are hard to tell from real wood. Here’s how to boost realism:
- Use wood-grain finishes or gel stains, not just flat paint.
- Add knots or grooves: Use a wood-burning tool or a utility knife to carve small lines or knots in MDF or plywood beams.
- Vary the color: Real wood isn’t perfectly even in color. Mix two shades of stain for more depth.
- Bevel the edges: Slightly round off beam corners with sandpaper—real wood beams rarely have sharp edges.
- Mix sizes: In a grid, use wider beams along the main axis and narrower ones across.
Credit: www.jennasuedesign.com
Cost Breakdown And Savings
How much will your project cost? Here’s a rough estimate for a 12×16 foot room with three beams (DIY wood vs. pre-made):
| Item | DIY Box Beam | Pre-made Polyurethane |
|---|---|---|
| Material (per beam) | $35 | $120 |
| Finish (paint/stain) | $10 | $15 |
| Fasteners/blocking | $15 | $15 |
| Total (3 beams) | $180 | $450 |
DIY beams can save you hundreds of dollars. However, pre-made beams are faster and often more realistic.
Tips For Different Ceiling Types
Not all ceilings are flat or the same material. Here’s how to handle common situations:
Vaulted Or Angled Ceilings
- Use a protractor to measure the angle.
- Cut beam ends at the same angle so they fit flush.
- For exposed beams, add crown molding at joints to hide gaps.
Popcorn Or Textured Ceilings
- Scrape off texture where beams will go. This helps beams sit flat.
- If you can’t remove texture, use flexible caulk to fill gaps.
Low Ceilings
- Choose beams no taller than 4 inches.
- Run beams parallel to the long side of the room to make the space feel bigger.

Credit: www.myvintageporch.com
Safety And Clean-up
Safety should never be overlooked, even for a lightweight project.
- Wear eye protection when cutting wood or drilling.
- Use a stable ladder—never overreach.
- Ventilate the room when using paint or stain.
- Clean up dust after sanding or cutting to avoid slipping.
Experience tip: Always work with a helper when lifting beams, even fake ones. This prevents accidents and keeps your lines straight.
Styling Ideas And Creative Uses
Fake ceiling beams aren’t just for rustic homes. Here are ways to use them:
- Modern look: Paint beams white or black for a bold contrast.
- Farmhouse style: Use distressed, stained wood for a cozy feel.
- Industrial style: Add metal brackets or rivets.
- Hidden lighting: Install LED strips on top of beams for soft, indirect light.
- Room dividers: Use a beam to visually separate spaces in an open floor plan.
For more design inspiration, check out photo galleries on sites like Houzz.
Maintenance And Longevity
Once installed, fake beams need little care. Dust them with a dry cloth every few weeks. If you used a clear polyurethane finish, they’re protected from fingerprints and stains. Polyurethane and PVC beams resist moisture and insects, which means they last for decades with almost no maintenance.
If a beam gets scratched, touch up with matching paint or stain. For deep gouges, use wood filler or colored wax.
Insider tip: Avoid hanging heavy objects from fake beams. They are decorative, not structural.
When To Call A Professional
Most homeowners can install fake beams with basic skills. But call a pro if:
- Your ceiling is very high (over 10 feet) and you don’t have safe ladders.
- You want a complex grid or coffered layout.
- You need to move electrical wires or fixtures.
A professional carpenter can finish the job quickly, but you’ll pay extra for labor.
Frequently Asked Questions
What’s The Difference Between Fake Beams And Real Wood Beams?
Fake beams are hollow and made from lightweight materials like polyurethane, MDF, or plywood. Real wood beams are solid, heavy, and structural. Fake beams are only for decoration and cannot support weight. Real beams can hold up a house, but require strong supports and are expensive to install.
Can Fake Beams Be Used In Bathrooms Or Outdoors?
Yes, but choose the right material. Polyurethane and PVC beams are water-resistant and won’t rot or warp in humid places. Avoid MDF or plywood in wet areas, as they can swell or get moldy.
How Do You Cover Seams Between Fake Beams?
Place seams over ceiling blocking so you can fill gaps with wood filler or caulk. Sand smooth and touch up with paint or stain. Adding decorative brackets or straps can also hide seams and add style.
Can You Install Fake Beams On A Sloped Or Vaulted Ceiling?
Yes, but you’ll need to cut the ends of the beams at an angle to match the ceiling slope. Measure carefully and use a miter saw for accurate cuts. For complex shapes, consider hiring a professional.
Do Fake Beams Add Value To A Home?
Faux beams can increase your home’s appeal and may add value if done well, especially in living areas. They make rooms feel custom and stylish. However, poorly installed or cheap-looking beams can have the opposite effect.
Adding fake beams to your ceiling is one of the most effective DIY projects for transforming a room. With careful planning, the right materials, and a few hours of work, you can create the look of real wood beams without the cost or hassle. Take your time, measure twice, and enjoy the result—a room that feels warmer, richer, and truly unique. For further reading on building materials, see the Wikipedia entry on box beams.