If you want your vinyl plank flooring to look beautiful and last for years, the most important step is often hidden—preparing the subfloor. A floor that isn’t level can ruin the look, feel, and durability of your vinyl planks. Gaps, bumps, and movement can appear if you skip this work. Many people rush into installation, but professionals know: leveling the floor is 70% of the job. It’s the foundation of every great vinyl floor. This guide will walk you through every step, with practical tips and clear explanations, so you can achieve a perfectly smooth surface for your new vinyl planks.
Why Leveling Matters For Vinyl Plank Flooring
Vinyl plank is popular because it looks good, costs less than hardwood, and is easy to maintain. But it’s thinner and more flexible than traditional hardwood or tile. If you lay vinyl on a bumpy or uneven floor, you’ll notice soft spots, clicking noises, or even damage as you walk. Over time, this can cause plank separation, visible seams, and early wear.
A properly leveled floor:
- Makes vinyl planks feel solid underfoot
- Prevents planks from shifting or popping up
- Reduces noise when walking
- Increases the life of your flooring
Even small dips or high points (over 1/8 inch) can cause problems. Some vinyl plank warranties are void if the subfloor is not level within the manufacturer’s tolerance. That’s why it’s critical to know how to check and fix your floor before installing vinyl planks.
Assessing Your Existing Floor
The first step is examining your current floor. Not all floors need the same preparation. You might be working with concrete, wood, tile, or even old vinyl. Each subfloor type has unique issues and solutions.
Tools You’ll Need
- 6-foot level or a long straightedge
- Tape measure
- Flashlight
- Notepad and pencil
- Smartphone camera (optional, for documenting problem spots)
What To Look For
Walk slowly across the floor. Pay attention to:
- Squeaks, soft spots, or movement
- Visible dips or humps
- Cracks or holes
- Moisture stains or odors (especially on concrete)
Place the level at several spots. Slide it across the surface and look for gaps under the level (low spots) or rocking (high spots). Mark any problem areas with a pencil.
For vinyl plank, most brands recommend the subfloor be flat within 3/16 inch over a 10-foot span or 1/8 inch over 6 feet. Use your tape measure to check any gaps you find.
Subfloor Material Check
- Concrete: Look for cracks, pits, or moisture issues.
- Plywood/Wood: Check for loose boards, rot, or nails sticking up.
- Tile: Check for loose tiles, high grout lines, or uneven areas.
- Old Vinyl: Look for peeling, bubbles, or soft areas.
Take your time in this step. The more issues you find now, the better your final result.
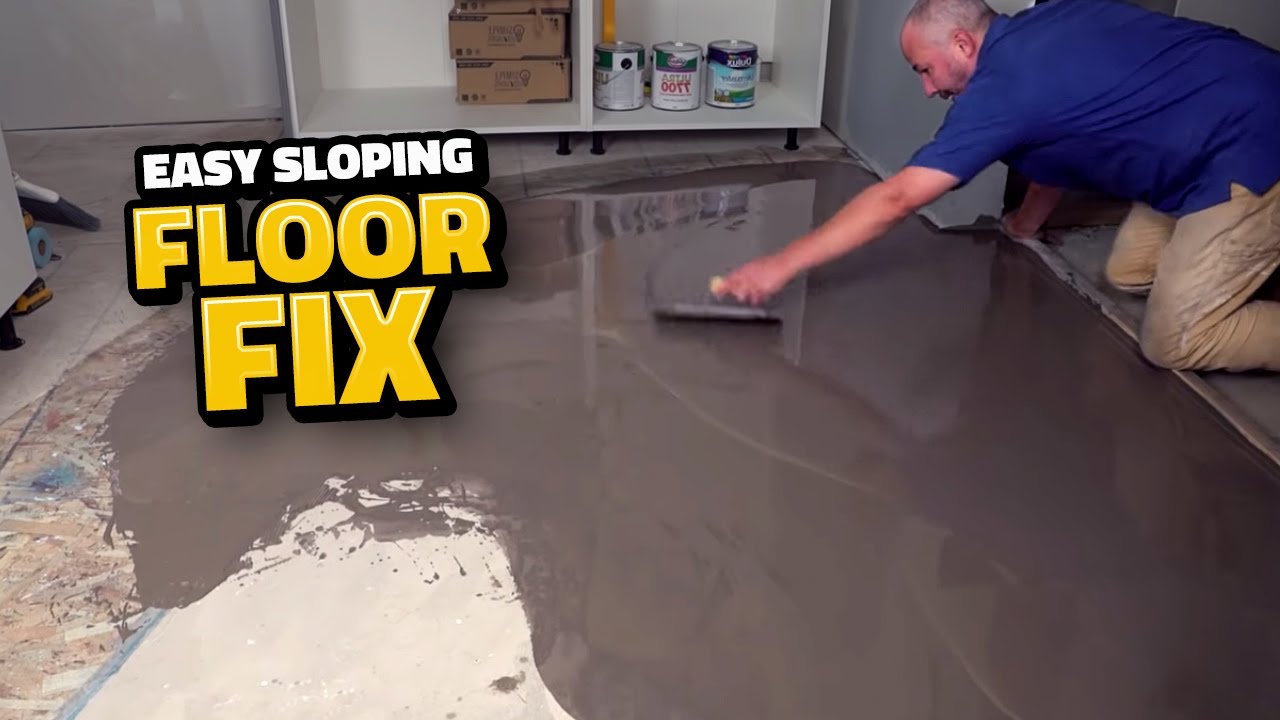
Fixing High And Low Spots
Once you’ve found the problem areas, you need to decide how to fix them. There are two main types of problems: high spots and low spots.
How To Fix High Spots
High spots must be removed so your vinyl planks can lie flat. The way you fix them depends on your subfloor material.
Concrete High Spots
- Mark the Area: Use chalk or a pencil.
- Grind Down: Use a concrete grinder, hand grinder, or even a rubbing stone for small areas.
- Clean Up: Vacuum all dust. Concrete dust can prevent adhesives from sticking.
Wood High Spots
- Locate Joists: Sometimes a high spot is a bowed joist under the plywood.
- Sand Down: Use a belt sander or floor edger. Sand gradually and check with your straightedge.
- Screw Down Loose Boards: If the wood is lifted, it might just need to be reattached.
Tile High Spots
- Remove Tile: If a tile sticks up, pry it out and patch the hole later.
- Grind Grout Lines: For raised grout, use a hand grinder.
Practical tip: Always wear a dust mask and ear protection when sanding or grinding. The dust can be harmful.
How To Fix Low Spots
Low areas must be filled. If you skip this, vinyl planks can flex, creating noise and weak spots.
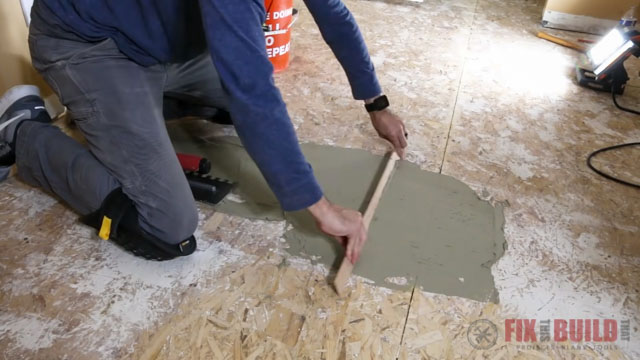
Concrete Low Spots
- Clean the Area: Remove dust and debris.
- Use Floor Leveler: Mix a self-leveling compound as per instructions.
- Pour and Spread: Pour into the low spot, feathering the edges with a trowel.
- Let It Cure: Most compounds need 24 hours to dry.
Wood Low Spots
- Screw Down Loose Boards: Sometimes the floor is loose, not low.
- Use Underlayment Patches: For small dips, use a wood patching compound.
- Self-Leveling Compound: For larger areas, use a compound rated for wood. Follow the package directions carefully.
Tile Low Spots
- Fill Gaps: Use a floor patch or self-leveling compound over the low tile area.
- Feather Edges: Smooth with a trowel.
Non-obvious insight: For wood floors, always check for water damage or rot if you find a low spot. Fix the cause before patching.
Cleaning And Prepping The Subfloor
A smooth, clean surface is essential before you install vinyl planks. Even small bits of debris or dust can create bumps or stop adhesives from working.
Cleaning Steps
- Vacuum Thoroughly: Use a shop vacuum, especially after sanding or grinding.
- Remove Staples/Nails: Pull out any that stick up.
- Scrape Off Old Glue: Use a putty knife for stubborn spots.
- Wipe With Damp Cloth: This removes fine dust. Let the floor dry completely.
Addressing Moisture
Vinyl plank is water-resistant, but too much moisture under the floor can cause mold or adhesive failure. Check for moisture, especially on concrete.
How To Test For Moisture (concrete)
- Tape a 2-foot square of plastic tightly to the floor.
- Leave for 24–48 hours.
- If water forms under the plastic, the concrete is too wet.
If you find moisture, solve this before continuing. Sometimes, a vapor barrier is needed.
Extra tip: Some subfloor products come with built-in moisture barriers, but you must still address water issues before installing flooring.
Choosing The Right Leveling Product
Not all leveling products are the same. Using the wrong one can cause your vinyl planks to fail. Here’s how to choose wisely.
Self-leveling Compounds
These are popular because they flow into dips and cure to a hard, smooth surface. Look for:
- Concrete subfloors: Standard self-leveling compound is fine.
- Wood subfloors: Use only products labeled as safe for wood.
Some examples:
| Product Type | Best For | Dry Time | Notes |
|---|---|---|---|
| Portland Cement-Based | Concrete | 4-24 hours | Strong, durable |
| Latex-Modified | Wood, Plywood | 6-12 hours | Flexible, bonds well |
| Feather Finish | Small dips | 1-4 hours | Feathers to zero edge |
Pro tip: Always check if the product is compatible with your specific subfloor. Some compounds can damage wood if used incorrectly.
Patch Compounds
For small holes or cracks, use a patching compound. These are thicker and dry fast.
- Wood: Use wood filler or putty.
- Concrete: Use a cement-based patch.
Note: Do not use generic wall spackle or drywall mud. These are not strong enough for floors.
Underlayment
If your floor is almost flat but not perfect, a thin underlayment can help. Some vinyl planks include an attached pad. Others require a separate foam or cork underlayment.
- Foam: Soft, easy to install, good for minor issues.
- Cork: More expensive, adds sound insulation.
Underlayment can help with tiny imperfections, but it cannot fix major dips or bumps.
Step-by-step Leveling Process
Let’s put all the steps together into a practical workflow. This is how professionals tackle the job from start to finish.
1. Clear The Room
Remove all furniture, rugs, and appliances. Take off baseboards if possible. You need full access to the entire floor.
2. Inspect The Subfloor
Use your level and flashlight. Mark all dips, humps, and damage. Photograph tricky areas for reference.
3. Address Structural Issues
Fix any loose boards, squeaks, or rot. On concrete, repair large cracks or moisture problems now.
4. Grind Down High Spots
Use a grinder (concrete) or belt sander (wood). Work slowly and re-check with your straightedge until the surface is flat.
5. Fill Low Spots
Mix your leveling compound as directed. Pour or trowel into low areas. Feather the edges. For large dips, you may need two coats.
Example: If you have a 1/4″ dip over 6 feet, fill in thin layers, letting each dry before adding more.
6. Let Everything Dry
Curing times vary. Most self-levelers need at least 24 hours. Don’t rush this step.
7. Sand And Smooth
Once dry, use a sanding block to smooth any rough edges or high spots in the patch.
8. Clean Again
Vacuum and wipe the floor. Remove all dust and debris.
9. Final Level Check
Lay your straightedge across the floor in different directions. The surface should be within 1/8 inch over 6 feet. If not, repeat the fill or grind process as needed.
10. Install Vapor Barrier (if Needed)
On concrete, a vapor barrier may be required, especially in basements or over radiant heat.
Practical tip: Always read your vinyl plank manufacturer’s instructions. They may have extra requirements for leveling and vapor protection.
Credit: www.youtube.com
Special Cases: Leveling Over Old Floors
Many homes have floors that have been covered several times—old vinyl, tile, or even carpet glue. Here’s how to handle these situations.
Over Old Vinyl
If the vinyl is flat, tight, and not cushioned, you can often install new vinyl planks over it after cleaning. Fill any deep cuts or dents with patch compound.
Warning: If the old vinyl is loose, bubbled, or soft, remove it before leveling.
Over Tile
You can install vinyl planks over tile, but you must fill grout lines and low spots first. Use a cement-based patch or self-leveler. Sand any high tiles.
Over Painted Or Sealed Concrete
Paint or sealers can stop leveling compounds or adhesives from sticking. Scrape or grind these areas to bare concrete before leveling.
Over Damaged Plywood
Remove and replace any rotten or water-damaged plywood first. Loose or squeaky boards should be screwed down tightly.
Mistakes To Avoid When Leveling Your Floor
Many beginners make the same errors when preparing for vinyl plank flooring. Here are the biggest pitfalls—and how to avoid them.
1. Skipping The Level Check
Don’t guess. Use a straightedge and measure dips and high spots. It’s easy to miss uneven areas by eye alone.
2. Using The Wrong Compound
Not all leveling products are the same. Using a concrete-only compound on wood can cause the patch to crack or fail.
3. Not Letting Compounds Cure
Rushing to install vinyl before the leveling compound is fully dry traps moisture, leading to mold or adhesive failure.
4. Forgetting To Clean
Dust, debris, or old adhesives left behind will prevent vinyl planks from sticking or lying flat.
5. Ignoring Moisture Issues
Moisture under your floor can ruin vinyl planks over time. Always check and fix water problems first.
6. Overfilling Dips
It’s easy to pour too much compound in one spot. Build up in layers to prevent cracking.
Non-obvious insight: Always check room temperature and humidity before applying leveling compounds. Extreme cold or heat can affect how they cure.
Comparing Common Leveling Solutions
Choosing the right leveling method depends on your subfloor and the extent of the unevenness. Here’s a comparison to help you decide:
| Method | Best For | Cost | DIY Difficulty | Notes |
|---|---|---|---|---|
| Self-Leveling Compound | Concrete/wood, large areas | $$ | Moderate | Fast, smooth finish |
| Feather Finish Patch | Small dips, cracks | $ | Easy | Dries fast |
| Underlayment Sheet | Minor imperfections | $$ | Easy | Adds cushioning |
| Sanding/Grinding | High spots | $ | Moderate | Messy, but effective |
Practical tip: The cheapest solution is not always best. If you’re unsure, test a small area first before doing the entire floor.
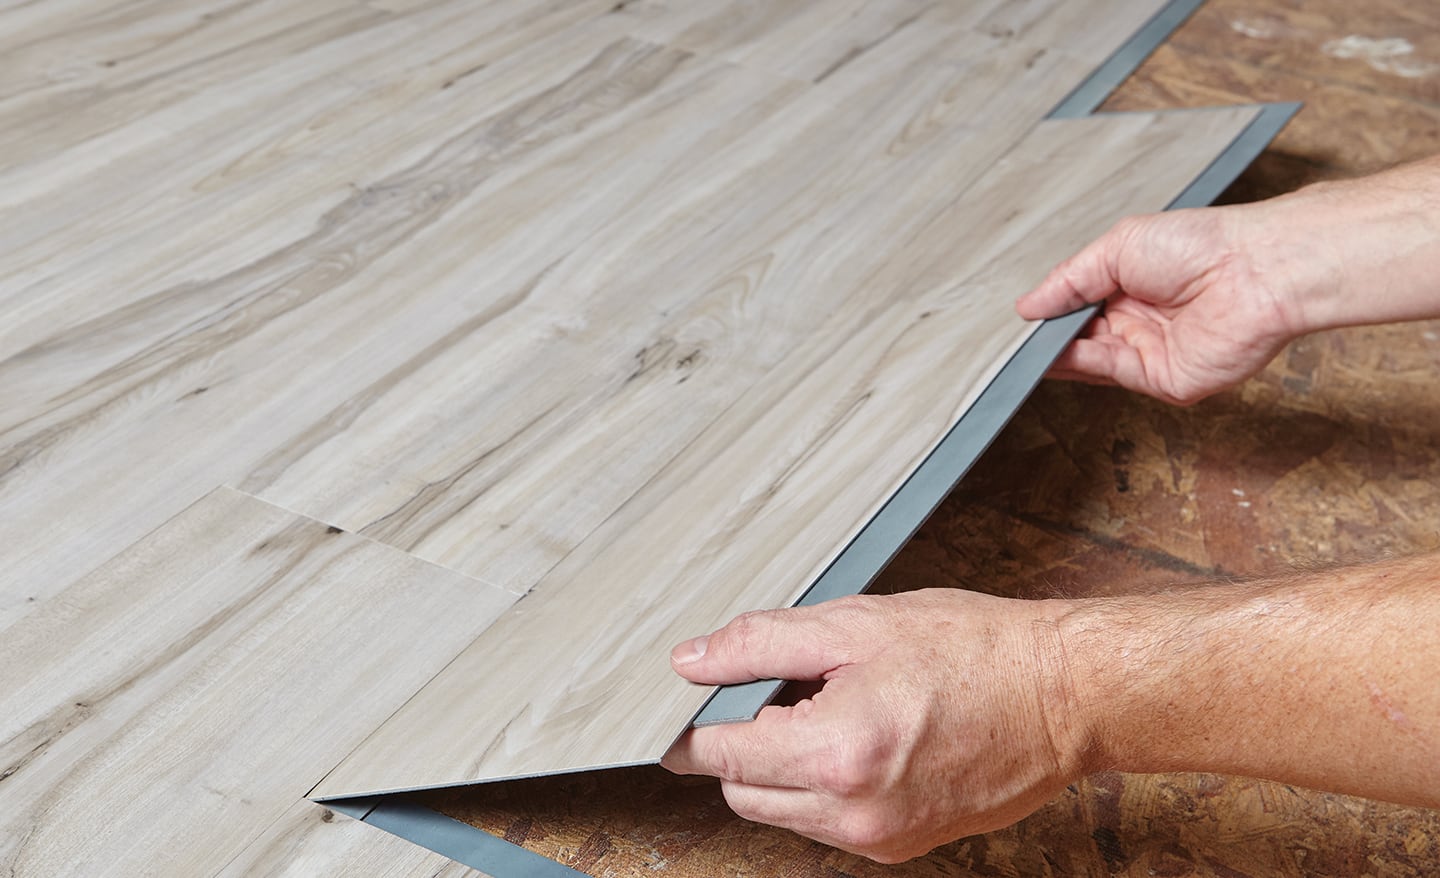
Preparing For Vinyl Plank Installation
Once your floor is level, clean, and dry, you’re ready for vinyl plank installation. Here are a few final steps:
Gather Tools And Materials
- Utility knife
- Tape measure
- Spacers (for expansion gaps)
- Rubber mallet
- Tapping block
Check that you have enough planks, underlayment (if needed), and transition strips.
Acclimate Your Vinyl Planks
Let your vinyl planks sit in the room for 48 hours before installation. This allows them to adjust to the room temperature and humidity, reducing the risk of expansion or contraction after installation.
Plan Your Layout
Dry-lay a few planks to see how they fit. Plan to start along the longest wall and stagger the seams for a natural look.
Read Manufacturer Instructions
Every vinyl plank brand has specific requirements. Always read and follow their guidelines for subfloor preparation, underlayment, and installation.
Non-obvious insight: Some manufacturers require photos of the prepped subfloor to honor warranties. Take clear photos after leveling for your records.
Professional Vs. Diy: When To Call An Expert
Leveling a floor is a doable DIY job for many homeowners, but sometimes it’s best to hire a professional.
Diy Is Best When:
- The unevenness is less than 1/4 inch overall
- You have basic carpentry or tiling experience
- The subfloor is in good shape
Call A Pro If:
- The floor has major dips, humps, or structural damage
- There are moisture issues you can’t solve
- You’re unsure about which products to use
A professional can save time and prevent costly mistakes, especially in older homes or complex projects.
Cost Breakdown: Leveling A Floor For Vinyl Plank
Leveling costs depend on the method, room size, and condition of your floor. Here’s a general breakdown for a 200-square-foot room:
| Item | DIY Cost | Pro Install Cost |
|---|---|---|
| Self-leveling compound | $60–$150 | $200–$400 |
| Tools (rental/purchase) | $40–$100 | Included |
| Underlayment | $50–$120 | $100–$250 |
| Labor | $0 | $300–$600 |
| Total | $150–$370 | $600–$1,250 |
Tip: Self-leveling compounds can be heavy (one bag covers about 40 sq ft at 1/8″ thick). Calculate how much you need before buying.
Credit: fixthisbuildthat.com
Safety Precautions
Leveling floors involves chemicals, dust, and sometimes power tools. Here’s how to stay safe:
- Wear a dust mask and safety goggles when sanding or grinding
- Use gloves when handling leveling compounds
- Keep the area well ventilated
- Clean up spills quickly—self-leveler hardens fast
If you’re sensitive to chemicals, check the product’s safety data sheet before starting.
Final Check Before Installation
A smooth, level, and clean floor is your best insurance for a long-lasting vinyl plank installation. Walk the floor in soft shoes, feeling for any remaining bumps or dips. Shine a flashlight across the floor to spot shadows that reveal unevenness.
If you find a problem, fix it now—it’s much easier than repairing after the planks are down.
Credit: www.homedepot.com
Frequently Asked Questions
How Flat Does The Subfloor Need To Be For Vinyl Plank Flooring?
Most manufacturers require the floor to be within 3/16 inch over a 10-foot span or 1/8 inch over 6 feet. Always check the instructions that come with your vinyl planks, as requirements can vary.
Can I Use Regular Floor Patch For All Subfloors?
No. Use only patching compounds or levelers that are rated for your specific subfloor (wood, concrete, tile). The wrong product can crack, fail, or damage your floor.
Do I Need To Remove All Old Flooring Before Leveling?
Not always. If the old floor is solid, flat, and well-attached (like old vinyl or tile), you can sometimes level right over it. Remove loose, cushioned, or damaged floors before leveling.
What If I Find Moisture Under My Concrete Floor?
Moisture can damage vinyl planks and adhesives. Test for moisture before leveling. If you find excess moisture, fix it (with a vapor barrier, dehumidifier, or drainage) before installing vinyl.
Where Can I Find More Info On Leveling Floors For Vinyl Plank?
For more detailed guides and product info, visit the Family Handyman’s floor leveling guide, which offers step-by-step visuals and advice.
A level floor is the secret to a beautiful, trouble-free vinyl plank installation. Take your time with prep—your feet, eyes, and wallet will thank you for years to come.