Many people want to make their homes look special and cozy. One way to do this is by adding a plank ceiling. This type of ceiling uses real wood or wood-like boards. It gives a room a warm and natural feeling, and can make a big change in how your space looks and feels. You might think installing a plank ceiling is only for experts, but with the right steps, tools, and tips, you can do it yourself. This guide will walk you through every part of the process, from planning to finishing touches.
Whether your ceiling is plain drywall, old popcorn, or something you want to cover up, plank ceilings work in almost any room—living rooms, bedrooms, kitchens, or even basements. The best part is, you do not need to be a master carpenter.
But you do need to work carefully and plan ahead. Let’s explore how to install a plank ceiling that looks professional and lasts for years.
Understanding Plank Ceilings
Before you start, it’s good to know what a plank ceiling is. Plank ceilings are made from long, thin boards of wood or wood-look materials. These planks are installed side by side across the ceiling, either parallel or in a pattern. The look can be rustic, modern, or traditional, depending on the wood and finish you choose. Popular woods include pine, cedar, and oak. For smaller budgets, there are also engineered planks and PVC options that look like wood.
Why Choose A Plank Ceiling?
- Aesthetic appeal: Adds warmth and style to any room.
- Covers imperfections: Hides old, damaged, or uneven ceilings.
- Customizable: Choose different colors, stains, or paint for any look.
- Value: Increases the value and appeal of your home.
A non-obvious benefit is improved acoustic properties. Wood absorbs sound, which can make rooms quieter and less echoey.
Planning Your Plank Ceiling Project
The most important step is planning. Rushing can lead to mistakes or wasted money.
Measure Your Ceiling
First, measure the length and width of the room where you want to install the plank ceiling. Multiply the two numbers to get the square footage. For example, a 12-foot by 14-foot room is 168 square feet.
Tip: Always buy 10–15% more material than you need. This extra allows for mistakes, bad cuts, or warped planks.
Choose Your Plank Material
There are many options. Here is a comparison to help you decide:
| Material | Pros | Cons | Typical Cost (per sq ft) |
|---|---|---|---|
| Solid Wood | Natural look, durable | Can be expensive, may warp | $3–$10 |
| Engineered Wood | Stable, less expensive | Not as solid, may chip | $2–$6 |
| PVC/Composite | Moisture resistant, easy to clean | Can look less natural | $1.5–$4 |
| Laminate | Low cost, many styles | Less durable, can’t refinish | $1–$3 |
Tools And Materials You Need
- Measuring tape
- Level
- Stud finder
- Chalk line
- Pencil
- Ladder or scaffold
- Miter saw or hand saw
- Nail gun or hammer and finishing nails
- Construction adhesive (optional)
- Safety glasses and ear protection
- Caulk and wood filler
- Paint, stain, or finish (if desired)
- Trim or molding (for edges)
Pro tip: Use a nail gun for faster and neater installation. Manual nailing works but takes longer and is harder above your head.
Check Your Ceiling
Inspect the existing ceiling for problems like leaks, mold, or electrical wiring. Fix all problems before you start. Plank ceilings work best on flat, dry ceilings.
Preparing The Ceiling
Preparation is key for a smooth job and a lasting result.
Remove Fixtures And Obstacles
Take down light fixtures, fans, and smoke detectors. Turn off the power at the breaker box for safety. Cover furniture and floors with drop cloths. If the old ceiling is very rough or popcorn-textured, you may want to scrape or flatten it for better results.
Locate Ceiling Joists
Use a stud finder to mark the joists. Joists are the beams that support your ceiling. Planks must be nailed into these for strength.
Mark the joist locations across the whole ceiling with a chalk line or pencil. This helps you know where to fasten each plank and avoids weak spots.
Plan Your Layout
Decide which way the planks will run. Most people run planks the long direction of the room for a more open look. But you can run them across the short side, or even on a diagonal for a unique effect. Start at the most visible wall and work toward the least visible one. This hides small errors.
Check if your room is truly square. Walls are often not perfectly straight. If needed, adjust your starting plank so any small gap ends up on the wall that is least seen.
Installing Furring Strips (if Needed)
In some cases, you need furring strips. These are thin wood strips attached to the ceiling, giving you a level surface and something strong to nail into. Use them if:
- Your ceiling joists are too far apart
- The ceiling surface is uneven
- You want to lower the ceiling slightly
Install furring strips every 16 inches across the ceiling, perpendicular to the direction your planks will run. Use a level to make sure they are flat.
Acclimating And Preparing Planks
Wood planks need to acclimate to your room before you install them. This means letting them sit in the space for at least 48 hours. This helps prevent shrinking or swelling after installation.
Remove planks from packaging and spread them out in the room. Stack them loosely so air can flow around each one.
Inspect each plank for damage or warping. Set aside any that are not straight. Mix planks from different boxes as you work. This gives a more natural, blended look.
Finish or paint planks before installing, if you want. It is easier to stain or paint on the ground. You can touch up nail holes later.
How To Install Plank Ceiling: Step-by-step
Now for the main part: installing the plank ceiling. Here is a step-by-step guide to make the process as clear as possible.
1. Mark Your Starting Line
Choose the wall you want to start from. Use a level and chalk line to mark a straight line about 1/4 inch from the wall. This is where your first row of planks will go.
Begin at the most visible wall (like the entry wall), so any small gaps are hidden at the far side.
2. Cut The First Row Of Planks
Measure the length for your first row. Cut planks as needed, leaving a 1/4-inch gap at each end for expansion. This gap will be covered by trim later.
If your planks have a tongue-and-groove edge, install with the tongue facing out, away from the starting wall.
Tip: For a stronger, more natural look, stagger the ends of the planks between rows. Do not start each row with the same length piece.
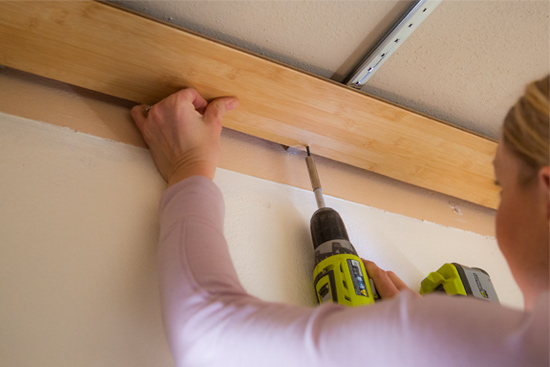
3. Attach Planks To The Ceiling
Hold the first plank in place along your chalk line. Use a nail gun to fasten the plank to each ceiling joist or furring strip. Place nails at an angle through the tongue if possible (for tongue-and-groove), or through the face if not.
Nail spacing: Every 16–24 inches, and at each joist.
For extra hold, you can add a bead of construction adhesive to the back of each plank. This helps prevent sagging.
Important insight: If you plan to remove the plank ceiling later, avoid glue. If it’s a permanent feature, glue adds strength.
4. Continue Row By Row
Work your way across the ceiling, row by row. Fit each new plank snugly against the last. Tap lightly with a rubber mallet if needed.
For tongue-and-groove planks, push the tongue into the groove and tap tight. For shiplap or plain edge, just butt them together.
Stagger joints: Start each row with a cut piece so seams do not line up. This looks better and adds strength.
Check for straightness every few rows with your level. Make small adjustments as you go to keep lines straight.
5. Cut Around Obstacles
When you reach lights, fans, or vents, measure and mark the spot on the plank. Use a jigsaw or hole saw to cut holes for these fixtures. Cut slowly for clean edges.
Save the cutout pieces for tight spots near the walls.
6. Finish The Last Row
The last row often needs to be cut narrower to fit. Measure the gap, subtract 1/4 inch for expansion, and cut planks to width. Use a pry bar or tapping block to fit the last row tightly.
Some installers pre-paint or stain the cut edges before installing, so the raw wood does not show.
7. Add Trim Or Molding
To cover gaps at the edges, install crown molding or quarter-round trim around the ceiling. This gives a clean, professional finish. Nail trim to the wall, not the planks, so the wood can move with temperature changes.
If you want a more rustic look, use beams or simple wood strips instead of fancy molding.
8. Install Fixtures And Clean Up
Reinstall lights, fans, and smoke detectors. Turn the power back on. Fill nail holes with wood filler, then sand and touch up paint or finish as needed.
Vacuum up dust and enjoy your new ceiling.
Uncommon beginner mistake: Not allowing for expansion gaps at the walls. Wood moves with moisture and temperature, so always leave a 1/4-inch gap, even if it feels strange.
Cost And Time Estimate
Installing a plank ceiling takes time, but knowing what to expect helps you plan. Here is a typical project breakdown:
| Room Size | Material Cost | Time Needed (DIY) | Pro Labor Cost |
|---|---|---|---|
| Small (10×12 ft) | $200–$600 | 1–2 days | $500–$1,200 |
| Medium (12×16 ft) | $400–$1,200 | 2–3 days | $1,000–$2,000 |
| Large (15×20 ft) | $700–$2,000 | 3–4 days | $1,800–$3,500 |
Note: Costs depend on the material you choose and your location.
Special Considerations For Different Rooms
Not every room is the same. Here’s what to watch for:
Kitchens And Bathrooms
These rooms have more moisture. Use wood that is sealed on all sides, or choose PVC/plastic planks. Make sure to leave expansion gaps and use caulk designed for humid areas.
Basements
Basements can be damp and uneven. Furring strips are often needed. Check for leaks before installing.
Sloped Or Vaulted Ceilings
Plank ceilings look great on slopes, but measuring and cutting take more time. Use scaffolding for safety. Start at the lowest point and work up.
Popcorn Ceilings
You can cover popcorn ceilings with planks, but test for asbestos first if your home is older than 1980. It is often safer to cover rather than remove popcorn texture.
Credit: checkinginwithchelsea.com
Mistakes To Avoid When Installing Plank Ceilings
Many DIYers make simple mistakes that can ruin the look or life of their new ceiling. Avoid these errors:
- Skipping acclimation: Wood that isn’t adjusted to your room can warp or gap.
- Not finding joists: Planks nailed only into drywall will sag or fall.
- Ignoring expansion gaps: Wood needs space to move.
- Poor layout planning: Crooked or uneven rows look unprofessional.
- Rushing cuts around fixtures: Take your time for a clean look.
- Skipping safety gear: Always wear eye and ear protection.
Smart tip: Take photos of joist locations and wiring before covering with planks. If you need to find a wire or pipe later, you’ll know exactly where it is.
How To Care For And Maintain Your Plank Ceiling
A plank ceiling is easy to keep looking good if you maintain it right.
- Dust regularly with a microfiber cloth or duster on an extension pole.
- Clean stains with a damp cloth and mild soap. Avoid soaking the wood.
- Check for leaks or moisture, especially in kitchens, bathrooms, and basements.
- Re-seal or re-stain every few years if the wood looks dry or faded.
- Touch up nail holes or scratches with matching filler and finish.
Pro insight: If a plank gets damaged, you can often remove and replace just one board, not the whole ceiling.
Common Design Options And Finishes
A plank ceiling can fit many styles, from classic to modern. Here are some popular choices:
- Whitewashed planks: Brighten a room, good for coastal or farmhouse look.
- Dark stains: Add drama and warmth, great for libraries or dens.
- Natural wood: Shows grain and knots, fits rustic or cabin styles.
- Painted planks: Any color, perfect for kids’ rooms or bold designs.
- Two-tone or patterned: Combine stains or paint for a unique look.
Advanced option: Add faux beams across your planked ceiling for extra style. These can be hollow to hide wires or lights.
When To Hire A Professional
While many people can install a plank ceiling themselves, some projects are better left to pros:
- Very high or vaulted ceilings: Safety is a concern.
- Complex lighting or wiring: Electricians can help.
- Historic homes: May require special materials or care.
- If you lack time or tools: Hiring out can save stress.
Important note: Always check local building codes, especially if you add insulation or change electrical fixtures.

Credit: www.youtube.com
Sustainability And Environmental Impact
Wood is a renewable resource, but it’s important to choose certified or reclaimed wood when possible. Look for the FSC (Forest Stewardship Council) label. This ensures wood is harvested responsibly.
Engineered and composite planks use less solid wood and often recycle materials. PVC is long-lasting but not biodegradable.
Where To Buy Plank Ceiling Materials
Big box stores like Home Depot and Lowe’s offer a wide selection. You can also find specialty woods at local lumberyards or online.
For unique looks, search for reclaimed wood sellers. This wood has history and character, and using it is good for the environment.
For more detailed information and design ideas, visit the Houzz Guide to Ceiling Planks.

Credit: checkinginwithchelsea.com
Frequently Asked Questions
How Long Does It Take To Install A Plank Ceiling?
Most DIYers can finish a small room in one or two days, including prep and clean-up. Larger rooms or complicated layouts may take several days. Professional installers are usually faster but cost more.
Can I Install A Plank Ceiling Over Popcorn Texture?
Yes, you can install directly over popcorn ceilings if the surface is sound and flat. If your home was built before 1980, check for asbestos before disturbing the texture. Furring strips can help create a flat surface.
What Is The Best Material For Moist Areas Like Bathrooms?
PVC or composite planks are best for high-moisture rooms. If you use wood, seal all sides with a water-resistant finish and leave expansion gaps. Always use caulk at the edges to prevent water from getting behind the planks.
Do I Need To Remove All Light Fixtures Before Installing Planks?
Yes, remove all fixtures so you can fit planks tightly. You’ll cut holes for the fixtures and reinstall them after the ceiling is complete. Always turn off power at the breaker box before starting.
Is A Plank Ceiling Expensive Compared To Drywall?
A plank ceiling often costs more than plain drywall but less than custom coffered ceilings. Material prices range from $1 to $10 per square foot, depending on your choice. Labor costs are higher if you hire a pro, but many homeowners find the DIY savings worth the effort.
Adding a plank ceiling can be one of the most satisfying upgrades for your home. With the right preparation, tools, and careful work, you can create a ceiling that makes your space feel warm, stylish, and unique. Take your time, follow the steps, and enjoy the transformation for years to come.