Installing a metal door frame is a task that can transform any building project, whether it’s for a home, office, or industrial space. Unlike wooden frames, metal door frames offer greater durability, better fire resistance, and can withstand harsh environments. Many people think this job is only for professionals, but with the right knowledge, tools, and patience, you can install a metal door frame yourself. This guide will walk you through every step, from understanding the different types of metal frames to final installation and finishing touches. If you want your door to function well, look good, and last for years, it’s worth learning how to do the job right.
Understanding Metal Door Frames
Before you begin, it’s essential to understand what a metal door frame is and why you might choose one over a wooden frame. Metal door frames are usually made from steel or aluminum. They are used in commercial buildings, hospitals, schools, and increasingly in residential construction.
Why Choose Metal?
- Strength: Metal frames can handle heavier doors and high traffic. They are less likely to split or crack, even after years of use.
- Fire Safety: Many metal frames are rated for fire resistance. Some can resist fire for up to 90 minutes, which is important in apartments or commercial spaces.
- Longevity: They do not rot, warp, or get eaten by termites. This makes them an excellent choice for humid climates or places where wooden frames might fail.
- Security: More difficult to break compared to wood. This is why banks, schools, and offices often choose metal frames.
Metal frames are also easier to maintain, needing only simple cleaning and occasional touch-up paint.
Types Of Metal Door Frames
There are several types, each serving a different purpose:
- Knock-down (KD) frames: These come in pieces and are assembled at the site. Good for renovation projects or when access is tight, for example, in corridors or upper floors where a full frame might not fit through stairs or elevators.
- Welded frames: Delivered as one solid piece, best for new construction. Welded frames are stronger and have fewer visible joints, giving a cleaner look.
- Slip-on frames: Slide over an existing wall, used in some retrofit jobs. These are ideal if you want to avoid major demolition but still want the benefits of a metal frame.
- Double rabbeted frames: Hold two doors (double doors) or a door and a sidelight. Common in schools, hospitals, or wide entrances.
Each type has its own installation method, but the general process is similar. Always check the manufacturer’s instructions for your frame.
Non-obvious insight: Not all metal frames are suitable for exterior use. If you’re installing a frame outdoors, make sure it has a weather-resistant finish or is made from galvanized steel to prevent rust.
Tools And Materials Needed
Preparation is half the job. Having the right tools and materials ready will save you time and reduce mistakes.
Essential Tools:
- Measuring tape
- Level (2-foot and 4-foot recommended)
- Hammer drill with masonry or wood bits
- Screw gun or electric drill
- Phillips and flathead screwdrivers
- Rubber mallet
- Chisel (if adjusting wall)
- Clamps
- Utility knife
- Caulk gun
Materials:
- Metal door frame (correct size for your opening)
- Shims (wood or plastic)
- Anchors (masonry or wood)
- Screws or bolts (as specified by the frame manufacturer)
- Expanding foam or backer rod (for insulation)
- Fire caulk or sealant
- Touch-up paint (for scratches)
Safety Equipment:
- Work gloves
- Safety glasses
- Ear protection (when drilling)
Extra tip: If your project is in a high-moisture area, consider stainless steel screws or anchors to avoid rust. Also, having extra shims and screws on hand can save time if you drop or lose pieces during installation.

Credit: www.youtube.com
Measuring And Preparing The Opening
Installing a metal door frame starts with precise measurements and a properly prepared opening. Most installation problems come from this step, so take your time.
Measure The Rough Opening
The “rough opening” is the hole in the wall where the frame will go. The opening should be:
- Width: 1/2 inch to 1 inch wider than the frame
- Height: 1/4 inch to 1/2 inch taller than the frame
This extra space allows you to adjust the frame for plumb (vertical alignment) and level.
Measure the width and height in three places (top, middle, bottom for width; left, center, right for height) to catch any unevenness in the wall. Use the smallest measurement to avoid a frame that’s too big to fit.
Check Wall Type
Is your wall made of drywall and wood studs, concrete block, or poured concrete? The installation method and anchors you use will depend on this. For example, masonry anchors are needed for concrete, while wood screws are used for wooden studs.
Some walls may have metal studs, especially in commercial buildings. In this case, use self-tapping screws designed for metal. For old brick walls, check for loose bricks or mortar and repair them before installation.
Clean And Inspect
Clear away debris, loose plaster, or old frame pieces. The opening must be flat and free from obstructions. If the wall is uneven, use a chisel or grinder to smooth it out. Double-check for any wiring or plumbing that could get in the way.
Sometimes old construction hides pipes or wires near the opening. Use a stud finder with wire detection, or gently probe with a screwdriver to avoid accidents.
Non-obvious insight: If your wall is out of plumb (leans in or out), it’s better to fix the wall before installing the frame. Trying to force a frame into a crooked opening will lead to door problems later.
Assembling The Metal Door Frame
If you have a welded frame, you can skip this step. For knock-down (KD) frames, assembly is required.
Assemble Kd Frames
- Lay out all frame pieces on a clean, flat surface. This helps you spot any damage or missing parts before you start.
- Connect the jambs to the head (top) piece. Most frames use tabs or screws for this.
- Check for squareness: Use a framing square or measure diagonally from corner to corner. Both measurements should be equal.
- Tighten screws or tabs as per the instructions. Do not over-tighten, as this may twist the frame.
If your frame includes silencers (small rubber plugs that quiet the door), insert them now. Some frames also have pre-installed hinge reinforcements. Make sure these face the correct side for your door swing (left or right).
Tip: If the pieces don’t fit easily, check for bends or debris in the joints before forcing them together. Use a rubber mallet for gentle taps—never a metal hammer, which can dent the frame.
Placing The Frame In The Opening
With your frame assembled, it’s time to position it in the opening.
Set The Frame
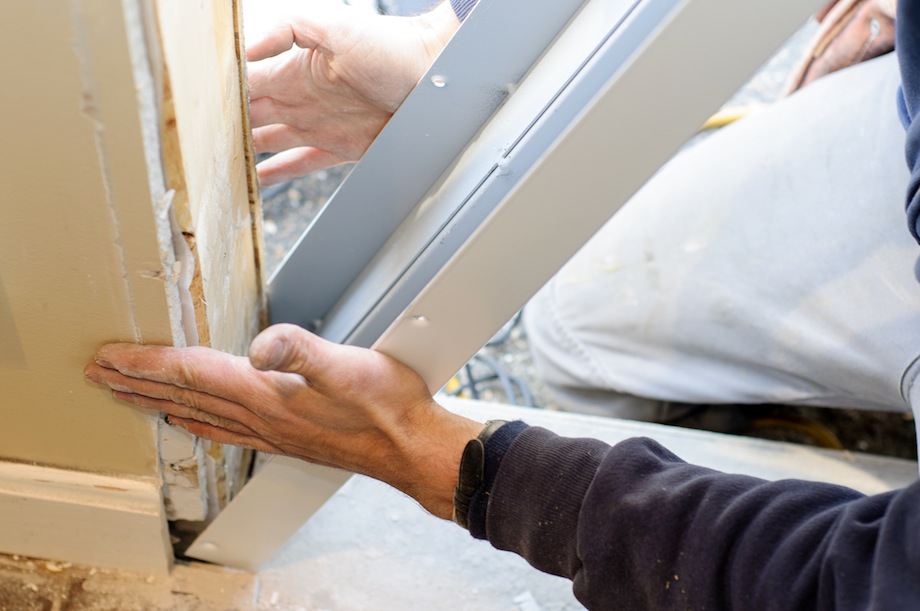
- Insert the frame into the opening. Get help if it’s heavy. Frames can flex and bend if handled roughly, so lift from the sides, not the middle.
- Shim the base on both sides so the frame sits at the correct height. The frame should not touch the floor unless specified.
- Use a level to check that the frame is plumb on both sides and level at the head.
- Shim at hinge and lock points: This keeps the frame from twisting when you anchor it.
Non-obvious insight: Many beginners forget to check the frame’s alignment in three directions: plumb (vertical), level (horizontal), and square (diagonal). Failure to do this can cause door binding later.
If your door includes a threshold (metal plate at the bottom), check the height with the frame installed so the door clears the floor covering (tile, carpet, etc. ).
Example: If you plan to add thick carpet or a mat, raise the frame slightly with shims so the door doesn’t drag.
Anchoring The Metal Door Frame
Anchoring is how you attach the frame to the wall. This step is crucial for stability and long-term performance.
Types Of Anchors
- Masonry anchors: Used in concrete or brick walls.
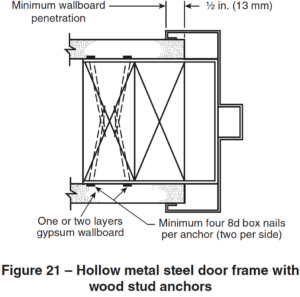
- Wood screws: For wood-stud walls.
- Expansion bolts: For added strength in heavy-duty situations.
Anchor Placement: Typically, anchors are placed at each hinge location, each strike (lock) location, and near the base and head of each jamb. Manufacturer instructions will give you exact points.
Some frames include welded anchor tabs, which are metal “ears” sticking out of the jamb. These get screwed or bolted to the wall for extra strength.
Drilling And Fastening
- Mark anchor positions on the wall using the frame’s holes as a guide.
- Remove the frame (if needed) and drill holes in the wall.
- Reinsert the frame and align holes.
- Insert anchors and tighten screws or bolts. Do not over-tighten.
Pro tip: Tighten each anchor a little at a time, alternating sides. This keeps the frame from twisting.
If you hit a hard spot when drilling, stop and clear the bit. For masonry, drill deeper than the anchor length to allow room for dust.
Checking Plumb And Level
After each anchor is installed, re-check the frame with your level and square. Adjust shims as needed before fully tightening the anchors. This step is often rushed, but it prevents long-term door problems.
If one side of the frame moves while tightening, loosen the anchor and add or adjust a shim. Even a few millimeters of movement can cause trouble later.
Installing The Door
Once your frame is anchored and true, you can install the door itself.
Hanging The Door
- Install hinges on the door if not pre-attached. Align them carefully with the hinge cutouts in the frame.
- Align the door with the frame and insert hinge pins. It helps to have a helper hold the door steady.
- Test swing: The door should open and close smoothly. If it rubs or sticks, adjust the shims or hinges.
For heavy or fire-rated doors, use all the supplied hinges. Missing a hinge can cause the door to sag or fail over time.
Installing Hardware
Install the lockset, strike plate, and any closers or kick plates. Most hardware comes with instructions, but make sure screws are tight and hardware is aligned. If the latch doesn’t catch, adjust the strike plate position.
Non-obvious insight: Use a bit of graphite lubricant on hinges and latches to prevent squeaks and sticking.
If your door has electronic hardware (like a keypad lock), follow the wiring instructions carefully and test the lock before closing the door fully.
Insulating And Sealing The Frame
Proper insulation and sealing can make your door frame more energy-efficient and fire-safe.
Insulating The Gap
There is usually a small gap between the frame and the wall. Fill this with:
- Backer rod (foam rod) for large gaps
- Expanding foam for smaller gaps
- Mineral wool for fire-rated openings
Avoid overfilling with expanding foam, as it can push the frame out of alignment.
For fire-rated doors, use only mineral wool or fire-resistant foam. Regular foam can melt in a fire and reduce your door’s safety rating.
Sealing
Use fire caulk or high-quality sealant around the frame, especially if fire resistance is required. Smooth the caulk with your finger or a tool for a neat finish.
If you’re installing an exterior door, run a bead of silicone caulk along the outside edges to keep out wind and rain.
Extra tip: Don’t seal the bottom of the frame if you expect water leaks. Leave a small gap so water can drain out.
Finishing Touches
The last steps are about making the installation look good and last longer.
Touch-up Painting
If you scratched the frame during installation, use touch-up paint made for metal surfaces. Clean the surface first for best results.
If your frame is galvanized, use a zinc-rich primer before painting for better adhesion.
Cleaning
Remove any excess caulk, foam, or dust. Clean the frame and door with a damp cloth.
For stubborn marks, use a mild detergent. Avoid harsh chemicals, which can damage the paint or finish.
Final Inspection
Check that:
- The door swings freely
- Locks and hardware work correctly
- The frame is plumb and level
- Gaps are even
A properly installed metal frame will have even reveals (gaps) around the door and no visible warping.
If you spot problems, fix them now rather than later. Small adjustments are easier before the final cleanup.
Common Mistakes And How To Avoid Them
Many installations fail because of avoidable errors. Here are some to watch out for:
- Poor measurements: Double-check all measurements before buying or installing the frame.
- Ignoring plumb and level: Even a slight tilt causes door problems.
- Wrong anchor type: Use the correct anchors for your wall type.
- Over-tightening screws: Can bend or distort the frame.
- Skipping insulation: Leads to drafts and lower fire rating.
- Not adjusting shims: Uneven reveals make doors look and work badly.
Non-obvious insight: Don’t skip the final inspection. Even pros sometimes forget a screw or leave a shim sticking out, which can cause noise or make the door look unfinished.
Credit: steeldoor.org
Comparing Metal And Wooden Door Frames
If you’re still deciding, here’s a quick comparison of metal and wooden door frames:
| Feature | Metal Frame | Wood Frame |
|---|---|---|
| Strength | High | Medium |
| Fire Resistance | Excellent | Poor |
| Durability | Long-lasting | Can rot or warp |
| Cost | Medium–High | Low–Medium |
| Installation Difficulty | Medium | Easy |
Example: If you live in an area with termites or high humidity, metal may be the smarter long-term choice, even if the upfront cost is higher.
Different Anchor Options For Metal Door Frames
Choosing the right anchor is important for a secure installation. Here’s a quick guide to the most common types:
| Anchor Type | Best For | Strength | Notes |
|---|---|---|---|
| Masonry Anchor | Concrete/Brick | High | Needs hammer drill |
| Wood Screw | Wood Studs | Medium | Easy to use |
| Expansion Bolt | Heavy Doors | Very High | More expensive |
| Powder-Actuated Fastener | Steel/Concrete | Very High | Requires special tool |
Non-obvious insight: For old brick or stone walls, use anchors designed for brittle material. Standard masonry anchors can break old bricks.
Credit: www.thisiscarpentry.com
Cost And Time Estimate
Understanding the cost and time involved helps you plan better.
| Step | Estimated Time | Estimated Cost (USD) |
|---|---|---|
| Measuring & Preparation | 1 hour | 0 (unless tools needed) |
| Frame Assembly | 30–45 minutes | 0 (included in frame cost) |
| Frame Placement & Shimming | 30 minutes | 5–10 (shims) |
| Anchoring | 1 hour | 10–30 (anchors, screws) |
| Door & Hardware Installation | 1 hour | Varies (door & hardware) |
| Insulating & Sealing | 30 minutes | 5–20 (foam, caulk) |
| Finishing Touches | 30 minutes | 0–10 (paint, supplies) |
Total time: 4–5 hours for an average DIYer (not including drying/curing time for paint or sealant).
Total cost: $100–$300 (excluding the door itself).
Add extra time for complex situations like old buildings, thick walls, or special fire-rated frames.
Advanced Tips For A Professional Finish
If you want your installation to look professional and last longer, consider these tips:
- Pre-fit the door to the frame before final anchoring to check clearances. This can prevent surprises after everything is tightened.
- Back-coat the frame with primer if it will be exposed to moisture. This protects against rust from the inside.
- Use fire-rated materials if required by local building codes. Check your permit or ask your inspector.
- Add weatherstripping for exterior doors to improve energy efficiency. Self-adhesive foam strips are easy to install.
- Install threshold plates to protect the floor and improve sealing. This is especially important for doors leading outside or to garages.
- Avoid overtightening hardware, which can strip threads or bend parts.
- Label all parts during disassembly for renovations. This makes reassembly much easier.
A professional installer always finishes with a final function test—open and close the door several times, lock and unlock, and check for smoothness.
When To Call A Professional
While installing a metal door frame is possible for a skilled DIYer, there are cases when professional help is better:
- Large or heavy doors (more than 100 lbs)
- Fire-rated or security doors requiring strict code compliance
- Structural wall openings that may need reinforcement
- Retrofit installations in old or uneven walls
A professional installer will have the right tools, know local building codes, and can ensure a safe, secure fit.
If you feel unsure or overwhelmed at any stage, it’s better to pause and get expert advice than to risk a poor installation.
Finding More Guidance And Building Codes
For complex projects or code questions, check local building codes or consult reliable sources like the National Fire Protection Association. They offer information on fire-rated doors and frames.
You can also ask at your local building department or hardware store for advice about your specific situation.
Frequently Asked Questions
How Do I Know If My Wall Can Support A Metal Door Frame?
Most walls can support a metal frame if you use the right anchors. For drywall with wood studs, use wood screws. For concrete or brick, use masonry anchors. If your wall is very thin or weak, you may need to reinforce it before installation.
Can I Install A Metal Door Frame Without Removing The Old Wooden Frame?
In most cases, the old frame must be removed for a proper fit. Some slip-on metal frames can go over existing frames, but this is less secure and may not look as clean. For best results, start with a bare opening.
Do I Need To Use Fire Caulk For All Metal Door Frames?
Fire caulk is only required for fire-rated doors and frames, often found in commercial or multi-family buildings. For standard doors in a home, regular caulk is usually enough, but fire caulk adds extra safety.
How Do I Fix A Metal Frame That Is Out Of Square After Anchoring?
Loosen the anchors, adjust the shims to correct the alignment, and retighten. If the frame is badly bent, it may need to be removed and reinstalled. Always check for plumb and square before final tightening.
What Is The Best Way To Maintain A Metal Door Frame After Installation?
Keep the frame clean, touch up any scratches with paint, and lubricate hinges once or twice a year. Check for rust or loose anchors, especially on exterior doors. Regular maintenance will help your frame last for decades.
Extra tip: For exterior doors, inspect weatherstripping and caulk every year, especially before rainy seasons. Replace any worn parts to keep your door air- and water-tight.
Installing a metal door frame can seem challenging, but with careful planning and attention to detail, you can achieve a strong, safe, and attractive result. Take your time at each step, use the right tools and materials, and don’t be afraid to ask for help if you need it.
With this knowledge, your next door installation will be a lasting success.