Every homeowner with a basement knows that floor drains play a quiet but vital role. They remove water from leaks, overflows, and even heavy cleaning. But sometimes, you need to cap a basement floor drain—maybe because of constant sewer gas smell, unwanted water backup, or to prepare for a renovation. Capping is not just plugging a hole; it’s about protecting your basement, your health, and your property value. Get it wrong, and you could create more problems than you solve.
This guide walks you through the entire process. You’ll learn why capping is sometimes necessary, how to do it step by step, which materials work best, and what mistakes to avoid. With practical tips and real-world examples, you’ll be able to make a smart, safe decision for your home.
Why Cap A Basement Floor Drain?
Capping a basement floor drain is not just about stopping water or odors. There are several reasons why homeowners consider this action:
- Sewer Gas Prevention: Old or dry drains can allow sewer gases into your home, which is both unhealthy and unpleasant.
- Water Backup Control: During storms or floods, drains can become entry points for sewage backup.
- Pest Entry: Open drains can be an access point for insects and even small rodents.
- Renovation Needs: If you’re finishing your basement or changing the floor plan, you may need to remove or block the drain.
- Plumbing System Changes: Sometimes, new plumbing layouts make certain floor drains unnecessary or problematic.
It’s important to note that capping a floor drain should not be your first solution if you have drainage problems. Instead, it’s a controlled, planned action when you’re sure the drain is not needed or is causing more harm than good.
Understanding Your Basement Floor Drain
Before you cap anything, you need to know what you’re dealing with. Basement floor drains are usually part of the house’s drainage system and can be connected to different types of plumbing lines:
- Sanitary sewer: Carries wastewater from the house.
- Storm sewer: Designed for rainwater only.
- Sump pit: Collects groundwater to be pumped outside.
Some older homes might have combined systems, which are now considered outdated and risky. The type of system matters because it changes how you should cap the drain.
How To Identify Your Floor Drain Type
There are a few ways to figure out which system your basement drain belongs to:
- Check where the pipe leads: Sanitary drains usually have a sewer odor; storm drains do not.
- Use dye testing: Pour a small amount of colored water down the drain and see where it appears outside.
- Ask a plumber: If you’re unsure, a professional can inspect and give you a clear answer.
Never assume you know your drain’s purpose. Capping a drain that is still needed for water removal can lead to flooding and damage.
Tools And Materials Needed To Cap A Basement Floor Drain
Capping a drain is a straightforward project, but you need the right supplies. Here’s what most homeowners will need:
- Gloves and safety glasses: For protection.
- Tape measure: To measure the drain opening.
- Pipe wrench or adjustable pliers: For removing the drain cover and tightening the cap.
- Shop vacuum: To clean debris from the drain.
- Plug or test cap: These come in several types (see the table below).
- Pipe cleaner or rag: For cleaning the pipe before sealing.
- PVC cement or plumber’s putty: To seal the cap if needed.
- Bucket and towels: To catch any water.
Some jobs may also need hydraulic cement, especially for permanent capping. If the drain is cast iron, you may need a rubber test plug or even a hammer and chisel to fit certain caps.
Comparison Of Common Floor Drain Caps
Here’s a quick look at cap types you might use:
| Cap Type | Material | Reusable | Best For |
|---|---|---|---|
| Mechanical Test Plug | Rubber/Plastic | Yes | Temporary or Testing |
| PVC Threaded Cap | PVC Plastic | No | PVC Pipe Ends |
| Cast Iron Cleanout Plug | Iron/Brass | No | Cast Iron Pipes |
| Hydraulic Cement Plug | Cement | No | Permanent Sealing |
Choosing the right cap depends on your pipe type (PVC, ABS, cast iron) and whether you want a temporary or permanent solution.
Step-by-step Guide: How To Cap A Basement Floor Drain
Capping a floor drain can be simple, but following the right steps is crucial for safety and effectiveness. Here’s a clear, practical guide:
1. Assess The Need And Impact
Before starting, ask yourself:
- Is the drain truly not needed?
- Is there another way for water to exit the basement?
- Will capping the drain affect the plumbing or cause water to pool elsewhere?
Ignoring these questions can lead to costly mistakes.
2. Gather Your Tools And Materials
Get everything ready before you begin. Double-check that your cap matches the drain size and pipe material.
3. Clean The Drain Opening
Remove the drain cover using a screwdriver or pliers. Use a shop vacuum to clean out dirt, debris, and any standing water. A clean surface helps the cap seal tightly.
4. Measure The Pipe
Use a tape measure to get the inside diameter of the pipe. Most floor drains are either 2″, 3″, or 4″ in diameter. Accurate measurement ensures you buy the correct cap size.
5. Choose The Cap Type
- For temporary capping (like during a remodel), use a mechanical test plug.
- For permanent sealing, a PVC or cast iron cap sealed with cement is best.
Refer to the comparison table above if unsure.
6. Install The Cap
- For mechanical plugs: Insert into the pipe, tighten the wing nut until snug. Do not overtighten, as this can crack plastic pipes.
- For threaded caps: Apply PVC cement to the threads (if plastic), then screw the cap on tightly.
- For hydraulic cement: Mix as directed, press into the pipe opening, and smooth the surface. This is a one-way operation; removal is difficult.
7. Test The Seal
Pour a small amount of water around the cap. Check for leaks or movement. For a gas-tight seal, also check for any sewer odor over the next few days.
8. Restore The Floor Surface (optional)
If you want a flush finish, cover the cap with a thin layer of concrete to blend with the floor. This step is common in finished basements.
9. Document The Change
Note the location and reason for capping the drain in your home records. Future homeowners or plumbers will thank you.
Credit: www.reddit.com
Mistakes To Avoid When Capping A Basement Floor Drain
Many DIYers rush the job and end up with bigger problems. Here are common mistakes and how to avoid them:
- Capping the wrong drain: Sometimes, a floor drain is the only exit for overflow water. Blocking it can cause flooding.
- Using the wrong cap size: A loose or oversized cap can leak or pop off under pressure.
- Ignoring building codes: Some codes require at least one floor drain in a basement. Check local rules before starting.
- Skipping cleaning: Dirt under the cap can prevent a tight seal.
- Not testing the seal: Always check for leaks and odors after installation.
- Using cheap materials: Low-quality caps can fail, especially with water pressure or chemical exposure.
- Permanent capping without backup: If you permanently seal the only floor drain, make sure you have another way to remove water.
Permanent Vs. Temporary Capping
Not all situations call for the same solution. Here’s how permanent and temporary capping compare:
| Feature | Permanent Cap | Temporary Cap |
|---|---|---|
| Removal | Difficult | Easy |
| Cost | Higher (if concrete used) | Lower |
| Ideal For | Finished floors, unused drains | Renovations, testing |
| Durability | Years/Decades | Months/Years |
Always choose permanent capping only after you’re certain the drain is not needed.
When To Call A Professional
Some situations require a licensed plumber:
- If the drain is connected to a main sewer line
- If you notice water backup elsewhere after capping
- If you are unsure about building codes in your area
- If the drain is surrounded by cracked or damaged concrete
- If you lack the proper tools or experience
A professional can also test for leaks and ensure your work meets code.
Health And Safety Concerns
Capping a basement floor drain is not just a technical task. Health and safety matter:
- Sewer gases (like methane or hydrogen sulfide) are toxic. If you smell strong odors, ventilate the area and wear a mask.
- If you find mold or standing water in the drain, clean thoroughly before capping.
- Use gloves and eye protection at all times.
If you cap a drain and notice persistent odors, call a plumber. This could indicate a problem elsewhere in the system.
Credit: drainbrain.com
Cost Of Capping A Basement Floor Drain
Most DIY drain capping projects are affordable. Here’s a breakdown of common costs:
- Mechanical test plug: $5–$20
- PVC cap: $2–$10
- Hydraulic cement: $10–$20
- Labor (if hiring a plumber): $100–$300
If you need concrete repair or major plumbing changes, costs can rise quickly.
Example Cost Scenario
Suppose you have a 3″ PVC drain. You buy a test plug ($12), PVC cement ($8), and gloves ($5). Your total is $25. If you call a plumber, expect to pay around $150 for a simple capping job.
Real-world Case Studies
Case 1: Odor Control In An Older Home
A homeowner in Detroit noticed a strong sewer smell every summer. The basement drain was rarely used. After confirming that no water needed to exit through the drain, they capped it with a mechanical plug. Odors disappeared, and the basement became usable storage space.
Case 2: Water Backup After Heavy Rain
During a storm in New Jersey, a family’s basement flooded through the floor drain. They capped the drain, but weeks later, water began pooling in the laundry room. Investigation revealed that the capped drain was the only escape for washing machine overflows.
The cap was replaced with a backwater valve—solving the problem without blocking needed drainage.
Case 3: Finishing The Basement
In Seattle, a homeowner finished their basement into a playroom. The central drain was capped using hydraulic cement after confirming all other drainage was routed outside. The floor was leveled and covered with carpet, creating a dry, odor-free space.
Alternatives To Capping A Basement Floor Drain
Sometimes, capping is not the best long-term solution. Consider these alternatives:
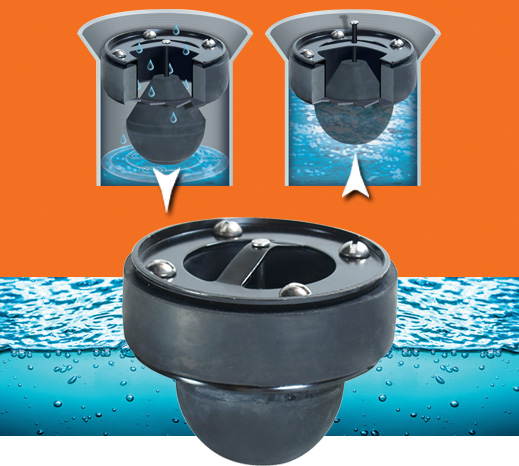
- Floor drain trap primer: Keeps water in the trap to block gases.
- Backwater valve: Allows water to flow out but prevents backup.
- Check valve: Stops reverse water flow.
- Drain maintenance: Regular cleaning prevents odors and blockages.
If you’re capping just because of smell, a trap primer may be a simpler, safer fix.
Dealing With Building Codes And Permits
Every city has its own rules for plumbing changes. Most require that at least one floor drain remain in a basement for safety reasons. Capping a drain without a permit can lead to fines, failed inspections, and resale problems.
Before you start:
- Check your local building code online or call your city’s inspection office.
- Some areas require you to use only removable caps.
- Permits may be needed for any changes to the sewer system.
Never skip this step. Unapproved work can cause headaches when selling your house.

Credit: www.youtube.com
Environmental Impact
Capping a drain affects how water moves around your property. If you block a drain that helps with stormwater, you might cause water to pool outside or push it into your neighbor’s yard. Always think about the big picture before making changes.
Expert Tips For A Trouble-free Job
Here are a few practical insights most beginners miss:
- Mark the Cap Location: After carpeting or tiling, you might forget where the cap is. Mark the spot on a sketch or take a photo.
- Use a Gas-Resistant Seal: Not all caps block sewer gases. Choose a cap specifically designed for gas-tight sealing if odors are a concern.
- Check for Multiple Drains: Some basements have two or more drains. Capping just one may not solve the problem.
- Test During Rain: After capping, monitor the basement during a heavy rainstorm to check for new leaks or water buildup.
- Keep the Old Cover: Even if you cap permanently, keep the old drain cover in storage. Future owners or plumbers might need it.
Frequently Asked Questions
What Happens If I Cap The Only Basement Floor Drain?
If you cap the only drain, any water from leaks, overflows, or cleaning will have nowhere to go. This can cause serious flooding and water damage. Always make sure you have another water exit, like a sump pump, before capping the last drain.
Can I Use Expanding Foam To Seal A Basement Floor Drain?
Expanding foam is not recommended for drain capping. It’s not waterproof, can break down over time, and does not block sewer gases. Use a proper plumbing cap or hydraulic cement for a long-lasting seal.
How Do I Know If My Drain Is Still Needed?
Check where water in your basement naturally flows. If the floor is sloped toward the drain or appliances (like water heaters) are nearby, the drain may still be needed. You can also consult a plumber for an inspection.
Will Capping A Drain Stop Sewer Smells?
If the smell is coming from an unused or dry trap, capping can help. But if sewer gas is entering from other pipes, capping one drain won’t fix the problem. Consider a trap primer or have a plumber check your system.
Do I Need A Permit To Cap A Basement Drain?
In many cities, yes—a permit is required for plumbing changes. Always check with your local building department before starting. Unpermitted work can cause problems later, especially when selling your home.
—
Capping a basement floor drain is more than just a DIY project—it’s a decision that affects your home’s safety, comfort, and value. With the right tools, knowledge, and planning, you can stop odors, prevent backup, and prepare for renovations with confidence. When in doubt, consult a professional and always check local codes. For more on plumbing systems and home safety, see the official EPA guidelines.
Take your time, choose the right cap, and you’ll have a dry, odor-free basement for years to come.