Hanging curtains in a room with crown molding can feel tricky. You want your window treatments to look polished, but you also don’t want to damage the molding or create awkward gaps. Many homeowners face this challenge, especially in older homes or spaces with beautiful architectural details. The good news is, you can achieve a stylish, seamless look—if you follow the right steps. This guide breaks down everything you need to know: from planning and measuring, to installation techniques, hardware choices, and design tips. Whether your goal is privacy, light control, or pure style, you’ll learn how to hang curtains with crown molding confidently.
Understanding Crown Molding And Its Impact
Crown molding is a decorative trim installed where the wall meets the ceiling. It adds elegance and can make a room look more finished. But it also creates a bump at the top of the wall, which changes how curtain rods can be mounted.
Types Of Crown Molding
Not all crown molding is the same. Some are wide and dramatic, while others are slim and subtle. The size and profile affect how much space you have to work with.
- Traditional crown molding: Wide, ornate, often with curves and patterns.
- Modern crown molding: Sleek, minimal, usually thinner.
- Custom molding: Unique shapes, sometimes with extra layers.
Understanding the type you have helps you decide how and where to install curtain hardware. For example, deep crown molding may limit space for wall brackets, while thin molding offers more flexibility.
Why Crown Molding Complicates Curtain Installation
Standard curtain rod installation usually involves mounting brackets above the window frame. With crown molding, this area may be blocked or uneven. Installing too close to the molding can cause:
- Difficulty securing brackets
- Curtains brushing against or covering the molding
- Reduced visual appeal
That’s why careful planning is essential.
Measuring And Planning For Curtain Placement
Precise measurement is the foundation for a neat curtain installation. With crown molding present, you need to adapt your usual measuring technique.
Step-by-step Measuring Process
- Measure window width: Use a tape measure to record the width of your window frame.
- Determine curtain rod length: Ideally, curtain rods should extend 6–12 inches beyond each side of the window. This makes windows look larger and lets curtains open fully.
- Identify molding height: Measure from the top of the window frame to the bottom of the crown molding. Note this vertical distance—it’s crucial for bracket placement.
- Decide curtain height: For a dramatic look, many designers recommend hanging curtains as high as possible. But with crown molding, you may need to lower the rod slightly.
Planning Rod Placement
- Leave at least 1–2 inches between the rod and the molding to avoid damage.
- If the molding is very deep, consider wall-mounting the rod below the molding.
- For slim molding, you may be able to mount brackets just above or at the same height as the molding.
Example Calculation
If your window is 48 inches wide, and the crown molding starts 6 inches above the window, your rod should be at least 60 inches long and positioned about 2 inches below the molding.
Choosing The Right Curtain Rods And Brackets
Selecting the correct hardware is essential for both functionality and appearance.
Curtain Rod Styles
- Single rod: Simple, holds one curtain layer.
- Double rod: Allows for layering (like sheer and blackout curtains).
- Adjustable rod: Expands to fit wider windows.
Bracket Types
- Standard brackets: Attach directly to the wall.
- Ceiling mount brackets: Useful if wall space is limited or molding is very deep.
- Decorative brackets: Match your room style.
Comparison Table: Rod And Bracket Options
Here is a quick comparison of rod and bracket types suited for crown molding situations:
| Rod/Bracket Type | Best For | Key Features | Limitations |
|---|---|---|---|
| Standard Wall Bracket | Thin or low crown molding | Easy installation, common | May not fit with deep molding |
| Ceiling Mount Bracket | Deep crown molding | Mounts to ceiling, avoids molding | Requires ceiling drilling |
| Extended Bracket | Wide windows, layered curtains | Supports heavy curtains, adjustable | Bulky appearance |
| Decorative Bracket | Matching room style | Stylish, blends with décor | May be costly |
Material And Finish
Choose hardware that matches or complements your room. Popular finishes include:
- Brushed nickel
- Matte black
- Bronze
- White
If you want your hardware to blend in, pick a finish similar to your wall or molding color.
Deciding Where To Mount Curtain Rods
The location of your curtain rod is key. With crown molding, you have three main options:
1. Below The Crown Molding
This is the most common solution. It allows easy access and avoids drilling into the molding.
- Pros: Preserves molding, easy to install, creates clean look.
- Cons: May reduce the “height” effect curtains can give.
2. In Front Of The Crown Molding
Some homeowners prefer to mount rods directly in front of the molding, especially if the molding is not too deep.
- Pros: Maximizes curtain height, bold appearance.
- Cons: Curtains may touch or cover molding, which can hide its beauty.
3. Ceiling Mount Above Crown Molding
For rooms with very deep molding or lack of wall space, ceiling mounting is ideal.
- Pros: No wall drilling, dramatic floor-to-ceiling look.
- Cons: Requires ceiling anchors, may not suit all curtain styles.
Data Table: Mounting Options
Compare mounting locations for curtain rods with crown molding:
| Mount Location | Visual Impact | Ease of Installation | Potential Issues |
|---|---|---|---|
| Below Molding | Clean, preserves molding | Easy | Less height effect |
| In Front of Molding | Bold, tall appearance | Moderate | Curtains may cover molding |
| Ceiling Mount | Modern, dramatic | Challenging | Requires ceiling anchors |

Credit: www.reddit.com
Step-by-step Guide: Hanging Curtains With Crown Molding
Now, let’s walk through the installation process. This guide works for most home setups, but always adapt based on your unique molding and window.
Gather Materials
You will need:
- Curtain rod and brackets
- Curtains (length and width to fit your window)
- Measuring tape
- Pencil
- Level
- Drill and screws
- Anchors (if needed)
- Ladder or step stool
Step 1: Mark Bracket Placement
Hold the bracket against the wall, below the crown molding. Use a pencil to mark the screw holes. Make sure both sides are level.
Pro tip: Use a laser level for the most accurate alignment.
Step 2: Drill Pilot Holes
Drill small holes where you marked. If your wall is drywall, use anchors to prevent screws from pulling out.
Step 3: Attach Brackets
Secure the brackets to the wall with screws. Double-check that they are level and firmly attached.
Step 4: Install Curtain Rod
Slide the rod through your curtains, then place it onto the brackets. Adjust as needed.
Step 5: Hang Curtains
Arrange the curtains so they fall evenly. Make sure the top is not touching or catching on the molding.
Step 6: Final Adjustments
Open and close the curtains to check movement. If the curtains drag on the molding, reposition the rod slightly lower.
Example: Living Room Installation
Suppose you have a window 50 inches wide, with 4-inch crown molding. You choose a 66-inch rod to extend beyond the window. You mark bracket placement 2 inches below the molding, drill, use anchors, and secure everything. Curtains hang cleanly, just below the molding, creating a polished look.
Advanced Techniques And Solutions
Sometimes basic installation isn’t enough. Here are some advanced tips for tricky crown molding setups.
Using Spacer Blocks
If the molding protrudes too much, you can use spacer blocks behind the brackets. This pushes the rod out further, avoiding contact with the molding.
- Spacer blocks can be made from wood or plastic.
- Paint them to match your wall for a seamless look.
Custom Brackets
Some hardware stores offer custom brackets designed for deep molding. These brackets curve out and around the molding, allowing rods to sit farther from the wall.
Ceiling-mounted Tracks
For modern homes, consider ceiling-mounted curtain tracks. These let curtains glide smoothly and avoid molding entirely.
- Tracks are ideal for very wide windows or sliding doors.
- They provide a sleek, minimalist appearance.
Example Table: Spacer Block Thickness
| Molding Depth | Recommended Spacer Thickness | Bracket Type |
|---|---|---|
| 1 inch | 1/2 inch | Standard |
| 2 inches | 1 inch | Extended |
| 3+ inches | 1.5 inches | Custom |

Credit: www.atticmag.com
Choosing Curtain Length And Style
With crown molding, curtain length and design matter. The right choice enhances your room and avoids visual clutter.
Curtain Length
- Floor-length curtains: Most popular, create a tall, elegant effect.
- Sill-length curtains: Best for kitchens or casual rooms.
- Puddle-length curtains: Dramatic, but harder to clean.
For rooms with crown molding, floor-length curtains are usually best. They draw the eye up and highlight the molding.
Curtain Heading Types
- Grommet: Modern, easy to slide.
- Rod pocket: Traditional, gathers fabric at top.
- Pinch pleat: Formal, structured look.
Choose a heading that matches your rod and room style.
Fabric Choices
- Sheer: Light, airy, lets in natural light.
- Blackout: Blocks light, good for bedrooms.
- Linen: Classic, soft, adds texture.
Non-obvious insight: Heavy curtains can make a room with crown molding feel crowded. Opt for medium-weight fabrics for balance.
Tips For Protecting Crown Molding
You want to preserve your crown molding. Here’s how:
- Avoid drilling directly into the molding. It’s hard to repair and ruins the look.
- Use wall anchors to spread the load, preventing cracks.
- If you must mount near the molding, use painter’s tape while drilling to minimize splintering.
Hidden pitfall: Sometimes, curtain rods installed too close to molding can cause paint chips over time, especially with frequent use. Leave a gap or use soft-touch hardware.
Common Mistakes And How To Avoid Them
Even experienced decorators make errors. Here are mistakes to watch out for:
- Mounting brackets too high: This can damage molding or create uneven curtains.
- Choosing the wrong rod length: Short rods make windows look small.
- Ignoring molding depth: Deep molding needs special brackets or spacers.
- Using heavy curtains without proper support: Risk of brackets pulling out.
- Skipping anchors: Screws in drywall alone won’t hold heavy curtains.
Pro tip: Always double-check measurements before drilling. If you’re unsure, test with masking tape before committing.
Style And Design Ideas
Curtains are more than just functional—they’re a design element. Here are ways to make your curtains shine in rooms with crown molding:
- Use contrasting colors between curtains and molding for visual interest.
- Choose rods with decorative finials to echo molding shapes.
- Layer sheers and blackout curtains for flexibility.
- Install tiebacks for a formal look.
Expert insight: For historic homes, match curtain patterns to molding style. In modern rooms, go for simple, clean lines.
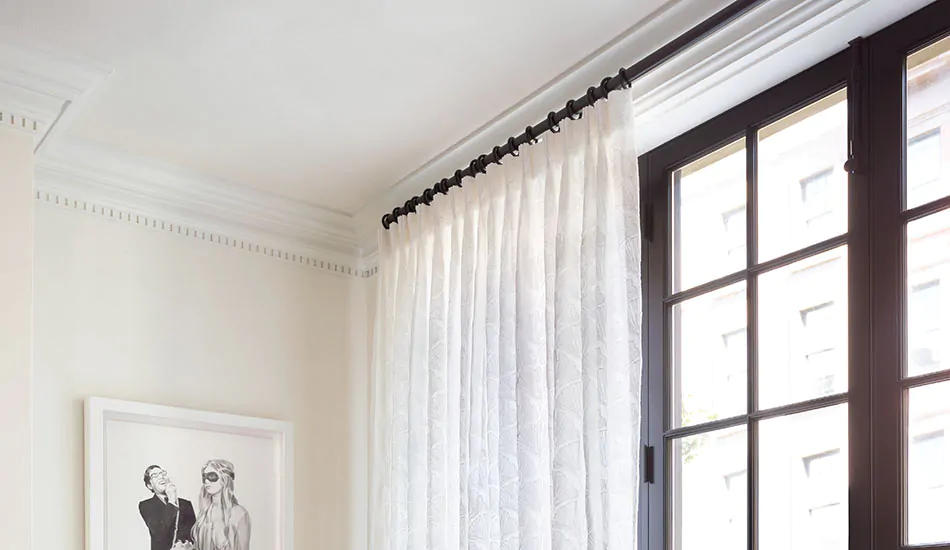
Credit: www.theshadestore.com
Real-life Examples And Case Studies
Let’s look at how homeowners and designers tackle curtain hanging with crown molding.
Example 1: Classic Dining Room
A homeowner with ornate crown molding wanted to add privacy without covering the trim. She chose slim rods, mounted 1 inch below the molding, and used sheer curtains. The result: privacy and elegance, with molding fully visible.
Example 2: Modern Bedroom
In a room with deep, minimalist molding, the designer chose ceiling-mounted tracks. Floor-length blackout curtains were installed for a clean, dramatic effect. No drilling into the molding, and the window looked taller.
Example 3: Rental Apartment Solution
Renters often face restrictions on drilling. One clever approach: tension rods. The rod was placed below the molding, held by friction. Lightweight curtains hung easily, with no damage to walls or molding.
Maintenance And Long-term Care
Curtain hardware needs regular attention. Here’s how to keep everything in top shape:
- Check brackets every 6 months for looseness.
- Dust crown molding and hardware to prevent buildup.
- If curtains snag on molding, adjust rod height or choose lighter fabrics.
- For painted molding, touch up chips with matching paint.
Surprising tip: Silicone spray on curtain rods can help curtains glide smoothly and reduce wear.
When To Hire A Professional
Sometimes, expert help is the best choice. Consider hiring a professional if:
- Your molding is very deep, fragile, or historic.
- You have multiple large windows.
- You want custom brackets or tracks.
- You’re uncomfortable using power tools.
Many designers offer curtain installation services. This can save time and prevent costly mistakes.
For more in-depth architectural guidance, visit the This Old House website.
Frequently Asked Questions
How High Should I Hang Curtains With Crown Molding?
Ideally, hang curtains about 1–2 inches below the bottom of the crown molding. This preserves the molding and creates a clean look. If your molding is very slim, you may be able to mount the rod just above the molding.
Can I Drill Into Crown Molding For Curtain Brackets?
It’s best to avoid drilling into crown molding. This can damage the trim and is hard to repair. Instead, mount brackets to the wall below the molding or use ceiling mounts.
What Curtain Rod Is Best For Deep Crown Molding?
For deep molding, use ceiling mount brackets or extended wall brackets. Spacer blocks can also help push the rod out further and avoid contact with the molding.
How Do I Keep Curtains From Snagging On Crown Molding?
Leave a gap between the rod and the molding—usually 1–2 inches. If curtains still snag, use lighter fabrics or adjust rod placement.
Is It Possible To Hang Curtains Without Drilling In A Rental?
Yes! Tension rods or adhesive hooks are good options. Place the rod below the molding, and use lightweight curtains to avoid stress on the hardware.
Final Thoughts
Hanging curtains with crown molding may seem complicated, but with careful planning and the right tools, you can achieve a beautiful result. Start by measuring carefully and choosing hardware that fits your space. Remember to protect your molding and use proper brackets or anchors. With these steps, your windows will look stylish—and your crown molding will stay untouched and beautiful. Whether you’re a DIY beginner or a seasoned decorator, these tips will help you create the perfect look for your home.