Gluing down hardwood floors can transform a space, adding warmth, style, and long-lasting value. But to get that smooth, elegant finish, you need more than just good materials—you need the right method. If you’re tackling this project yourself, it’s important to understand each step, from choosing the right adhesive to laying the last board.
This guide explains everything you need to know, in clear language, to help you glue down hardwood floors like a pro—even if you’ve never done it before.
Many people think gluing hardwood is only for experts. But with patience, preparation, and the right advice, you can get a beautiful result. You’ll also avoid common beginner mistakes that can lead to squeaks, gaps, or warping. Whether you’re working with engineered wood or solid planks, this guide walks you through the process, answers your questions, and helps you make smart choices at every stage.
What Is Glue-down Hardwood Flooring?
Glue-down hardwood flooring is a method where wood planks are attached directly to the subfloor using a strong adhesive. This method is popular for engineered hardwood, but some solid woods can also be glued if the manufacturer allows it. Glue-down floors work especially well over concrete, but they’re also suitable for wood subfloors.
Unlike floating floors, which snap together and rest on top of a foam underlayment, glued floors become part of the building. This creates a solid feel underfoot and helps block sound. With the right glue and careful installation, glued hardwood can last for decades.
Benefits And Drawbacks Of Glue-down Installation
Before you start, it’s wise to understand why people choose glue-down hardwood floors—and what challenges you might face.
Benefits
- Stability: Glued floors resist movement. They are less likely to squeak or bounce compared to floating floors.
- Sound Reduction: The adhesive creates a tight bond, reducing hollow sounds.
- Suitable for Many Subfloors: Works well over concrete and plywood.
- Lower Profile: No need for thick underlayments, which helps in rooms with low ceilings.
- Professional Finish: Many high-end floors use this method for a seamless look.
Drawbacks
- Permanent: Removing glued wood is hard. Repairs can be tricky.
- Skill Required: Mistakes are difficult to fix after the glue dries.
- Messy: Adhesive can be sticky and hard to clean if it gets on the wood’s surface.
- Longer Install Time: Needs careful preparation and patience.
Choosing The Right Hardwood Flooring
Not all hardwood is suitable for glue-down installation. Picking the right material is the first step to a successful project.
Engineered Vs. Solid Hardwood
- Engineered wood is usually best for glue-down. It’s made from several layers, so it resists shrinking and expanding.
- Solid hardwood (single-piece planks) can be glued, but only if the manufacturer says it’s safe. Solid wood moves more with moisture changes.
Board Size
- Wide planks (over 5 inches) can be glued, but need special adhesives.
- Thinner boards are easier for beginners.
Wood Species
Dense woods like oak and maple are popular. Softer woods (like pine) may dent easily but are easier to cut. Always check if your chosen wood is compatible with glue-down installation.
Pre-finished Vs. Site-finished
- Pre-finished boards are coated in the factory. They are quicker to install, but glue must be cleaned off immediately or it will mark the finish.
- Unfinished boards are sanded and finished after installation, hiding minor glue marks.
Tools And Materials You Need
Gather all your tools and materials before you start. This saves time and reduces mistakes.
Essential Tools
- Tape measure (for accurate cuts)
- Chalk line (for straight rows)
- Trowel (to spread glue evenly—follow adhesive manufacturer’s size)
- Rubber mallet (to tap boards together)
- Flooring cutter or saw (for end cuts)
- Flooring spacers (to maintain gaps at walls)
- Moisture meter (to check subfloor and wood)
- Knee pads (to protect your knees)
- Notched trowel (usually 1/4″ x 1/4″ for engineered)
- Pull bar (for tightening boards at wall edges)
- Shop vacuum (for cleaning subfloor)
- Rags and mineral spirits (for glue cleanup)
Materials
- Hardwood flooring (enough for your space, plus 5-10% extra for cuts)
- Adhesive (urethane-based is common)
- Moisture barrier (if installing over concrete)
- Blue painter’s tape (to hold boards together as glue dries)
- Wood filler (for small gaps)
- Transition strips (for doorways)
- Baseboards/quarter round (for the edges)
Preparing The Subfloor
A flat, dry subfloor is the foundation for a good installation. Skipping this step is a major cause of floor problems.
Types Of Subfloor
- Concrete: Must be fully cured (usually at least 60 days old).
- Plywood or OSB: Needs to be clean, dry, and level.
Checking For Moisture
Excess moisture is the enemy of hardwood. Use a moisture meter to test both the subfloor and the wood flooring. For concrete, moisture should be below 3 lbs per 1,000 sq. ft. per 24 hours (calcium chloride test).
If moisture is high, use a moisture barrier. Some adhesives include a built-in barrier, but confirm with the manufacturer.
Leveling The Subfloor
Your subfloor should be flat within 1/8 inch over 6 feet. Use a long straightedge to check. Fill low spots with a patching compound and sand down high spots. For concrete, use self-leveling compound if necessary.
Cleaning
Sweep and vacuum the subfloor completely. Any dust or debris can prevent the glue from sticking.
Acclimating Hardwood Flooring
Wood moves with temperature and humidity. Acclimation helps prevent gaps or buckling later.
- Bring the wood inside the room where it will be installed.
- Let it sit for 3–7 days, stacked with air gaps between boxes.
- Room temperature should be 60–80°F, humidity 30–50%.
Manufacturers may have specific recommendations. Skipping acclimation is a common mistake that leads to floor problems.
Laying Out Your Floor
Planning your layout before you start gluing is key for a great look and less waste.
Find The Starting Wall
Most people start along the longest, straightest wall. In open spaces, you might run the boards parallel to sunlight or the main entrance.
Measure And Mark
- Use a chalk line to mark your first row.
- Leave a 3/8” to 1/2” expansion gap at all walls.
Dry Lay A Few Rows
Lay out boards without glue to check the pattern and fit. Mix boards from different boxes to blend color variations.
Stagger The Joints
End joints should be at least 6 inches apart from row to row. This makes the floor stronger and looks better.
Choosing The Right Adhesive
The right adhesive makes a big difference in the durability and performance of your floor.
Types Of Adhesive
- Urethane adhesive: The most common for engineered and solid hardwood. Stays flexible, resists moisture, and forms a strong bond.
- MS Polymer: Low VOC, easy to clean, and also strong.
- Water-based adhesives: Cheaper but not as moisture-resistant. Not recommended for solid wood or high-humidity areas.
Always check that the adhesive is made for your specific wood and subfloor type.
Coverage
Adhesive coverage varies. Read the label for how many square feet each bucket covers. Running out mid-job is a hassle and can cause uneven drying.
Credit: floorset.com.au
Step-by-step Guide To Gluing Down Hardwood Floors
Now, let’s get into the main steps. Take your time with each stage for the best results.
1. Prepare The Subfloor
- Double-check that it’s flat, clean, and dry.
- Install a moisture barrier if needed.
2. Plan Your First Row
- Mark your starting line using a chalk line.
- Place spacers at the wall to keep an expansion gap.
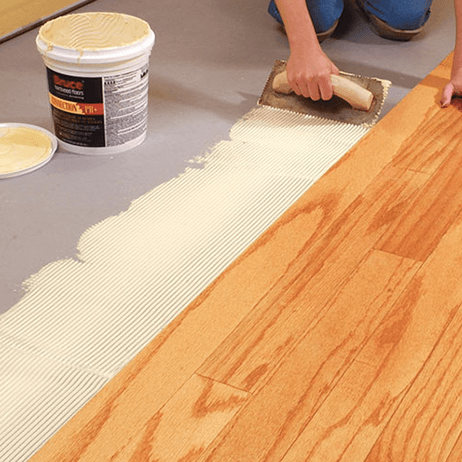
3. Spread The Adhesive
- Only spread enough glue for 2–3 rows at a time.
- Use a notched trowel at a 45-degree angle. The notches control glue thickness.
- Don’t leave adhesive open too long. It can start to dry and lose stickiness.
4. Lay The First Row
- Place boards firmly into the glue, pressing down evenly.
- Use a rubber mallet and tapping block to close gaps.
- Wipe off any glue that squeezes up immediately—dried glue can be hard to remove, especially on pre-finished boards.
5. Continue Laying Boards
- Stagger the end joints at least 6 inches.
- Mix boards from different boxes for a natural look.
- Use a pull bar to fit boards tightly at the wall.
6. Check For Level And Fit
- Every few rows, check that the floor is flat and tight.
- Adjust if needed before the glue sets.
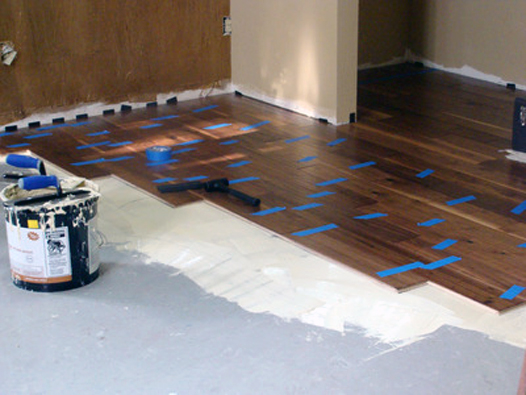
7. Finish The Last Row
- You may need to rip (cut lengthwise) the last boards to fit.
- Leave the expansion gap at the wall.
- Use painter’s tape to hold boards in place as the glue cures.
8. Let The Floor Cure
- Wait at least 24 hours before walking on the floor or moving furniture.
- Keep pets and kids off during this time.
Handling Edges, Doorways, And Special Areas
Some areas need special attention for a professional result.
Doorways
- Use a jamb saw to trim door frames so boards slide under.
- For transitions to other floors (like tile or carpet), install a transition strip.
Around Pipes And Vents
- Use a hole saw to cut neat holes for pipes.
- Leave expansion gaps and cover with trim rings or covers.
Stairs
- Most glue-down floors are not for stairs. Use stair noses and glue or nail as recommended.
Cleaning Up Glue
Spilled adhesive is a common issue, but quick action prevents stains.
- Urethane glue: Wipe off immediately with a damp cloth and mineral spirits.
- MS Polymer: Usually cleans with water.
- Dried glue may need scraping—test in a hidden spot first.
Don’t let glue dry on finished surfaces. It can leave a permanent haze.
Installing Baseboards And Trim
After the floor cures, finish the edges for a clean look.
- Remove spacers from the expansion gap.
- Install baseboards or quarter round to cover the gap.
- Nail baseboards to the wall, not the floor, to allow for movement.
Common Mistakes And How To Avoid Them
Learning from others’ mistakes can save you frustration and money.
- Skipping subfloor prep: Uneven or dirty subfloors lead to loose boards and squeaks.
- Ignoring acclimation: Wood that’s not adapted to the room can expand or contract, causing gaps or buckling.
- Not enough expansion gap: Wood swells with humidity—no gap means the floor can push against walls and buckle.
- Using the wrong adhesive: Not all glue works with every wood or subfloor.
- Working too slowly: Adhesive can skin over and lose stickiness if left open too long.
- Letting glue dry on boards: Clean up spills right away.
- Not mixing boards: Using boards from one box at a time can create color patches.
Practical Tips For A Perfect Glue-down Floor
- Measure twice, cut once: Double-check all measurements before cutting.
- Work in small sections: Don’t rush to cover a large area with glue—it dries fast.
- Keep the room at the right temperature and humidity during and after installation.
- Rent a flooring roller if possible, to press boards firmly into the adhesive.
- Have extra blades and trowels: Glue can gum up tools quickly.
- Keep pets out: Pet hair can stick to glue and floor.
Cost And Time Estimates
Knowing how much time and money to budget helps plan your project.
| Task | Time Estimate (per 100 sq ft) | Cost Estimate |
|---|---|---|
| Subfloor prep | 2–4 hours | $50–$200 |
| Acclimation | 3–7 days (no labor) | Free |
| Flooring installation | 4–8 hours | $2–$4/sq ft (DIY) |
| Adhesive | — | $1–$2/sq ft |
| Tools & supplies | — | $100–$300 (one-time) |
Professional installation can cost $5–$10 per square foot, depending on complexity and location.
Comparing Glue-down To Other Installation Methods
It’s helpful to see how glue-down compares to other popular flooring methods.
| Installation Method | Best for | Pros | Cons |
|---|---|---|---|
| Glue-down | Concrete, plywood, engineered wood | Stable, quiet, lower profile | Permanent, messy, slower install |
| Floating | Engineered wood, laminate | Quick, easy to repair/remove | Can sound hollow, less solid feel |
| Nail-down | Solid wood, plywood subfloors | Very secure, traditional method | Not for concrete, noisy during install |

Credit: www.reallycheapfloors.com
How To Maintain Glue-down Hardwood Floors
A well-installed floor is just the beginning. Good care helps your floor last for decades.
- Sweep or vacuum regularly to remove dirt and grit.
- Use a damp mop (not wet) for cleaning. Avoid harsh chemicals.
- Protect from water: Wipe up spills right away.
- Use felt pads under furniture to prevent scratches.
- Refinish as needed: Most engineered floors can be lightly sanded once or twice, solid wood more often.
Non-obvious Insights Most Beginners Miss
- Subfloor flatness is more important than you think. Even small dips can cause “springy” spots. Always use a long straightedge to check—not just your eyes.
- Not all adhesives block moisture equally. If you’re on a basement or slab, read the adhesive label closely and consider a separate moisture barrier.
- Mixing board lots prevents color patches. Hardwood varies in color—mix planks from different boxes as you go to blend these natural differences.
- Extra glue on tongues or grooves can prevent boards from fitting tightly. Wipe off excess before setting the next board.
- Expansion gaps must be kept clear. Don’t let glue or debris fill this gap, or your floor may buckle in humid weather.
Credit: www.viewalongtheway.com
When To Call A Professional
Some situations are best left to experts:
- Very uneven or cracked subfloors
- High moisture levels that can’t be fixed
- Large or complex layouts (herringbone or chevron patterns)
- If you’re unsure about any step
A professional can also handle difficult cuts and transitions, and may offer a warranty.
Final Quality Check
After the floor is cured:
- Walk across the room. Listen for squeaks or hollow spots.
- Check that all boards are tight, with no gaps.
- Inspect for glue stains and clean as needed.
- Install baseboards and transition strips.
This attention to detail makes your floor look truly professional.
Environmental And Health Considerations
- Low-VOC adhesives are safer, especially in homes with children or pets.
- Ventilate the room during and after installation to minimize glue fumes.
- Dispose of waste properly. Glue buckets and rags can be hazardous—follow local rules.
For more details on adhesives and their safety, see this EPA guide to flooring adhesives.
Frequently Asked Questions
What Kind Of Hardwood Floors Can Be Glued Down?
Most engineered hardwood can be glued down, and some types of solid hardwood as well. Always check the manufacturer’s instructions. The glue-down method works well with planks up to 5 inches wide. Wider boards need special adhesives.
How Long Does Glued Hardwood Need To Cure Before Walking On It?
Let the floor cure for at least 24 hours before walking on it or moving in furniture. Some adhesives may need more time, especially in humid or cold conditions. Check the label for exact recommendations.
Can I Glue Hardwood Floors Over Old Tile Or Vinyl?
Yes, you can glue hardwood over some types of tile or vinyl, but the surface must be clean, flat, and well-bonded. Rough up shiny surfaces with sandpaper. Remove any loose or damaged tiles first. Always use an adhesive approved for this application.
What’s The Difference Between Glue-down And Floating Floors?
Glue-down floors are attached to the subfloor with adhesive, making them feel solid and quiet. Floating floors snap or glue together but do not attach to the subfloor—they “float” on top, usually over a foam underlayment. Floating floors are faster to install but may sound more hollow.
How Do I Clean Up Adhesive If I Spill It On The Boards?
Clean glue spills right away with a damp cloth and mineral spirits (for urethane adhesive). If it dries, use a plastic scraper gently. For pre-finished wood, always test cleaners in a hidden spot first to avoid damaging the finish.
Gluing down hardwood floors is a rewarding project that adds beauty and value to any space. With careful preparation, the right tools, and attention to detail, you can achieve a professional result—even as a first-timer. Remember, the most important steps happen before you open the first bucket of glue: planning, acclimating, and preparing the subfloor. Take your time, follow each stage, and enjoy the comfort and elegance of your new hardwood floor for years to come.