Gaps between a dresser and the wall are more common than many homeowners realize. These spaces can be frustrating—they collect dust, swallow small items, and make a room look less tidy. Whether your gap is a tiny sliver or a wide space, it’s worth addressing.
In this guide, you’ll discover practical solutions, creative tricks, and important considerations for covering gaps between dressers and walls. You’ll also learn why these gaps happen and how to prevent them in the future. By the end, you’ll be ready to choose the best method for your space and style.
Why Gaps Happen Between Dressers And Walls
Most people think gaps are just a furniture problem, but the causes are more complex. Understanding them can help you find the right fix.
1. Baseboards And Molding
Many dressers can’t sit flush against the wall because of thick baseboards or decorative molding. This is especially true in older homes, where moldings are wider.
2. Uneven Walls Or Floors
Walls and floors are rarely perfectly straight or flat. Even a small tilt or curve can push your dresser away from the wall.
3. Furniture Design
Some dressers have backs that are not flat or have support bars, which prevent them from getting close to the wall.
4. Electrical Outlets And Cables
Outlets, plugs, and cords behind the dresser create a gap, especially if you need to access them regularly.
5. Safety And Airflow
Sometimes, a gap is intentional. If a dresser holds electronics or items that need ventilation, a gap allows for airflow.
Non-obvious insight: Sometimes, furniture legs are not level, causing a gap at the top even if the bottom looks snug. Checking with a level can reveal hidden problems.
Choosing The Best Gap Cover Solution
There is no one-size-fits-all answer. The right solution depends on the gap size, your room’s style, and what you need to access behind the dresser. Here are the main factors to consider:
- Gap width and depth
- Furniture material and design
- Room aesthetics
- Budget
- How often you need to access outlets or cables
Non-obvious insight: Before buying or building a solution, measure both the widest and narrowest parts of the gap. Walls and furniture are rarely perfectly parallel.
Credit: www.younghouselove.com
Simple Solutions For Small Gaps
If your gap is less than two inches, you have many easy and fast options. These fixes require little skill and can be completed in minutes.
1. Caulk Or Flexible Filler
For gaps under 1 inch, paintable caulk or acrylic filler works well. It blends in and blocks dust.
- How to use:
Clean the gap, apply a bead of caulk, and smooth with a finger or tool. Paint to match the wall or dresser if desired.
- Best for:
Small, fixed dressers or when you don’t need to move furniture often.
2. Foam Gap Sealers
Foam weatherstripping or gap sealer tape is an easy fix.
- How to use:
Cut the foam to length and press it into the gap. It compresses to fit uneven spaces.
- Best for:
Temporary fixes or rentals (removes easily).
3. Backer Rods
For gaps between 1/4 inch and 1 inch, a backer rod (round foam rod) is a good choice.
- How to use:
Push the rod into the gap, then cover with caulk if you want a smooth finish.
- Best for:
Deep but narrow gaps.
Stylish And Functional Gap Covers
Sometimes you want the cover to add style, storage, or a finished look. These options do more than just block the gap.
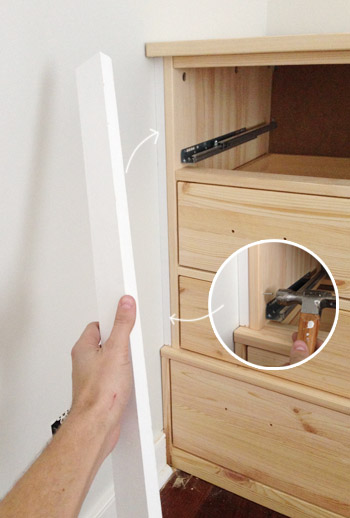
1. Custom Trim Or Molding
Adding a wood trim strip or molding can make a gap look intentional.
- How to use:
Cut a piece of wood or molding to size, paint or stain it to match your dresser or wall, and attach with nails or adhesive.
- Best for:
Permanent fixes, especially in classic or traditional rooms.
2. Gap Filler Panels
A gap filler panel (a flat board or painted panel) can cover wider spaces.
- How to use:
Cut a panel to the gap’s size, finish it, and secure to the wall or the back of the dresser.
- Best for:
Gaps over 2 inches, modern or minimalist rooms.
3. Decorative Screens
A folding screen or decorative panel adds texture and hides the gap.
- How to use:
Place the screen between the dresser and wall. Choose a pattern or color that fits your decor.
- Best for:
Wide gaps or for renters who want a non-permanent solution.
4. Slim Shelving
A narrow shelf or bookcase can fill the gap and give extra storage.
- How to use:
Buy or build a shelf that fits the space. Secure it for safety if needed.
- Best for:
Large gaps, kids’ rooms, or anywhere you want more organization.
Diy Methods: Step-by-step Instructions
For those who like hands-on projects, making your own gap cover can be rewarding. Here’s a simple guide for a custom wood filler strip.
Materials Needed
- Measuring tape
- Saw (hand saw or power saw)
- Sandpaper
- Paint or stain
- Nails or strong adhesive
- Wood or MDF board
Steps
1. Measure The Gap
Measure both the height and width of the gap at several points. Use the largest measurement.
2. Cut The Board
Cut the wood to fit the length and width of the gap. Sand the edges for a smooth finish.
3. Paint Or Stain
Finish the board to match your dresser or wall.
4. Attach The Filler
Use nails or adhesive to secure the strip to the wall or back of the dresser.
5. Check The Fit
Move the dresser back and make sure the filler covers the gap completely.
Practical tip: If your floors aren’t level, you may need to sand or trim the bottom edge for a perfect fit.
Using Store-bought Gap Covers
There are several products designed for furniture gaps. They save time and often look professional.
1. Furniture Gap Bumper
These are flexible rubber or plastic strips that fit between furniture and the wall.
- Installation:
Simply press into place. Some have adhesive backing.
- Pros:
Fast to install, easy to remove.
- Cons:
May not match all decors, limited to smaller gaps.
2. Adjustable Gap Fillers
Some companies make adjustable panels that expand to fit your gap.
- Installation:
Slide to the right width and secure.
- Pros:
Good for renters, reusable.
- Cons:
Can be more expensive than DIY.
3. Cord And Cable Covers
If your gap is needed for cords, use a cord cover that protects and hides wires while blocking the gap.
- Installation:
Stick or screw the cover to the wall or dresser.
- Pros:
Organizes wires, reduces dust.
- Cons:
Only works if you need cables in the gap.
Creative Solutions For Wide Gaps
When the gap is 3 inches or more, you can turn a problem into a feature.
1. Pull-out Storage
Build or buy a pull-out organizer for the space.
- How to use:
Attach drawer slides to a narrow shelf. Store items like shoes, books, or cleaning supplies.
- Best for:
Bedrooms, closets, or small apartments.
2. Hidden Lighting
Install LED strip lights in the gap for mood lighting.
- How to use:
Stick the strip to the wall or dresser back. Plug into a nearby outlet.
- Best for:
Modern bedrooms or for a unique touch.
3. Vertical Planters
Fill the gap with a vertical planter for small plants or herbs.
- How to use:
Place a slim planter in the space. Choose plants that thrive in low light if the gap is dim.
- Best for:
Bedrooms with natural light, plant lovers.
Safety Considerations
Never ignore safety when covering furniture gaps.
- Tip-over risk:
Always secure tall dressers to the wall with anti-tip kits, especially if you’re adding weight or storage in the gap.
- Fire hazard:
Don’t block outlets with covers that can overheat.
- Childproofing:
Make sure covers can’t be pulled out easily by children or pets.
Cleaning And Maintenance
Covering the gap can reduce dust, but some covers also collect dirt.
- Removable covers:
Choose a solution you can remove or clean occasionally.
- Foam and caulk:
Check for cracking or peeling over time.
- Storage solutions:
Clean behind shelves or organizers to avoid pests.
Comparison: Diy Vs. Store-bought Gap Covers
To help you decide, here’s a quick comparison:
| Feature | DIY Gap Cover | Store-Bought Gap Cover |
|---|---|---|
| Cost | Low (materials only) | Medium to High |
| Customization | High | Low to Medium |
| Installation Time | 1-2 hours | 5-15 minutes |
| Removability | Usually permanent | Often removable |
| Appearance | Matches your decor | Limited styles |
Credit: bellewoodcottage.com
Common Mistakes To Avoid
Fixing a gap seems simple, but people often make these errors:
1. Measuring Only One Spot
Walls and furniture aren’t always straight. Always measure in several places.
2. Blocking Outlets Or Vents
Never cover electrical outlets, switches, or air vents. It’s unsafe and can cause overheating.
3. Choosing The Wrong Material
Foam or soft fillers can break down over time. Use harder materials for permanent fixes.
4. Not Securing The Dresser
Any gap cover adds weight or pressure. Anchor the dresser to the wall for safety.
5. Ignoring Cleaning
Dust and crumbs can build up behind covers if not cleaned.
How To Hide A Gap Without Moving The Dresser
Sometimes it’s impossible to move a heavy dresser. Here are options that work in place:
- Flexible foam gap fillers: Push in from above.
- Decorative trim: Attach to the wall above the dresser.
- Tall plants or decor: Place tall vases or faux plants in front of the gap.
These methods disguise the gap without heavy lifting.
When To Leave The Gap Open
Not every gap needs to be covered. If your dresser holds electronics, has a heat source, or is used for daily cable access, leaving a small gap improves airflow and prevents overheating.
If you leave the gap, clean it regularly and use a cord cover to keep things tidy.
Table: Best Solutions By Gap Size
Here’s a quick reference for what works best, depending on your gap’s width:
| Gap Size | Best Solutions | Notes |
|---|---|---|
| < 1 inch | Caulk, foam tape, backer rod | Paintable for a seamless look |
| 1-2 inches | Trim strip, store-bought bumper | Easy to match room style |
| 2-4 inches | Panel, slim shelf, decorative screen | Adds style or storage |
| > 4 inches | Pull-out storage, plants, shelving unit | Turns gap into usable space |
Preventing Gaps In The Future
If you’re rearranging furniture or moving to a new home, planning ahead can reduce or eliminate gaps.
- Choose flat-back furniture:
Look for dressers with a flat back and legs.
- Trim baseboards:
In some cases, you can notch baseboards or use a coping saw to fit the dresser closer.
- Plan for outlets:
Place dressers away from high-use outlets, or use shallow plug adapters.
- Use adjustable feet:
Some dressers allow you to adjust the legs for uneven floors.
Sustainability And Eco-friendly Options
If you care about the environment, here are some green choices:
- Use reclaimed wood:
For DIY covers, old wood is both stylish and sustainable.
- Choose reusable covers:
Foam and rubber fillers can often be reused in new homes.
- Donate unused items:
If you remove a gap-filling shelf, give it to someone who can use it.
Real-life Examples And Case Studies
Let’s look at how people solve gap problems in real homes.
- Small apartment, 1-inch gap:
A renter used paintable caulk to fill a narrow gap. The fix was quick, matched the wall, and stopped losing coins and keys.
- Family home, 3-inch gap:
A DIYer built a narrow pull-out shelf on wheels for books and art supplies. It turned wasted space into valuable storage.
- Modern condo, outlet behind dresser:
The owner used a flexible gap bumper with a cutout for the plug. This allowed access to the outlet and kept the look clean.
Cost Breakdown For Popular Solutions
Understanding costs helps set your budget. Here’s a rough guide:
| Solution | Average Cost (USD) | Labor Needed |
|---|---|---|
| Caulk or foam tape | $5 – $15 | None to low |
| Custom trim or panel | $10 – $40 | Medium (cutting, finishing) |
| Store-bought bumper | $10 – $25 | None |
| Slim shelf unit | $25 – $80 | Medium to high |
| Pull-out storage | $40 – $100 | High (assembly, installation) |
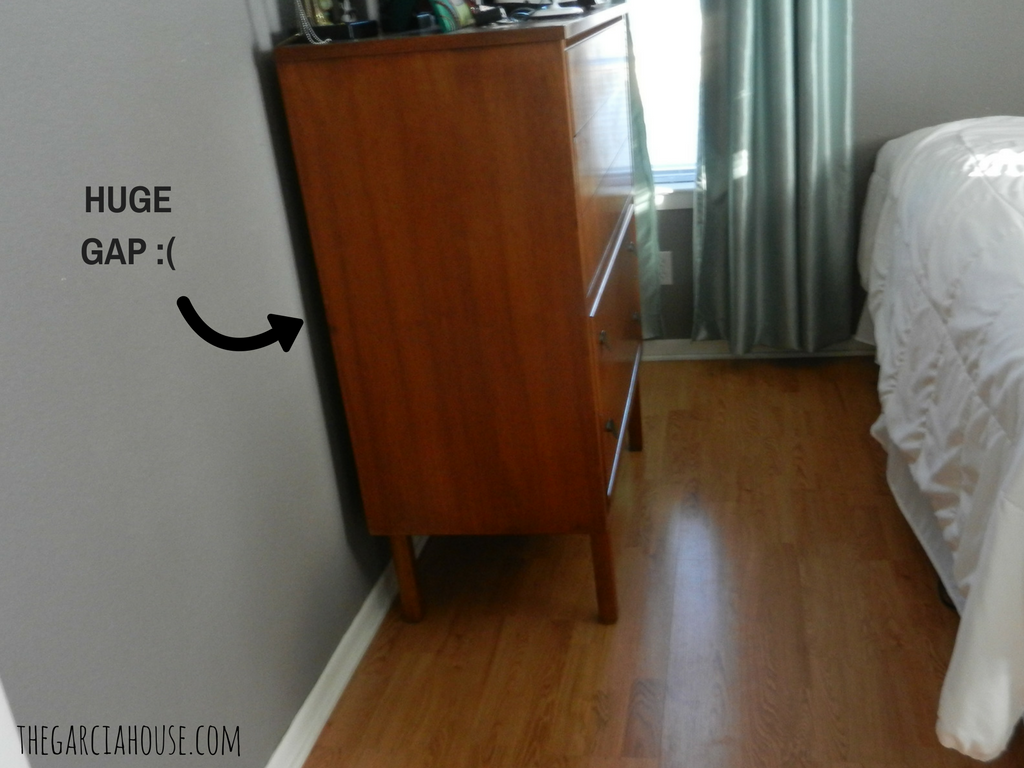
Credit: www.thegarciahouse.com
Tips For Renters
If you rent, choose removable solutions like foam tape, decorative screens, or slim shelves. Avoid nailing or gluing covers to walls, as this can cause damage and risk your deposit.
Where To Buy Gap Cover Solutions
You can find most supplies at major hardware stores, home centers, or online retailers. For specialty items, check furniture stores or search for “furniture gap covers” online. If you want more information, the Wikipedia Furniture page offers a useful overview of furniture types and styles.
Frequently Asked Questions
What Is The Easiest Way To Cover A Small Gap?
The simplest method is to use paintable caulk or foam weatherstripping. These options are fast, affordable, and require no special tools. Just clean the area, apply the filler, and smooth it out.
Can I Use A Shelf To Fill A Wide Gap?
Yes, a slim shelf or bookcase is a great way to fill a large gap and add storage. Measure carefully to ensure the shelf fits snugly. Secure it for safety, especially in homes with children or pets.
Will Covering The Gap Make Cleaning Harder?
It depends on the solution. Removable covers like foam or panels can be taken out for cleaning. Permanent solutions like caulk stop dust from entering the gap but make deep cleaning more difficult. Choose a method that matches your cleaning habits.
What Should I Avoid When Covering A Dresser Gap?
Avoid blocking electrical outlets, air vents, or using flammable materials near heat sources. Do not use covers that make the dresser unstable. Always secure tall furniture with anti-tip kits.
Is It Better To Fix The Gap Or Leave It Open?
Fixing the gap is best for appearance, cleaning, and safety. However, if the gap is needed for ventilation or access to outlets, it may be better to leave it open and just keep the area tidy.
Addressing the gap between your dresser and wall can transform the look and function of your room. Whether you choose a quick DIY fix or a stylish custom solution, you’ll enjoy a cleaner, safer, and more attractive space. Take a few minutes to measure, choose your method, and enjoy the improved results for years to come.