Getting rid of mice in the ceiling is a problem many homeowners face, but not everyone talks about openly. You might hear scratching at night, see droppings, or notice strange smells. These small signs often mean there’s a bigger issue above your head. Mice in your ceiling don’t just keep you up at night—they can also damage wires, insulation, and even create fire risks. If you’re reading this, you probably want clear steps, not just general advice. The good news is: you can solve this problem with a mix of smart tactics, patience, and a little effort.
Let’s look at everything you need to know to get mice out of your ceiling, keep them from coming back, and restore peace to your home.
Why Mice Get Into Ceilings
Most people wonder, “Why my ceiling? ” Mice don’t pick homes randomly. They look for warmth, food, shelter, and safety from predators. Ceilings, especially in older homes, offer all these things.
Mice can squeeze through tiny holes—some as small as a quarter inch (about 6 mm). Often, they enter through gaps in the roof, eaves, vents, or where wires and pipes pass into your house. Once inside, they find ceiling voids a perfect hiding spot.
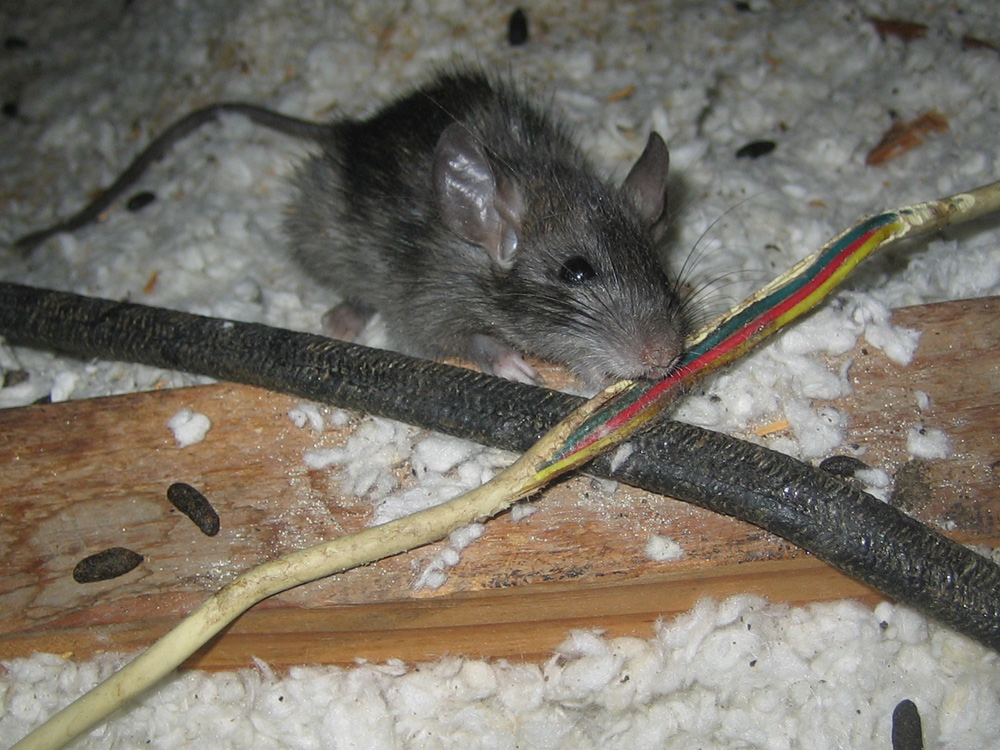
There’s insulation to nest in, wires to chew (which sharpens their teeth), and it’s usually quiet—away from people and pets.
The truth is, mice are survivors. If they find an easy way in, they’ll use it. If there’s food nearby, they’ll stay. Understanding this helps you think like a mouse—key for solving the problem.
Signs You Have Mice In The Ceiling
Sometimes, you hear noises and wonder if it’s really mice. It’s important to look for clear evidence before starting a full removal plan.
Common signs include:
- Scratching or scurrying sounds at night, especially in the ceiling or walls.
- Droppings—small, dark, rice-shaped pellets found near entry points or in the attic.
- Gnaw marks on wires, wood, or pipes.
- Insulation damage—you may notice chewed or disturbed insulation in the attic.
- Unusual smells—a strong, musky odor, or the smell of urine.
- Grease marks—oily streaks along beams or entry holes, left by mouse fur.
- Nests—shredded paper, fabric, or insulation bunched up in hidden spots.
If you notice two or more of these, it’s likely you have a mouse problem.
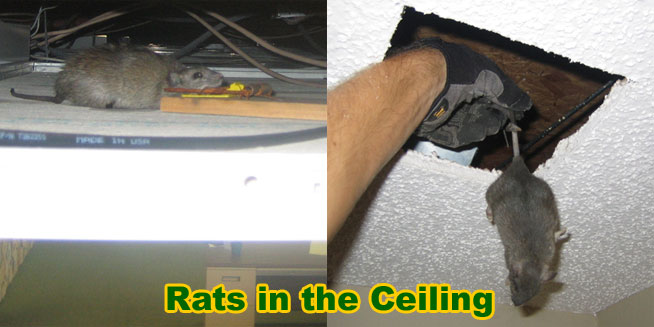
Credit: www.attic-rat.com
Why You Must Act Quickly
You might think, “It’s just a few mice, no big deal. ” But mice multiply fast. A single female can have 5-10 litters per year, with 5-8 babies each time. That’s up to 80 new mice from one female each year!
Mice can chew through electrical wires, increasing fire risk. Their droppings spread diseases such as hantavirus and salmonella. If left alone, a few mice can turn into a serious infestation in just months.
Two non-obvious problems many people miss:
- Hidden water leaks: Mice chew pipes, causing leaks you might not notice until there’s water damage.
- Structural damage: Chewing on wood and insulation weakens your home’s structure over time.
Taking action early saves money, protects your health, and prevents bigger repairs later.
How Mice Enter The Ceiling
To get mice out, you must first know how they got in. Mice are excellent climbers and squeezers.
Common entry points:
- Gaps around roof vents and soffits
- Holes where cables or pipes enter
- Broken or missing roof tiles
- Gaps under eaves and fascia boards
- Cracks in exterior walls or foundations
- Open attic windows or vents without screens
Non-obvious entry point: Even thin cracks (as small as 1/4 inch) around utility lines can be enough for a mouse. Many people focus on bigger holes and miss these smaller ones.
Knowing exactly where mice get in helps you block their routes and makes traps more effective.
Step-by-step Plan To Get Mice Out Of The Ceiling
Getting mice out isn’t just about setting traps and hoping for the best. Here’s a proven, practical plan:
1. Confirm The Infestation
Before you start, make sure you’re dealing with mice (not rats or squirrels). Check droppings, listen for sounds, and look for gnaw marks. If you’re unsure, use a motion-activated camera in the attic to catch what’s moving at night.
2. Find Entry And Exit Points
Walk around your house—inside and outside. Look for all possible gaps, holes, and cracks. Pay special attention to:
- Roof edges
- Vents
- Pipe and cable entries
- Chimney gaps
Shine a flashlight into dark corners. If you see light coming through from outside, seal that spot.
3. Seal All Entry Points (except One)
This is the most important step. Use steel wool and caulk for small holes. For larger gaps, use metal mesh or hardware cloth. Mice can chew through foam and wood, but not steel.
Pro tip: Leave one exit point open at first. This encourages mice to leave through your traps or one-way doors. After a week, seal the final hole.
Common mistake: Sealing all holes before trapping. This traps mice inside, and they may die in the ceiling, causing odor problems.
4. Remove Food Sources
Mice stay where there’s food. Store all pantry items in sealed containers. Clean up crumbs and spills. Don’t leave pet food out overnight. Keep garbage in sealed bins and empty it often.
5. Set Traps Strategically
Traps work best when placed directly in mouse pathways. In ceilings, this usually means:
- Attic corners
- Along beams near entry points
- Under insulation where nests are found
Types of traps:
- Snap traps: Quick and humane when used correctly.
- Electric traps: Kill mice instantly and are easy to check.
- Live-catch traps: Good if you prefer not to kill, but you must release mice far from home.
Best baits: Peanut butter, chocolate, or oatmeal work better than cheese.
Pro insight: Use gloves when handling traps. Mice avoid traps with human scent.
6. Use Bait Stations (carefully)
If traps alone aren’t enough, use enclosed bait stations with rodenticide. Place these only in the attic or ceiling—never where pets or children can reach. Check local rules, as some poisons are restricted.
Warning: Poisoned mice may die in the ceiling, leading to odor and maggot problems. Traps are safer but slower.
7. Consider One-way Exclusion Doors
A one-way door lets mice leave but not return. Install these at the main entry point. After a week, remove and seal the hole.
Tip: One-way doors are especially useful in ceilings, as they reduce the risk of dead mice inside.
8. Clean And Disinfect
After removing mice, wear gloves and a mask. Remove all droppings, nests, and contaminated insulation. Disinfect with a bleach solution (1 part bleach to 10 parts water).
Important: Do not vacuum droppings, as this spreads germs into the air.
9. Repair Damage
Check all wires, insulation, and wood beams for damage. Replace chewed wires immediately—this prevents fires. Repair or replace insulation and seal any remaining holes.
10. Monitor And Repeat
Keep checking for signs of new mice. Set a few traps as a safeguard, especially during fall and winter when mice look for warmth.
Comparing Trap Types For Ceilings
Choosing the right trap makes a big difference. Here’s a comparison to help you decide:
| Trap Type | Effectiveness | Safety | Best Use Case |
|---|---|---|---|
| Snap Trap | High | Safe if placed out of reach | Quick removal in attic/ceiling |
| Electric Trap | Very High | Enclosed, safe design | Easy checking, less mess |
| Live Trap | Moderate | Very safe | Humane removal |
| Bait Station | High (with risk) | Risk to pets/kids | Severe infestations only |
Pros And Cons Of Common Mouse Removal Methods
It helps to know the good and bad sides of each method before you start.
| Method | Pros | Cons |
|---|---|---|
| Traps | Immediate results, easy to check | Must be checked daily |
| Poison | Can reduce large populations | Risk of dead mice in ceiling, slow |
| Professional Pest Control | Expertise, less hassle | Costly, may use chemicals |
| DIY Exclusion (one-way door) | Prevents re-entry, humane | Can be tricky to install |
When To Call A Professional
Sometimes, DIY solutions aren’t enough. Call a licensed pest control expert if:
- Mice return despite your efforts
- You hear loud noises, suggesting bigger animals (like rats or squirrels)
- There’s evidence of chewed wires or water leaks
- You can’t access the ceiling safely
- You notice a strong, persistent smell (could mean a dead animal)
Professionals have tools to locate hidden nests, use safe traps, and block entry points you may miss. If you choose this route, ask about their methods and guarantees.
Long-term Prevention Strategies
Getting mice out is only half the battle. Keeping them out is just as important.
1. Seal Up All Gaps
Re-inspect your house every season. Weather, settling, and repairs can create new gaps. Use steel mesh, caulk, or metal flashing for all repairs.
2. Trim Trees And Bushes
Mice often climb trees or vines to reach your roof. Keep branches trimmed at least 3 feet away from your house.
3. Install Mesh Over Vents
Cover all attic and roof vents with stainless steel mesh. This allows airflow but blocks mice.
4. Keep Attic And Ceiling Spaces Dry
Mice prefer moist environments. Fix any leaks in the roof or pipes quickly. Good ventilation also discourages nesting.
5. Manage Food And Garbage
Don’t store food (including pet food) in the attic. Clean up after parties or events where crumbs might attract rodents.
6. Store Items Off The Floor
If you use your attic for storage, keep items in sealed bins and off the floor. This makes it harder for mice to nest.
7. Use Ultrasonic Repellents (optional)
Some people use plug-in ultrasonic devices that emit sounds mice dislike. Results are mixed, but they can help as part of a larger strategy.
8. Regular Inspections
Check your attic, roof, and ceiling areas at least twice a year for signs of mice. Early action prevents big problems.
Non-obvious prevention tip: Use peppermint oil or sachets of dried mint in the attic. Mice dislike the smell. While not a guaranteed solution, it’s a safe, natural extra layer of defense.
What Not To Do
Even well-meaning people make mistakes that make things worse.
- Don’t use glue traps in the ceiling. They are inhumane and can catch non-target animals.
- Don’t block all entry points before trapping. This causes odor and maggot problems from dead mice.
- Don’t rely on cats to solve ceiling infestations. They can help with ground-level mice, but not those in ceilings.
- Don’t ignore the problem. Mice breed fast, and damage grows quickly.
Health And Safety Tips
Dealing with mice means contact with droppings, urine, and sometimes dead animals. Protect yourself:
- Always wear gloves and a mask when cleaning.
- Disinfect tools and surfaces after use.
- Wash hands thoroughly.
- Never use a regular vacuum or broom to clean droppings.
- If you feel sick after cleaning, see a doctor immediately.
Diseases like hantavirus are rare but dangerous. Take all signs seriously.
How Much Does Mouse Removal Cost?
DIY removal costs less but takes time and effort. Here’s a rough breakdown:
- Traps: $3–$10 each. You may need 6–12 traps.
- Bait stations: $10–$30 each, plus $10–$20 for bait.
- Sealants and mesh: $20–$100 depending on the number of gaps.
- Professional pest control: $200–$600 for a full service, including inspection, trapping, and sealing.
Hidden cost: Repairing chewed wires or insulation can add hundreds to your bill if left unchecked.
Credit: www.aaanimalcontrol.com
Why Do Mice Return?
Many people solve their mouse problem once, only to find mice back a few months later. Why? Two main reasons:
- Missed entry points: Mice find even the smallest opening. Missing just one is enough for them to get back in.
- New food sources: Bird feeders, pet food, or even compost piles near the house attract mice.
Regular maintenance and inspections are the best way to stop repeat infestations.
When Mice Die In The Ceiling
Sometimes, despite your best efforts, a mouse dies in the ceiling. You’ll notice a strong, rotting smell that lasts 1–2 weeks. Flies or maggots may appear near vents or light fixtures.
What to do:
- Pinpoint the area by smell
- Cut a small hole in the drywall if needed (and safe)
- Remove the carcass with gloves, seal in a bag, and dispose of it outdoors
- Disinfect the area thoroughly
- Repair the hole after cleaning
If you can’t reach the spot, ventilate the room and wait. The odor will fade, but it’s not pleasant.
Natural And Eco-friendly Mouse Control
Many people prefer not to use poisons or harsh chemicals. Here are safe, eco-friendly options:
- Peppermint oil: Soak cotton balls and place in the attic. Replace weekly.
- Dried mint or bay leaves: Scatter where mice travel.
- Electronic repellents: Some plug-ins emit frequencies mice dislike.
- Predator scents: Some stores sell pellets that mimic fox or cat urine, which can deter mice.
Note: Natural methods alone rarely solve a real infestation but are good for prevention or as an extra step.
Myths And Misconceptions About Mice In Ceilings
Let’s clear up some common myths:
- Mice only infest dirty homes: False. Mice enter any home if it’s warm and has food.
- Cheese is the best bait: False. Peanut butter or chocolate works better.
- You can scare mice away for good: False. Only sealing up entry points and removing food keeps them out.
- Cats solve ceiling infestations: False. Cats help on the ground, not in ceilings.
Believing these myths delays real solutions.
How To Tell If Mice Are Gone
After a week of no sounds, no new droppings, and untouched traps, it’s likely the mice are gone. To be sure:
- Sprinkle flour near suspected entry points. No footprints means no mice.
- Check traps every few days for two weeks.
- Use a camera trap if you want extra confirmation.
If you find new evidence, restart your removal plan and check for missed entry points.
Handling Large Infestations
A few mice can be handled with traps and patience. But if you hear constant noise, see lots of droppings, or notice damage in many spots, you may have a large infestation.
What to do:
- Set at least 12–20 traps in all active areas.
- Check traps twice daily.
- Call a professional for advice on the safest, quickest removal.
- Be ready for a longer process—large groups take time to remove.

Credit: www.youtube.com
Mice Vs. Other Ceiling Pests
Not all ceiling noises mean mice. Here’s a quick comparison:
| Pest | Noises | Droppings | Typical Entry Points |
|---|---|---|---|
| Mice | Light scratching, scurrying at night | Small, black, rice-shaped | Gaps under eaves, vents, pipes |
| Rats | Louder gnawing, thumping | Larger, sausage-shaped | Bigger holes, ground-level vents |
| Squirrels | Daytime running, heavy thuds | Oval, lighter color | Roof gaps, chimneys |
| Bats | Chirping, fluttering | Tiny, shiny, crumbly | Roofline, small wall gaps |
Correct identification means the right solution.
Useful Resources
For more detailed guidance, check the official advice from the Centers for Disease Control and Prevention (CDC).
Frequently Asked Questions
What Attracts Mice To My Ceiling?
Mice look for warmth, food, and shelter. Gaps near the roof, easy attic access, and stored food or clutter attract them. Insulation offers nesting material, and quiet ceiling spaces keep them safe from predators.
Will Mice Leave On Their Own If I Remove Food?
Rarely. Mice can survive on small crumbs and water from condensation. Removing food helps, but you must also seal entry points and use traps for full removal.
Can I Hear Mice In The Ceiling During The Day?
Usually, you’ll hear mice at night. They are most active after dark, but in large infestations, you might hear sounds during the day as well.
Is It Safe To Use Poison In The Ceiling?
It’s risky. Poisoned mice may die in hard-to-reach spots, causing odors and attracting insects. Use traps first, and only use bait stations as a last resort, following all safety guidelines.
How Long Does It Take To Get Rid Of Mice In The Ceiling?
Most mild infestations are solved in 1–2 weeks with proper traps and sealing. Larger infestations can take a month or more, especially if entry points are missed.
Removing mice from your ceiling takes time, care, and attention to detail. But with the right steps, you can reclaim your home and prevent future problems. Remember, the key is to act early and stay vigilant—your peace of mind (and ceiling) depends on it.