
Hardwood floors bring warmth and natural beauty to any home, but they’re not immune to problems. Over time, you might notice sections that rise, curve, or dip—clear signs of a warped hardwood floor. This issue can be frustrating, especially if you’ve invested in quality flooring. The good news is, most warped floors can be repaired without replacing the entire floor. With the right knowledge, tools, and a bit of patience, you can restore your hardwood to its original glory.
If you’ve spotted floorboards that look swollen, buckled, or cupped, don’t panic. Warping is common, and there are solutions for nearly every type of damage. This guide will walk you through the causes, how to assess the damage, and step-by-step methods for fixing warped hardwood floors—whether you’re dealing with a slight bend or a severe buckle.
Along the way, you’ll learn practical tips, common mistakes to avoid, and how to keep your floors flat and beautiful for years to come.
Understanding Warped Hardwood Floors
Before you jump into repairs, it’s crucial to understand what’s happening under your feet. Warped hardwood floors develop when moisture or humidity causes the wood to expand or contract unevenly. Unlike other flooring types, wood is a living material—it breathes and moves depending on the environment.
Types Of Warping
1. Cupping
Edges of the board are higher than the center, creating a cup shape. Usually caused by moisture from below.
2. Crowning
Center of the board is higher than the edges. Often happens when the top of the wood gets wet.
3. Buckling
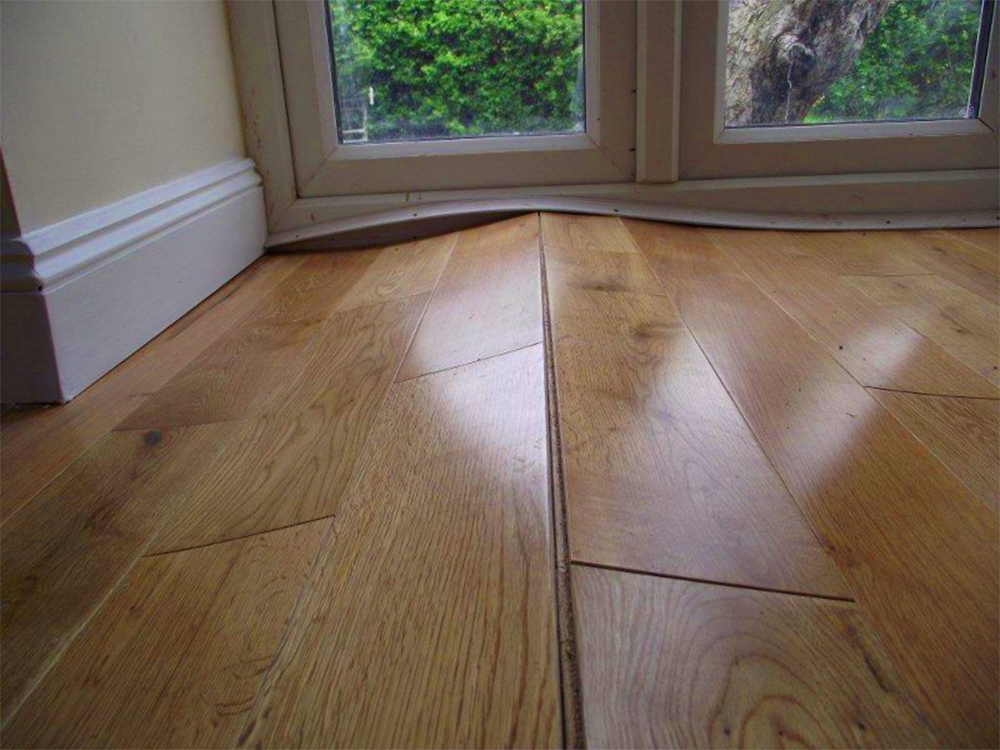
Boards lift dramatically off the subfloor, sometimes creating waves or hills. This is the most severe type and usually needs urgent attention.
4. Twisting
Boards turn or twist along their length, often due to severe moisture imbalances.
Knowing the type of warping helps you choose the right repair method.
What Causes Hardwood Floors To Warp?
Most warping comes from moisture imbalance. Here are the main culprits:
- Leaks from plumbing, appliances, or roof
- High humidity in the room or under the house
- Wet mopping or standing water left on the floor
- No vapor barrier under the flooring
- Improper acclimation of wood before installation
Surprisingly, even dry air can cause warping if moisture is lost too quickly.
Assessing The Damage
You can’t fix what you haven’t measured. Before grabbing your hammer or sander, take time to assess the damage.
Visual Inspection
Walk slowly across the room and note where boards look uneven, raised, or sunken. Use a flashlight to spot subtle curves.
Feel With Your Hand
Run your palm across the boards. You’ll feel cupping or crowning more easily this way.
Measure Moisture
A moisture meter (available at hardware stores) gives a clear reading. Compare several boards:
- Normal readings: 6-9% for hardwood indoors
- Problem areas: 12% or higher
Check For Mold And Odors
Musty smells or black spots suggest water has been around for a while. Mold means you’ll need to address moisture sources before repairs.
Inspect The Subfloor
If possible, lift a vent cover or remove a baseboard to see the subfloor. Moisture there means repairs must go deeper.
Decide: Repair Or Replace?
Not all damage can be fixed. If boards are split, blackened, or severely twisted, replacement may be necessary. For slight cupping or crowning, repairs are often enough.
Essential Tools And Materials
Having the right tools makes repairs smoother and safer. Here’s what you’ll need for most warp repair jobs:
- Pry bar and hammer
- Circular saw or hand saw
- Moisture meter
- Sander (palm, orbital, or drum sander)
- Sandpaper (various grits)
- Wood glue
- Flooring nails or screws
- Wood filler or putty
- Clean towels and fans
- Weights (for flattening boards)
- Replacement boards (if needed)
- Safety goggles, dust mask, and gloves
Tip: Rent larger tools like drum sanders if you don’t own them. This saves money and storage space.
How To Repair Minor Warping (cupping And Crowning)
For most homeowners, cupping and crowning are the most common and easiest to fix. Here’s a step-by-step approach.
Step 1: Dry Out The Area
Before you try to flatten boards, the wood must be dry. Otherwise, repairs won’t last.
- Stop all sources of water (fix leaks, stop wet mopping).
- Use fans and dehumidifiers to dry the area for at least 48-72 hours.
- Open windows if weather allows, but avoid humid days.
- Check moisture levels with your meter until they drop below 10%.
Step 2: Light Sanding
Once the wood is dry, minor cupping or crowning can often be leveled by sanding.
- Start with 60-80 grit sandpaper for heavy cupping, or 100-120 grit for slight warping.
- Sand in the direction of the grain.
- Use an orbital or drum sander for large areas; a palm sander for small spots.
- Vacuum dust and wipe with a damp cloth.
Note: Don’t sand too much. Removing too much wood weakens the boards.
Step 3: Refinish
After sanding, refinish the boards to match the rest of the floor.
- Apply a matching wood stain if needed.
- Let it dry fully (follow the can instructions).
- Apply 2-3 coats of polyurethane or floor finish.
- Let each coat dry and sand lightly between coats.
Step 4: Monitor Over Time
Check the area weekly for a month. Warping can return if the moisture problem isn’t fixed.
Credit: hudsonfloorgroup.com
How To Repair Moderate Warping (buckling And Twisting)
When boards actually lift off the subfloor or twist, you need a more involved approach. Here’s how to tackle moderate warping.
Step 1: Identify And Fix Moisture Source
Repair any leaks or water issues before you start. This might mean:
- Fixing plumbing leaks
- Improving crawl space or basement ventilation
- Installing a vapor barrier
Step 2: Remove Affected Boards
- Use a pry bar and hammer to gently lift warped boards.
- If boards are nailed, remove nails carefully.
- Cut boards with a circular saw if needed, being careful not to damage nearby flooring.
Step 3: Dry The Subfloor
Once boards are up, let both the subfloor and removed boards dry completely. Use fans, heaters, or dehumidifiers as needed.
Step 4: Replace Or Reinstall Boards
If boards return to shape after drying, you can often reinstall them. If not, replace with new boards.
- Apply wood glue to tongue-and-groove joints.
- Nail or screw boards securely to the subfloor.
- Use putty to fill small gaps or holes.
- Sand and refinish the repaired area.
Step 5: Blend The Repair
It’s rare for new boards to match old ones perfectly at first. Use stain blending pens or custom stains for a seamless look.
Repairing Severe Warping (multiple Boards Or Widespread Damage)
Sometimes, water damage is extensive—after a flood or major leak. In these cases, more aggressive repairs are needed.
Step 1: Remove All Warped Boards
Take up every board showing signs of warping, buckling, or mold.
Step 2: Inspect And Replace Subfloor
Check the subfloor for mold, rot, or softness. Replace any sections that are damaged. Use treated plywood for best results.
Step 3: Install Vapor Barrier
A vapor barrier (plastic sheeting) protects new flooring from future moisture.
Step 4: Acclimate New Hardwood
Let new boards sit in your home for at least 72 hours before installing. This prevents future warping.
Step 5: Reinstall Flooring
Install boards following the original pattern, using glue and nails as before. Sand and finish to match the rest of the floor.
When To Call A Professional
Not all repairs are DIY-friendly. Call a pro if:
- Warping is severe and covers a large area
- There is mold or a persistent odor
- The subfloor is damaged or soft
- The floor is historic or very valuable
Professionals have moisture meters, drying equipment, and the skill to match stains and finishes exactly.
Preventing Future Warping
Prevention is always better than repair. Here are proven strategies to keep your hardwood flat and beautiful.
Control Humidity
Aim to keep indoor humidity between 35% and 55%. Use a humidifier in winter and a dehumidifier in summer.
Clean Spills Quickly
Wipe up water and other liquids immediately. Don’t let water sit on the floor.
Avoid Wet Mopping
Use a damp mop, not a soaking wet one. Microfiber mops are safest.
Use Mats And Rugs
Place mats near doors and sinks to catch water and dirt.
Check Plumbing Regularly
Inspect under sinks, refrigerators, and dishwashers for leaks every few months.
Install A Vapor Barrier
If your home is over a crawl space or basement, a vapor barrier stops moisture from rising into the floor.
Acclimate New Wood
Let any new wood flooring rest in your home for 3-7 days before installation. This prevents sudden moisture changes.
Use Proper Installation Techniques
Follow manufacturer guidelines for spacing, nailing, and gluing. Mistakes at installation often cause later warping.
Maintain Your Floor’s Finish
Reapply polyurethane or sealer every few years to protect against spills and humidity.
Credit: etpainting.com
Common Mistakes To Avoid
Many homeowners make the same errors when trying to fix warped hardwood floors. Here’s what to watch out for:
1. Skipping Moisture Testing
Guessing won’t work. Always use a moisture meter.
2. Sanding Too Early
If the wood isn’t fully dry, sanding can make things worse.
3. Using Too Much Water To Clean
Even “hardwood-safe” cleaners can cause damage if overused.
4. Not Fixing The Root Cause
If you repair the boards but don’t solve the moisture problem, warping will return.
5. Ignoring Underfloor Moisture
The subfloor often hides leaks or condensation.
6. Trying To Flatten Severely Warped Boards
Sometimes, replacement is the only option.
Realistic Results: What To Expect After Repair
It’s important to have realistic expectations after repairing warped hardwood floors. Here’s a comparison of outcomes based on the type of repair:
| Type of Repair | Expected Results | Longevity |
|---|---|---|
| Light sanding (cupping/crowning) | Surface looks smooth; minor color variation may remain | 5-10 years if moisture controlled |
| Board replacement (buckling/twisting) | Like-new appearance; slight color mismatch possible | 10+ years with good maintenance |
| Full section replacement | Uniform look; best if large area was damaged | Same as new floor (20+ years) |
No repair is perfect, but most homeowners are satisfied if the root cause is fixed and color is blended well.

Credit: www.reddit.com
Cost Comparison: Diy Vs Professional Repair
Wondering if you should do it yourself or hire a pro? Here’s a cost breakdown:
| Repair Type | DIY Cost | Pro Cost | Time Required |
|---|---|---|---|
| Sanding & refinishing | $50-$200 (tools/materials) | $300-$800 | 1-2 days |
| Board replacement | $100-$400 | $500-$1,500 | 2-3 days |
| Full section replacement | $500-$2,000 | $2,500-$10,000 | 3-5 days |
These are average costs for a 200 sq. Ft. area. Always get multiple quotes if hiring a professional.
Real-life Example: Fixing A Warped Floor
Let’s look at a real scenario. A homeowner in Atlanta noticed their floors cupping after a summer of high humidity. They checked for leaks—none found. Humidity in the house was at 70%. They ran two dehumidifiers for a week, and moisture dropped to 8%. After waiting two more weeks, the boards returned nearly flat. A light sanding and fresh finish made the floor look almost new. The key lesson: patience and solving the humidity issue first saved money and preserved the wood.
Advanced Tips Most People Miss
Even experienced DIYers overlook these details:
- Check under appliances and rugs: Warping often starts in hidden areas. Move heavy furniture and look for problems early.
- Document repairs: Take photos before and after. If you sell your home, this shows buyers the problem was fixed professionally.
- Test for leaks after heavy rain: Sometimes, exterior water enters through the foundation. Check the floors after storms.
- Seal floor gaps with flexible fillers: Use products designed for hardwood, which move as the wood expands or contracts.
How To Blend New And Old Boards
Matching new wood to old can be tricky. Here’s what helps:
- Use stain blending pens: Available at hardware stores, these let you “paint” in subtle color changes.
- Test stains on scrap pieces: Never apply a new stain directly—test first.
- Feather sanding: Sand the edge of new and old boards together for a seamless look.
- Apply finish to a whole section: Don’t just spot-finish; cover a larger area for an even sheen.
Quick Reference: Repair Steps By Problem Type
Here’s a summary for fast decision-making:
| Problem | Steps to Fix | Skill Needed |
|---|---|---|
| Cupping | Dry area, light sanding, refinish | Beginner-Intermediate |
| Crowning | Dry area, sand, refinish | Beginner-Intermediate |
| Buckling | Remove board, dry subfloor, replace | Intermediate-Advanced |
| Twisting | Remove and replace board | Intermediate |
Where To Find More Help
If you want to learn more about hardwood floor care and repair, check resources like the National Wood Flooring Association. They provide detailed guides and professional referrals.
Frequently Asked Questions
What Causes Hardwood Floors To Warp?
Warping happens when wood absorbs or loses moisture unevenly. Common causes include leaks, high humidity, wet mopping, or a lack of vapor barrier. Wood expands with moisture and contracts when dry, so any imbalance can lead to cupping, crowning, or buckling.
Can Warped Hardwood Floors Go Back To Normal On Their Own?
Slight warping (like small cupping) can sometimes flatten out if the moisture problem is fixed quickly. Use dehumidifiers and fans to dry the area. However, severe warping or long-term water exposure usually requires sanding, refinishing, or board replacement.
How Can I Tell If My Floor Needs To Be Replaced Instead Of Repaired?
Replace boards if they are split, blackened, moldy, or extremely twisted. Minor surface warps can often be sanded and refinished. If large areas are affected or the subfloor is damaged, replacement is usually best.
Is It Safe To Walk On A Warped Hardwood Floor?
Small warps are usually safe, but severe buckling can be dangerous. Raised boards create tripping hazards and can damage the floor further with continued use. Fix the problem as soon as you notice it.
How Do I Prevent Future Warping?
Control indoor humidity, clean spills immediately, avoid wet mopping, and use vapor barriers. Regularly check for leaks and keep your floor’s finish in good condition.
Hardwood floors are an investment worth protecting. With the right approach, you can fix warping and keep your home beautiful for decades. Pay attention to moisture, act quickly when problems arise, and don’t hesitate to call a pro for big repairs.
Your floors will thank you every time you walk across them.