Adding legs to cube storage units is a clever way to upgrade your furniture. Many people use cube storage for books, toys, or even as room dividers. But most of these units sit flat on the floor. Raising them with legs can make them look more stylish, add extra height, and even help with cleaning.
If you want your room to feel more open or simply want to give your storage a new look, this guide will show you exactly how to do it.
Many DIYers think this project is hard or risky, but in reality, anyone with some basic tools and patience can add legs to cube storage. This guide will help you avoid common mistakes and make sure your cube storage stays strong and safe.
We’ll look at different leg styles, tools and supplies you’ll need, and every step from planning to finishing touches. Whether you’re new to DIY or have some experience, you’ll find clear instructions, practical tips, and even a few advanced ideas.
Let’s get started on transforming your cube storage into something truly special.
Why Add Legs To Cube Storage?
Raising your cube storage unit off the floor brings several benefits you might not realize at first.
First, it changes the visual appeal. With legs, cube storage looks more like custom furniture and less like a simple shelf. This small change can make a big difference in your room’s style. Mid-century, modern, or even farmhouse looks are possible just by picking the right legs.
Second, adding legs makes cleaning easier. When your storage sits directly on the floor, dust and dirt collect underneath. With legs, you can easily vacuum or sweep below the unit.
There’s also a practical advantage. A raised unit is less likely to suffer from water damage if there’s a spill or if you mop the floor. This helps your furniture last longer.
If you have kids or pets, raising cube storage can also help keep toys, shoes, or other items out of reach.
Finally, legs can help you level your storage on uneven floors. Some leg styles even include adjustable feet, so your unit won’t wobble.
These small details are often missed by beginners, but they can make a big impact on your daily life and the look of your home.
Choosing The Right Legs For Your Cube Storage
Picking the right legs is a key step. Not all legs work for every cube storage unit. Here’s what to consider:
Weight Capacity
Cube storage units are often made from MDF or particleboard. These materials are not as strong as solid wood, so you need to pick legs that will spread the weight evenly. Check the manufacturer’s information for the weight your cube storage can hold.
Then, choose legs that match or exceed that capacity.
Style And Height
There are many styles: hairpin legs, wooden legs, metal furniture feet, or even casters (wheels). The style you choose should match your room and your needs.
- Short legs (2–4 inches) give a low, modern look.
- Medium legs (6–8 inches) create a classic furniture style.
- Tall legs (10 inches or higher) make the unit easy to use as a console table.
Mounting Type
Some legs attach with top plates (flat metal plates you screw into the cube base), while others have threaded bolts. Make sure the legs you buy include all necessary mounting hardware.
Stability
Wide or angled legs often give more stability. If you plan to store heavy items, or if kids will use the unit, look for legs with a wide base or built-in levelers.
Material
- Wooden legs are warm and classic but can dent.
- Metal legs are strong and modern but may scratch floors.
- Plastic legs are affordable but less durable.
Example: Comparing Leg Types
Here’s a quick comparison of common leg types for cube storage:
| Leg Type | Height Range | Style | Weight Capacity | Best For |
|---|---|---|---|---|
| Wooden Tapered | 4–8 in | Mid-century, classic | Moderate | Living rooms, bedrooms |
| Metal Hairpin | 4–12 in | Modern, industrial | High | Lofts, offices |
| Plastic Block | 2–4 in | Simple, budget | Low to moderate | Kids’ rooms, playrooms |
| Casters | 2–6 in | Mobile, practical | Moderate | Flexible spaces |
Remember, the right choice depends on your needs, style, and how the cube storage will be used.
Tools And Materials Needed
Before you start, gather all the tools and supplies. Here’s a basic checklist:
- Furniture legs (4 or more, depending on unit size)
- Mounting plates (if not included with legs)
- Screws
- Drill and drill bits
- Screwdriver
- Measuring tape
- Pencil
- Level
- Wood glue (optional, for extra strength)
- Protective pads (to prevent floor scratches)
- Sandpaper (if smoothing rough edges)
- Paint or stain (optional, to match legs or cube storage)
If your cube storage is made from thin material, you may also want reinforcement boards (small pieces of plywood) to help secure the legs.
A non-obvious tip: Have a helper if your cube storage is heavy or large. Lifting and flipping the unit alone can be awkward and risky.
Planning Your Leg Placement
Many beginners rush this step, but careful planning makes a safer, more attractive result.
Marking The Corners
Most cube storage units are not solid wood. The corners are often the strongest part. Place your legs as close to each corner as possible, but not so close that you hit the side panels when drilling.
Measure at least 1–2 inches in from each edge. Mark each spot clearly with a pencil.
Checking For Obstacles
Look inside the cube storage. Some units have hidden screws, dowels, or panels under the base. If you drill into these, you could damage the structure. Tap the underside lightly to check for solid spots.
Spacing For Larger Units
If your unit is longer than 36 inches (90 cm), consider adding a fifth or even sixth leg in the middle for extra support. This is especially important if you will store heavy items or use the top as a bench.
Symmetry Matters
Even spacing looks better and gives more stability. Use a measuring tape to double-check all marks before drilling.
How To Add Legs To Cube Storage: Step-by-step
Now, let’s walk through each step in detail.
1. Empty And Clean The Unit
Remove everything from your cube storage. Wipe the bottom to remove dust and dirt. This helps the legs attach firmly.
2. Flip The Unit
Place the cube storage upside down on a soft surface (like a rug or blanket) to avoid scratches.
3. Mark Leg Locations
Using your earlier measurements, mark where each leg will go. Double-check that all markings are even and symmetrical. For example, on a 12-inch deep unit, you might mark each leg at 1. 5 inches from the sides.
4. Prepare Pilot Holes
Use a drill bit slightly smaller than your screws to make pilot holes at each mark. This step prevents the wood or MDF from splitting.
Pro tip: If you’re drilling into thin material, place a small block of wood inside the cube, under the drill spot, to avoid drilling all the way through.
5. Attach Mounting Plates
If your legs use mounting plates, screw each plate in place. Make sure they are tight but not overtightened, which can strip the wood.
If your legs have threaded bolts, you may need to screw them directly into the pilot holes.
6. Reinforce If Needed
For extra stability, glue a small plywood square (about 3×3 inches) to the inside where each leg will attach. This spreads the weight and makes the joint stronger.
7. Attach The Legs
Screw or twist each leg into its mounting plate or directly into the base. Use a level to make sure each leg is at the same height.
8. Add Floor Protectors
Stick felt or rubber pads to the bottom of each leg. This prevents scratches and helps the unit slide more easily.
9. Flip The Unit Upright
Carefully flip the cube storage back over. Test for wobbling. If it’s uneven, adjust the legs or add shims under the short ones.
10. Load And Enjoy
Wait a few hours if you used glue. Then, refill your cube storage and enjoy your upgraded furniture.
Advanced Tips And Variations
If you want to go beyond the basics, here are some ideas:
Creating A Floating Look
Use recessed legs (set inward from the corners) to make the cube storage look like it’s floating. This is a popular designer trick and works well in modern interiors.
Painting Or Staining The Legs
Match the legs to your room by painting or staining them before attaching. For metal legs, use spray paint made for metal surfaces.
Adding Casters
Want to move your cube storage easily? Install locking casters instead of fixed legs. Just be sure to buy casters rated for the total weight.
Combining Materials
Mix wood and metal legs for a unique look. For example, use metal hairpin legs with a wooden top for a mid-century style.
Using Brackets For Extra Strength
For very heavy loads, add L-brackets inside the cube storage, connecting the base to the side panels. This makes the whole structure stronger.
Example: Upgrading An Ikea Kallax
Many people own the popular IKEA Kallax cube storage. These units are strong enough for legs, but the base is hollow. Always use mounting plates and consider adding plywood reinforcements.
Common Mistakes To Avoid
Adding legs is simple, but here are some errors that can ruin your project:
- Skipping pilot holes: This can crack the bottom panel, especially with MDF or particleboard.
- Placing legs too close to edges: This weakens the joint and can split the material.
- Not checking for level: Uneven legs cause wobbling and make your unit look sloppy.
- Ignoring weight limits: Overloading your cube storage can cause it to collapse.
- Forgetting floor protection: Bare metal or wood can scratch floors badly.
- Using the wrong screws: Screws that are too long can poke through the base, ruining the look and possibly causing injury.
- Rushing the measurements: Inaccurate marks can lead to crooked legs and instability.
By avoiding these mistakes, your project will last longer and look better.
How To Choose The Best Leg Height
Picking the right height is not just about looks. It affects how you use the storage and how safe it is.
Standard Heights
- 2–4 inches: Good for a subtle lift, easy cleaning, and a modern look.
- 6–8 inches: Classic furniture height, comfortable for a bench or sideboard.
- 10 inches or more: Makes the unit easy to access and visually light.
Consider The Room
If your room has low furniture, shorter legs keep the look balanced. For high beds or sofas, taller legs help the storage match.
Example: Height Comparison
Here’s how different heights affect a typical 30-inch high cube storage unit:
| Leg Height | Total Height | Best Use |
|---|---|---|
| 2 in | 32 in | Under windows, TV stand |
| 6 in | 36 in | Sideboard, entryway table |
| 10 in | 40 in | Console table, divider |
Higher units are easier to access but may need wall anchoring for safety, especially if you have children.

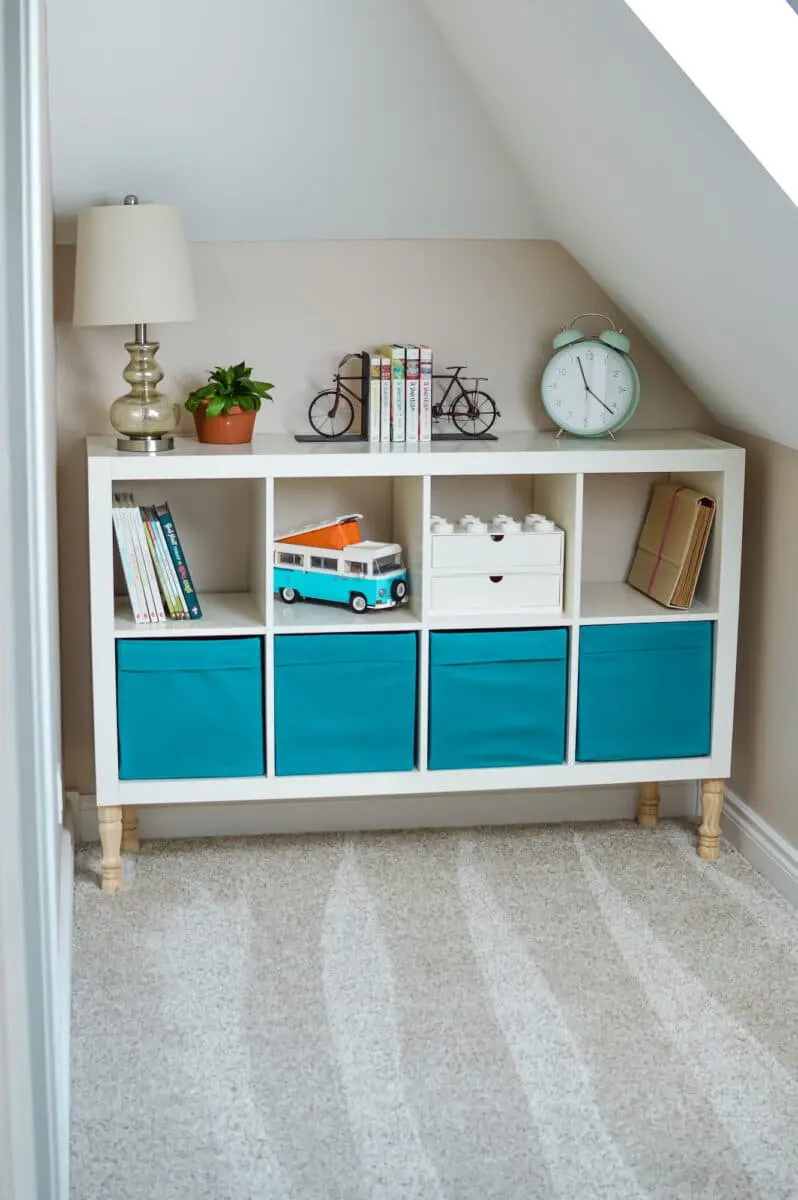
Credit: www.wherethesmileshavebeen.com
Matching Legs To Your Room Style
The leg style you choose should fit your overall room design.
- Mid-century modern: Tapered wood legs in walnut or oak finishes.
- Industrial: Black or raw metal hairpin legs.
- Farmhouse: Chunky turned wood legs, painted white or distressed.
- Scandinavian: Simple cylindrical legs in light wood.
- Contemporary: Sleek metal or acrylic legs.
If you’re unsure, take a photo of your room to the hardware store. Lay sample legs next to it to see what matches best.
Safety Tips And Childproofing
Adding legs changes the center of gravity of your cube storage. Units become taller and sometimes less stable.
- Always anchor tall units to the wall with anti-tip kits, especially if children will use them.
- Test for wobble after installing legs. If unstable, lower the leg height or add more legs.
- Secure heavy items on lower shelves to prevent tipping.
- Check leg tightness every few months and retighten as needed.
Most accidents happen because of skipped safety steps, not poor installation.
Cost Breakdown: Diy Vs. Store-bought
You might wonder if it’s cheaper to add legs yourself or buy furniture with legs already attached.
- DIY Leg Kit: $15–$40 (for 4 legs with plates)
- Screws and glue: $5
- Plywood for reinforcement: $10 (for a small sheet)
- Total DIY cost: $30–$55
- Buying a new unit with legs: $80–$200
Most DIY upgrades are 50–70% cheaper than buying new, and you get a custom look.
When To Avoid Adding Legs
In some cases, adding legs is not the best choice:
- If your cube storage is very old or damaged, the base may not support new legs.
- If the unit is extremely large (over 60 inches wide), it may need professional reinforcement.
- If you plan to store very heavy items (like books or electronics), consider a low platform or base instead.
If in doubt, ask at your local hardware store or check the manufacturer’s advice.

Credit: www.youtube.com
Real-life Examples
Example 1: Entryway Shoe Bench
Sara wanted a stylish shoe bench for her entryway. She used a 4-cube storage unit, added 6-inch wooden legs, and placed baskets in each cube. The unit looked custom-made and made it easy to clean underneath.
Example 2: Kids’ Toy Organizer
Mike added 4-inch plastic block legs to his kids’ storage cubes. The unit was easy to move, and toys stayed off the floor. He also anchored the unit to the wall for safety.
Example 3: Modern Room Divider
Lila turned two 8-cube units on their sides, attached 8-inch hairpin legs, and made a striking room divider in her studio. The open space under the divider let light through and made the room feel larger.
Cleaning And Maintenance Tips
After adding legs, cleaning under your cube storage is much easier. But a few extra steps will keep everything looking good.
- Check and tighten legs every 3–6 months.
- Reapply floor protectors if they wear out.
- Wipe legs with a damp cloth to remove dust.
- Touch up paint or stain if you notice scratches.
For units with metal legs, avoid harsh chemicals that can rust or discolor the finish.
Where To Find Good Furniture Legs
You can find furniture legs at:
- Hardware stores (Home Depot, Lowe’s)
- Online retailers (Amazon, Etsy)
- Furniture parts suppliers (Rockler, IKEA)
- Local woodworking shops
Always check reviews and weight ratings before buying. Some online shops even offer custom sizes and colors.
For more on different types of furniture legs, visit the Wikipedia Furniture Foot page.
Frequently Asked Questions
How Much Weight Can My Cube Storage Hold After Adding Legs?
It depends on the leg style, material, and how well they’re attached. Most cube storage can safely hold 30–50 pounds per cube, but the total limit is often set by the weakest point. Always add extra support for large or heavy units.
Can I Add Legs To Particleboard Or Mdf Cube Storage?
Yes, but you must be careful. Use mounting plates and, if possible, reinforce the underside with small plywood boards. MDF and particleboard are not as strong as solid wood, so avoid over-tightening screws.
What If My Cube Storage Wobbles After Adding Legs?
Check that all legs are attached evenly and are the same height. Use a level and add shims or adjustable levelers if needed. If the base is weak, add reinforcement or consider lowering the leg height.
Do I Need To Anchor My Cube Storage To The Wall After Adding Legs?
If the unit is over 36 inches tall or will hold heavy items, especially in a child’s room, yes. Wall anchors are easy to install and prevent tipping accidents.
Can I Remove The Legs Later Without Damaging The Unit?
If you use proper mounting plates and avoid glue, you can remove legs with minimal damage. Small screw holes may remain but are usually not visible once the unit is upright.
Adding legs to cube storage is a simple project that makes a big impact. With careful planning and the right materials, your basic shelf can become a beautiful, practical piece of furniture. Whether you want a new look, easier cleaning, or more style, this upgrade is well worth the effort.
Credit: singlegirlsdiy.com