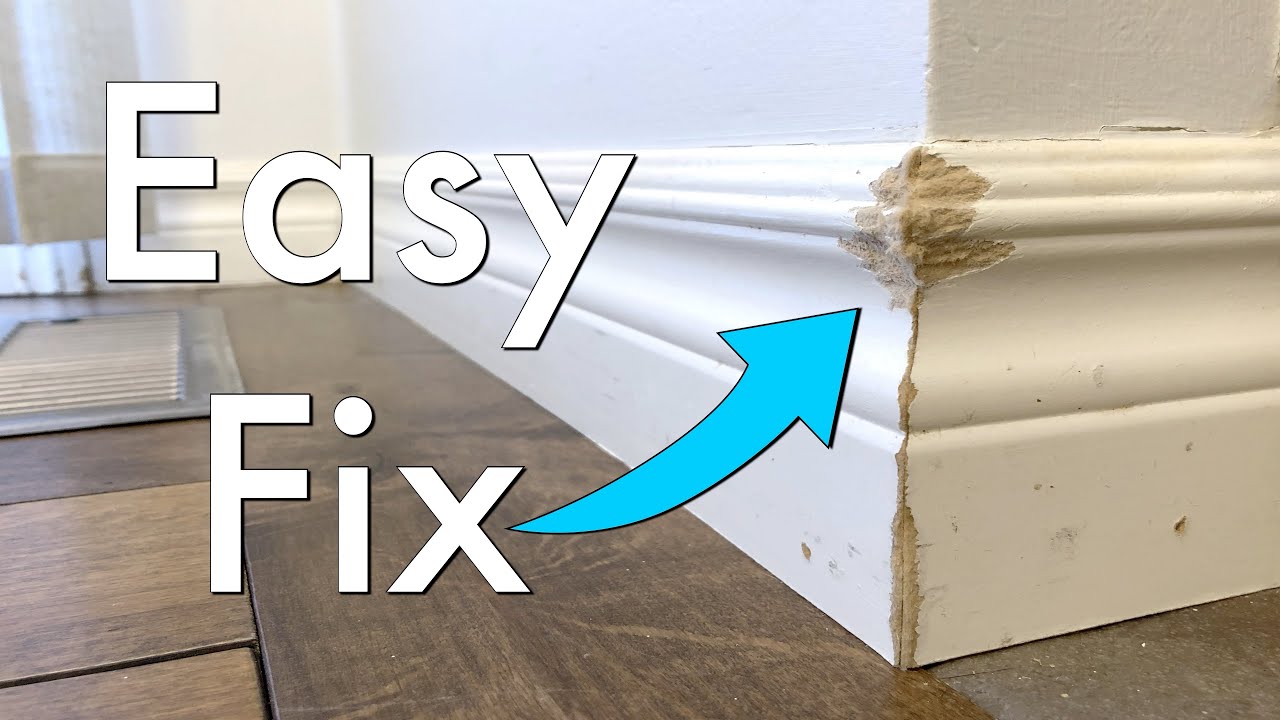
Many homeowners and renters know the frustration of discovering chewed wood corners in their living spaces. Whether it’s a puppy teething or a rabbit exploring, pets often turn their attention to door frames, baseboards, and furniture corners. The result is a mix of bite marks, missing chunks, and rough, unsightly damage. This problem can make a well-kept home look neglected, lower property value, and even lead to further chewing if not addressed quickly.
But don’t worry—you can fix chewed wood corners and restore them to look almost new, often without calling a professional. The process is easier and less expensive than you might think. With the right materials, a bit of patience, and some tips from experience, you’ll soon have those corners looking sharp again.
In this guide, you’ll learn what tools you need, step-by-step repair methods, common mistakes to avoid, and how to prevent future chewing. You’ll also see comparisons between repair products, real examples, and answers to popular questions about wood corner repair.
Why Do Pets Chew Wood Corners?
Before starting repairs, it’s helpful to understand why pets chew wood in the first place. This knowledge can help you prevent future damage.
- Teething: Puppies and kittens chew to relieve gum pain as their teeth grow in.
- Boredom: Dogs, rabbits, and even some cats may chew out of boredom or to release energy.
- Attention Seeking: Some pets chew when they want attention from their owners.
- Instinct: Small animals like rabbits or rodents have natural chewing instincts to keep their teeth healthy.
Recognizing the cause can help you choose the right prevention strategies after you finish repairs.
Assessing The Damage
Not all wood corner damage is the same. Some chew marks are shallow and cosmetic, while others remove large chunks of wood.
Types Of Chew Damage
- Surface Scratches: Light marks or shallow grooves.
- Gouges: Deeper marks, but wood structure is mostly intact.
- Missing Chunks: Actual pieces of wood are gone, leaving a hole or dent.
- Splintered Edges: Wood fibers sticking out, sometimes with loose or broken pieces.
Understanding the type of damage helps you pick the right repair method. For example, deep gouges need filling, while surface scratches may only need sanding and painting.

Credit: www.reddit.com
Essential Tools And Materials
Having the right tools makes the repair process smoother and ensures a professional finish. Here’s what you’ll need for most chewed wood corner repairs:
- Sandpaper (80, 120, and 220 grit)
- Wood filler or epoxy putty
- Putty knife (flexible type is best)
- Utility knife
- Painter’s tape
- Primer (if painting)
- Paint or stain
- Small paintbrush or foam brush
- Vacuum or brush (for cleaning dust)
- Clean cloth
- Protective gloves
- Mask (for dust)
Optional but helpful:
- Corner molding (for severe damage)
- Wood hardener (for soft or damp wood)
- Pet deterrent spray (for prevention)
Step-by-step Guide To Fixing Chewed Wood Corners
Now, let’s walk through the repair process. Each step is important for a smooth, lasting result.
1. Clean The Area
Start by cleaning the damaged corner. Remove dust, dirt, and loose wood fibers using a vacuum or brush. Wipe the area with a damp cloth and let it dry. This ensures that filler and paint stick well.
2. Remove Loose Wood
Use a utility knife to carefully cut away splinters or loose pieces. Don’t dig too deep—just remove anything that is not firmly attached. This step helps the repair last longer.
3. Sand The Damaged Area
Sand the area with 80-grit sandpaper to smooth sharp edges and create a rough surface for filler to stick. Widen the area slightly if needed to remove all weak wood. Then switch to 120-grit for a smoother surface. Wipe away dust with a clean cloth.
4. Apply Painter’s Tape
Use painter’s tape to protect nearby walls, floors, or undamaged wood. This keeps the repair neat and prevents messes during filling and painting.
5. Fill The Damage
Choose the right filler for your repair:
- Wood filler: Good for shallow gouges and missing bits. Dries quickly, easy to sand.
- Epoxy putty: Best for larger holes and corners with missing chunks. Strong and durable, but takes a bit longer to harden.
Mix the filler (if needed), then use a putty knife to press it firmly into the damaged area. Overfill slightly to allow for sanding later. Shape the corner as closely as possible to its original form, but don’t worry about making it perfect yet.
6. Let It Dry
Drying time depends on the product. Wood filler usually dries in 15–30 minutes; epoxy putty may need 1–2 hours. Check the instructions on the package. Do not rush—let the filler cure completely before sanding.
7. Sand And Shape
Once dry, sand the filled area with 120-grit sandpaper. Shape the corner to match the rest of the trim. Use 220-grit for a final smooth finish. Run your fingers over the repair; it should feel even with the surrounding wood.
8. Prime (if Painting)
If you plan to paint the corner, apply a coat of primer to the filled area. This helps the paint stick and prevents color differences. Let the primer dry according to instructions.
9. Paint Or Stain
Use a small brush to apply paint or stain that matches your woodwork. You may need two coats for good coverage. Allow the first coat to dry before applying the second.
10. Remove Tape And Clean Up
Carefully peel off the painter’s tape while the paint is still a bit wet (for sharp edges). Clean up any dust and wash your tools.
11. Inspect And Touch Up
Check your work in good light. If you see uneven spots, lightly sand and add a bit more filler or paint as needed.
Here’s a summary table comparing common repair materials:
| Material | Best Use | Dry Time | Pros | Cons |
|---|---|---|---|---|
| Wood Filler | Small gouges, surface scratches | 15-30 min | Easy to sand, paintable | Not as strong as epoxy |
| Epoxy Putty | Missing chunks, corners | 1-2 hours | Very strong, shapes well | Needs mixing, longer dry time |
| Premade Corner Molding | Severe damage | N/A | Quick, hides all damage | May not match exactly |
Credit: www.youtube.com
Advanced Techniques For Severe Damage
Some chewed corners are too badly damaged for filler alone. In these cases, try more advanced repairs.
Using Premade Corner Molding
For heavily chewed or crumbling corners, corner molding can cover the damage and provide a crisp, durable edge. Choose molding that matches the size and style of your trim.
- Cut the molding to the right length.
- Use wood glue or construction adhesive to attach it over the damaged area.
- Clamp it in place until dry.
- Fill any gaps with wood filler and sand smooth.
- Paint or stain to match.
This method is fast and often looks better than trying to rebuild a missing corner from scratch.
Rebuilding With Wood Pieces
For very large missing sections, you can cut and glue a small piece of wood to the corner, then sand and finish as usual. This is more advanced and may require a saw, but it’s a long-lasting solution.
- Cut a block slightly larger than the missing area.
- Glue it in place and clamp until dry.
- Shape and sand to match the original profile.
- Fill small gaps with wood filler.
- Paint or stain as needed.
Reinforcing Soft Or Rotten Wood
If chewing exposed soft or damp wood, treat it with wood hardener before repairing. This product soaks in and strengthens weak fibers, making repairs more solid.
Matching Paint And Stain
One of the hardest parts of repairing chewed wood corners is making the fix blend in with the rest of your trim.
Tips For A Good Color Match
- Take a sample: If possible, bring a small piece of the woodwork to the paint store for matching.
- Test small areas: Try the paint or stain on a hidden spot first.
- Layer colors: Sometimes applying two thin coats of different shades works better than one thick coat.
- Use a sealer: For stain, a clear sealer helps even out color differences and adds protection.
Paint Vs. Stain
Paint covers repairs better and is easier to match, but stain can look more natural if done well. For stained wood, try using gel stains—they are thicker and blend better over repaired areas.
Here’s a comparison between paint and stain for repairs:
| Finish Type | Coverage | Ease of Matching | Durability |
|---|---|---|---|
| Paint | Excellent | Easy | High |
| Stain | Moderate | Challenging | Moderate to High |
Non-obvious insight: Always sand the surrounding area lightly before painting or staining. This helps blend the repair and avoids a hard edge where new finish meets old.
Common Mistakes To Avoid
Many first-time repairs fail because of these avoidable errors:
- Skipping cleaning: Dust and dirt stop filler and paint from sticking.
- Underfilling: Not using enough filler leads to dents after sanding.
- Rushing drying time: Sanding or painting before filler is fully dry causes cracks or uneven surfaces.
- Poor color matching: Using leftover paint without checking the color can make repairs stand out.
- Ignoring prevention: Not addressing the root cause means pets may chew the same spot again.
Non-obvious insight: If you’re unsure about the filler’s color, choose one that’s slightly lighter. Dark filler is harder to hide under paint or stain.
Preventing Future Chewing
After fixing the wood, it’s important to stop your pet from chewing again. Here are proven ways to prevent repeat damage:
For Dogs
- Exercise and toys: Give your dog plenty of walks and chew toys to reduce boredom.
- Training: Use positive reinforcement to teach “leave it.”
- Deterrent sprays: Apply pet-safe sprays with a bitter taste to the corners.
- Barriers: Use baby gates to block access to certain rooms.
For Cats And Small Pets
- Scratching posts: Provide alternatives like posts or mats.
- Bitter sprays: Many work for cats and rabbits too.
- Double-sided tape: Pets dislike the sticky feeling.
- Supervision: Redirect chewing behavior as soon as you see it.
Home Modifications
- Add corner protectors: Clear plastic or rubber guards are nearly invisible but protect the wood.
- Regularly check for signs of chewing and address them early.
Practical tip: Sometimes pets chew because they’re anxious or stressed. If prevention methods don’t work, talk to your vet or a pet behaviorist for extra help.
When To Call A Professional
Most chewed wood corners can be repaired with DIY methods. However, there are times when it’s better to hire a pro:
- The damage affects structural parts of the house, like beams or load-bearing trim.
- The area is large or complex, such as ornate molding with detailed profiles.
- You want a perfect color match for valuable or historic woodwork.
- You’ve tried DIY repairs and the damage keeps coming back.
Professionals have access to custom tools, high-quality fillers, and color-matching technology. The cost is higher, but the results can be flawless.
Real-life Example
Let’s look at a real situation: Jane’s 8-month-old Labrador chewed the bottom corner of her living room baseboard. The damage was a 3-inch section with deep bite marks and one small missing piece.
Jane followed these steps:
- Cleaned and sanded the area.
- Used epoxy putty to rebuild the missing chunk.
- Shaped the putty with her putty knife and let it dry overnight.
- Sanded until smooth and primed the repair.
- Painted with leftover trim paint, feathering the edges to blend.
After two coats, the repair was nearly invisible, and Jane added a pet deterrent spray to keep her dog away. Months later, the corner still looked perfect.
Cost Comparison: Diy Vs. Professional Repair
Is it worth fixing chewed wood corners yourself? Here’s a quick cost breakdown:
| Repair Option | Material Cost | Time Required | Skill Needed |
|---|---|---|---|
| DIY Repair | $10–$35 | 1–2 hours | Basic |
| Professional Repair | $75–$200 | 1–2 hours | Expert |
As you can see, DIY repair is much cheaper and quick for simple damage. Only call a professional if the job is big or you want a perfect, invisible repair.
Tips For A Lasting Finish
To make your repair look great for years:
- Use high-quality paint or stain—cheap products fade and chip.
- Apply a clear sealer on top of stain for extra protection.
- Clean the area regularly to spot new damage early.
- If the repair is in a high-traffic area, check every few months for signs of wear.
Extra tip: Save a small jar of your trim paint for future touch-ups. Label it with the room name and date.
Credit: www.reddit.com
Frequently Asked Questions
How Long Does It Take To Fix A Chewed Wood Corner?
Most repairs take about 1–2 hours, including drying time. Severe damage or using epoxy may need more time for drying. Always follow the product’s instructions for best results.
Can I Use Spackle Instead Of Wood Filler?
Spackle is for drywall, not wood. It’s too soft and may crack or fall out. Always use wood filler or epoxy putty for wood repairs—they are stronger and last longer.
What If My Pet Keeps Chewing The Same Spot?
Try pet deterrent sprays, add barriers, and give your pet more toys or exercise. If chewing continues, check for stress or anxiety and ask your vet for advice. Preventing repeat damage is as important as the repair itself.
Is There A Way To Make The Repair Invisible?
A perfect color match and careful sanding are key. Use primer before painting, and blend the edges with a small brush. For stained wood, use gel stains and layer colors as needed. Sometimes, a repair is slightly visible up close but invisible from a distance.
Where Can I Learn More About Wood Repair And Pet Behavior?
For more on wood repair and pet-proofing your home, check out This Old House. They offer expert tips, videos, and guides for homeowners.
Fixing chewed wood corners is a rewarding project that makes your home look cared for and saves money. With the right tools and steps, you can restore damaged trim and keep it looking sharp—no matter how curious your pets are. Take your time, follow the tips above, and enjoy your refreshed space.