If you’re installing laminate flooring in your home, you probably want a smooth, professional look. But when you reach a doorway, things get tricky. Many DIYers get stuck at this step, creating awkward gaps, ugly transitions, or floors that don’t move as they should. Done wrong, you might even damage your floor over time. Done right, you’ll hardly notice the transition, and your floor will last longer.
So, how do you end laminate flooring at doorways and get a clean, durable result? This guide explains every method, tool, and common mistake—so you can work with confidence, even if it’s your first time. Whether your doorway meets another laminate floor, tile, carpet, or just a threshold, you’ll learn the right way to finish the job.
Why Doorways Are Challenging With Laminate Flooring
Doorways seem small, but they create big problems for floating floors like laminate. Here’s why:
- Expansion gaps must be maintained so the floor can expand and contract with temperature and humidity.
- Door jambs and trim can block flooring planks, making it hard to slide them into place.
- Different floors (carpet, tile, wood) may meet at the doorway, each with its own height and edge style.
- If you skip proper transitions, the floor can buckle, squeak, or look unfinished.
One detail many beginners miss is that laminate flooring should never be pinned under door trim or thresholds. It needs room to move. Another is that most doorways need a transition strip or molding, not just a raw plank edge.
Tools And Materials Needed
You don’t need expensive gear, but having the right tools and supplies makes the job easier:
- Measuring tape and pencil
- Jigsaw or handsaw (for cutting planks)
- Tapping block and rubber mallet
- Pull bar (to fit planks in tight spots)
- Oscillating multi-tool (for undercutting door jambs)
- Utility knife
- Laminate transition strips (T-molding, reducer, threshold)
- Construction adhesive or mounting track (for transition strips)
- Spacers for expansion gap
- Safety glasses and gloves
If you’re working with several types of floors in one house, you may also need a carpet tuck strip or tile edge trim.
Planning Your Laminate Flooring Layout At Doorways
Before you start cutting, it’s smart to plan your approach. A few minutes here can save hours of frustration.
- Decide the direction: Laminate planks usually run parallel to the longest wall, but check which way best fits your doorways. Laying planks across a doorway is easier than having short ends meet at the threshold.
- Check the height difference: Is the new laminate higher or lower than the floor in the next room? This affects which transition strip you’ll use.
- Measure the doorway width: Each strip has a maximum length; cut it to fit.
- Locate the expansion gap: Plan to leave a 1/4″ to 1/2″ gap at the wall and under the doorway—never push the planks tight against the frame.
One tip: Lay out a few dry planks to see where seams will fall. If a seam lands right in the center of the doorway, adjust your pattern so it’s hidden under the transition strip.
Cutting And Fitting Laminate At Doorways
Undercutting Door Jambs
The neatest way to fit laminate under a door is by undercutting the door jamb. This means trimming the bottom of the door trim so a plank can slide under it.
Steps:
- Place a scrap piece of laminate (with underlayment if used) next to the jamb.
- Use a pencil to mark the height.
- Cut the jamb with an oscillating tool or fine-tooth saw. Go slow to avoid splinters.
- Remove the cut piece. Test-fit the plank—it should slide under with a little space for movement.
This method hides the cut edge and makes the floor look built-in. Don’t skip the expansion gap, even under the jamb.
Cutting Planks To Fit
- Measure from the last full plank to the door frame.
- Subtract the expansion gap (usually 1/4″).
- Mark and cut the plank with a jigsaw.
- Test-fit before snapping it in.
If you need to notch a plank around a door frame, measure carefully and cut slowly. A tight fit looks better, but don’t force the plank under the jamb—let it float.
Credit: www.carpentry-tips-and-tricks.com
Types Of Doorway Transitions
You’ll need a transition strip for most doorways. The right strip depends on the floors meeting at the doorway.
Here’s a quick comparison:
| Transition Type | Best For | Typical Height Difference |
|---|---|---|
| T-molding | Laminate to laminate (same height) | 0–1/8″ |
| Reducer strip | Laminate to lower floor (vinyl, concrete) | 1/4″–1/2″ |
| End cap/threshold | Laminate to carpet or outside door | Varies |
| Stair nose | Laminate to stairs | Any step down |
T-molding
T-molding is shaped like a “T” and bridges two floors of the same height. It snaps into a metal or plastic track glued to the subfloor. Leave an expansion gap on both sides, then press the molding into place.
Reducer Strip
A reducer strip slopes down from the higher laminate to a lower floor (like vinyl or concrete). It’s used when the height difference is up to 1/2″. Reducers also snap into a track or are glued down.
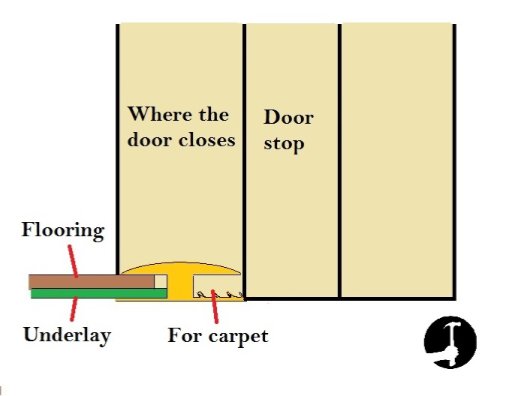
End Cap Or Threshold
End caps (also called thresholds or square nose) finish the edge where laminate meets carpet or a sliding door. They cover the expansion gap and provide a finished look.
Stair Nose
Where laminate meets stairs, use a stair nose molding. These are thicker and fit over the edge of the top stair. Always follow the manufacturer’s instructions for stairs, as safety is critical.
Step-by-step: How To End Laminate Flooring At Different Doorways
Let’s break down the process for the most common situations.
1. Laminate To Laminate (same Height)
This is the simplest case.
- Leave a 1/4″ expansion gap on both sides.
- Cut a T-molding to fit the doorway.
- Install the metal or plastic track per instructions (usually glued or screwed to the subfloor).
- Snap the T-molding into the track, covering both edges.
Pro tip: If the track is loose, add a bead of construction adhesive under it.
2. Laminate To Carpet
Laminate and carpet expand and contract differently, so a transition is a must.
- Stop the laminate 1/4″ short of the carpet edge.
- Use an end cap or threshold molding.
- If the carpet is lower, tuck the edge under the molding using a carpet tucker.
- Secure the molding in the track or with adhesive.
Non-obvious insight: For a smoother look, use a carpet shim to raise the carpet to laminate level before installing the molding.
3. Laminate To Tile
Tile is usually higher than laminate. Here’s what to do:
- Measure the height difference.
- Use a reducer strip if the difference is up to 1/2″.
- Leave a 1/4″ gap at the edge.
- Install the track and reducer molding.
If the tile is much higher, consider feathering the subfloor under the laminate for a gentler slope.
4. Laminate To Exterior Door (patio, Entry)
Exterior doors need extra care to keep out water and dirt.
- Use an end cap or threshold.
- Stop the laminate 1/4″ from the door sill.
- Seal the gap with a flexible caulk (not hard filler) to allow movement and block drafts.
Extra tip: Pick a threshold with a drip edge if the door is exposed to rain.
5. Laminate To Concrete Or Vinyl
If the next room is concrete or vinyl, use a reducer strip.
- Leave a 1/4″ gap between the laminate and the other floor.
- Cut the reducer to fit.
- Snap or glue into place.
If there’s a large drop, use a double reducer or build up the low floor with a thin underlayment.
How To Install Transition Strips
Most transition strips come with a mounting track. Here’s how to use them:
- After laying the last row of laminate, measure the doorway width.
- Cut the transition strip and track to length with a hacksaw.
- Clean the subfloor.
- Glue or screw the track to the subfloor, centered in the gap.
- Let adhesive dry (if used).
- Press the transition strip into the track until it clicks.
Some strips are glued directly to the floor. For heavy traffic areas, tracks hold better.
Comparison Of Installation Methods
Here’s a side-by-side look at the most common transition installation methods:
| Method | Pros | Cons | Best For |
|---|---|---|---|
| Mounting track (snap-in) | Secure, clean look | Requires precise gap | High-traffic, DIY-friendly |
| Glue-down only | Fast, no screws | May loosen over time | Low-traffic, quick fixes |
| Nail-down (rare) | Very secure | Pins laminate, can cause buckling | Solid wood, not floating floors |
Common Mistakes To Avoid
Many DIYers make small errors that cause big problems months later. Here are the most common, and how to avoid them:
- Skipping the expansion gap: If you cut planks tight to the jamb or threshold, the floor can’t move and may buckle.
- Forcing planks under door jambs: This can break the click-lock system or scratch the surface.
- Using the wrong transition strip: If the transition is too tall or short, it creates a trip hazard.
- Pinning the floor with nails or screws: Laminate must float. Never fasten it at the edges.
- Not sealing exterior door gaps: Moisture can get under the floor, leading to swelling and mold.
One detail beginners miss: Always clean out dust and debris before installing transition strips. Even small pebbles can keep a strip from sitting flat.

Credit: www.familyhandyman.com
Advanced Tips For A Professional Finish
If you want your floor to look like a pro did it, consider these extra steps:
- Color-match your transition strips: Most flooring brands sell strips that match their planks. If not, buy unfinished wood strips and stain them.
- Feather the subfloor under laminate if there’s a big height change. Use self-leveling compound or plywood underlayment.
- Trim door bottoms: If your new floor is higher, remove the door and trim 1/4″–1/2″ from the bottom so it swings freely.
- Use painter’s tape when cutting near doorways to avoid chipping the laminate surface.
- Test-fit everything before gluing. Once the adhesive sets, adjustments are tough.
A good practice is to take photos as you go, so you can remember exactly how everything fits—helpful if you ever need to replace a plank or repair the floor.
Special Cases: Irregular Doorways And Old Houses
Not every doorway is standard size or shape. In older homes, you may find:
- Out-of-square jambs: Scribe the plank edge with a compass to fit tight curves.
- Extra-wide thresholds: Use two transition strips back-to-back, or custom-cut a wider piece.
- Multiple floor types: If three floors meet in one spot, plan so the transition is centered and not angled.
For historical homes, check if local codes require specific thresholds at exterior doors for weatherproofing.
Maintenance And Longevity
A good transition strip not only looks nice, it protects the edge of your floor from wear and moisture. To keep your laminate looking new:
- Vacuum regularly to remove grit that could scratch the strip.
- Wipe up spills quickly, especially near exterior doors.
- Check transition strips yearly—re-glue or reattach if they become loose.
If you ever replace flooring in the next room, you can usually pop out the old transition strip and fit a new one.
Real-world Example: Fixing A Bad Doorway Transition
Imagine a homeowner installs laminate in their hallway, but doesn’t use a transition strip where it meets carpet in the bedroom. The carpet frays, the laminate edge chips, and the floor starts to squeak.
The fix: Remove the last row of planks, undercut the door jamb, leave a proper expansion gap, and install a matching end cap. Tuck the carpet edge under the molding and secure it. The result is a solid, safe, and attractive threshold.
When To Hire A Pro
While most people can handle basic transitions with patience and care, you may want to hire a flooring pro if:
- The floor heights differ by more than 1/2″.
- There are curved or irregular doorways.
- You need to meet building codes for accessibility.
- The floor meets a wet area (bathroom, laundry).
A professional installer will have specialty tools and materials, and can usually finish a tricky doorway in less than an hour.
Environmental Factors And Expansion
Laminate is sensitive to humidity and temperature. In regions with large seasonal changes, expansion gaps are even more important. If you live in a humid climate, consider a slightly larger gap (up to 1/2″) at doorways.
In dry climates, small gaps can close up as the floor expands. If possible, acclimate your laminate planks in the house for 48 hours before installation, and keep the indoor temperature stable.

Credit: www.youtube.com
Summary Table: Best Transition By Doorway Type
Here’s a quick reference for choosing the right transition strip:
| Doorway Type | Recommended Transition | Expansion Gap Needed |
|---|---|---|
| Laminate to laminate | T-molding | 1/4″ |
| Laminate to carpet | End cap/threshold | 1/4″ |
| Laminate to tile | Reducer strip | 1/4″ |
| Laminate to exterior door | End cap/threshold (seal gap) | 1/4″–1/2″ |
| Laminate to concrete/vinyl | Reducer strip | 1/4″ |
Frequently Asked Questions
How Much Expansion Gap Should I Leave At Doorways With Laminate Flooring?
Always leave at least 1/4 inch between the laminate and any fixed object, including door frames and thresholds. In very humid climates, you can increase this to 1/2 inch. This gap prevents the floor from buckling as it expands and contracts.
Can I Nail Or Screw Transition Strips Through Laminate Flooring?
No. Never fasten anything through a floating laminate floor. Nails or screws can stop the floor from moving, leading to gaps or buckling. Always use the mounting track, or glue the strip to the subfloor—not the laminate.
What If My Doorway Is Wider Than A Standard Transition Strip?
If your doorway is extra wide, you can join two strips back-to-back, or have a custom threshold made from wood. Make sure the transition covers the entire expansion gap and is secured to the subfloor, not the laminate itself.
Is It Okay To Install Laminate Flooring Under The Door Jamb?
Yes, but only if you undercut the jamb and allow for an expansion gap. Slide the plank under the jamb, but don’t wedge it tightly. The floor must be able to move freely.
What’s The Best Way To Join Laminate Flooring To A Bathroom Or Laundry Room?
At wet areas, use an end cap or threshold strip, and seal the expansion gap with flexible, waterproof caulk. This keeps moisture out and helps protect your laminate from swelling or mold.
For more technical details about flooring installation and building codes, check resources from the National Wood Flooring Association.
Finishing laminate flooring at doorways can be challenging, but with the right tools, planning, and attention to detail, your floor can look seamless and last for years. Take your time, measure twice, and always leave room for the floor to move.
Your home will thank you for it.