Ceiling tiles can make a room look clean and professional, but when they start to sag, the whole space feels old and uncared for. Sagging ceiling tiles are not just an eyesore; they can also be a sign of bigger problems like water leaks or too much humidity.
If you are facing this problem, you are not alone. Many homes, schools, and offices with drop or acoustic ceilings deal with sagging tiles over time. The good news? Most sagging tiles can be fixed with the right tools, a little patience, and some basic know-how.
In this guide, you’ll learn step-by-step how to repair sagging ceiling tiles, understand why they sag, and prevent the problem from coming back.
Why Do Ceiling Tiles Sag?
Sagging ceiling tiles are more than a cosmetic issue. It’s important to understand the reasons behind this problem before fixing it. Here are the most common causes:
- Moisture: Water damage from leaks in the roof or plumbing above the ceiling is the top reason for sagging tiles. Even small leaks can weaken the tiles over time.
- High Humidity: In bathrooms, basements, or poorly ventilated rooms, high humidity can cause tiles to absorb moisture from the air and lose their shape.
- Age and Wear: Like anything else, ceiling tiles have a life span. Over the years, the material can soften, warp, or sag.
- Poor Installation: If tiles were cut too small, not installed flat, or the grid is misaligned, tiles won’t sit correctly and can sag or shift.
- Heavy Loads Above: Extra insulation, wiring, or debris resting on the tiles can press them down and cause sagging.
A key insight many people miss: Even small, hidden leaks can cause sagging months before you see water stains. It’s not always easy to spot the real cause at first glance.
Tools And Materials Needed For Repair
Before you start, gather all the tools and materials needed for repairing sagging ceiling tiles. Having everything ready will make the job easier and faster.
Basic Tools:
- Ladder or sturdy step stool
- Utility knife or tile cutter
- Tape measure
- Straightedge or ruler
- Gloves and safety goggles
- Putty knife or scraper
Repair Materials:
- Replacement ceiling tiles (if any are damaged beyond repair)
- Tile support clips or wire
- Ceiling tile adhesive (for glue-up tiles)
- Spray bottle (for moisture control)
- Primer and ceiling paint (for stained tiles)
- Small paintbrush or roller
- Disposable drop cloths
- Cleaning supplies (sponge, mild soap, towels)
- Sealant or caulk (for sealing leaks)
Optional Items:
- Dehumidifier (for rooms with high humidity)
- Mold-resistant primer (for water-damaged areas)
- Plastic sheeting (to protect floors and furniture)
Pro tip: Always wear gloves and goggles when working above your head to protect your eyes and hands from dust, debris, and chemicals.
Evaluating The Problem: Inspection Steps
Before jumping into repairs, take some time to inspect the ceiling. This helps you choose the right repair method and avoid wasted effort.
Step 1: Identify The Type Of Ceiling Tile
There are two main types of ceiling tiles:
- Drop-in tiles: Rest in a metal grid (also called suspended ceilings).
- Glue-up tiles: Glued directly onto drywall or another flat surface.
Knowing your tile type is important because the repair methods are different.
Step 2: Check For Water Damage
Look for yellow or brown stains, mold, or wet spots. These are clear signs of moisture problems. Press gently on the tile; if it feels soft or crumbly, it may need replacing.
Step 3: Inspect The Grid Or Surface
For drop ceilings, check if the metal grid is bent, broken, or loose. For glue-up tiles, look for loose adhesive or cracks in the drywall.
Step 4: Find The Source Of Moisture
If you see signs of water, find out where it’s coming from. This could be a roof leak, pipe leak, or condensation. Fixing the source is the only way to prevent the problem from returning.
Step 5: Measure And Assess Tile Condition
Measure the size of sagging tiles and note how many need fixing or replacing. Decide if the tiles can be repaired or if they are too damaged.
Common beginner mistake: Many people only fix the tiles without stopping the leak or moisture. The sagging will return if you skip this step.
Safety Precautions Before You Start
Safety is key when working above your head, especially with old tiles that might contain asbestos or mold.
- Always wear a dust mask if you suspect old tiles or mold.
- Work with a partner if possible, especially when using a ladder.
- Turn off electricity to nearby lights if you will be working close to wiring.
- If you suspect asbestos (tiles made before 1980), do not disturb them. Contact a professional for testing and removal.
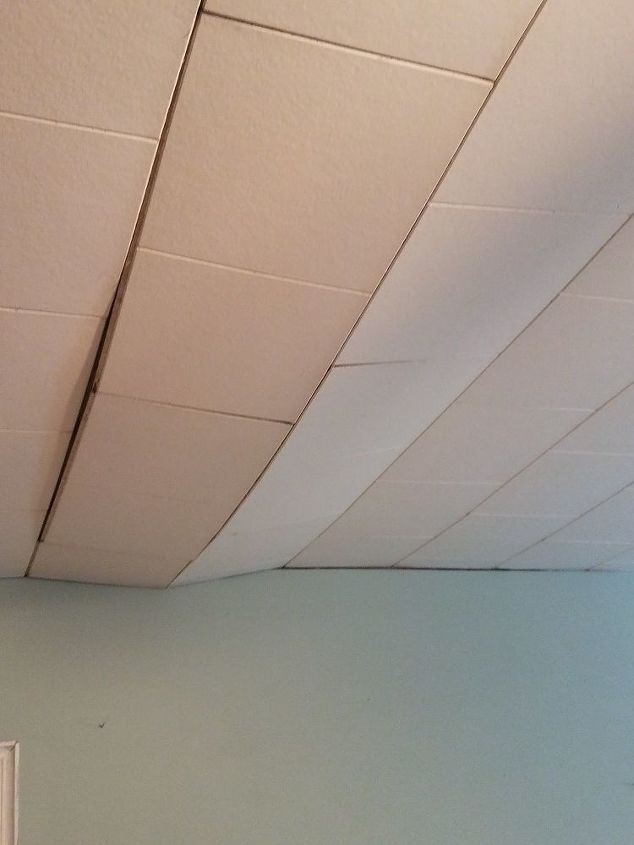
Credit: www.hometalk.com
Repairing Sagging Drop-in Ceiling Tiles
Drop-in tiles are the most common in offices and basements. They sit in a metal grid and are easy to remove and replace. Here’s how to repair sagging drop-in tiles.
Step 1: Remove The Sagging Tile
Gently push the tile up and tilt it to slide it out of the grid. Place it on a flat surface for inspection.
Step 2: Fix Minor Sagging (if Tile Is Still Good)
If the tile is not stained or damaged, you can often flatten it.
- Lay tile flat: Place a heavy, flat object (like books or a board) on top of the tile. Leave it overnight to help flatten it.
- Steam method: Lightly mist the back of the tile with water using a spray bottle. Cover with a towel and place a heavy object on top. The moisture and pressure can help restore shape.
Caution: Do not soak the tile. Too much water will make the problem worse.
Step 3: Add Support Clips
If tiles sag because they are too thin or the grid is loose, use ceiling tile support clips. These clips attach to the metal grid and hold the tile up.
- Place a clip at each corner and sometimes at the edges, depending on the tile size.
- For extra support, add light gauge wire above the tile and attach to the grid.
Step 4: Reinstall The Tile
Slide the tile back into place. Check that it sits flat and flush with the grid. Adjust the clips or wires if needed.
Step 5: Replace Damaged Tiles
If the tile is stained, crumbling, or moldy, it’s best to replace it. Buy a matching tile, cut to size if needed, and fit it into the grid.
Step 6: Repair Or Adjust The Grid
If the grid itself is bent or out of alignment, gently bend it back with pliers or replace the damaged piece. Make sure the grid is level before replacing the tile.
Bonus tip: If you cannot find a perfect match for your tile, install the new tile in a less visible spot and move an old tile to the center of the room.
Repairing Sagging Glue-up Ceiling Tiles
Glue-up tiles are usually made of foam, plastic, or fiberboard and are glued directly to drywall or plaster. Repairing these requires different steps.
Step 1: Remove Loose Or Sagging Tiles
Use a putty knife to gently pry the sagging tile away from the ceiling. Be careful not to break it if you plan to reuse it.
Step 2: Clean The Surface
Scrape off old adhesive from both the back of the tile and the ceiling. Wipe away dust and dirt to help the new adhesive stick.
Step 3: Apply New Adhesive
Use a strong adhesive made for ceiling tiles. Apply it to the back of the tile in small dabs or a zigzag pattern.
Step 4: Press Tile Back Into Place
Press the tile firmly against the ceiling. Hold for a few seconds, or use painter’s tape to hold it while the glue sets.
Step 5: Fill Gaps And Paint
If there are small gaps or cracks around the tile, fill them with caulk. Once dry, touch up with ceiling paint for a clean look.
Step 6: Replace Damaged Tiles
If the tile is too damaged to reuse, replace it with a new one. Cut to size if needed, and glue it in place.
Practical insight: Some glue-up tiles can be painted. If color matching is a problem, repaint the whole ceiling for a uniform look.
Preventing Future Sagging
Fixing sagging tiles is only half the battle. To keep your ceiling looking good, take steps to prevent the problem from coming back.
- Control moisture and leaks: Regularly check for leaks in the roof or plumbing. Fix problems right away.
- Use a dehumidifier: In damp rooms, a dehumidifier keeps humidity low and tiles dry.
- Improve ventilation: Install exhaust fans in bathrooms and kitchens to reduce humidity.
- Install vapor barriers: In basements or below ground level, a vapor barrier above the ceiling tiles can help.
- Check insulation: Make sure insulation above the ceiling is dry and not too heavy for the tiles.
- Maintain the grid: Tighten or replace loose grid pieces to keep tiles supported.
Little-known tip: You can buy moisture-resistant ceiling tiles for bathrooms and basements. They cost a bit more but last much longer in humid areas.
Advanced Tips: Dealing With Mold And Stains
Sometimes, sagging tiles are also stained or moldy. Here’s how to handle these problems safely.
Removing Mold
- Wear gloves, goggles, and a dust mask.
- Remove and throw away any moldy tiles.
- Clean the area above the ceiling with a mix of water and bleach (1 cup bleach to 1 gallon water).
- Let dry completely before installing new tiles.
Covering Water Stains
- Clean the tile with a mild soap and water.
- Let dry fully.
- Apply a stain-blocking primer (like Kilz or Zinsser).
- Repaint with ceiling paint.
Important: Never paint over mold. Remove it first, or it will come back and cause health problems.
When To Call A Professional
Most sagging ceiling tiles can be repaired by DIYers. But sometimes, it’s best to call in a pro:
- If you suspect asbestos (tiles made before 1980)
- If there is major water damage or mold
- If you cannot find or fix the source of leaks
- If the ceiling structure (joists or grid) is damaged
A professional can safely test, repair, and replace tiles, and handle any hidden dangers.
Cost Comparison: Diy Vs. Professional Repairs
Here’s a practical look at what you might spend fixing sagging ceiling tiles yourself versus hiring a professional.
| Repair Task | DIY Cost (Approx.) | Professional Cost (Approx.) |
|---|---|---|
| Replace 10 tiles | $40–$80 | $200–$400 |
| Fix grid alignment | $20–$50 | $100–$250 |
| Remove mold | $10–$40 | $300–$700 |
| Repair small leak | $0–$50 | $150–$600 |
DIY repairs are often much cheaper, but make sure you are comfortable working with ladders, tools, and possible mold.

Credit: www.reddit.com
Ceiling Tile Types: Which Are Most Likely To Sag?
Some tiles hold up better than others. Here’s a quick comparison.
| Tile Material | Moisture Resistance | Durability | Cost | Common in |
|---|---|---|---|---|
| Mineral fiber | Low | Medium | Low | Offices, schools |
| Vinyl-coated | High | High | Medium | Bathrooms, kitchens |
| Foam | Medium | Low | Low | Basements |
| Metal | Very high | Very high | High | Commercial spaces |
Vinyl-coated and metal tiles are best for humid places. If you have repeated problems, consider upgrading.
Common Mistakes When Repairing Sagging Ceiling Tiles
Even experienced DIYers make mistakes with ceiling tiles. Here are some to avoid:
- Ignoring the real cause: Only fixing tiles without stopping leaks or moisture means the problem will return.
- Using too much water to flatten tiles: Tiles get soggy and may break.
- Painting over mold: This only hides the problem and lets it grow.
- Not matching tile type: Mixing tile types can look bad and lead to more sagging.
- Overloading tiles: Adding heavy insulation or wiring above tiles can cause them to sag, even after repair.
Extra insight: Sometimes, a few sagging tiles are a warning sign of a bigger ceiling or roof problem. Always check above the tiles for hidden damage.
Environmental And Health Concerns
Many old ceiling tiles contain materials that can be unhealthy if disturbed.
- Asbestos: Found in some tiles made before 1980. If you suspect asbestos, do not touch the tiles. Hire a licensed professional to test and remove them.
- Mold: Can cause allergies and breathing problems. Always wear protection and remove moldy tiles safely.
- Dust and debris: Clean up thoroughly after repairs to avoid indoor air quality problems.
If you have children or people with breathing problems in the home, be especially careful during and after repairs.
How To Choose Replacement Ceiling Tiles
When you need to replace tiles, not all are created equal. Here’s what to consider:
- Material: Choose moisture-resistant tiles for bathrooms, kitchens, and basements.
- Size and thickness: Match your old tiles for a uniform look.
- Fire rating: Check for tiles with a fire rating if required by local codes.
- Color and texture: If you cannot match exactly, consider replacing all tiles in one room for consistency.
- Eco-friendly options: Some new tiles are made from recycled materials.
Common buyer mistake: Buying tiles based only on price. Cheap tiles may sag or stain faster, costing more in the long run.
For more about ceiling tile materials and safety, see this Wikipedia page on ceiling tiles.
Real-world Example: Fixing Sagging Tiles In A Basement
Let’s look at a practical example. Alex, a homeowner, noticed several tiles sagging in his finished basement. He found a small leak in a pipe above the ceiling.
Here’s how he fixed it:
- Turned off water and repaired the leaking pipe.
- Removed all sagging tiles and checked for mold (found a little, cleaned it with bleach).
- Let the area dry for 24 hours with fans.
- Flattened tiles using a board and weights. Replaced two tiles that were too damaged.
- Used support clips to hold older tiles in place.
- Installed a small dehumidifier to prevent future problems.
Six months later, the ceiling still looks great, and no new sagging has appeared.
Lesson: Alex fixed the real problem (the leak), cleaned up, and took steps to prevent future damage—exactly what experts recommend.
Frequently Asked Questions
What Causes Ceiling Tiles To Sag The Most?
The biggest cause is moisture—usually from leaks in the roof, plumbing, or high humidity. Over time, water weakens the tile material, making it sag or even collapse.
Can You Fix A Sagging Ceiling Tile Without Replacing It?
Yes, you can often flatten and support a sagging tile if it isn’t too damaged. Lay it flat with a weight, use a little moisture, and add support clips. But if the tile is stained, moldy, or crumbling, it’s best to replace it.
How Do I Know If My Ceiling Tiles Have Asbestos?
If your tiles were installed before 1980, there’s a chance they contain asbestos. Don’t cut or disturb them. Hire a licensed professional to test and, if needed, remove them safely.
Is It Safe To Paint Over Stained Ceiling Tiles?
You can paint over water stains after the tile is dry and clean. Use a stain-blocking primer first. Never paint over mold—always remove moldy tiles.
What Are The Best Tiles For Rooms With High Humidity?
Vinyl-coated and metal ceiling tiles work best in humid rooms like bathrooms or basements. They resist moisture and last longer than mineral fiber or foam tiles.
—
Repairing sagging ceiling tiles is a project most people can do with the right steps and tools. The key is to address the real cause, use the right materials, and take time to do the job safely. With these tips, you can restore your ceiling, prevent future problems, and enjoy a better-looking space for years to come.

Credit: www.youtube.com