Radiant floor heating has become a popular choice for comfortable, energy-efficient indoor environments. Imagine walking barefoot on warm tiles during a cold winter morning or enjoying even heat throughout every room, with no cold spots or noisy air vents. These benefits explain why more homeowners and builders are turning to radiant floor heating systems.
But designing such a system is more complex than simply laying pipes under the floor. It requires careful planning, an understanding of heat transfer, and attention to every detail. If you want to design a radiant floor heating system that works well, lasts for years, and saves energy, it’s important to get every step right.
What Is Radiant Floor Heating?
Radiant floor heating is a method that warms a room from the ground up. Unlike forced-air systems, which blow warm air through ducts, radiant systems use hot water tubes or electric heating cables installed beneath the floor surface. As the floor heats up, it gently radiates warmth into the room, creating a cozy, even temperature.
There are two main types:
- Hydronic systems: Use water heated by a boiler or water heater, circulated through flexible tubing.
- Electric systems: Use electric wires or mats.
Hydronic systems are more common for whole-house heating because they are more efficient for large areas. Electric systems are often used for smaller spaces, like bathrooms.
Key Benefits Of Radiant Floor Heating
Radiant floor heating offers several advantages compared to traditional heating systems:
- Even Heat Distribution: The entire floor becomes a large, gentle heat source. No cold spots or drafts.
- Energy Efficiency: Lower operating temperatures are needed compared to radiators or forced air, saving energy.
- Silent Operation: No noisy fans or moving air.
- Allergy Friendly: No dust or allergens blown around the room.
- Design Flexibility: No visible radiators or vents.
According to the U.S. Department of Energy, radiant systems can be up to 30% more efficient than forced-air systems in some settings. However, performance depends on proper system design.

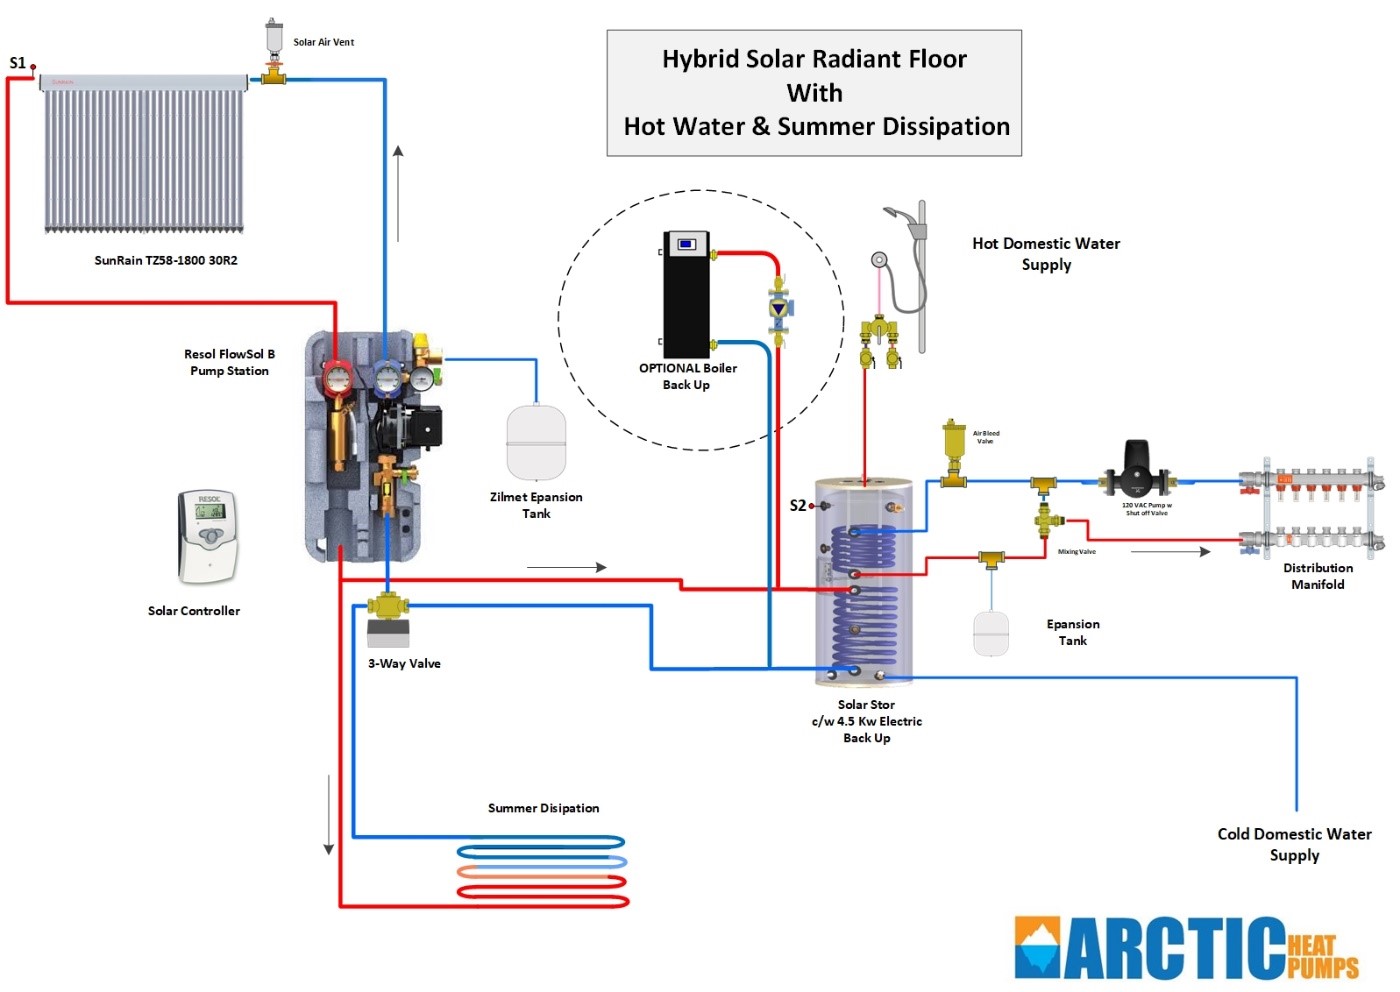
Credit: www.h2xengineering.com
Planning Your Radiant Floor Heating System
Designing a radiant floor heating system starts with careful planning. The following steps are essential for a successful installation.
1. Assess Your Heating Needs
Start by calculating the heat loss of each room. Factors include:
- Room size (square footage)
- Ceiling height
- Insulation levels in walls, floors, and ceilings
- Number and type of windows and doors
- Local climate
A heat loss calculation, often measured in BTUs (British Thermal Units) per hour, tells you how much heat each space needs to stay comfortable on the coldest days. Many online calculators can help, but for best results, consult a professional or use software such as LoopCAD or Uponor’s design tools.
Example
If a 200-square-foot room in a cold climate loses 6,000 BTUs/hour, your system must supply at least that much heat.
2. Choose The Right Radiant System
The next step is selecting between hydronic and electric radiant floor heating.
- Hydronic systems are best for whole-home or large-area heating. They use a boiler or water heater to warm water, which circulates through PEX tubing.
- Electric systems are simpler to install and work well for spot heating in small areas like bathrooms.
Hydronic Vs. Electric: A Quick Comparison
| Feature | Hydronic System | Electric System |
|---|---|---|
| Best For | Whole house, large spaces | Small rooms, retrofits |
| Operating Cost | Lower (for big areas) | Higher (per sq. ft.) |
| Installation Cost | Higher upfront | Lower upfront |
| Floor Height Impact | More (tubing + slab) | Less (thin mats) |
| Maintenance | Some (boiler, pump) | Minimal |
For most new homes or major remodels, hydronic radiant floor heating is the best investment.
3. Select The Best Floor Covering
Radiant floor heating works with many floor types, but some are better than others.
- Tile and stone: Excellent. They conduct heat quickly and efficiently.
- Engineered wood: Good, if rated for radiant use.
- Laminate: Acceptable, but check with the manufacturer.
- Carpet: Insulates the floor, so use only low-pile varieties with thin padding.
- Vinyl and linoleum: Possible, but only certain products are approved for radiant heat.
Important tip: Thick carpets or dense hardwoods (like maple) reduce heat output. Always check flooring compatibility.
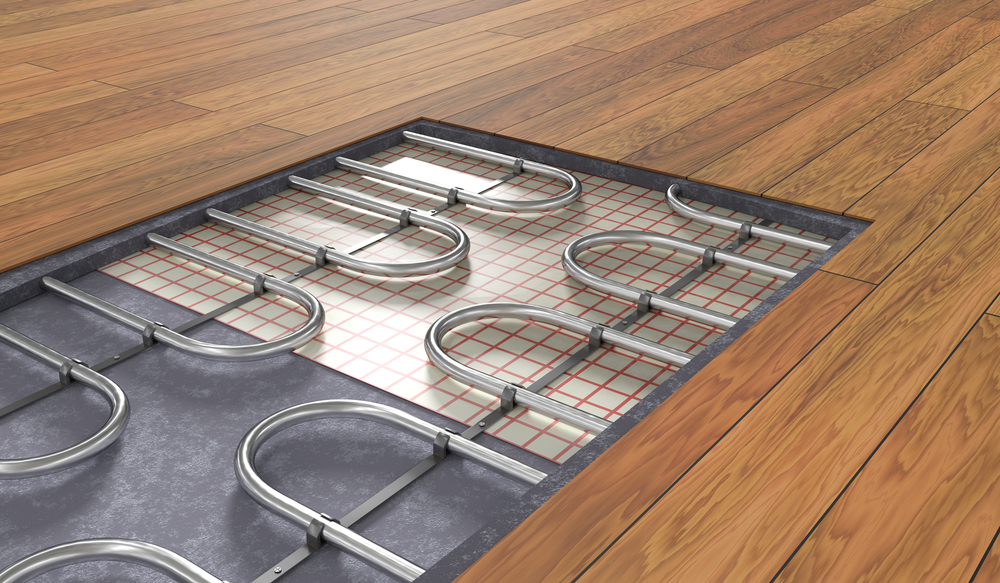
4. Calculate Tubing Layout And Spacing
For hydronic systems, the tubing layout is critical for even heat.
- Spacing: Commonly 6 to 12 inches apart. Closer spacing gives more even warmth but uses more tubing and increases cost.
- Pattern: Two main patterns are used:
- Serpentine (snaking): Easier to install, but may lead to uneven floor temperatures in large rooms.
- Spiral (counterflow): More even heat, ideal for big spaces.
Example Spacing Table
| Floor Type | Recommended Tubing Spacing |
|---|---|
| Tile/Stone | 6-9 inches |
| Wood/Laminate | 9-12 inches |
| Carpet | 6 inches (max) |
Non-obvious insight: In cold climates or bathrooms, closer spacing (6 inches) keeps the floor surface comfortably warm.
5. Select And Size The Heat Source
For hydronic systems, the boiler or water heater must match the system’s size.
- Condensing boilers: Most efficient, especially for low-temperature radiant heating.
- Tankless water heaters: Possible for small systems or single rooms.
- Geothermal heat pumps: Can work with radiant systems for ultra-low energy use.
Key sizing tip: Don’t oversize the boiler. It should closely match the total heat loss of the home, not just the radiant system’s BTU needs. Oversizing leads to short cycling (turning on and off too often), which wastes energy and reduces equipment life.
6. Insulate Properly
Insulation is crucial for radiant floor heating. Without it, much of the heat escapes downward, wasting energy.
- Under-slab insulation: Rigid foam boards (2″ or more) beneath concrete slabs.
- Between joists: Batts or rigid foam between floor joists in suspended floors.
- Edge insulation: Insulate slab edges to prevent heat loss to the ground.
Non-obvious insight: Slab edge loss can account for over 25% of total heat loss if left uninsulated. Always insulate around the perimeter.
7. Plan Zoning And Controls
Zoning allows you to heat different rooms or areas independently. This increases comfort and saves energy.
- Thermostats: Each zone should have its own thermostat for precise control.
- Manifolds: Distribute water to each tubing loop/zone.
- Actuators: Open or close water flow to each zone on demand.
Zoning is especially important in homes with rooms facing different directions, as sun exposure and heat loss vary.
8. Design The Manifold And Loop Lengths
The manifold is the central hub where all tubing loops start and end. Each loop should be:
- Less than 300 feet long (for 1/2” PEX) to avoid pressure drop and uneven heating.
- Similar length to other loops in the same zone for balanced flow.
Practical tip: Use a manifold with adjustable flow meters and isolation valves. This makes balancing and servicing the system easier.
9. Choose A Suitable Installation Method
There are several ways to install radiant tubing:
- Slab-on-grade: Tubing is embedded in a concrete slab. Best for new construction.
- Thin slab (overpour): A thin layer of concrete or gypsum is poured over tubing on an existing subfloor.
- Staple-up: Tubing is attached under the floor between joists. Requires insulation below.
- Panels or plates: Pre-made panels or aluminum plates transfer heat more evenly and speed up installation.
Choose the method that fits your building’s structure and project budget.
10. Select Circulators And Pumps
Pumps move water through the tubing. Proper sizing is key:
- Too small: Not enough flow, uneven heating.
- Too large: Wastes energy, can create noise.
Calculate the required pump size based on flow rates (gallons per minute) and head pressure (feet). Modern ECM (electronically commutated motor) pumps are more efficient and adjust their speed as needed.
11. Integrate With Other Heating Systems
Radiant floor heating can work alone or together with other systems, such as:
- Forced-air for air conditioning
- Radiators or baseboard heaters for backup
In mixed systems, careful design is needed to avoid overheating or conflicting controls.
12. Consider System Water Quality
Poor water quality can cause corrosion, scaling, or biological growth inside the system.
- Use oxygen-barrier PEX tubing to prevent rust in metal components.
- Fill the system with clean, treated water.
- Add inhibitors if needed.
Non-obvious insight: Even stainless steel manifolds can corrode if water is high in dissolved oxygen or minerals.
13. Install Air Elimination Devices
Air bubbles reduce system efficiency and can cause noise.
- Use air separators or automatic air vents at high points.
- Bleed all air from tubing during commissioning.
14. Plan For Expansion And Maintenance
Design the system for easy servicing:
- Manifolds should be accessible.
- Allow space for future zone expansion.
- Label all tubing loops clearly.
15. Estimate And Control Costs
Radiant floor heating is an investment. Typical costs range from $10 to $20 per square foot (installed), depending on method and materials.
Ways to control costs:
- Use staple-up or plate systems for retrofits.
- Limit radiant to main living spaces, using other methods elsewhere.
- Choose efficient, right-sized boilers or water heaters.
16. Understand System Controls And Smart Thermostats
Modern radiant systems can be controlled by smart thermostats. These learn your schedule, adjust for weather, and allow remote control.
- Saves energy by reducing heat when not needed.
- Allows zoning by room or area.
17. Test And Commission The System
Before covering the tubing with flooring, the system must be tested:
- Pressure test tubing for leaks (usually at 60 psi for 24 hours).
- Check manifold operation, pump function, and thermostat control.
- Verify even heating across all zones.
18. Schedule Regular Maintenance
While radiant systems are low-maintenance, regular checks prevent problems:
- Inspect pumps and valves yearly.
- Check for leaks or unusual noises.
- Service the boiler or heat source as recommended.
19. Plan For Future Upgrades
Think ahead:
- Will you add solar panels or a heat pump later?
- Is there space for more zones or smart controls?
- Is the system compatible with future floor coverings?
Planning now saves time and money later.
20. Work With Qualified Professionals
Radiant floor heating design is complex. Work with experienced installers and designers who understand local codes and best practices.
Tip: Ask for references and proof of training from manufacturers or industry groups.
Real-world Example: Hydronic Radiant System In A 2,000 Sq. Ft. Home
Let’s walk through a real-world example of a hydronic radiant floor heating system:
- Home size: 2,000 sq. Ft.
- Location: Cold climate (Minnesota)
- Floor covering: Tile in kitchen and bathrooms, engineered wood elsewhere
Design Steps:
- Heat loss calculated at 35,000 BTUs/hour for the whole home.
- Chose hydronic system with high-efficiency condensing boiler.
- PEX tubing spaced at 9 inches in living areas, 6 inches in bathrooms.
- 8 zones for independent control: Kitchen, living room, 3 bedrooms, 2 bathrooms, basement.
- Rigid foam insulation under slab, with edge insulation.
- Manifold located in basement utility room, loops kept under 275 feet.
- Smart thermostats for each zone.
- System pressure tested before floor installation.
- Annual maintenance contract for boiler and pumps.
Results: Even warmth, no cold spots, energy bills 25% lower than the old forced-air system. Homeowners especially appreciated the silent operation and warm bathroom floors.
Common Design Mistakes To Avoid
Even with the best intentions, it’s easy to make errors that hurt performance. Watch out for these:
- Under-insulating the slab or floor, leading to heat loss.
- Over-sizing the boiler, causing short cycling.
- Using incompatible floor coverings that block heat.
- Skipping zoning, resulting in uneven temperatures.
- Ignoring water quality, which can damage equipment.
- Not testing for leaks before finishing floors.
Radiant Floor Heating System Design Checklist
Before you start installation, make sure you have:
- Complete heat loss calculations for each room
- Chosen the right system type (hydronic or electric)
- Selected compatible floor coverings
- Detailed tubing layout and spacing plan
- Sized and selected the heat source properly
- Installed proper insulation under and around the floor
- Designed zones and controls for comfort and efficiency
- Sized circulators and pumps accurately
- Added air elimination and water treatment devices
- Confirmed accessibility for manifolds and maintenance
- Pressure-tested the system before covering tubing
Credit: www.solartubs.com
Data Table: Typical Heat Output By Floor Covering
The type of floor covering affects how much heat reaches the room. Here’s a quick comparison:
| Floor Covering | Heat Output (BTUs/sq. ft.) | Response Time |
|---|---|---|
| Tile/Stone | 20-25 | Fast |
| Engineered Wood | 12-15 | Medium |
| Laminate | 10-14 | Medium |
| Carpet (low-pile) | 6-8 | Slow |
Frequently Asked Questions
How Long Does Radiant Floor Heating Last?
Properly installed radiant systems can last 40 years or more. PEX tubing is highly durable and resistant to corrosion. The main components that may need replacement over time are pumps and boilers, which usually last 15-20 years.
Is Radiant Floor Heating Expensive To Run?
Radiant floor heating is usually cheaper to operate than forced-air systems, especially if your home is well insulated and you use a high-efficiency boiler. Electric systems cost more to run, so they are better for small areas.
Can I Install Radiant Floor Heating Myself?
While some handy homeowners install electric mat systems in small rooms, hydronic radiant heating is much more complex. Mistakes can lead to leaks, uneven heating, or costly repairs. For most people, professional installation is the best choice.
Does Radiant Floor Heating Work With All Floor Types?
Most floor types work, but tile and stone are best. Engineered wood, laminate, and some vinyls are suitable if rated for radiant use. Thick carpets or dense hardwoods can reduce heat output, so always check with the manufacturer.
Where Can I Learn More About Radiant Floor Heating?
For technical guides, product comparisons, and professional advice, visit the U.S. Department of Energy.
Radiant floor heating is a smart investment for comfort, efficiency, and long-term value. With careful design and quality installation, you can enjoy warm, silent floors for decades to come. If you plan each step with care, your system will deliver the cozy, even heat that makes every room feel like home.
Credit: plymouthplumbers.com