Connecting glass to wood sounds simple, but in reality, it’s a task that requires care, the right materials, and proper technique. Whether you’re building a glass cabinet door, installing a window in a wooden frame, or creating custom furniture, the way you join these two very different materials affects both the look and the strength of your final piece.
Mistakes can lead to cracks, loose joints, and even safety risks. But when you understand the options and steps, you can achieve sturdy, beautiful results that last.
People often underestimate how much the differences between glass and wood matter. Glass is hard, brittle, and doesn’t flex much. Wood is strong but expands and contracts with humidity. The right connection method must allow for these differences, or you’ll face trouble down the road. In this article, you’ll discover the main ways to connect glass to wood, the tools and supplies you’ll need, and clear, practical advice for each method. You’ll also learn tips to avoid the most common mistakes and ensure your project is both safe and stylish.
Understanding The Basics Of Glass-to-wood Connections
Before you pick up any tools, it’s important to know why connecting glass to wood is different from joining other materials. The main challenge is their physical properties. Glass is not just fragile; it’s completely rigid. Wood, on the other hand, moves with changes in temperature and humidity. This movement can cause stress at the joint, leading to cracks in the glass or gaps in the wood.
Another key difference is how these materials are typically joined. Wood can be nailed, screwed, or glued. Glass cannot be directly nailed or screwed without risk of shattering. That’s why the methods used for glass-to-wood connections focus on adhesives, mechanical fasteners that hold but don’t pierce, and special hardware.
Common Uses
Here are some common situations where you need to join glass to wood:
- Cabinet doors with glass panels
- Table tops resting on wooden bases
- Glass windows in wooden frames
- Display cases and shelving
- Decorative partitions or room dividers
Each of these projects may require a different approach, so it’s important to match the connection method to your specific need.
Key Considerations
When planning your connection, keep these points in mind:
- Movement: Wood expands and contracts. Leave space for this movement so the glass doesn’t crack.
- Weight: Glass can be heavy. Ensure the wood can support it without bending or breaking.
- Safety: Use tempered or laminated glass for doors, windows, and furniture to reduce injury risk if broken.
- Appearance: Choose a method that matches the look you want—some are nearly invisible, others add a decorative touch.
- Ease of replacement: If the glass might need to be changed in the future, use a method that allows for removal.
Main Methods To Connect Glass To Wood
There are several ways to join glass to wood, each with its pros and cons. Let’s look at the most popular options and when to use them.
1. Using Silicone Adhesive
Silicone adhesive is one of the most popular methods for bonding glass to wood. It’s clear, flexible, and strong enough for most interior uses.
How It Works
Silicone stays slightly flexible after curing, which helps absorb some of the movement from the wood. It’s waterproof and resists UV light, so it works well for windows and outdoor projects.
Steps
- Clean both surfaces with rubbing alcohol and a lint-free cloth. Any dust or oil can weaken the bond.
- Apply a thin, even bead of clear silicone to the wood where the glass will sit.
- Carefully place the glass onto the adhesive. Press gently but do not slide the glass around.
- Use spacers (small rubber or plastic pieces) to keep the glass from touching the wood directly, if needed.
- Allow the silicone to cure for at least 24 hours before handling.
Pros And Cons
Silicone is invisible and waterproof, but it’s not suitable for holding heavy glass in vertical positions without extra support.
2. Using Wood Moldings Or Beadings
This traditional method uses thin strips of wood called moldings or beadings to trap the glass in a frame. It’s common in cabinet doors and windows.
How It Works
The wood frame has a groove (called a rabbet) where the glass sits. The molding is nailed or glued over the edge of the glass to hold it in place.
Steps
- Cut a groove in the wood frame to fit the glass.
- Place the glass into the groove.
- Position the molding or beading over the edge of the glass.
- Attach the molding using small brads, nails, or wood glue.
Pros And Cons
This method is strong and allows for easy glass replacement. However, it requires careful woodworking and the right tools.
3. Using U-channel Or L-channel
U-channel or L-channel are metal or plastic strips shaped like the letter “U” or “L”. They hold the glass securely and are often used in display cases or partitions.
How It Works
The channel fits over the edge of the glass, which is then attached to the wood with screws or adhesive.
Steps
- Measure the glass and cut the channel to length.
- Attach the channel to the wood using screws or construction adhesive.
- Slide the glass into the channel.
Pros And Cons
Channels provide a strong hold and protect the glass edge. They can be visible, so choose a finish that matches your project.
4. Using Specialized Glass Clips
Glass clips are small metal or plastic brackets that hold the glass in place. They’re often used for shelves or decorative panels.
How It Works
The clip is screwed into the wood, and the glass sits in a slot or notch in the clip.
Steps
- Mark the positions for the clips on the wood.
- Screw the clips into place.
- Insert the glass into the clips.
Pros And Cons
Clips are easy to install and allow for quick glass replacement. However, they are visible and may not suit all designs.
5. Using Double-sided Mounting Tape
Double-sided tape can be used for lightweight glass panels, such as in picture frames or small doors.
How It Works
The tape sticks to both the wood and the glass, creating a strong bond without mess.
Steps
- Clean both surfaces thoroughly.
- Apply the tape to the wood, pressing firmly.
- Remove the backing and press the glass into place.
Pros And Cons
Tape is quick and clean, but not strong enough for heavy or load-bearing glass.
6. Using Construction Adhesive
Some heavy-duty construction adhesives are designed to bond glass to wood. These are used when a strong, permanent hold is needed.
How It Works
The adhesive forms a thick, strong layer between the materials.
Steps
- Clean and roughen the wood surface slightly for better grip.
- Apply adhesive in lines or dots.
- Press the glass into place and use temporary supports until the adhesive sets.
Pros And Cons
This method gives a very strong bond but is nearly impossible to remove without breaking the glass.
7. Using Glazing Putty
Glazing putty is a traditional material for installing glass panes in window frames.
How It Works
The putty is pressed around the edge of the glass, sealing it into the wood frame.
Steps
- Roll the putty into thin ropes.
- Press the putty into the groove of the wood frame.
- Set the glass onto the putty.
- Apply more putty on top and smooth it out.
Pros And Cons
Putty gives a classic look and is easy to repair, but it takes time to cure and needs painting.
Comparing Popular Glass-to-wood Connection Methods
Choosing the right method depends on your project’s needs. Here’s a quick comparison:
| Method | Best For | Removability | Strength | Visibility |
|---|---|---|---|---|
| Silicone Adhesive | Windows, Cabinet Doors | Difficult | Medium | Low |
| Wood Moldings | Doors, Frames | Easy | High | Medium |
| U/L-Channel | Display Cases | Easy | High | Medium |
| Glass Clips | Shelves, Panels | Easy | Medium | High |
| Mounting Tape | Light Panels | Medium | Low | Low |
| Construction Adhesive | Heavy Installations | Difficult | Very High | Low |
| Glazing Putty | Windows | Medium | Medium | Medium |
Materials And Tools You’ll Need
The right materials and tools make a big difference. Here’s what you’ll typically need for glass-to-wood projects:
- Glass panel (tempered or laminated for safety)
- Wood frame or support
- Adhesive (silicone, construction, or double-sided tape)
- Moldings or beadings (if using)
- Glass clips or channels (if using)
- Glazing putty (for windows)
- Clean cloth and rubbing alcohol
- Measuring tape
- Utility knife
- Small nails or brads
- Screwdriver or drill
- Rubber spacers or pads
- Painter’s tape (to hold glass while adhesive cures)
Some projects may require other specialty items, but this list covers the basics.
Safety Equipment
- Gloves (to protect from sharp glass edges)
- Safety glasses
- Dust mask (when sanding wood or working with putty)
Tip
Always measure the glass and wood at least twice. Even a small mistake can mean the glass won’t fit or the wood frame will be too loose.

Credit: forum.canadianwoodworking.com
Step-by-step Guide: Connecting Glass To Wood With Silicone Adhesive
Let’s walk through one of the most common and beginner-friendly methods: using silicone adhesive to fix a glass panel into a wooden frame.
Step 1: Prepare The Surfaces
Clean both the glass and wood with rubbing alcohol. Remove all dust, oils, and old adhesive. Let the surfaces dry completely.
Step 2: Dry-fit The Glass
Place the glass in the frame without adhesive to check the fit. There should be a small gap (about 1-2 mm) on all sides to allow for wood movement.
Step 3: Apply Silicone
Run a thin, continuous bead of clear silicone along the wood where the glass will sit. Don’t use too much—excess can squeeze out.
Step 4: Insert Spacers
Place small rubber spacers at each corner. These prevent direct contact and allow for movement.
Step 5: Set The Glass
Carefully lower the glass into position. Press gently but firmly. Do not slide the glass, as this can smear the adhesive.
Step 6: Secure While Curing
Use painter’s tape to hold the glass in place while the silicone cures (at least 24 hours).
Step 7: Clean Up
Wipe away any excess silicone with a damp cloth before it sets. Once cured, trim off any extra with a utility knife.
Step 8: Final Inspection
Check for gaps, bubbles, or loose spots. The glass should be secure but not under stress.
Case Study: Glass Cabinet Door
Suppose you want to add a glass panel to a wooden cabinet door. Here’s how you might do it using wood moldings:
- Cut a rabbet (groove) in the back of the cabinet door.
- Place the glass into the groove.
- Attach thin wooden moldings over the glass edge with small nails or glue.
- Paint or stain the moldings to match the door.
This method lets you replace the glass easily if it ever breaks.
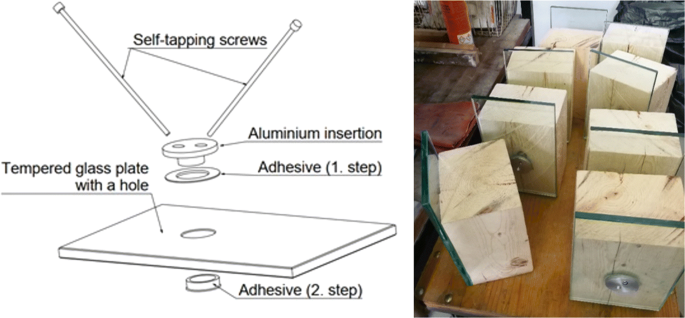
Credit: link.springer.com
Mistakes To Avoid When Connecting Glass To Wood
Even experienced DIYers make errors. Here are some common mistakes—and how to avoid them:
- Not allowing for wood movement: If the wood expands, it can crack the glass. Always leave a small gap and use flexible adhesive.
- Using the wrong adhesive: Not all glues work on glass. Always choose one marked for glass-to-wood applications.
- Skipping surface cleaning: Any dirt or oil weakens the bond. Clean both surfaces thoroughly.
- Forgetting spacers: Direct contact between glass and wood can lead to chips or cracks.
- Over-tightening clips or channels: Too much pressure can shatter the glass. Tighten gently.
- Ignoring safety glass: For doors, windows, or furniture, always use tempered or laminated glass.
Advanced Techniques: Hidden Fixings And Decorative Joints
For high-end or custom furniture, you might want a connection that’s invisible or adds to the design.
Hidden Adhesive Channels
Some wood frames have a recessed channel hidden behind the edge. The glass sits in this groove, secured with silicone so the joint is almost invisible.
Decorative Metal Brackets
In modern designs, decorative brackets can both hold the glass and become a design feature. These are often used in contemporary tables or display cases.
Inlay And Overlay Techniques
A thin strip of wood is inlaid over the edge of the glass, creating a seamless look. This requires precise woodworking and is best for experienced builders.

Credit: www.adkwik.co.uk
Practical Tips For A Professional Finish
- Always use tempered glass for safety, especially in doors or tables.
- If you’re painting or staining the wood, do it before installing the glass. This prevents damage to the glass surface.
- For exterior projects, make sure all joints are sealed against moisture.
- Use soft pads or bumpers where the glass meets the wood to reduce noise and protect both surfaces.
- If you’re not sure the glass will stay put, add a small mechanical support, such as a clip or bracket.
Table: Adhesives For Glass-to-wood Projects
Choosing the right adhesive can be confusing. Here’s a quick reference:
| Adhesive Type | Strength | Color | Flexibility | Best For |
|---|---|---|---|---|
| Clear Silicone | Medium | Clear | High | Windows, Cabinets |
| Construction Adhesive | Very High | Opaque | Medium | Heavy glass panels |
| Epoxy | High | Clear/Yellow | Low | Permanent bonds |
| Double-Sided Tape | Low | Clear | Low | Lightweight glass |
| Glazing Putty | Medium | White | Medium | Windows |
Maintenance And Long-term Care
A good glass-to-wood joint can last for many years with proper care. Here’s how to keep it looking and working its best:
- Clean glass regularly with a soft cloth and glass cleaner. Avoid letting water pool at the joints.
- Check joints annually for cracks, gaps, or movement.
- Re-seal or re-caulk any exterior glass if you see gaps or leaks.
- Avoid slamming doors or windows with glass panels—this puts stress on the joint.
- Replace worn spacers or pads to prevent rattling or damage.
If you ever need to replace the glass, reverse the installation steps. With moldings or clips, this is usually straightforward. With adhesives, you may need a utility knife and patience.
Table: Common Glass Types For Wood Projects
Not all glass is the same. Here’s a quick guide to the most common types used in wood projects:
| Glass Type | Strength | Breakage Pattern | Best For |
|---|---|---|---|
| Annealed Glass | Standard | Large, sharp shards | Picture frames |
| Tempered Glass | 4-5x stronger | Small, blunt pieces | Doors, tables, windows |
| Laminated Glass | High | Holds together | Windows, partitions |
| Frosted Glass | Standard | Large shards | Cabinet doors, privacy screens |
Real-world Example: Glass Table Top On Wooden Base
Imagine you’re attaching a thick glass top to a wooden table base. Here’s what works best:
- Use clear silicone pads at the contact points. These prevent the glass from sliding and protect both surfaces.
- For added security, use small clear bumpers or hidden metal clips underneath.
- Avoid adhesives for large table tops, as the glass may need to be removed for cleaning or repair.
This approach gives a floating look, keeps the glass stable, and allows easy maintenance.
Where To Get More Help
If you’re working on a large or important project, or if safety is a concern, consider consulting a professional glazier or woodworker. There are also many helpful resources and guides available from official sources such as Wikipedia.
Frequently Asked Questions
What Is The Best Adhesive To Use For Connecting Glass To Wood?
The best adhesive depends on your project. Clear silicone adhesive is the most popular for windows, cabinet doors, and small panels because it’s strong, flexible, and nearly invisible. For heavy panels or exterior use, a high-quality construction adhesive may be better. Always choose a product labeled for both glass and wood.
Can I Use Normal Wood Glue To Stick Glass To Wood?
No, wood glue (like PVA) is not suitable for glass. It does not bond well and can fail over time. Always use an adhesive specifically designed for glass-to-wood applications, such as silicone, epoxy, or construction adhesive.
Is It Safe To Use Glass In Furniture And Doors?
Yes, but only if you use tempered or laminated glass. These types are much safer because they break into small, blunt pieces or stay together if shattered. Never use standard glass in doors, tables, or other places where safety is a concern.
How Do I Replace A Broken Glass Panel In A Wooden Frame?
First, remove any moldings, clips, or fasteners holding the glass. Carefully lift out the broken pieces, wearing gloves and safety glasses. Clean out old adhesive or putty. Install the new glass using the original method, making sure to use spacers and the correct adhesive.
Always use safety glass for replacements.
Can I Drill Holes In Glass To Attach It To Wood With Screws?
Drilling glass is risky and should only be done with the right tools and safety gear. Even with special bits, glass can crack or shatter easily. For most projects, it’s better to use channels, clips, or adhesives rather than drilling holes in the glass.
Connecting glass to wood is a skill that combines careful planning, the right materials, and patience. When done well, it lets you create beautiful, functional pieces that last for years. Whether you’re a hobbyist or a pro, understanding the methods and their strengths will help you make the best choice for your next project.