Whitewashing laminate flooring is one of the most effective ways to give your home a fresh, modern look without replacing the floors. Many people think you can only whitewash real wood, but with the right approach, you can transform laminate surfaces too. If you’re looking for a light, coastal style or want to brighten dark, dated laminate, this guide explains every step. Whether you’re a DIY beginner or have some experience, you’ll find clear instructions, expert tips, and real-world advice here.
You’ll learn which products to use, what mistakes to avoid, and how to get long-lasting results. You’ll also find practical comparisons and data, so you can choose methods and materials that fit your situation. Let’s explore how to whitewash laminate flooring the right way—so it looks beautiful, lasts longer, and adds value to your space.
Can You Whitewash Laminate Flooring?
Many homeowners worry that laminate flooring cannot be painted or whitewashed. Laminate is a synthetic product with a printed surface, not real wood. However, with careful prep and the right materials, you can successfully whitewash laminate. The secret is understanding the challenges:
- Laminate is non-porous and smooth, so paint has trouble sticking.
- The top layer is usually a plastic-like coating that must be abraded.
- Laminate’s printed design can sometimes show through if you don’t use enough coverage.
Still, with good prep and the right technique, you can make laminate look whitewashed and stylish. This project takes time and patience, but it’s much cheaper than installing new flooring.
Tools And Materials Needed
Getting the right tools and materials is essential for a successful whitewash finish. Here’s what you’ll need:
- Fine-grit sandpaper (180–220 grit)
- Sanding block or electric sander (optional, for larger areas)
- Vacuum and damp microfiber cloth
- Painter’s tape
- Drop cloths or plastic sheeting
- Degreasing cleaner (like TSP substitute)
- Bonding primer (water-based or shellac-based)
- High-quality paintbrushes and small foam rollers
- White latex paint (matte or eggshell, water-based preferred)
- Clear water-based polyurethane (for sealing)
- Buckets for mixing
- Measuring cup for diluting paint
- Stir sticks
- Disposable gloves
- Respirator or mask (for sanding and painting)
- Rags or sponges
Tip: Don’t use oil-based primers or sealers—they can yellow over time and may not bond well to laminate.
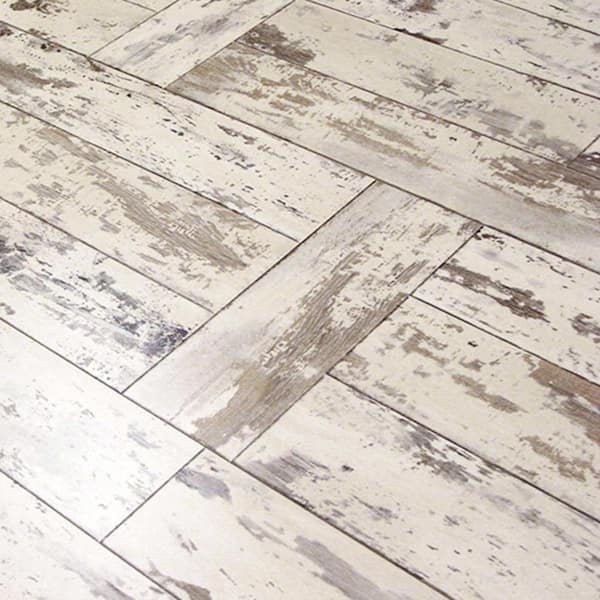
Credit: www.homedepot.com
How To Whitewash Laminate Flooring: Step-by-step Guide
This process has several steps. Skipping any of them can result in peeling, uneven color, or damage. Go slowly, and do each step carefully for the best results.
1. Prepare The Room
Remove all furniture, rugs, and obstacles from the room. Sweep and vacuum the floor to remove dust and debris. Cover any walls, baseboards, or nearby surfaces with painter’s tape and drop cloths to protect them from paint splatters.
2. Clean The Floor Thoroughly
Laminate often has a residue of oils, waxes, or cleaning products. Use a degreasing cleaner—like a TSP substitute—diluted with water. Scrub the floor with a damp cloth or sponge. Rinse with clean water and let dry completely. This step helps primer and paint stick better.
3. Lightly Sand The Surface
Laminate must be scuffed up so primer can grip the surface. Use 180–220 grit sandpaper to gently sand the entire floor. Don’t sand too hard—you only want to dull the shine, not remove the “wood grain” picture.
- Use a sanding block for small areas, or an electric sander for bigger rooms.
- Vacuum all dust, then wipe with a damp microfiber cloth.
Tip: Pay extra attention to high-traffic spots. These areas can have extra shine and might need a second pass.
4. Apply A Bonding Primer
A high-quality bonding primer is the key to a long-lasting whitewash. Look for primers labeled for glossy or laminate surfaces. Use a foam roller for large areas and a brush for edges and corners.
- Apply a thin, even coat.
- Let it dry as directed (usually 2–4 hours).
- For best results, apply a second thin coat.
Don’t rush. If you skip priming or use a cheap product, the finish may peel or scratch off easily.
5. Mix And Test Your Whitewash
Whitewash is usually a mix of white latex paint and water. The ratio changes how “see-through” or opaque the finish looks. Here’s a common formula:
- For a semi-transparent look: Mix 1 part white paint with 2 parts water.
- For a more solid look: Mix equal parts paint and water.
Mix well in a bucket. Always test your mix on a hidden spot or a spare laminate board. Let it dry and see if you like the color.
6. Apply The Whitewash
Work in small sections (about 2 feet by 4 feet). Use a brush or foam roller to apply the whitewash. Immediately wipe the area with a clean, damp rag to create a washed, streaky look. This mimics the classic whitewashed wood style.
- Work along the “grain” printed on the laminate.
- Blend edges of each section for even coverage.
- Let the first coat dry for 2–4 hours.
You may need 2–3 coats for a more opaque look. Always let each coat dry fully before adding another.
7. Seal The Floor
Laminate is not naturally absorbent, so the painted finish needs protection. Use a water-based polyurethane designed for floors. Apply 2–3 thin coats with a clean brush or roller.
- Let each coat dry as directed (usually 2–4 hours).
- Lightly sand between coats with 320-grit sandpaper for smoothness.
- Avoid walking on the floor until the final coat is dry and hard (usually 24–48 hours).
This protective step prevents scratches, stains, and water damage.
8. Clean Up And Replace Furniture
Carefully remove painter’s tape and drop cloths. Vacuum or sweep the floor. Wait at least 48 hours before moving furniture back in. Place felt pads under furniture legs to avoid scratching the new finish.
Comparing Whitewashing Laminate Vs. Other Floor Types
It’s easy to confuse whitewashing laminate with whitewashing real wood or vinyl. Each flooring type reacts differently to paint and sealers. Here’s a simple comparison:
| Floor Type | Prep Required | Durability | Final Look | Difficulty |
|---|---|---|---|---|
| Laminate | Heavy cleaning, sanding, priming | Good (if sealed well) | Semi-wood look | Medium |
| Engineered Wood | Light sanding, cleaning | Excellent | Natural wood grain | Medium |
| Vinyl Plank | Cleaning, specialized primer | Fair | Smooth, less grain | Medium |
| Solid Hardwood | Heavy sanding, cleaning | Excellent | Rich wood grain | Hard |
Laminate gives a fresh, updated look, but you’ll never get the deep grain of real wood. Still, the change is dramatic and budget-friendly.
Common Mistakes To Avoid
Many first-timers make errors that ruin the finish or cause peeling. Here are the most frequent mistakes—and how to avoid them.
1. Skipping The Sanding Step
Even a light sanding helps primer and paint stick. If you skip this, the paint may chip off in weeks.
2. Using The Wrong Primer
Regular wall primer won’t bond to laminate. Always use a bonding primer rated for slick surfaces.
3. Making The Whitewash Too Watery
Too much water can cause streaks or pooling. Stick to the recommended ratios and test before starting.
4. Not Sealing The Finish
Laminate whitewash without a sealant will scratch and stain easily. Use a water-based polyurethane.
5. Rushing Between Coats
Let each coat dry fully. If you rush, the finish can wrinkle or peel.
6. Skipping Edge Blending
Work in small sections and blend edges as you go. Overlapping dry paint can create visible lines.
7. Using Oil-based Products
Oil-based sealers can yellow over time and don’t bond well to laminate.
8. Not Testing On A Hidden Area
Always test your whitewash mix on a spare board or hidden spot.
Tip: Always read product labels. Some paints and sealers are not floor-rated and can fail under foot traffic.
Tips For Achieving The Best Whitewash Look
Getting a beautiful whitewashed effect is part science, part art. These tips help you get a finish you’ll love:
- Use a foam roller for smooth, streak-free application.
- Work quickly—whitewash dries fast.
- For more “wood grain,” use a dry brush technique: Dip the brush in paint, then wipe most off before brushing the floor.
- To add warmth, mix a small amount of gray or beige paint into your whitewash.
- For a rustic look, leave some darker streaks.
- To hide seams, run your brush with the “grain” of the laminate board.
- Allow extra drying time if the room is humid or cold.
Remember, you can always add another coat, but removing paint from laminate is difficult.
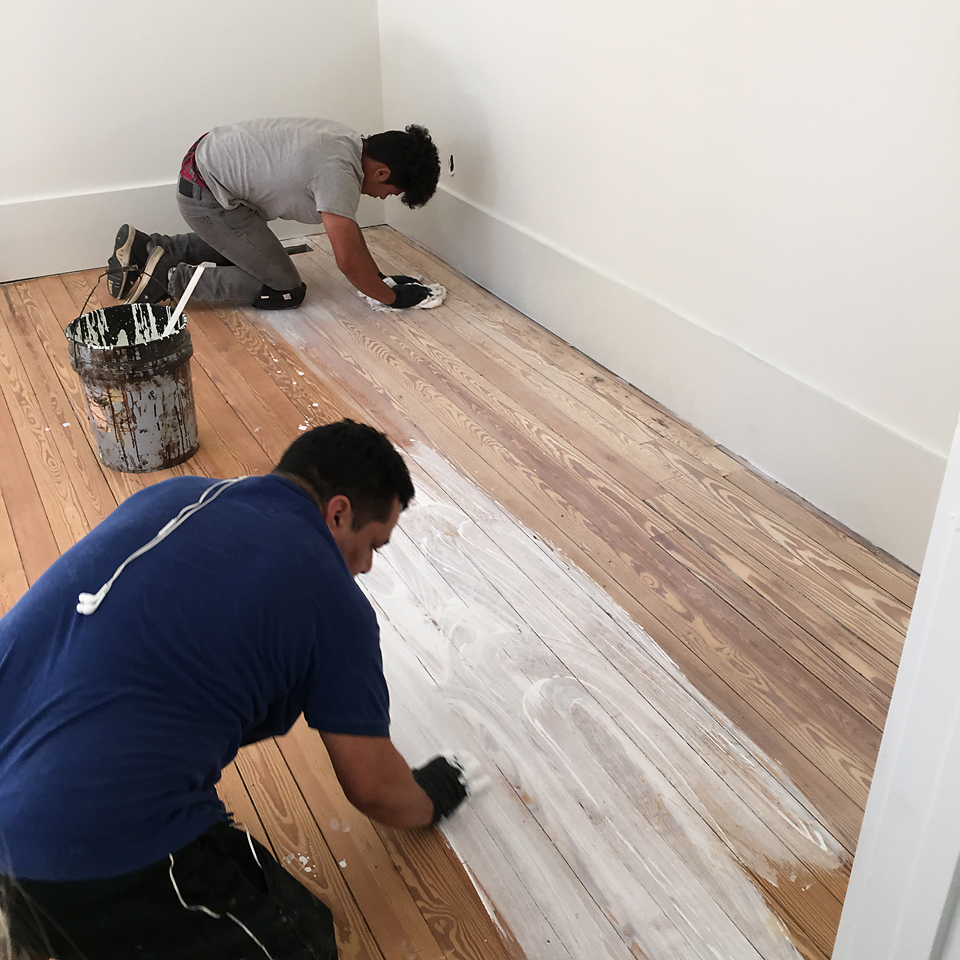
Credit: addisonswonderland.com
Maintaining Whitewashed Laminate Floors
Proper care keeps your whitewashed floors looking fresh for years. Here’s what you should do:
- Sweep or vacuum regularly to remove grit.
- Use damp (not wet) mops for cleaning.
- Avoid harsh chemicals or abrasive pads.
- Place mats at entrances to catch dirt.
- Use felt pads under all furniture.
- Touch up chips or scratches with leftover paint, then reseal.
With good care, a whitewashed laminate finish can last 3–5 years before needing touch-ups.
Real-world Example: Transforming A Dated Room
Consider a small apartment with dark oak laminate from the early 2000s. The owner wanted a bright, open look but couldn’t afford new floors. They followed the steps above:
- Cleaned and sanded the laminate
- Used a shellac-based bonding primer
- Mixed 1 part paint, 2 parts water for a semi-transparent look
- Applied two coats, wiping each for a streaky effect
- Sealed with three coats of water-based polyurethane
The result? The room looked twice as large and much brighter. Even years later, the finish still looked great with only minor touch-ups needed.
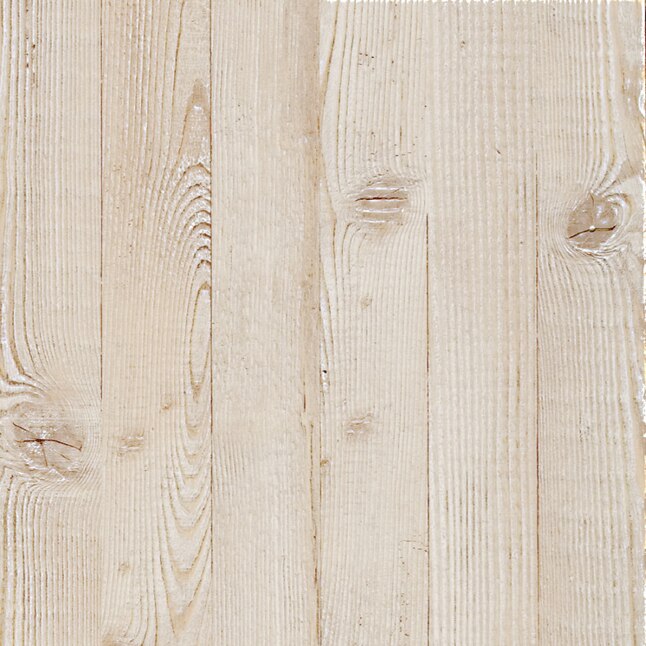
Credit: www.lowes.com
Cost Breakdown: Diy Vs. Hiring A Pro
Let’s compare the typical costs for DIY whitewashing versus hiring a professional:
| Item | DIY Cost (per 200 sq ft) | Professional Cost (per 200 sq ft) |
|---|---|---|
| Materials (paint, primer, sealant, tools) | $70–$120 | Included |
| Labor | $0 (your time) | $300–$600 |
| Total | $70–$120 | $370–$720 |
DIY whitewashing is much cheaper, but it takes time and patience. Hiring a pro saves effort but costs much more.
Alternative Methods For Whitewashed Look
If you don’t want to paint your laminate, there are a few other ways to get a whitewashed appearance:
1. Peel-and-stick Vinyl Planks
Some brands sell whitewashed wood-look planks. These install over your existing laminate.
2. Laminate Floor Refinishing Kits
Special kits include primer, paint, and sealers made for laminate. They cost more but are designed for durability.
3. Rugs And Decor
For a low-commitment look, use large white or gray area rugs and coastal decor.
Each option has pros and cons:
| Method | Cost | Durability | Skill Needed |
|---|---|---|---|
| Painted whitewash | Low | Good (if sealed) | Medium |
| Peel-and-stick planks | Medium–High | Excellent | Low |
| Refinishing kit | Medium | Excellent | Medium |
| Rugs/decor | Low–Medium | Good | Low |
Painted whitewash is the best value for most people, but peel-and-stick planks are a good no-mess solution.
Two Non-obvious Tips For Beginners
1. Humidity Matters.
If you paint during high humidity, the finish can take much longer to dry and may stay tacky. Try to work when humidity is below 60%, or use a dehumidifier.
2. Test Furniture Pads.
Some felt pads use adhesives that can react with fresh polyurethane, causing cloudiness or peeling. Wait at least a week after sealing before adding pads, and check that the glue is compatible with water-based finishes.
Environmental And Safety Considerations
Many primers, paints, and sealers emit volatile organic compounds (VOCs). Choose low-VOC or zero-VOC products for better indoor air quality. Always ventilate the area by opening windows and using fans. Wear a mask while sanding or painting.
Dispose of used rags, paint, and chemicals according to local rules. Never pour leftover paint or primer down the drain.
When Not To Whitewash Laminate
Whitewashing is a great DIY project, but sometimes it’s not the best choice. You should avoid it if:
- The laminate is water-damaged or swollen.
- The floor is peeling or bubbling.
- You plan to sell soon and want a traditional look.
- The room has heavy traffic (like commercial spaces).
In these cases, replacing the floor or using area rugs may be smarter.
Expert Advice: How To Fix Common Problems
Problem: The finish is peeling or chipping.
Solution: This usually means the surface wasn’t sanded or primed well. Sand the area, spot-prime, and repaint, then reseal.
Problem: Streaks or uneven color.
Solution: This often happens when the whitewash is too watery or wasn’t wiped/blended well. Add more paint to your mix and blend edges as you go.
Problem: Sticky or soft finish.
Solution: This can be caused by high humidity or not letting each coat dry. Wait longer between coats and ensure good ventilation.
Problem: Yellowing over time.
Solution: Oil-based sealers can yellow. Only use water-based polyurethane for a true white look.
Final Thoughts
Whitewashing laminate flooring is a smart way to refresh your home without spending a fortune. With the right tools and a careful approach, almost anyone can achieve a beautiful, durable finish. Remember to prep well, use quality materials, and never skip sealing.
Your patience will pay off with a bright, stylish floor that feels brand new.
If you want more details about paint and primer choices, check out this Bob Vila guide for further reading.
Frequently Asked Questions
What Is The Best Paint For Whitewashing Laminate Floors?
The best paint is water-based latex in matte or eggshell finish. It sticks well, dries fast, and is easy to mix for whitewashing. Avoid oil-based paints—they can yellow and may not bond to laminate.
How Long Does It Take To Whitewash Laminate Flooring?
Expect 2–3 days for the full process:
- Day 1: Prep, clean, sand, and prime.
- Day 2: Apply whitewash coats.
- Day 3: Seal and cure.
Drying times may vary with temperature and humidity.
Will Whitewashed Laminate Floors Scratch Easily?
If you seal with water-based polyurethane, your floors will resist scratches and stains. Still, laminate is softer than hardwood, so always use felt pads and avoid dragging furniture.
Can I Undo A Whitewash If I Don’t Like The Result?
It’s possible, but difficult. You would need to sand off the paint and refinish the laminate, or cover it with new flooring. Always test on a small area first to avoid regrets.
Is Whitewashing Laminate Flooring Safe For Pets And Kids?
Yes, if you use low-VOC, water-based products and let them cure completely. The sealed finish is easy to clean and more resistant to stains and spills than bare laminate.
Whitewashing your laminate floor can truly transform your space—just take your time, follow each step, and enjoy your new look!