Building your own basement storage shelves is one of the most practical ways to maximize space and keep your home organized. Many basements have unused walls and corners that can become valuable spots for storing tools, seasonal items, or even family memories.
But starting a shelving project can feel overwhelming if you’re not sure where to begin. The good news? With a bit of planning and the right approach, anyone can create sturdy, affordable, and custom-fit shelves—even with limited woodworking experience.
This guide walks you through each step of the process, from designing shelves that match your needs to choosing materials, building, and installing your shelves securely. Along the way, you’ll find useful tips, avoidable mistakes, and practical advice based on real-life experience.
By the end, you’ll have the knowledge and confidence to transform your basement into an organized, clutter-free space.
Why Build Your Own Basement Storage Shelves?
Before diving into the project, let’s look at why building your own basement shelves is often better than buying pre-made units.
First, custom-built shelves use your space efficiently. Basements come in all shapes and sizes, with tricky corners, low ceilings, and odd features like water heaters or support posts. Store-bought shelves rarely fit perfectly, which means wasted space. When you build your own, you control the size, height, and depth, so every inch counts.
Second, homemade shelves are usually much stronger. Many store-bought units are made of thin particleboard or flimsy plastic. These can sag or break when loaded with heavy boxes or tools. Building your own lets you choose robust materials that hold up for years.
Third, it’s cost-effective. While the initial cost for wood and hardware can seem high, custom shelves often cost less per foot than similar-quality store options. Plus, you end up with a solution that meets your exact needs.
Finally, building shelves gives you a sense of achievement and practical skills you can use for other home projects. For many, this is the most rewarding part.
Planning Your Basement Shelves
Every successful project begins with good planning. Here’s how to make sure your shelves fit your space and needs.
Measure Your Space
Start by measuring the area where you’ll build. Use a tape measure to note:
- Wall length
- Height from floor to ceiling
- Depth available (distance from wall outward)
Write these numbers down. It helps to sketch the wall on paper, adding windows, pipes, electrical outlets, or anything you need to work around.
Decide What You’ll Store
Think about what you’ll put on the shelves. Storing paint cans or tools? You’ll need strong, deep shelves. Holiday decorations or light boxes? You can use thinner materials and shallower depths.
Make a quick list of your main storage items and estimate their size and weight. This helps you choose the right materials and shelf spacing.
Choose Your Shelf Style
There are a few common types of basement shelves:
- Freestanding shelves: Not attached to the wall; can move if needed.
- Wall-mounted shelves: Anchored directly to the wall; save floor space.
- Corner shelves: Make use of often-wasted corner space.
- Ceiling-hung shelves: For seasonal or rarely used items.
For most basements, freestanding or wall-mounted shelves are best. They’re sturdy and flexible for different uses.
Sketch Your Design
Draw a simple plan based on your measurements. Decide:
- How many shelves you want
- Spacing between shelves (12-18 inches is typical)
- Shelf length and depth
This drawing doesn’t need to be fancy, but it will keep you on track. If you’re not confident, look up simple shelving diagrams online for reference.
Tools And Materials Needed
Having the right tools and materials makes building easier and safer. Here’s what most people will need for a basic set of sturdy wooden shelves:
Tools
- Tape measure
- Pencil
- Level
- Circular saw or hand saw
- Drill and drill bits
- Screwdriver (manual or electric)
- Stud finder (for wall-mounted shelves)
- Safety glasses
- Dust mask
- Carpenter’s square
A table saw and miter saw are useful but not required for simple projects.
Materials
- 2×4 lumber for frames and supports
- Plywood or OSB panels (typically 3/4-inch thick) for shelf surfaces
- Wood screws (2.5 or 3 inches)
- Wall anchors (if mounting to drywall or concrete)
- Wood glue (optional, for extra strength)
- Paint or sealant (optional, for moisture protection)
The quantities depend on your shelf size and number, so calculate these based on your plan.
Here’s an example material list for a 6-foot long, 6-foot high, 16-inch deep shelving unit with four shelves:
- Eight 2x4s (8 feet long each)
- One 4×8-foot plywood sheet (cut to four 16-inch wide shelves)
- One box of 3-inch wood screws (about 50)
- Paint or sealer (if desired)
Comparing Shelf Materials
Choosing the right materials is key for strength, durability, and cost. Here’s a comparison of common options:
| Material | Strength | Cost | Moisture Resistance | Ease of Use |
|---|---|---|---|---|
| Plywood (3/4″) | High | Moderate | Good | Easy |
| OSB (Oriented Strand Board) | Medium | Low | Fair | Easy |
| Particleboard | Low | Low | Poor | Easy |
| Melamine/Coated Board | Medium | High | Good | Moderate |
| Metal Shelving | Very High | High | Excellent | Harder |
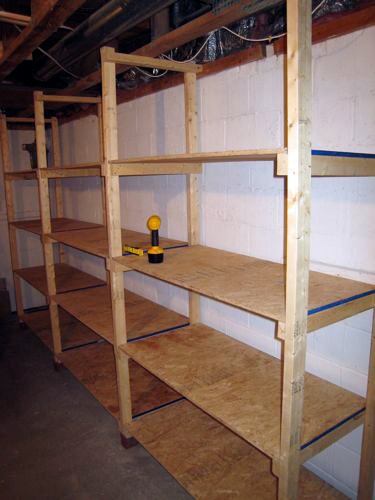
Most DIYers choose 3/4-inch plywood for shelf surfaces and 2x4s for the frame. This combo is strong, easy to cut, and holds up well in basements.

Credit: www.remodelandolacasa.com
Preparing Your Basement
Basements can be damp or have uneven floors and walls. Here’s how to get ready before you build:
Check For Moisture
Basements sometimes have water leaks or humidity. Place a piece of plastic (about 2 feet square) on the floor and tape down the edges. Leave it overnight. If water collects under the plastic, solve the moisture problem before adding shelves.
Storing items on damp shelves can cause mold or damage.
Clean And Clear The Area
Move any boxes, tools, or debris from your build zone. Sweep or vacuum the floor. This gives you space to work safely and see any issues with the walls or floor.
Mark Your Layout
Using painter’s tape or chalk, mark where your shelves will go on the floor and wall. This helps you see if there’s enough space to move around, open doors, or access windows.
Step-by-step: How To Build Basement Storage Shelves
Now for the main event. Here’s a practical, step-by-step process for building basic, strong, and adjustable basement shelves.
Step 1: Cut Your Lumber
Measure and cut all the pieces before starting assembly. For one set of shelves, you’ll need:
- Vertical posts: Four pieces of 2×4, cut to your desired shelf height (e.g., 72 inches)
- Shelf supports: Eight pieces of 2×4, cut to shelf depth (e.g., 16 inches)
- Shelf rails: Eight pieces of 2×4, cut to shelf length (e.g., 72 inches)
- Shelf boards: Four pieces of plywood, cut to length and depth (e.g., 72 x 16 inches each)
Double-check all measurements before cutting. Slight errors can cause shelves to wobble or not fit.
Step 2: Build The Shelf Frames
Lay two shelf rails parallel on the floor. Place two shelf supports at each end, forming a rectangle. Attach them with wood screws (two per joint), drilling pilot holes first to prevent splitting.
Repeat for each shelf. You should have four sturdy rectangles.
Step 3: Attach The Plywood Shelf Tops
Lay a plywood board on top of each frame. Attach using wood screws around the edges (about every 12 inches). This prevents flexing when loaded.
Step 4: Assemble The Upright Structure
Stand two vertical posts upright, spaced the shelf length apart (e. g. , 72 inches). Attach the bottom shelf frame at your desired height (typically 4 inches from the floor). Use a level to make sure the shelf is flat.
Screw the shelf frame to the posts through the sides. Repeat for the other side, forming two ladder-shaped ends.
Step 5: Add Remaining Shelves
Attach the remaining shelf frames at your planned heights (e. g. , every 16-18 inches). Use a level for each shelf to keep everything even. Secure each shelf with screws through the posts.
Step 6: Connect The Two Sides
With help, stand both “ladders” upright, spaced the correct shelf depth apart (e. g. , 16 inches). Attach the shelf frames to both sides, creating a complete rectangle structure.
Double-check for level and square as you attach each shelf.
Step 7: Secure To Wall (if Needed)
For added safety, especially if you have children or earthquakes, anchor your shelving to wall studs. Use angle brackets and long screws for wood walls, or masonry anchors for concrete. This prevents tipping if shelves are bumped.
Step 8: Paint Or Seal (optional)
If your basement is damp, consider sealing the wood with a water-resistant paint or clear sealant. This helps prevent warping and mold. Let everything dry completely before loading shelves.
Step 9: Load Your Shelves Carefully
Spread heavy items evenly across shelves. Place the heaviest items on the bottom to prevent tipping. Don’t overload—most 2×4 and plywood shelves can hold 150-300 pounds per shelf if built correctly.

Credit: www.thewoodgraincottage.com
Example: Shelf Dimensions For Common Basement Uses
Choosing the right shelf size matters for storage efficiency. Here’s a handy reference for common uses:
| Storage Type | Recommended Depth | Recommended Height | Recommended Spacing |
|---|---|---|---|
| Plastic bins | 18-24 inches | Up to 7 feet | 16-20 inches |
| Paint cans/tools | 12-16 inches | Up to 6 feet | 12-15 inches |
| Books/magazines | 10-14 inches | Up to 6 feet | 10-12 inches |
| Holiday decorations | 16-20 inches | Up to 7 feet | 14-18 inches |
| Bulk food storage | 14-20 inches | Up to 6 feet | 12-16 inches |
Adjust shelf size to fit your main storage items for the best results.
Common Mistakes And How To Avoid Them
Even experienced DIYers make errors. Here are some common mistakes and how to prevent them:
- Not checking for level/square: If your floor or walls are uneven, shelves can lean or wobble. Use a level and carpenter’s square at every stage.
- Using weak materials: Thin plywood or particleboard can sag under weight. Use 2x4s and 3/4-inch plywood for strength.
- Overloading shelves: Even strong shelves have limits. Spread weight evenly and keep heaviest items low.
- Not securing to wall: Freestanding shelves over 4 feet high should be anchored, especially if you have children.
- Ignoring moisture: Unsealed wood absorbs moisture, leading to warping or rot. Seal wood if your basement is damp.
- Forgetting access: Make sure there’s enough room in front of shelves to move and open boxes.
A non-obvious tip: Always leave a small gap (1/2 inch) between the shelf and wall, especially if your basement has pipes or wires. This allows for air flow and prevents items from being damaged by condensation.
Customizing Your Basement Storage Shelves
Once you have the basics, you can add features to make your shelves fit your needs even better.
Adjustable Shelves
Instead of fixing each shelf in place, install shelf brackets or support rails, so you can move shelves up or down as your storage needs change. You can buy inexpensive metal standards and brackets at most hardware stores.
Adding Doors Or Curtains
If you store items that collect dust, add simple plywood doors or hang a heavy curtain over the shelf front. This keeps items clean and out of sight.
Wheels For Mobility
If your floor is smooth and level, add locking caster wheels to the shelf base. This makes it easy to move shelves for cleaning or rearranging your basement.
Lighting
Basements can be dark. Mount battery-powered LED lights under each shelf to make it easy to see items, even in corners.
Labeling
Attach labels or clear bins so you always know where things are. This saves time and prevents searching through every box.
Painting And Finishing
Paint your shelves to match your basement décor or add a clear finish for a natural look. Use paint designed for wood and moisture resistance.
Safety Tips For Basement Shelving
Basements present special challenges. Here are important safety reminders:
- Always wear safety glasses and a dust mask when cutting wood.
- Keep cords and tools away from water sources.
- If drilling into concrete, use a masonry bit and anchors.
- Don’t stack shelves too high—keep the top shelf within easy reach.
- Store heavy items low to prevent tipping.
- Check shelves every few months for signs of moisture, sagging, or loose screws.
Credit: www.oneprojectcloser.com
Maintenance And Longevity
Well-built basement shelves can last for decades with simple care. Here’s how to keep them in top shape:
- Inspect for moisture or mold regularly, especially in humid seasons.
- Tighten any loose screws or brackets.
- Repaint or reseal wood every few years if your basement is damp.
- Don’t let clutter build up—keep only what you need.
A non-obvious insight: Place a small dehumidifier near your shelves if you notice condensation or musty smells. This protects both the shelves and your stored items.
When To Buy Instead Of Build
Building your own shelves is rewarding, but sometimes buying is the smarter choice. Consider buying if:
- You need shelves fast, with no time for a project.
- You have no tools or cannot borrow them.
- You want metal shelves for very heavy loads.
- Your basement is extremely damp or has regular water leaks.
There are excellent heavy-duty plastic and metal shelves available at hardware stores. Compare their cost, strength, and size to your DIY plan before starting.
You can find more about building codes and material guidelines on the official Family Handyman website.
Real-life Example: Basement Shelf Project
Let’s look at a real-life project for inspiration.
Sarah wanted to organize her unfinished basement, which had a 12-foot wall behind her laundry area. She measured the space and decided on a 12-foot-long, 18-inch-deep shelf unit with five shelves. She used ten 2x4s and two plywood sheets, spending about $120.
Sarah cut all her wood using a circular saw and assembled the frames with her teenage son. They anchored the shelf to the wall for safety. After sealing the wood with clear polyurethane, she loaded the shelves with bins for holiday décor, camping gear, and emergency supplies.
Her project took a weekend and transformed her basement from cluttered to organized. Sarah’s advice: “Double-check all your measurements and don’t rush. It’s worth the effort!”
Cost Comparison: Diy Vs. Store-bought Shelving
How much can you save by building your own? Here’s a sample cost comparison for a 6-foot long, 6-foot high, 16-inch deep shelving unit:
| Option | Material Cost | Labor (DIY) | Strength | Custom Fit |
|---|---|---|---|---|
| DIY (Plywood/2×4) | $70-$120 | 4-5 hours | Very High | Yes |
| Store-Bought (Plastic) | $60-$100 | 30 minutes | Low-Medium | No |
| Store-Bought (Metal) | $120-$200 | 30 minutes | High | No |
DIY shelves usually offer better strength and a perfect fit for your basement, but require time and tools.
Frequently Asked Questions
How Much Weight Can My Basement Shelves Hold?
Well-built shelves using 2×4 framing and 3/4-inch plywood can easily hold 150-300 pounds per shelf if weight is spread evenly. For heavier loads, add more vertical supports and use thicker plywood.
What Is The Best Way To Anchor Shelves To A Concrete Wall?
Use masonry anchors or concrete screws. Drill holes with a masonry bit, insert anchors, and attach with heavy-duty brackets. This prevents tipping and adds safety.
How Do I Prevent Mold And Moisture Damage?
Seal wood with a water-resistant paint or polyurethane. Use a dehumidifier if your basement is humid. Check shelves regularly for mold and dry any leaks quickly.
Can I Build Shelves Without Power Tools?
Yes, but it’s harder. You can use a hand saw and manual screwdriver, but it will take more time and effort. Borrowing or renting tools makes the job faster and safer.
Is It Safe To Store Food On Basement Shelves?
Yes, if your basement stays cool and dry. Avoid placing food directly on concrete or near chemicals. Use sealed bins for extra protection against moisture and pests.
Building basement storage shelves is a project that brings long-term rewards. With careful planning, the right materials, and attention to detail, you can create shelves that keep your home organized and your basement clutter-free for years to come.