Building your own sofa table is a rewarding project that not only enhances your living space but also lets you add a personal touch to your home décor. Whether you want to display photos, store remote controls, or simply have a spot to place your coffee cup behind the couch, a custom sofa table is both practical and stylish.
Many people think woodworking is too hard for beginners, but with the right approach, clear steps, and a bit of patience, anyone can build a beautiful, sturdy sofa table. This guide will walk you through each stage, from planning and choosing materials to finishing and styling your table, so you’ll feel confident—even if you’ve never built furniture before.
Why Build A Sofa Table Yourself?
A sofa table, sometimes called a console table, sits behind your sofa or against a wall, serving as a handy spot for décor, lighting, or storage. While you can buy these tables in stores, building your own offers some clear benefits:
- Customization: You choose the size, style, and finish, so it fits your home perfectly.
- Cost savings: DIY versions are often cheaper than store-bought ones, especially for solid wood.
- Skill development: You learn woodworking basics and gain confidence for future projects.
- Satisfaction: There’s a unique pride in using furniture you made with your own hands.
Many beginners are surprised how quickly they pick up skills like measuring, cutting, and sanding. Plus, when you control the process, you can avoid common problems like wobbly tables or poor-quality finishes.
Planning Your Sofa Table
Before you touch any tools, planning is essential. Good planning saves time, money, and frustration.
Deciding The Table’s Purpose And Location
Ask yourself:
- Will your sofa table hold lamps, books, or just light décor?
- Do you need storage shelves or drawers?
- Will it sit behind a sofa or against a wall?
Measure the space where you want your table. Write down the length, width, and height you need. Standard sofa tables are about 28-32 inches high (to match most sofas), 12-18 inches deep, and can range from 48-72 inches long.
Sketching A Design
Draw a simple sketch, even if it’s just on paper. Mark the tabletop, legs, and any shelves or supports you want. This helps you see proportions and plan the build. Some people use free online tools, but a pencil sketch is enough for most beginners.
Pro Tip: Don’t add too many features at first. A simple, sturdy design is easiest for your first project. You can always build a more complex table later.
Choosing A Style
Popular sofa table styles include:
- Modern: Clean lines, simple shapes, little decoration.
- Rustic: Natural wood, distressed finish, chunky legs.
- Industrial: Metal legs, reclaimed wood top, exposed hardware.
- Traditional: Turned legs, stained wood, classic look.
Pick a style that matches your other furniture. This keeps your room looking unified.
Selecting Materials
The material you choose affects the table’s look, strength, and cost.
Wood Choices
Most DIY sofa tables use one of these woods:
| Wood Type | Appearance | Cost (per board foot) | Workability |
|---|---|---|---|
| Pine | Light color, visible grain | $2 – $4 | Very easy |
| Oak | Medium brown, strong grain | $5 – $8 | Moderate |
| Maple | Pale, smooth grain | $6 – $10 | Moderate |
| Poplar | Light, sometimes greenish | $3 – $5 | Easy |
| Plywood | Depends on veneer | $1 – $3 | Easy |
Pine is best for beginners because it’s cheap, light, and easy to work with. Oak and maple look richer and are more durable, but cost more and are harder to cut.
Other Materials
- Metal legs: For industrial style or extra strength.
- Glass top: Adds elegance but is harder to make safely.
- Paint or stain: Changes the final color and protects the wood.
Calculating Quantities
List the pieces you need: tabletop, legs, supports, and (if needed) shelves. Always buy a little extra wood in case you make mistakes.
For a basic 60″ long, 14″ deep, 30″ high table, you’ll need:
- 1 tabletop: 60″ x 14″
- 4 legs: 30″ high (1.5″ thick)
- 2 long aprons (side supports): 56″
- 2 short aprons (end supports): 11″
Gathering Tools And Supplies
You don’t need a fancy workshop. Most sofa tables can be made with basic tools, many of which can be borrowed or rented.
Essential tools:
- Tape measure
- Pencil
- Square or straight edge
- Circular saw or handsaw
- Drill and drill bits
- Sandpaper (80, 120, 220 grit)
- Clamps
- Safety glasses
Optional tools:
- Miter saw (for precise angled cuts)
- Orbital sander (for faster sanding)
- Pocket hole jig (for hidden joints)
Hardware and supplies:
- Wood screws (1.25″ to 2.5″ depending on thickness)
- Wood glue
- Wood filler
- Paint or stain
- Polyurethane (for a protective finish)
- Brushes or rags
Pro Tip: Practice using your saw and drill on scrap wood before starting. This helps prevent mistakes on your good pieces.
Credit: www.jennasuedesign.com
Cutting And Preparing The Wood
Now you’re ready to start building. The first real step is cutting your boards to the correct sizes.
Measuring And Marking
Measure twice, cut once. Use your tape and square to mark each piece before cutting. Make sure all legs are the same length, and the tabletop is straight and even.
Non-obvious insight: Label each piece after cutting (e.g., “leg 1”, “apron 2”). This saves confusion later, especially if your wood looks similar.
Making The Cuts
- Use a circular saw or miter saw for straight, clean cuts.
- For plywood, put painter’s tape along the cut line to reduce splintering.
- Sand all cut edges lightly with 120-grit sandpaper to smooth them.
If you don’t have a saw, many home improvement stores will cut boards to your measurements for a small fee.
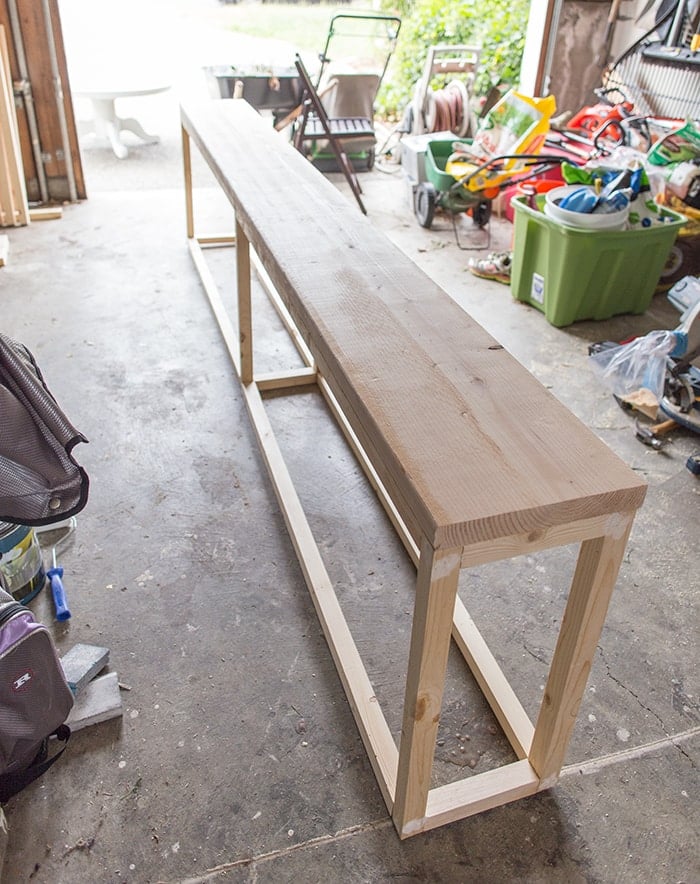
Assembling The Table Frame
The frame supports the tabletop and gives the table its strength.
Attaching The Aprons To The Legs
- Lay two legs flat on the floor, about as far apart as your tabletop’s length.
- Place one long apron between them, flush with the top of the legs.
- Drill pilot holes through the apron into the legs. This prevents the wood from splitting.
- Apply wood glue to the joints, then screw the apron to the legs.
- Repeat for the other side with the second long apron.
Now connect the two sides by attaching the short aprons at the ends, forming a rectangle.
Pro Tip: Check for squareness by measuring corner to corner diagonally. Both distances should be equal.
Strengthening The Frame
For extra strength, especially on longer tables, add a center support under the tabletop. This can be a simple board screwed between the long aprons.
Non-obvious insight: Many beginners skip this and find their table sags after a few months. Even a thin support can make a big difference.

Credit: www.jennasuedesign.com
Attaching The Tabletop
Place your tabletop board on top of the frame, making sure it overhangs evenly on all sides (typically 1″ overhang looks good). Clamp it in place.
- Drill pilot holes up through the aprons into the tabletop.
- Use screws that are short enough not to poke through the top.
- Space screws about every 8-10 inches for even support.
If you want a “floating” look, use small metal brackets instead of screwing directly through the aprons.
Pro Tip: Do not glue the tabletop down. Wood expands and contracts with humidity, and glue can cause it to crack over time.
Adding Shelves Or Drawers (optional)
If you want extra storage, you can add a lower shelf or simple drawers.
Adding A Shelf
- Cut a board to the same length as your tabletop, and about 8-12 inches deep.
- Attach shelf supports (small strips of wood) about 4-6 inches from the floor, on the inside of each leg.
- Rest the shelf board on these supports and screw or nail it in place.
Adding Drawers
- This is more advanced, but possible for motivated beginners.
- Make a simple box slightly smaller than the space between the aprons.
- Use drawer slides (available at hardware stores) for smooth opening.
- Attach a drawer front that matches the table’s style.
Most first-time builders skip drawers, but shelves are a manageable upgrade.
Sanding For A Smooth Finish
Sanding is one of the most important steps for a professional look.
- Start with 80-grit sandpaper to remove rough spots or glue.
- Switch to 120-grit for smoothing.
- Finish with 220-grit for a silky surface.
Always sand in the direction of the wood grain. Wipe the dust away with a damp cloth before finishing.
Non-obvious insight: Sand the edges and corners slightly round. Sharp edges chip easily and can be uncomfortable to touch.
Painting, Staining, And Sealing
How you finish your sofa table affects both appearance and durability.
Staining
- Brush or wipe on wood stain to bring out the grain.
- Wipe off excess with a rag.
- Let dry completely.
Painting
- Use a primer if painting raw wood.
- Apply at least two coats of paint, sanding lightly between coats for smoothness.
Sealing
- Apply polyurethane or another clear finish to protect the wood.
- Use thin coats, sanding lightly between them.
- Let dry at least 24 hours before heavy use.
Pro Tip: Oil-based finishes are tougher, but water-based ones dry faster and have less odor.
Attaching Hardware And Final Assembly
If you added drawers, attach handles or knobs. For all tables, check that all screws are tight and the table doesn’t wobble. Adjust as needed.
Stick felt pads to the bottom of the legs to protect your floors. If your table is heavy, ask a friend to help move it into place.
Styling And Using Your Sofa Table
Now comes the fun part—making your table part of your home.
- Place lamps or candles for soft lighting.
- Use baskets or boxes on lower shelves for storage.
- Display photos, books, or plants on top.
- Add a tray to hold keys or remotes.
A well-placed sofa table can divide spaces, hide cords, or simply add beauty to your room.
Common Mistakes And How To Avoid Them
Even careful builders make errors. Here’s how to dodge the most frequent problems:
- Wobbly legs: Always check for square corners and tighten screws. Use corner braces if needed.
- Splitting wood: Drill pilot holes before screwing into the ends of boards.
- Uneven finish: Sand thoroughly and wipe off all dust before finishing.
- Table doesn’t fit space: Double-check your measurements before starting.
- Sags over time: Add a center support for tables longer than 5 feet.
Non-obvious insight: Let your finish cure completely before placing heavy items. Polyurethane, for example, might feel dry in a few hours but takes days to reach full strength.
Real-world Example: Building A 60-inch Rustic Sofa Table
Let’s look at a sample project to tie everything together.
Project goal: A 60″ long rustic pine sofa table with a lower shelf.
Materials used:
- 1 pine board for tabletop (60″ x 14″)
- 4 pine legs (2″ x 2″ x 30″)
- 2 aprons (1″ x 4″ x 56″)
- 2 end aprons (1″ x 4″ x 11″)
- 1 shelf board (60″ x 10″)
- Wood screws, glue, stain, polyurethane
Steps followed:
- Cut all pieces to size and label them.
- Assembled the frame with aprons and legs.
- Checked for square and added a center support.
- Attached the tabletop and shelf.
- Sanded thoroughly, rounding all edges.
- Applied a walnut stain and two coats of water-based polyurethane.
- Let the table cure for 48 hours.
- Moved it behind the sofa and styled with a lamp and family photos.
Result: A strong, attractive table that cost under $75 in materials—much less than store-bought versions of similar size and quality.
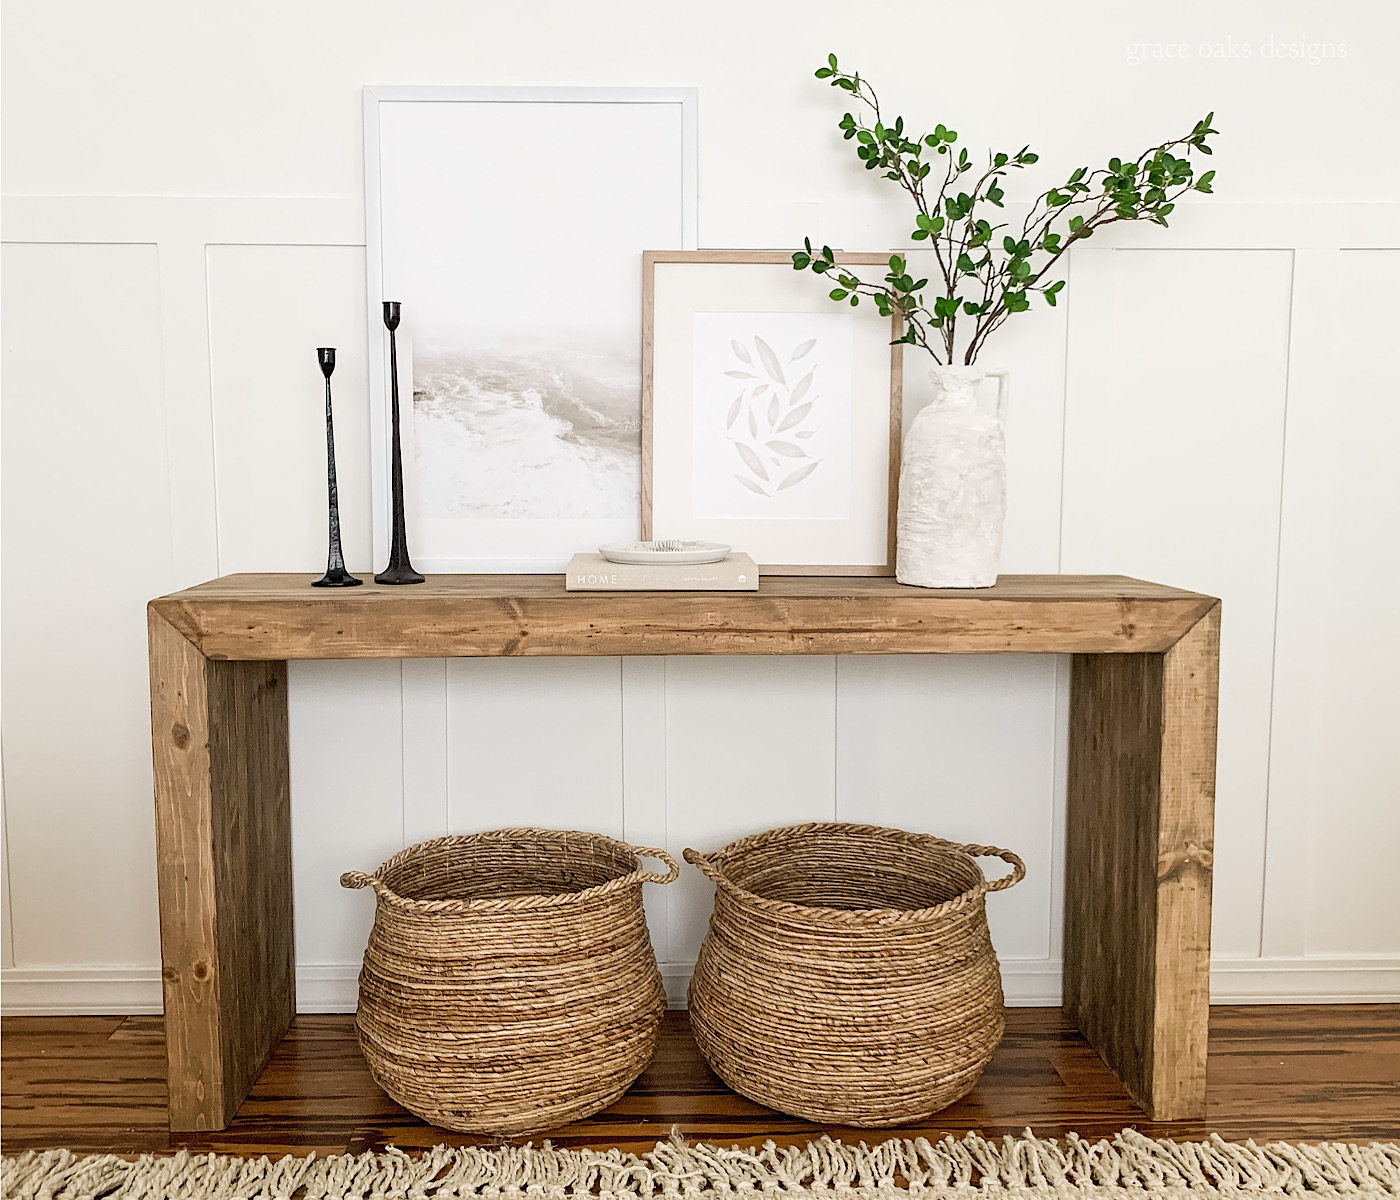
Credit: graceoaksdesigns.com
Cost Comparison: Diy Vs Store-bought Sofa Table
How much can you really save? Here’s a typical cost breakdown:
| Option | Material Cost | Time Spent | Average Retail Price | Potential Savings |
|---|---|---|---|---|
| DIY Pine Table | $60 – $100 | 8-12 hours | $250 – $600 | $150 – $500 |
| DIY Oak Table | $120 – $180 | 10-14 hours | $400 – $900 | $280 – $720 |
| Store-Bought (Solid Wood) | — | — | $300 – $1,000 | — |
As you can see, making your own table can save hundreds of dollars, especially for larger or solid wood pieces.
Safety Tips For First-time Builders
Working with tools and wood is fun, but it’s important to stay safe:
- Always wear safety glasses when cutting or drilling.
- Keep your work area well-lit and clear of clutter.
- Unplug power tools when changing blades or bits.
- Never force a saw or drill—let the tool do the work.
- Keep fingers away from blades and moving parts.
- Store chemicals (paint, stain) out of reach of children.
If you’re unsure about a tool, ask for help at your local hardware store. Many offer free beginner classes.
Upgrading Your Skills For Future Projects
Building a sofa table is a great start, but you can use your new skills for bigger projects:
- Bookshelves
- Coffee tables
- TV stands
- Entryway benches
As you gain confidence, try more advanced joinery (like mortise and tenon), add metal or glass elements, or experiment with new finishes.
Non-obvious insight: Keep notes and sketches of each project. This makes repeat projects easier and helps you learn from mistakes.
Where To Find Inspiration And Plans
There are many sources for sofa table ideas and free plans:
- Home improvement websites (like Family Handyman)
- YouTube woodworking channels
- Pinterest boards for furniture
- DIY forums and Facebook groups
Look for tables that match your skill level and available tools. Don’t hesitate to adapt plans to your needs—customization is the best part of DIY.
Frequently Asked Questions
How Long Does It Take To Build A Sofa Table?
Most first-time builders finish a basic sofa table in 8 to 12 hours, spread over a weekend. More complex designs or detailed finishes can take longer. Allow extra drying time for paint or polyurethane.
What Is The Ideal Height For A Sofa Table?
The best height is usually 1 to 2 inches below the back of your sofa. For most couches, this means a table between 28 and 32 inches high. This keeps lamps and décor at a comfortable level.
Can I Build A Sofa Table Without Power Tools?
Yes, but it will take more effort. You can use a handsaw instead of a circular saw and a screwdriver instead of a drill. However, power tools make the work faster, easier, and often more precise.
What Type Of Wood Is Easiest For Beginners?
Pine is the top choice for beginners. It’s widely available, inexpensive, and easy to cut and sand. Poplar is also beginner-friendly. Hardwoods like oak or maple are stronger but require sharper tools and more effort.
How Do I Prevent My Table From Wobbling?
Check that your frame is square during assembly, and tighten all screws. Adding corner braces or a lower shelf helps stabilize the table. If your floor is uneven, use adjustable pads on the legs.
Building your own sofa table is more than a way to save money—it’s a chance to create something unique and personal for your home. With simple tools, clear steps, and a bit of patience, anyone can build a beautiful table that lasts for years.
Start simple, learn as you go, and you’ll soon be ready for even bigger woodworking projects.