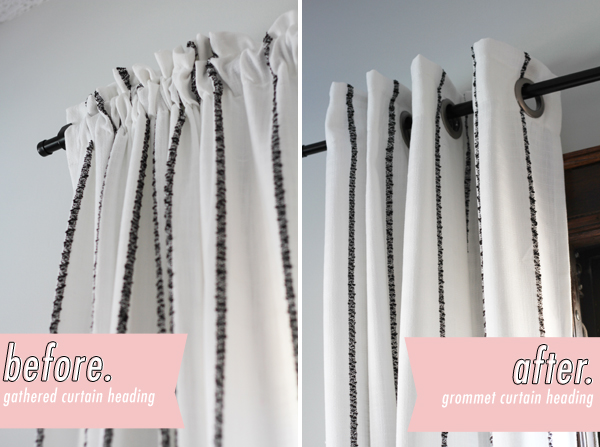
Adding grommets to curtains can change the look and function of your window treatments in a big way. Grommets make curtains hang in smooth, even folds, they slide easily along the rod, and they add a modern, clean touch. Many people buy grommet-top curtains, but it’s possible to add grommets to almost any flat curtain panel—even if you’re not an expert at sewing or home improvement.
If you’ve ever struggled with curtains that bunch up, snag, or look messy, making this upgrade could save you hours of frustration and give your room a fresh style. You don’t need to be a professional. With a few tools, some patience, and the right guidance, you can transform your curtains in an afternoon.
In this detailed guide, you’ll learn everything from choosing the right grommets, measuring and marking, tools to use, and the full step-by-step process. You’ll also get practical tips, common mistakes to avoid, and answers to questions beginners often ask.
Let’s explore exactly how to add grommets to curtains—so you can enjoy smooth-draping panels and a polished finish, all done by your own hands.
Why Add Grommets To Curtains?
Grommets aren’t just for looks. They offer several functional and style benefits:
- Smooth Movement: Curtains with grommets slide easily on the rod. This means no more tugging or getting stuck halfway.
- Neat Appearance: Grommets create even, natural folds, so curtains look organized and hang beautifully.
- Modern Style: Grommet-top curtains have a contemporary, tailored look that works well in most rooms.
- Durability: The grommets reinforce the top edge of the curtain, helping them last longer and resist tearing.
- DIY Flexibility: You can add grommets to most fabric types, so you’re not limited to what’s sold in stores.
Many people don’t realize that adding grommets can also make it easier to clean and maintain curtains. You can quickly take them down for washing or switch them out seasonally. Some even use grommets for creative projects like room dividers or outdoor patio curtains.
Understanding Grommets: Types, Materials, And Sizes
Before you start, you need to pick the right grommets. Not all grommets are the same. They differ in material, size, and design.
Types Of Grommets
- Plastic (Resin) Grommets: Lightweight, rust-proof, and easy to snap together. Good for indoor use and light to medium-weight curtains.
- Metal Grommets: Usually made from brass, stainless steel, or aluminum. Stronger and more durable, best for heavy curtains or outdoor use.
Grommet Sizes
Grommets come in different inner diameters. The size you need depends on your curtain rod and fabric thickness.
- 1 inch (25 mm): Fits most standard curtain rods.
- 1.5 inch (38 mm): Common for slightly larger rods or thicker fabrics.
- 2 inch (50 mm) and above: For very thick rods or dramatic, oversized looks.
For most home curtains, the 1. 5-inch grommet is a safe choice.
Grommet Colors And Finishes
You’ll find grommets in finishes like nickel, antique brass, matte black, or white. Match them to your curtain rod and room hardware for a coordinated look.
Comparing Grommet Materials
Here’s a quick comparison to help choose:
| Material | Best For | Pros | Cons |
|---|---|---|---|
| Plastic | Indoor, light curtains | Rust-proof, easy to install, many colors | Less strong, may break with heavy use |
| Metal | Heavy curtains, outdoor | Strong, durable, classic look | Can rust (unless stainless), harder to install |
Non-obvious insight: Metal grommets can sometimes cause marks on the curtain rod over time, especially with daily use. If you have a delicate rod, consider plastic or add rod covers.

Credit: www.youtube.com
Tools And Materials Needed
Gather everything before starting. You’ll need:
- Curtain panels (flat top, not pleated)
- Grommet kit (grommets plus installation tools, if not using snap-together grommets)
- Measuring tape
- Fabric marker or chalk
- Scissors (sharp fabric scissors)
- Ruler or straight edge
- Iron (optional, for prepping fabric)
- Pins or clips
- Fray check or clear nail polish (for raw fabric edges)
- Hammer and grommet tool (for metal grommets)
- Cutting mat or thick cardboard (to protect your surface)
Tip: Don’t use regular office scissors; dull blades can fray the fabric and give uneven cuts.
Preparing Your Curtains
A little preparation makes the whole process smoother.
Wash And Iron First
Always wash, dry, and iron your curtains before adding grommets. This prevents shrinkage and ensures the fabric is flat and easy to measure. Skipping this step is a common mistake—shrinking after grommets are added can warp the top edge.
Check The Top Hem
Curtains need a sturdy top hem for grommets. If your curtains have a thin hem (less than 2 inches), sew an extra strip of fabric behind the top edge to reinforce it. Grommets can rip through thin material, especially on heavy drapes.
Mark Curtain Orientation
Decide which side is the front and which is the back. Most grommets look best from the front, so plan to install them from that side.
Measuring And Marking Grommet Placement
Good measuring is essential. Uneven grommets look sloppy and cause the curtain to hang poorly.
How Many Grommets?
Standard panels (50–54 inches wide) usually need 8 grommets across the top. For wider panels, use more—add 1 grommet for every 6–8 inches of width.
Example: For a 100-inch wide curtain, use 12–14 grommets.
Spacing Grommets Evenly
- Subtract Margins: Leave at least 1.5–2 inches from each edge of the curtain to the first and last grommet.
- Calculate Spacing: Measure the width between the two end grommets, then divide by the number of spaces (not the number of grommets). For 8 grommets, you’ll have 7 spaces.
- Mark Locations: Use a fabric marker to mark the center of each grommet.
Practical Example:
Curtain width: 54 inches.
Margins: 2 inches on each side (total 4 inches).
Usable width: 50 inches.
Number of spaces: 7 (for 8 grommets).
Spacing: 50 ÷ 7 = ~7.14 inches between grommet centers.
How Far From The Top?
Most grommets are set so the inside top edge is 1–1. 5 inches from the curtain’s top. This allows some fabric above the rod for a tailored look and keeps the curtain from dragging on the rod.
Pro tip: Don’t place grommets too close to the edge—fabric can rip, especially with heavy use.
Cutting Holes For Grommets
Now, make holes where you marked. Here’s how to do it safely and neatly.
- Trace the Grommet: Use the grommet’s inner ring as a template. Place it on each mark and draw a circle.
- Cut Carefully: Pinch the fabric and snip the center with sharp scissors. Cut out the circle just inside the line so the hole isn’t too big.
- Protect from Fraying: Dab a little fray check or clear nail polish around the edge of each hole. This prevents the threads from unraveling.
Important: Never cut all the holes before installing the first grommet. Check your fit with one grommet, then continue. Fabric thickness and stretch can change the hole size needed.
Installing Grommets: Step-by-step Guide
For Snap-together Plastic Grommets
These are the easiest for beginners.
- Place the Grommet Back: Put the back half under the fabric hole, lining up the edges.
- Snap the Front: Press the front half on top. Some need a firm push; others may need a gentle tap with a rubber mallet.
- Check the Fit: The grommet should fit tightly without wobble.
For Metal Grommets
Metal grommets use a setting tool and sometimes a hammer.
- Insert Grommet: Place the grommet’s tall side up through the hole from the front.
- Add Washer: Place the washer (flat ring) over the back of the grommet.
- Use the Setting Tool: Position the included tool over the grommet and tap firmly with a hammer until it flattens and holds tight.
- Inspect: The grommet should be secure, with no loose edges or gaps.
Quick Reference Installation Comparison
| Grommet Type | Tools Needed | Difficulty | Best For |
|---|---|---|---|
| Snap-together plastic | Hands, maybe rubber mallet | Very easy | Light/medium curtains, beginners |
| Metal with tool | Hammer, setting tool | Moderate | Heavy drapes, outdoor curtains |
Non-obvious insight: Some thick blackout curtains have foam or rubbery layers that can make grommet snapping difficult. In these cases, trim a bit of the inner layer around the hole to help the grommet grip.
Hanging And Adjusting Your Grommet Curtains
Once all grommets are installed, it’s time to hang your curtains.
- Thread the Rod: Slide the rod through the grommets, making sure the folds all face the same direction.
- Check for Evenness: Stand back and check that the curtain hangs evenly. Adjust folds by hand if needed.
- Test Movement: Slide the curtain back and forth. It should move easily without catching.
- Adjust Length: Grommets may shorten the curtain by about 1 inch (because the rod sits inside the grommet). If you need more length, lower your rod before installing.
Tip: If the curtain drags on the floor, move the rod up. If it’s too short, try adding a decorative trim to the bottom hem.
Credit: www.deucecitieshenhouse.com
Troubleshooting Common Problems
Grommet Holes Too Large
If you cut the hole too big, the grommet will be loose and may fall out.
- Solution: Sew a small zigzag stitch around the hole or use fusible interfacing to reinforce. Then try installing again.
Grommets Not Aligned
Misaligned grommets cause uneven folds.
- Solution: Measure again before cutting. If you notice after installation, you can sometimes remove and re-install, but this may leave marks.
Fabric Fraying
Edges may fray, especially on loosely woven fabrics.
- Solution: Always use fray check or a zigzag stitch around the hole before inserting the grommet.
Grommet Won’t Snap Or Set
Thick fabrics can be hard to work with.
- Solution: Trim inner layers around the hole. For metal grommets, tap more firmly with the hammer, but don’t smash—this can bend the grommet.
Experience-based tip: If you’re working with lined curtains, pin the layers together before marking and cutting. This prevents shifting and ensures the hole goes through all layers cleanly.
Advanced Tips For A Professional Finish
Reinforcing The Top Edge
If your curtain fabric is thin or sheer, sew a 3–4 inch strip of sturdy fabric along the top (like cotton twill or canvas). This gives the grommets extra grip and helps the curtain hang straight.
Adding Interfacing
Iron-on interfacing between the curtain layers (just at the top) can make even lightweight fabrics strong enough for grommets.
Decorative Touches
Choose contrast grommets (like black on white fabric) for a bold look, or match them to the rod for a subtle style. You can also add ribbon trim or embroidery above the grommets for a custom finish.
Outdoor Curtains
If using outdoors, pick stainless steel grommets (rust-proof) and use weather-resistant fabric. Seal the holes with waterproof fabric sealant.
Comparing Grommet Curtains Vs. Other Top Styles
Understanding why grommets might be better for you:
| Curtain Top Style | Ease of Sliding | Looks | DIY Difficulty |
|---|---|---|---|
| Grommet | Excellent | Modern, clean | Moderate |
| Rod pocket | Poor | Casual, classic | Easy |
| Tab top | Good | Casual | Easy |
| Pleated | Varies | Formal | Difficult |
Key takeaway: Grommets are a good balance between style, function, and DIY difficulty.
Safety Tips And Mistakes To Avoid
- Always use sharp tools on a safe surface.
- Keep fingers away from the hammer and cutting blade.
- Don’t rush marking—most installation errors come from careless measurement.
- Never try to force a grommet that doesn’t fit; adjust the hole or try a different size.
- Don’t skip reinforcing thin fabrics or you risk ripping over time.
Beginner mistake: Forgetting to leave enough space above the grommet so the curtain doesn’t “bunch” at the rod. Always check your rod and grommet measurements before cutting.

Credit: www.sailrite.com
Creative Ways To Use Grommeted Curtains
Beyond standard windows, grommeted curtains work for:
- Room dividers: Create flexible walls in studios or offices.
- Closet doors: Replace sliding doors with a curtain for easy access.
- Showers: Use waterproof fabric and rust-proof grommets.
- Outdoor patios: Add privacy and sun protection.
Some designers even use grommets as a style element, threading thick ropes or chains instead of curtain rods for a rustic or industrial look.
How To Care For Grommet Curtains
- Cleaning: Most curtains can be machine washed, but check your fabric and grommet material. Metal grommets may need to be dried quickly to avoid rust.
- Ironing: Iron on the reverse side, avoiding direct heat on plastic grommets.
- Storage: Hang or roll; folding can crease the grommet area.
- Maintenance: If a grommet loosens, remove and replace with a slightly larger size or reinforce the area.
Pro insight: If you change your décor, you can remove old grommets and add new ones in a different finish, giving your curtains a fresh look without buying new panels.
When To Consider Professional Help
If your curtains are very thick, expensive, or have sentimental value, you may want to take them to a tailor. Professionals have industrial tools for perfect grommet installation and can reinforce delicate fabrics.
Signs you may need help:
- Curtain fabric is leather, vinyl, or triple-layered.
- You don’t have the tools for metal grommets.
- You want a perfectly even, factory finish.
Where To Buy Grommet Kits And Supplies
You can find grommet kits at:
- Craft stores: Joann, Michaels, Hobby Lobby
- Hardware stores: Home Depot, Lowe’s
- Online: Amazon, Walmart, specialty sewing sites
Tip: Read reviews and check that the kit matches your curtain rod size. Some kits include only a few grommets—buy extra in case of mistakes.
For more detailed grommet information, check resources like the Wikipedia Grommet Page.
Frequently Asked Questions
How Many Grommets Do I Need Per Curtain Panel?
For most standard panels (about 50 inches wide), 8 grommets is ideal. For wider curtains, add 1 grommet for every 6–8 inches of width. This keeps folds even and prevents sagging.
Can I Add Grommets To Sheer Or Lightweight Curtains?
Yes, but you must reinforce the top edge. Add interfacing or a fabric strip before installing grommets. Otherwise, the fabric may tear over time.
What Size Grommet Fits My Curtain Rod?
Measure the rod diameter and choose a grommet with an inner hole at least 0. 5 inches larger. For a 1-inch rod, a 1. 5-inch grommet is safe.
Are Grommets Safe For Outdoor Curtains?
Yes, if you use stainless steel or rust-proof plastic grommets. Make sure the fabric is weather-resistant and seal the holes with fabric sealant.
Can I Remove And Reuse Grommets?
Metal grommets are usually not reusable after removal. Plastic snap grommets can sometimes be reused if not damaged, but it’s best to use new ones for a secure fit.
Adding grommets to curtains is a satisfying DIY project that can make your windows look custom and stylish. With the right tools, careful measuring, and attention to detail, you can create curtains that slide easily, hang beautifully, and last for years.
Whether you want a modern look, need better function, or just want to refresh your space, following these steps will give you a result you can be proud of.