If you live in a mobile home, you know the floor is more than just a surface—it’s the foundation of your daily life. But unlike traditional homes, mobile homes often have unique flooring systems that can wear out or become damaged over time.
If you notice soft spots, squeaks, or even holes, you might feel worried about safety and comfort. The good news? You don’t need to be a professional to fix many floor problems in a mobile home. With the right tools, some patience, and clear guidance, you can restore your floor’s strength and appearance yourself.
This guide will help you understand every step of how to fix floors in a mobile home. You’ll learn how to spot problems, choose the right materials, remove and replace damaged sections, and prevent future issues. Whether your floor is sagging, rotted, or just feels weak, you’ll find solutions here. Let’s walk through the process together and make your mobile home feel solid again.
Understanding Mobile Home Floor Construction
Before you start any repair, it’s important to know how your mobile home floor is built. Most mobile homes use a layered system, which is a bit different from standard houses.
- Subfloor: This is usually made from plywood or particle board. It sits on top of the floor joists.
- Floor joists: These are the wooden beams that support the subfloor. They run across the width of the home.
- Vapor barrier: A plastic sheet under the floor helps prevent moisture from rising.
- Finish flooring: This is what you see and walk on—carpet, vinyl, laminate, or tile.
Mobile homes are more likely to have particle board subfloors, which are cheaper but absorb water easily and can become soft or rotten.
Non-obvious insight: In mobile homes, water leaks from windows, doors, or plumbing are the most common reason for floor damage—not just foot traffic.
Common Floor Problems In Mobile Homes
Understanding the problem is the first step to fixing it. Here are the most common floor issues you’ll find:
- Soft spots: Areas that feel spongy or weak. Usually caused by water damage.
- Sagging or uneven floors: May be due to damaged joists or supports.
- Cracks or holes: Sometimes from heavy objects or long-term neglect.
- Squeaks and creaks: Often from loose nails or shifting boards.
Hidden cause: Sometimes, the actual problem is below the surface. For example, a leaking pipe under the floor can silently rot the subfloor for months before you notice a problem.
Tools And Materials Needed
Having the right tools will save you time and make the repair much safer. Here’s what you’ll likely need:
- Pry bar
- Circular saw or handsaw
- Tape measure
- Screwdriver or drill
- Hammer
- Utility knife
- Chalk line
- Safety glasses and gloves
- Level
Materials:
- Replacement subfloor panels (plywood is best, usually 5/8″ or 3/4″ thick)
- Construction adhesive
- Deck screws or ring-shank nails
- Floor patch or wood filler (for small repairs)
- Vapor barrier plastic (6-mil or thicker)
- Finish flooring material (optional)
Pro tip: Buy extra plywood in case you make a mistake cutting, or you find more damage than expected.
How To Inspect And Locate Floor Damage
Don’t start tearing up your floor until you know exactly where the problem is. Here’s how to check your floor:
- Walk the floor slowly and pay attention to any soft or bouncy spots.
- Look for discoloration or stains on carpet or vinyl—this often means water damage underneath.
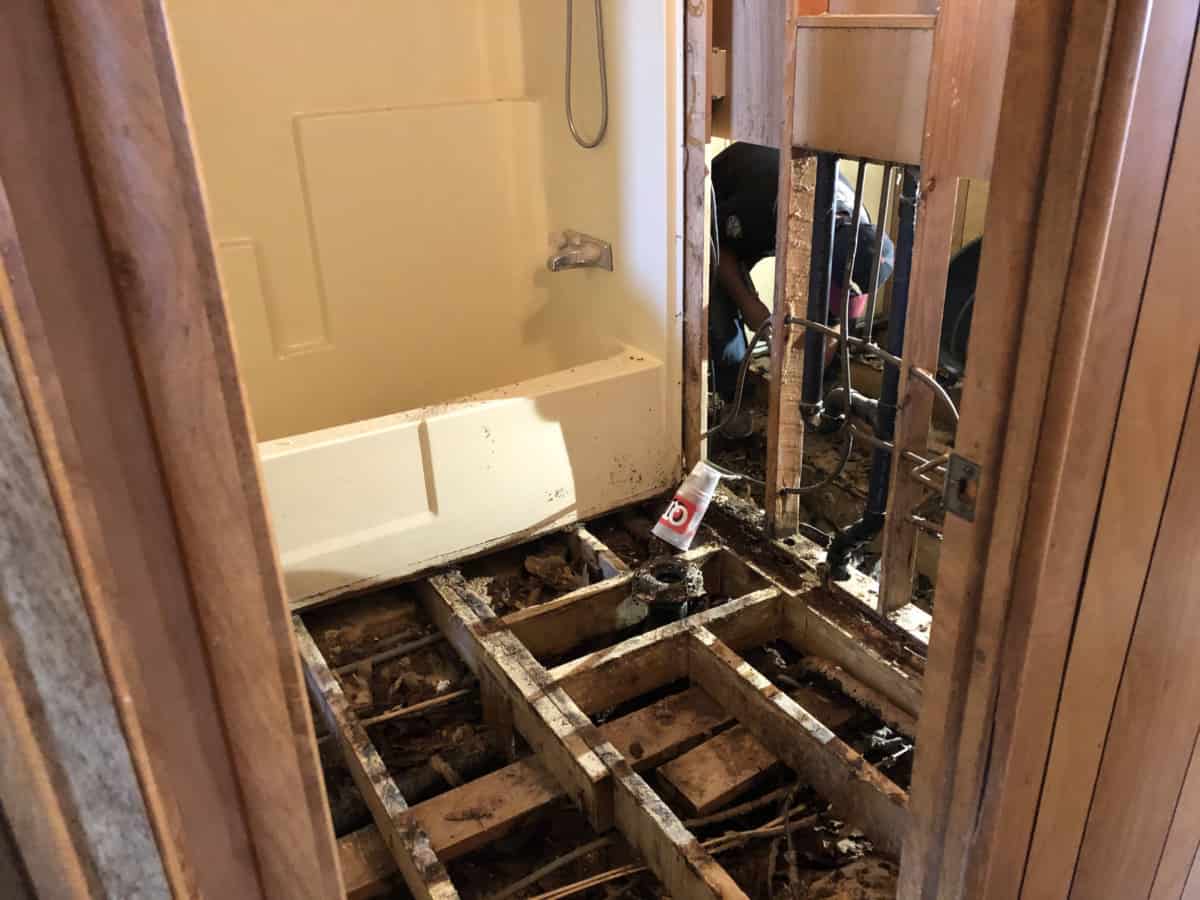
- Check around plumbing fixtures like sinks, tubs, and toilets. These are trouble spots.
- Use a screwdriver to gently poke at the floor in suspicious areas. If it sinks in easily, the wood is rotted.
- Look under the home (if possible) for water drips, sagging insulation, or musty smells.
Advanced tip: Moisture meters can help identify damp spots in the subfloor that are not visible yet.
Preparing The Area For Repair
Preparation is a key part of a good floor repair. Here’s what you should do before removing any damaged sections:
- Remove all furniture and appliances from the area.
- Take up the finish flooring (carpet, vinyl, etc.) In the damaged area. Use a utility knife for carpet or a scraper for vinyl.
- If the floor is wet, use fans to dry out the area as much as possible.
- Mark the edges of the damaged section with chalk. Make straight cuts, so the new plywood fits snugly.
Safety reminder: Wear gloves and a dust mask—old floors can have mold, dust, or even asbestos in rare cases.
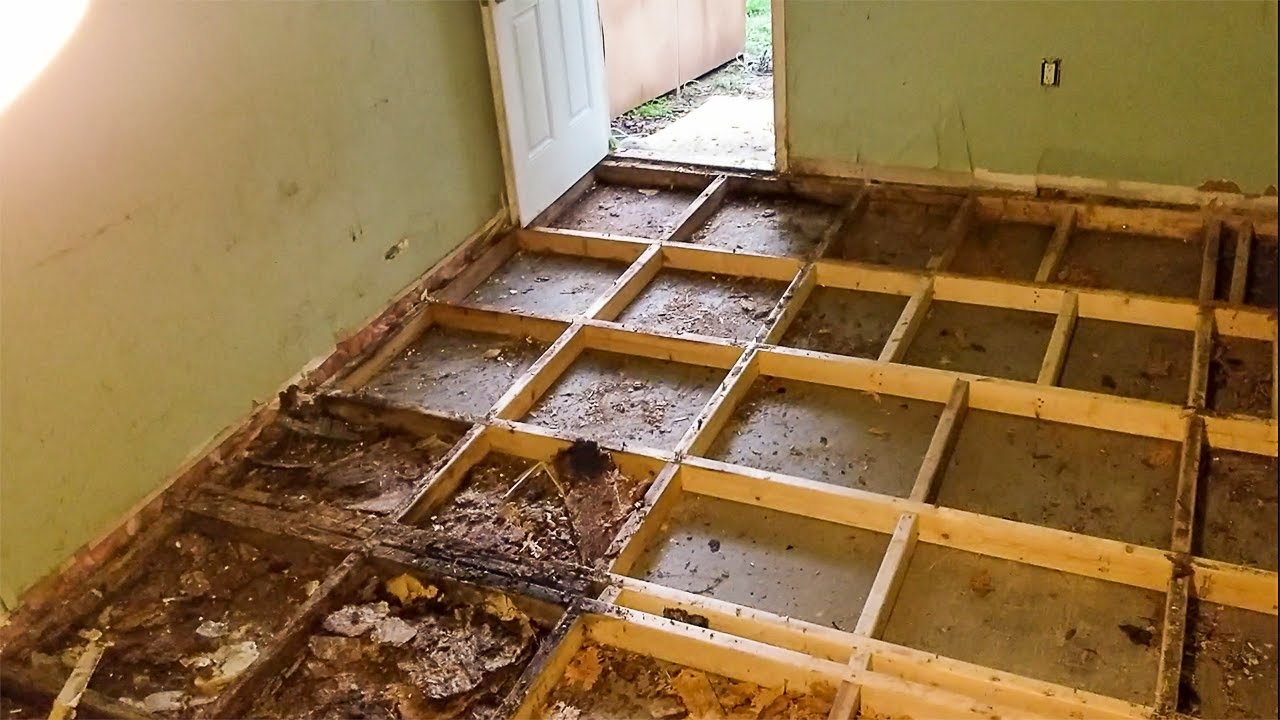
How To Remove Damaged Subfloor
Now it’s time to get hands-on. Here are the steps to take out the bad subfloor:
- Use a circular saw set to the depth of the subfloor (usually 5/8″ or 3/4″). Be careful not to cut into wires or pipes.
- Cut along your marked lines. Stop if you hit resistance—check for nails or screws.
- Pry up the old subfloor using a pry bar. Remove all nails or screws.
- If insulation is wet or moldy, remove it as well. Replace with new insulation before installing new subfloor.
- Check the floor joists. If they are rotted or cracked, they may need reinforcement or replacement.
Non-obvious insight: Mobile home floors sometimes have metal cross braces. If you find these, don’t remove them—they help keep the floor stable.
Repairing Or Reinforcing Floor Joists
If you find that the floor joists are damaged, fixing them is essential before you put in new subfloor. Here’s how to do it:
- For minor damage (like a small crack), use wood glue and clamps to secure the crack. Add a metal mending plate if needed.
- For severe rot or splits, “sister” a new joist next to the old one. This means placing a new board (same size) alongside the damaged one and screwing them together.
- Make sure the new joist is level and supported at both ends.
Important: Never skip fixing a broken joist. The floor will sag again if you do.
How To Install New Subfloor In A Mobile Home
Once the area is cleaned out and joists are solid, you’re ready to install the new subfloor panel.
- Measure the opening carefully. Cut the plywood to fit the hole exactly.
- Lay down a new vapor barrier (plastic sheet) if the old one was removed.
- Apply construction adhesive to the tops of the joists.
- Place the plywood into the opening. It should sit flat and level with the surrounding floor.
- Secure the plywood with deck screws or ring-shank nails, spacing them every 6-8 inches.
- Check for movement or squeaks. If the panel moves, add more screws.
Pro tip: Use tongue-and-groove plywood if possible. It locks together and makes the floor stronger.
Example: Subfloor Material Comparison
Choosing the right subfloor material is crucial. Here’s how common options stack up:
| Material | Water Resistance | Strength | Cost (per sheet) | Best For |
|---|---|---|---|---|
| Plywood | Good | High | $40-60 | Most repairs |
| OSB | Moderate | Medium | $30-40 | Budget fixes |
| Particle Board | Poor | Low | $20-30 | Temporary use |
Advice: Always choose plywood for long-lasting results. Particle board will fail again if it gets wet.
Credit: freedomsubfloordivision.com
Sealing And Preparing For Finish Flooring
After the new subfloor is in place, you’ll want to seal and prepare the surface for the finish flooring.
- Fill any gaps or screw holes with wood filler or floor patch. Let it dry and sand smooth.
- Sweep and vacuum the area to remove dust.
- Check for levelness with a long level. If the patch is higher or lower than the old floor, add self-leveling compound.
Extra tip: If you plan to install vinyl or laminate, a perfectly smooth subfloor is important. Any bumps or dips will show through.
Reinstalling Or Replacing Finish Flooring
Now you can put the room back together. Here’s what to do:
- For carpet, lay down new padding if needed and stretch the carpet back into place. Use a knee kicker for tightness.
- For vinyl, cut the new sheet to fit, glue it down, and roll out bubbles.
- For laminate or tile, follow the manufacturer’s installation instructions carefully.
Hidden insight: If you had water damage, it’s a good time to upgrade to water-resistant flooring like luxury vinyl planks.
Flooring Type Comparison For Mobile Homes
Not sure which finish flooring to choose? Here’s a helpful comparison.
| Flooring Type | Water Resistance | Durability | Installation Difficulty | Estimated Cost (per sq ft) |
|---|---|---|---|---|
| Carpet | Low | Medium | Easy | $2-4 |
| Vinyl Sheet | High | High | Moderate | $3-5 |
| Laminate Plank | Medium | High | Moderate | $2-6 |
| Tile | High | Very High | Hard | $5-10 |
Fixing Small Soft Spots Without Full Replacement
Not all floor problems need a big repair. If you have a small soft spot (less than 1 foot across) with no major water damage, you can try this method:
- Drill a few small holes in the soft area.
- Inject liquid wood hardener (available at hardware stores) into the holes. This product soaks into the wood and makes it solid again.
- Let it dry fully—usually overnight.
- Fill the holes with wood filler, let dry, then sand smooth.
Caution: This is only for minor damage. If the area moves a lot, cut out and replace the subfloor instead.
Addressing Squeaky Or Noisy Floors
Squeaks are common in mobile homes. Here’s how to quiet them:
- If you can access the underside of the floor, have someone walk above while you listen for the squeak. Add screws from below into the subfloor and joist at the noisy spot.
- If you can’t access from below, drive screws through the floor covering into the joist. Hide the screw with wood filler if needed.
Special tip: Avoid using extra nails—screws are stronger and less likely to pull out over time.
Preventing Future Floor Problems
Once you’ve put in the work, you want your floor to stay solid for years. Prevent problems by:
- Regularly checking for leaks around windows, doors, and plumbing.
- Keeping the underside of your mobile home dry and well-ventilated.
- Using area rugs in high-traffic spots to reduce wear.
- Avoiding heavy loads on weak areas. Spread heavy furniture weight with wide pads.
Non-obvious insight: Mobile homes settle over time, sometimes pulling the floor away from the walls. If you see big gaps, releveling the home might be needed.
When To Call A Professional
Some floor problems are bigger than a DIY repair. Call a professional if:
- You find large areas of mold or rot (may need mold remediation).
- The home’s frame or steel beams are rusted or bent.
- The floor is sagging more than 1 inch over a short distance.
- You’re not comfortable with power tools or working under the home.
Practical tip: Many contractors offer free estimates. It’s smart to get a second opinion if you’re unsure.
Credit: freedomsubfloordivision.com
Estimated Costs For Mobile Home Floor Repair
Budget is a big concern for many mobile home owners. Here’s a breakdown of typical costs:
| Repair Type | DIY Cost | Pro Cost | Time Needed |
|---|---|---|---|
| Patch small area | $50-100 | $200-400 | 2-4 hours |
| Replace full room | $250-600 | $1,000-2,500 | 1-2 days |
| Joist repair | $100-300 | $500-1,500 | 4-8 hours |
Tip: Save money by doing the demolition and removal yourself, even if you hire a pro for the replacement.
Safety Tips And Common Mistakes
Working on a mobile home floor is rewarding, but safety comes first. Here’s how to avoid problems:
- Always turn off power and water to the area before cutting.
- Check for wires or pipes before making any cuts.
- Use hearing and eye protection when using power tools.
- Don’t rush. Measure twice, cut once.
- Don’t use particle board as a repair material—it won’t last.
Common mistake: Forgetting to check for leaks. If you don’t fix the source of water, new repairs will fail quickly.
Environmental Considerations
Mobile homes are often in humid climates or placed on damp ground. To protect your repairs:
- Make sure the skirting around your home is intact to keep out water.
- Install moisture barriers under your home if they are missing.
- Use treated wood if your floor is close to the ground.
Expert tip: Check local building codes. Some states have special rules for mobile home repairs.
Resources For Further Help
If you need more information, the US Department of Housing and Urban Development (HUD) offers guidelines for mobile home construction and repair. Find more at HUD Manufactured Home FAQs.

Credit: www.youtube.com
Frequently Asked Questions
What Causes Soft Spots In Mobile Home Floors?
Soft spots are usually caused by water leaks from plumbing, windows, or doors. When water soaks into the particle board subfloor, it weakens and becomes spongy. Sometimes, heavy foot traffic or old age can make the problem worse, but moisture is almost always involved.
Can I Repair Just A Small Section, Or Do I Need To Replace The Whole Floor?
You can often repair only the damaged section if the rest of the floor is solid. Cut out the bad area with straight lines and install a new plywood patch. However, if you find damage in many places, a full replacement may be easier and safer.
What Kind Of Plywood Is Best For Mobile Home Floors?
Use exterior grade plywood (5/8″ or 3/4″ thick) for the best strength and moisture resistance. Avoid particle board. Tongue-and-groove plywood is best if you can find it, as it locks together and prevents squeaks.
How Do I Find The Floor Joists In My Mobile Home?
Floor joists usually run every 16 inches under the subfloor. You can find them by tapping the floor and listening for a solid sound, or by using a stud finder. Sometimes, you can look under the home for the exact location.
Is It Safe To Live In The Home During Floor Repairs?
For small repairs, you can usually stay in the home if you avoid the work area. For big jobs with mold, major water damage, or structural problems, it’s safer to stay elsewhere until repairs are complete.
Fixing floors in a mobile home takes effort, but it’s possible for most homeowners with basic tools and a careful approach. By understanding your floor’s construction, using the right materials, and following these steps, you’ll restore your home’s safety and comfort for years to come.