Keeping your hand mixer clean is not just about hygiene—it’s about performance, safety, and the lifespan of your appliance. Whether you bake every weekend or use your mixer occasionally, proper cleaning makes a big difference. Food residue, grease, and even hidden batter can affect how your hand mixer works and even create risks for your health. But many people feel uncertain about how to clean a hand mixer the right way, especially since it’s an electrical device.
In this guide, you’ll learn every step and detail you need. From quick after-use cleaning to deep cleaning, you’ll discover safe methods, helpful tips, and common mistakes to avoid. You’ll also find out how often to clean, how to handle tough stains, and even what to do if your mixer accidentally gets wet.
These instructions are practical and easy to follow, even if you’re new to using kitchen appliances. Let’s ensure your hand mixer stays in top shape and ready for every recipe.
Why Cleaning Your Hand Mixer Matters
A clean hand mixer works better and lasts longer. When you leave batter, dough, or grease on your mixer, it can harden and become difficult to remove. This buildup may slow down the motor, affect the beaters’ movement, or even cause strange smells.
Over time, a dirty hand mixer can spread bacteria or mold, especially if food gets stuck in small crevices.
Regular cleaning also keeps your recipes tasting pure. Old residue can mix into new batches, giving unwanted flavors or causing allergies. Some users are surprised to learn that even small traces of egg or flour can cause problems for sensitive eaters.
Proper cleaning also protects the electrical parts from moisture, which is important for your safety.
Understanding The Parts Of A Hand Mixer
Before you start cleaning, you need to know the basic parts of most hand mixers. This helps you clean every area and avoid damaging anything.
- Beaters or Whisks: The metal attachments that mix your ingredients.
- Eject Button: Releases the beaters for cleaning.
- Body: The main plastic or metal housing that contains the motor.
- Speed Control: Usually a switch or dial, often collects food residue.
- Cord: The electrical connection to power your mixer.
- Vents: Small holes for air to keep the motor cool.
Not all models are exactly the same. Some may have dough hooks, turbo buttons, or even a storage case. Check your user manual for any unique features your model has.
Credit: www.americastestkitchen.com
Basic Cleaning After Each Use
Cleaning your hand mixer after every use keeps it ready for your next recipe and prevents hard-to-clean buildup. Here’s a simple routine you can follow.
Step 1: Unplug The Mixer
Always unplug your hand mixer before cleaning. This keeps you safe and prevents any electrical accidents.
Step 2: Remove The Beaters
Press the eject button to release the beaters or whisks. Some models need a gentle pull after pressing the button. Do not force the attachments—they should slide out easily.
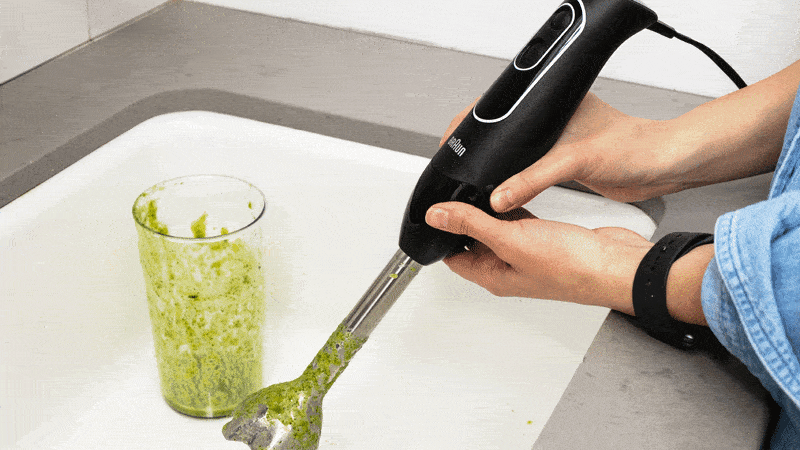
Step 3: Clean The Beaters
Rinse the beaters under warm water immediately after use. If there is dried batter or sticky dough, soak them in warm, soapy water for 10-15 minutes. Use a soft sponge or brush to remove any residue.
Tip: For beaters with stubborn spots, a toothbrush works well for cleaning around the joints and wires.
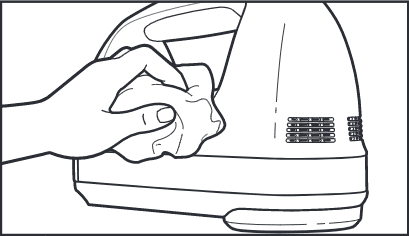
Step 4: Wipe The Body
Use a slightly damp cloth to wipe the mixer’s body. Focus on the handle, speed control, and any splatters. Do not let water drip into the motor vents or openings.
Step 5: Dry Everything
Use a dry towel to wipe the beaters and body. Let the beaters air dry for a few minutes before storing or attaching them back.
Step 6: Store Properly
Keep your mixer and attachments in a dry place. If your model has a storage case, make sure everything is fully dry before closing it.
Deep Cleaning Your Hand Mixer
Even with daily cleaning, your mixer needs a deeper clean every few weeks, especially if you bake often or notice sticky spots. Deep cleaning removes hidden dirt, grease, and residue from hard-to-reach areas.
What You’ll Need
- Mild dish soap
- Warm water
- Soft brush (like a toothbrush)
- Microfiber or soft cloth
- Toothpick or cotton swab
- Baking soda (for tough stains)
Step 1: Unplug And Disassemble
Unplug your mixer. Remove all attachments (beaters, whisks, dough hooks). If your mixer allows, detach the cord or other removable parts.
Step 2: Soak Attachments
Soak the metal attachments in warm, soapy water for at least 20 minutes. This softens dried batter and grease.
Step 3: Scrub And Rinse
Use a soft brush or toothbrush to clean all attachment surfaces, especially at the base where food often sticks. Rinse with clean water and set aside to air dry.
Step 4: Clean The Mixer Body
Dampen a microfiber cloth with soapy water (not dripping wet). Wipe the entire body, handle, and speed controls. For sticky residue, wrap the cloth around your finger or a cotton swab to clean crevices.
Step 5: Clean The Vents
Use a dry toothbrush or cotton swab to gently brush away any dust or crumbs from the air vents. Never use water here—moisture can damage the motor.
Step 6: Remove Stubborn Stains
For tough spots, sprinkle a little baking soda on a damp cloth and gently rub the area. Baking soda is a mild abrasive and won’t scratch most surfaces.
Step 7: Clean The Cord
Wipe the cord with a damp cloth. Check for food splashes near the plug, as these can be a safety hazard.
Step 8: Dry Thoroughly
Let all parts dry completely before using or storing. Moisture inside electrical parts can cause short circuits or rust.
Cleaning Different Types Of Hand Mixers
Not all hand mixers are built the same. Some have extra attachments, some are cordless, and others are vintage. Here’s how to handle these variations.
Classic Metal Beaters
Most mixers come with metal beaters, which are usually dishwasher safe. However, hand washing helps them last longer and prevents rust.
Chrome-plated Attachments
Some attachments have a shiny chrome finish. Avoid soaking these for long periods as water can cause the finish to peel.
Plastic Whisks Or Hooks
Plastic attachments can stain with foods like tomato or turmeric. Rinse immediately and use a little baking soda for tough stains.
Cordless Hand Mixers
Cordless mixers have a battery compartment. Never let water touch this area. Use a dry cloth for the battery cover and a damp one for the rest.
Vintage Hand Mixers
Older mixers may have non-removable beaters or less water-resistant materials. Only use a damp cloth for cleaning, and avoid soaking any parts.
Safe Cleaning For Electrical Appliances
Cleaning any electrical appliance, including your hand mixer, requires extra care. Water and electricity don’t mix, and even a small mistake can be risky.
- Always unplug first. Never clean a plugged-in mixer.
- Keep water away from the motor. Only the beaters and removable parts should be washed with water.
- No submerging. Never put the body of the mixer in water, even for a few seconds.
- Check cords and plugs. If the cord is sticky or dirty, wipe it with a damp cloth, but avoid the plug area.
If your mixer accidentally gets wet, do not use it until it is completely dry—this may take 24-48 hours. If you see water inside the vents, hold the mixer upside down and gently shake it to remove any drops.
Common Mistakes To Avoid
Many people make cleaning mistakes that can damage their hand mixer or make cleaning harder. Here are some to watch for:
- Using harsh chemicals: Bleach or strong cleaners can damage surfaces and harm your health.
- Soaking the mixer body: This can cause permanent motor damage.
- Scratching attachments: Using steel wool or sharp objects can ruin the finish.
- Forgetting the vents: Dust and crumbs in vents can overheat the motor.
- Not drying completely: Storing damp parts leads to rust or mold.
A common beginner mistake is cleaning only what you see. Batter and dough often hide around the base of the beaters or inside the eject button area.
How Often Should You Clean Your Hand Mixer?
Frequency depends on use:
- After every use: Quick clean of beaters and body.
- Weekly: If you use it daily, deep clean once a week.
- Monthly: For occasional use, a deep clean every month is enough.
- Before storage: Deep clean if you plan to store it for a long period.
If you notice sticky spots, strange smells, or the mixer sounds louder than usual, it’s a good sign it needs a deep clean.
Cleaning After Mixing Different Foods
What you mix can affect how you clean your hand mixer.
Eggs And Dairy
Residue from eggs and dairy can spoil quickly. Clean immediately after use to prevent smells and bacteria.
Sticky Doughs
Bread or pizza dough often leaves sticky residue. Soak beaters longer and use a brush for joints.
Chocolate And Fats
Greasy mixtures can cling to attachments. Use hot, soapy water and a little vinegar if needed.
Allergens
If you mix allergen-containing foods (like nuts or gluten), wash thoroughly to prevent cross-contamination.
Comparing Hand Mixer Cleaning Methods
Here’s a quick comparison of cleaning methods for hand mixers:
| Method | Best For | Time Needed | Effectiveness |
|---|---|---|---|
| Quick Wipe | Daily cleaning | 2-3 minutes | Good for light messes |
| Soaking Attachments | Sticky or dried residue | 15-30 minutes | Very effective |
| Deep Clean with Baking Soda | Tough stains, odors | 10-15 minutes | Excellent |
| Dishwasher (attachments only) | Metal beaters | Varies | Depends on water spots |
Tools And Products That Help
Certain tools make hand mixer cleaning easier and more effective.
- Soft brushes: Reach small spaces in attachments.
- Microfiber cloths: Trap dust and dry surfaces quickly.
- Cotton swabs: Clean vents and control switches.
- Mild dish soap: Safe for all surfaces.
- Baking soda: Removes odors and tough stains.
- White vinegar: Cuts grease (use sparingly).
Avoid using any abrasive cleaners or pads.
Hand Washing Vs Dishwasher For Mixer Attachments
Should you use your dishwasher for hand mixer parts? It depends.
| Cleaning Method | Pros | Cons |
|---|---|---|
| Hand Washing | Gentle, prevents rust, cleans all surfaces | More time-consuming |
| Dishwasher | Fast, easy for multiple attachments | May cause water spots, not safe for all types |
Tip: Always check your mixer’s manual before using the dishwasher, especially for attachments with plastic parts or special coatings.
What To Do If Your Hand Mixer Is Very Dirty
If your hand mixer has not been cleaned for a long time, don’t worry—there’s still hope. Here’s an action plan:
- Remove all attachments and soak them in hot, soapy water for at least 1 hour.
- Use a soft brush and baking soda paste (baking soda mixed with a little water) to scrub all metal parts.
- For the mixer body, use a slightly damp cloth with a little vinegar on sticky areas, then wipe again with plain water.
- Clean vents and small spaces with a dry toothbrush or cotton swab.
- Let everything dry completely before reassembly.
If there is visible mold or strong odors, repeat the process and consider replacing old attachments if stains remain.
How To Keep Your Hand Mixer Clean Longer
Prevention makes cleaning easier and protects your mixer.
- Wipe up spills immediately.
- Don’t overfill your mixing bowl—less splatter means less mess.
- Rinse attachments right after use to prevent dried food.
- Store the mixer and accessories in a clean, dry place.
- Inspect the cord and body regularly for food splashes or buildup.
If you use your mixer for different foods (like sweet and savory), clean between uses to avoid mixing flavors.

Credit: www.reddit.com
Troubleshooting: Sticky Buttons, Smells, And More
Sometimes, problems show up even with regular cleaning. Here’s how to handle them:
Sticky Speed Control Or Eject Button
Food can get under buttons, making them hard to press.
- Use a cotton swab dampened with a little rubbing alcohol to clean around the button edges.
- Press the button several times to loosen any residue.
Strange Smells
Smells usually come from food stuck in hard-to-reach places or from overheating.
- Deep clean the mixer and attachments.
- Let the mixer air out overnight.
- If the smell continues, check for signs of burnt wiring (a sign it may need repair).
Beater Joints Not Rotating Smoothly
Old batter or grease can clog the rotating parts.
- Soak the attachments in hot, soapy water and scrub the joints with a toothbrush.
- Do not use oil or lubricant—it can affect food safety.
Mixer Body Looks Dull
Plastic or metal can lose shine over time.
- Wipe with a little vinegar on a cloth, then buff dry with a soft towel.
How Cleaning Affects Mixer Performance
A well-cleaned mixer performs better. Clean beaters rotate smoothly, mix faster, and don’t spread old flavors. The motor runs quieter and cooler when vents are clear. Clean controls are easier to use, and the mixer is safer because there’s less risk of stuck buttons or electrical problems.
Some users report that after a deep clean, their old mixer feels almost new again, with less noise and better whipping results. Over time, cleaning protects the value of your appliance, which matters if you want to sell or donate it later.
When To Replace Parts Instead Of Cleaning
Sometimes, cleaning isn’t enough. If you notice:
- Rust on beaters: Replace them. Rust can flake off into food.
- Cracked or warped attachments: These can break during use.
- Damaged cord or plug: This is a safety hazard—replace immediately.
- Loose speed controls: If cleaning doesn’t help, repairs may be needed.
Check your hand mixer’s brand for replacement parts. Using damaged pieces can be dangerous.
Eco-friendly Cleaning Tips
You can clean your hand mixer without harming the environment.
- Use baking soda and vinegar instead of chemical cleaners.
- Choose biodegradable dish soap.
- Wash attachments with minimal water—don’t leave the tap running.
- Air dry parts instead of using paper towels.
These steps save resources and are gentle on your mixer.
Credit: www.kitchenaid.co.uk
What To Do If Your Hand Mixer Gets Wet Inside
If water gets inside your mixer, safety is the top concern.
- Unplug the mixer immediately.
- Hold the mixer so water can drain out (motor side down).
- Shake gently to remove drops.
- Leave the mixer in a dry, warm place for at least 24-48 hours.
- Do not use a hair dryer or heater, as these can melt plastic or damage the motor.
If the mixer does not work or you see sparks or smoke, do not use it. Consult the manufacturer or a repair specialist.
Storing Your Hand Mixer
Proper storage keeps your mixer clean and ready.
- Store in a dry place. Moisture leads to rust or mold.
- Keep attachments together. Use a storage case if available.
- Wrap the cord loosely. Tightly wound cords can break inside.
- Cover the mixer. A clean towel or bag protects from dust.
If you store your mixer for a long time, give it a quick clean before the next use.
Top Cleaning Myths And Facts
Let’s clear up some common myths:
- Myth: You can put the whole mixer in the dishwasher.
Fact: Only beaters/attachments are usually dishwasher safe.
- Myth: All stains mean the mixer is ruined.
Fact: Most stains can be removed with patience and the right tools.
- Myth: Using oil is good for sticky buttons.
Fact: Oil attracts more dust and can get into food.
For more information on cleaning kitchen appliances safely, you can check Consumer Reports.
Frequently Asked Questions
How Do I Clean Hand Mixer Beaters With Dried Dough Stuck On Them?
Soak the beaters in warm, soapy water for 15-30 minutes. Use a toothbrush or soft brush to scrub around the wires and joints. For stubborn spots, make a paste with baking soda and water, apply it, and scrub gently. Rinse and dry thoroughly.
Can I Put Hand Mixer Attachments In The Dishwasher?
Most metal beaters and whisks are dishwasher safe, but check your user manual first. Some attachments, especially those with plastic parts or special coatings, can be damaged by high heat or harsh dishwasher detergents. Hand washing is always a safe choice.
What Should I Do If Water Gets Inside My Hand Mixer?
Unplug the mixer immediately. Hold it with the motor side down to drain any water. Let it dry in a warm, well-ventilated place for at least 24-48 hours. Do not use the mixer until completely dry. If you notice any problems after drying, seek professional help.
Why Does My Hand Mixer Smell Bad Even After Cleaning?
Lingering smells are often caused by food or grease trapped in small spaces, like vents or around buttons. Try a deep cleaning with baking soda and a toothbrush. Let the mixer air out overnight. If the smell continues, it may be a sign of motor issues or burnt wiring.
How Often Should I Deep Clean My Hand Mixer?
Deep cleaning is recommended every 2-4 weeks for regular users. If you use your mixer less often, a monthly deep clean is enough. Always deep clean before storing the mixer for a long time or if you notice sticky spots, strange smells, or performance changes.
Keeping your hand mixer clean doesn’t have to be difficult or time-consuming. With these practical steps and tips, you’ll protect your appliance, your recipes, and your health. Clean regularly, avoid common mistakes, and your hand mixer will serve you well for years to come.