How To Vent A Dryer Through The Floor
Every home with a clothes dryer needs a safe and effective way to get rid of hot, moist air. Most dryers vent through the wall, but sometimes, the best option is venting through the floor. This can happen in basements, laundry rooms without exterior walls, or when remodeling older homes.
If you do this wrong, you risk mold, fire, or damage to your dryer. But if you do it right, your dryer will run safely and efficiently for years.
In this guide, you’ll learn how to vent a dryer through the floor step by step. We’ll cover tools, materials, safety, common mistakes, and how to keep your vent working properly. You’ll find clear advice, practical examples, and tips that even many experienced homeowners miss.
Whether you’re a beginner or have some DIY experience, you’ll get everything you need to finish the job confidently.
Why Venting A Dryer Matters
Dryers produce hot air, moisture, and lint. If you don’t vent them outside, these can cause:
- Mold in your home
- Reduced dryer efficiency
- Higher fire risk
- Damage to walls, floors, and furniture
Venting through the floor is sometimes the only practical solution, especially in basement laundry rooms or apartments. It can also be safer than running long horizontal ducts through walls.
Many people do not realize that venting a dryer directly indoors can also introduce toxic gases, especially if you use a gas dryer. These gases include carbon monoxide, which is odorless and dangerous. Even for electric dryers, venting indoors allows fine lint particles to float in the air, which can affect your breathing or make your home dusty.
That’s why venting outside is the safest and healthiest choice.
Assessing Your Space And Planning
Before you start, you need a clear plan. Not every floor is suitable, and you must check:
- Floor material: Wood, concrete, tile, or carpet
- Location: Is there an outside exit beneath the floor?
- Obstacles: Pipes, wires, joists, beams
- Building codes: Local rules may limit venting options
Good planning also helps you avoid expensive mistakes, such as making holes in the wrong place or having to reroute your duct after discovering a hidden pipe.
Floor Material Considerations
Different materials require different tools and techniques. Here’s a quick comparison:
| Floor Material | Ease of Cutting | Tools Needed | Extra Cautions |
|---|---|---|---|
| Wood | Easy | Hole saw, jigsaw | Check for joists |
| Concrete | Hard | Hammer drill, masonry bit | Dust, vibration |
| Tile | Medium | Diamond bit, hole saw | Cracking risk |
| Carpet | Easy | Utility knife, hole saw | Remove carpet first |
If you’re cutting through a floor with layers (for example, tile over concrete, or carpet over wood), plan for each layer separately. For carpet, always remove it from the area where you will cut to avoid fraying and to get a cleaner hole.
With tile, tap lightly and use water to cool the bit so tiles don’t overheat and crack.
Checking For Obstacles
Always check for joists, wires, or pipes under the floor. Use a stud finder or camera. Accidentally cutting into a joist can weaken your floor, and hitting a pipe or wire can cause expensive damage.
One detail people often miss: floors may have “sleeper joists” or double joists in certain areas, like by doors or heavy appliances. Use a small drill bit to make a “test” hole outside your marked area to check for hidden wood. Also, look for heating ducts if your home uses forced air; these may be close to the laundry area.
Local Building Codes
Many cities require venting to the outside. Some ban long horizontal runs or indoor vents. Check your local rules before you begin. You can find code info at your city’s website or ask a licensed contractor.
Some codes require “backdraft dampers” to prevent outside air or pests from coming back inside. In cold climates, codes may require insulation around metal ducts to reduce condensation. Knowing these small details now can save you from having to redo the work later.
Tools And Materials You’ll Need
Getting the right tools makes the job easier and safer. Here’s what you’ll need:
- Dryer vent kit (includes duct, outside vent cap)
- Hole saw (size: 4–5 inches, matches vent diameter)
- Drill (corded or cordless)
- Screwdriver
- Tape measure
- Utility knife
- Caulk and caulking gun
- Safety gear (gloves, goggles, mask)
- Duct tape or metal foil tape
- Vacuum or shop vac
- Stud finder or inspection camera
- Level
For concrete floors, add:
- Hammer drill
- Masonry bit
- Concrete screws
For tile floors, add:
- Diamond hole saw
- Masking tape
A few extra items can help, especially for first-timers: a flashlight for seeing under floors, a small brush for cleaning out rough edges on the hole, and a helper to hold the duct or vacuum up dust as you cut. Always wear gloves and goggles—cutting through materials creates sharp edges and flying debris.
Step-by-step Guide To Venting Through The Floor
Follow these steps carefully. If you skip or rush, you could create safety risks or have to redo the work.
Step 1: Map Out The Vent Path
Use your tape measure to check the distance from dryer to outside. Aim for the shortest, straightest path. Long or twisted vents reduce efficiency and create fire risks.
Pro tip: Try to keep vent runs under 25 feet. Each 90-degree bend equals about 5 feet of extra resistance.
Plan the vent route so that there are as few bends as possible. If the outside wall is far, consider re-positioning your dryer or rearranging laundry appliances to shorten the duct path. Every extra foot means more lint buildup and weaker airflow.
Step 2: Mark The Hole Location
Place your dryer where it will sit. Mark the spot where the vent will exit the floor. Double-check by measuring underneath the floor to make sure you’re not above a joist, pipe, or wire.
If you have a multi-layered floor, mark your spot on each layer to keep your cut clean and aligned. For tiled floors, put masking tape over the area to avoid chipping when drilling.
Step 3: Check Under The Floor
If you have a crawlspace or basement, use a flashlight to inspect the area below. If you don’t, use an inspection camera through a small pilot hole.
For added safety, drill a small pilot hole (1/8 inch) first. Push a piece of wire through and check where it comes out below. This helps you confirm you won’t hit anything important. If you’re unsure, check with a plumber or electrician.
Step 4: Cut The Hole
Choose the right tool for your floor type. For wood, use a hole saw. For concrete, use a hammer drill and masonry bit. For tile, use a diamond bit and go slowly to avoid cracks.
Common mistake: Rushing the cut can splinter wood or crack tile. Always use safety gear.
If the hole edges are rough, use a file or sandpaper to smooth them. This helps the duct fit snugly and prevents lint snags. After cutting, vacuum up all debris—leftover dust or chips can interfere with sealing and fitting.
Step 5: Install The Vent Duct
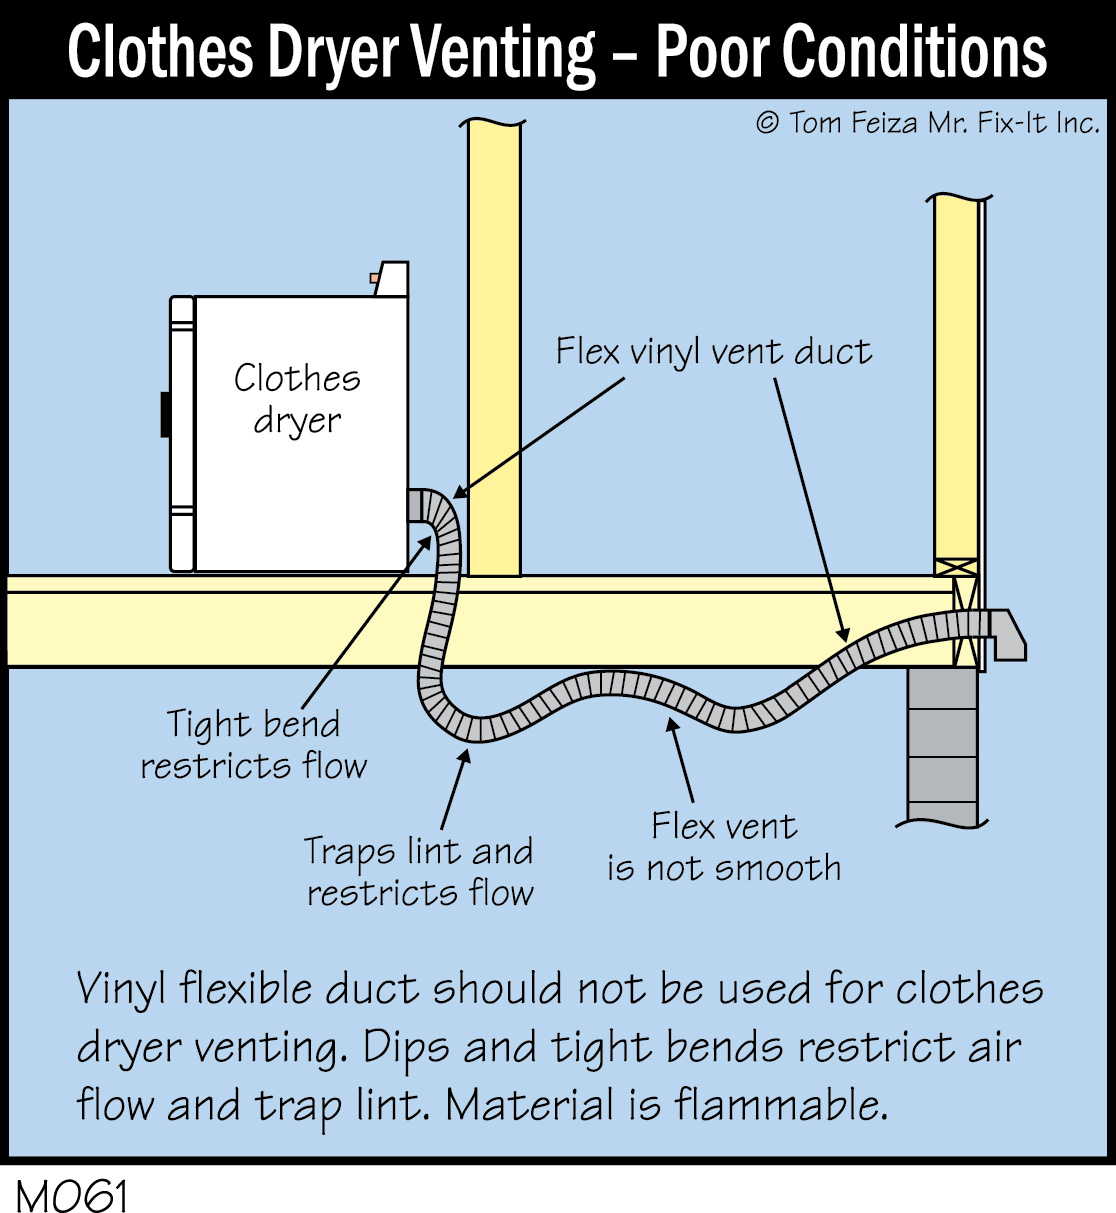
Feed the duct through the hole. Use rigid metal duct where possible. Flexible foil is easier but less safe—lint catches in the grooves and can cause fire.
Non-obvious insight: Many people use plastic duct, but it’s not allowed by code and melts in fires. Always use metal.
Connect the duct to your dryer with a clamp. Seal joints with metal foil tape, not duct tape (which dries out).
When feeding the duct, keep it as straight as possible. If you must use a bend, use a smooth elbow joint rather than crimping the duct. This keeps airflow high and lint buildup low. Check that there are no sharp bends or kinks, especially where the duct passes through the floor.
Step 6: Attach The Exterior Vent Cap
Outside, install the vent cap. It keeps rodents and rain out. Secure it with screws and seal edges with caulk.
Double-check that the vent cap’s flap or screen can move freely. Sometimes, paint or caulk can block it. If your vent will be low to the ground, add a small screen or cage to keep out animals, but make sure it’s easy to remove for cleaning.
Step 7: Secure And Seal The Duct
Inside, use clamps and screws to secure the duct. Where the duct meets the floor, seal any gaps with caulk.
Pro tip: Smooth seals help prevent lint buildup.
Don’t just rely on tape—use screws at each connection for extra strength, especially if the duct will be moved for cleaning. Apply a continuous bead of caulk around the duct where it passes through the floor to block air and moisture leaks.
Step 8: Test The Setup
Plug in your dryer and run a short cycle. Go outside and check for strong airflow. Look for leaks or weak spots. Fix any loose joints.
If you notice air escaping indoors or weak airflow outside, double-check all seals and joints. Sometimes, a small leak can be fixed by tightening a clamp or adding more foil tape. Strong, warm air outside means your vent is working.

Credit: smokealert.net
Comparing Dryer Vent Types
You might wonder whether to use rigid, semi-rigid, or flexible ducts. Here’s a comparison:
| Vent Type | Safety | Ease of Installation | Durability | Lint Buildup |
|---|---|---|---|---|
| Rigid metal | Best | Medium | High | Low |
| Semi-rigid | Good | Easy | Medium | Medium |
| Flexible foil | Poor | Easy | Low | High |
| Plastic | Unsafe | Easy | Low | High |
Best practice: Always choose rigid metal for safety and lasting performance.
Another detail: Rigid ducts are easier to clean. You can run a brush through without tearing them. Flexible foil can collapse or get holes, and plastic can melt or crack during cleaning.
Safety Precautions
Dryer vents are a leading cause of house fires. The US Fire Administration reports 2,900 dryer fires each year, causing $35 million in property damage.
To stay safe:
- Use metal duct
- Keep vent runs short and straight
- Clean vents every 6–12 months
- Never vent indoors or into crawlspace
- Seal all joints tightly
Fire Hazards
Lint is highly flammable. Even a small buildup can ignite. Never use plastic duct or let vent joints leak.
For extra safety, consider installing a smoke detector in your laundry area. If your dryer is in a basement or closed room, check that you have enough ventilation so heat doesn’t build up.
Mold And Moisture Risks
Moist air from the dryer can lead to mold under your floor or in crawlspaces. Always vent to the outdoors, never to a basement or attic.
If your vent exits near a window or door, make sure moist air won’t blow back inside. In cold climates, insulate the last few feet of duct to avoid water droplets forming and dripping onto the floor.
Maintenance And Cleaning
Your vent will need regular cleaning. Lint buildup reduces airflow and increases fire risk. Here’s how to keep it clean:
- Unplug the dryer.
- Remove the vent duct at both ends.
- Use a dryer vent brush to clear lint.
- Vacuum remaining lint.
- Reconnect and check for tight seals.
Non-obvious insight: Many people forget to clean the vent cap outside. It can get blocked by leaves, lint, or even bird nests.
Warning: If your clothes take too long to dry or you smell burning, clean the vent immediately.
It’s also smart to check the vent after big laundry days or if you wash lots of towels or blankets, which create more lint. Mark your calendar for annual cleanings, or set a reminder on your phone.
Troubleshooting Common Problems
If something isn’t working, check these issues:
Weak Airflow
- Possible causes: Too many bends, long run, blocked vent cap, crushed duct
- Solution: Shorten the run, replace flexible duct with rigid, clean vent cap
Check for kinks behind the dryer, and make sure the duct isn’t pinched where it goes through the floor. If your vent run is long, a booster fan can help.
Dryer Shuts Off Early
- Possible causes: Clogged vent, overheating
- Solution: Clean vent, check duct connections
Some dryers have thermal sensors that stop the cycle if airflow is weak. Cleaning the duct often fixes this.
Water In The Duct
- Possible causes: Condensation, leaking joints
- Solution: Seal joints, insulate duct, make sure vent slopes slightly downward
Make sure the vent always runs downhill toward the outside. If the outside end is higher, water can pool inside.
Rodents Or Insects
- Possible causes: Broken vent cap, missing screen
- Solution: Replace vent cap, add screen, check regularly
Check for chewed or missing parts. Screens should be cleaned so lint does not block airflow.
Special Considerations For Basement And Crawlspace Installations
Venting through the floor often means venting into a basement or crawlspace. These areas have unique challenges.
Moisture Problems
Basements are humid. Venting moist air into them increases mold risk. Always vent outside.
If your duct runs through a damp basement or crawlspace, check it for leaks every few months. Small leaks can quickly cause big mold problems in these areas.
Crawlspace Access
If you’re venting through a crawlspace, make sure you can reach the vent cap for cleaning. Consider adding an access panel.
If your crawlspace is tight, use extension tools or flexible brushes for cleaning. A removable vent cap can make annual maintenance easier.
Insulating The Vent
If your vent runs through cold areas, insulate it to prevent condensation. Use foam pipe insulation or wrap with fiberglass.
Wrap the duct completely, especially near the vent exit. Use waterproof tape to hold insulation in place, and check that it doesn’t get wet or moldy.
Cost Breakdown
Venting a dryer through the floor is usually affordable if you do it yourself. Here’s what you can expect:
| Item | Average Cost (USD) |
|---|---|
| Dryer vent kit | $15–$30 |
| Hole saw | $20–$40 |
| Drill | $50–$100 |
| Caulk | $5–$10 |
| Safety gear | $10–$20 |
| Labor (if hired) | $150–$300 |
Doing it yourself saves money, but always prioritize safety.
If you need to buy new tools, consider borrowing from a friend or renting from a hardware store. Remember, the cost of a safe, working vent is much less than the cost of fixing water or fire damage later.
Practical Tips For A Smooth Installation
Here are some tips to make your project easier:
- Measure twice, cut once
- Use a level to keep duct straight
- Seal all edges with caulk to prevent leaks
- Label vent cap outside so you can find it for cleaning
- Use screws, not just tape, to secure duct
Non-obvious insight: If your vent runs longer than 10 feet, consider adding a booster fan to maintain airflow.
When working alone, use tape to hold the duct in place while you attach screws. If your vent path is close to other pipes or wires, add a warning label for future repairs.
Mistakes To Avoid
Many beginners make these mistakes:
- Using plastic duct—unsafe and banned by code
- Venting indoors—causes mold and fire risk
- Not sealing joints—leads to leaks and lint buildup
- Forgetting to clean—causes dryer inefficiency and fire risk
- Cutting through joists—weakens the floor structure
Avoid these for a safe, lasting installation.
A less obvious mistake: Ignoring the outside vent location. If it’s near a deck or walkway, you may blow lint and hot air where people sit or walk. Try to vent in an out-of-the-way spot.
When To Call A Professional
If you’re unsure about tools, safety, or building codes, it’s best to call a licensed contractor. They can:
- Check for hidden obstacles
- Ensure code compliance
- Handle tricky floor types (concrete, tile)
- Guarantee safe venting
It’s a smart investment if you have doubts.
Professionals also have specialized tools, like long duct brushes and cameras, to check for blockages. If your home is older or has a complex layout, an expert can save you time and trouble.
Environmental Impact
Efficient dryer venting saves energy. Poor vents mean longer dry times, higher electricity use, and more wear on your dryer.
According to the US Department of Energy, a clogged vent can increase drying time by 50%. That means higher bills and more carbon emissions.
A well-vented dryer also lasts longer. You’ll replace fewer parts, and your dryer motor won’t overheat as often. Saving energy is good for your wallet and the planet.
Credit: misterfix-it.com
Real-life Example
Let’s look at a basement laundry room. The owner had no wall access, so they vented through the floor. They:
- Used a rigid metal duct
- Cut a hole in the wood floor with a hole saw
- Installed a vent cap outside, sealing edges with caulk
- Insulated the duct to prevent condensation
Result: Their dryer worked faster, and moisture problems were solved.
Another example: In an older home, the owner found the vent run was over 20 feet with three bends. After switching to a shorter, straight run through the floor, they noticed clothes dried in half the time, and their energy bill dropped.
Frequently Asked Questions
How Big Should The Dryer Vent Hole Be?
Most dryer vents are 4 inches in diameter. Use a hole saw slightly larger, about 4.25–4.5 inches, to allow for fitting and caulk.
Can I Use Flexible Duct For The Whole Vent?
It’s best to use rigid metal duct. Flexible duct is easier but can trap lint, leading to fire risk. Use flexible only for short connections (under 2 feet).
Is Venting Through The Floor Allowed Everywhere?
Not always. Some building codes ban floor venting or require special materials. Always check local rules before starting.
How Often Should I Clean The Vent?
Clean your dryer vent at least once a year. If you dry many loads or notice slow drying, clean every six months.
What If I Can’t Vent Outside?
Never vent a dryer indoors or into a crawlspace. If you can’t reach outside, consider a ventless dryer or call a professional for advice.

Credit: www.reddit.com
Final Thoughts
Venting a dryer through the floor can be the best solution for many homes, but only if you follow the right steps. With careful planning, the right materials, and regular maintenance, your dryer will work safely and efficiently. Remember to always use metal duct, keep the vent short and straight, and clean it regularly. If you’re ever in doubt, don’t risk your home—call a professional. For more detailed building code info, see NFPA Dryer Fire Safety.
By following this guide, you can enjoy a safer, more efficient laundry room and peace of mind.