Updating antique furniture is a fascinating way to combine history with personal style. Many people love the charm and stories hidden in old pieces, but sometimes the look or function no longer fits modern life. With the right approach, you can transform antique furniture, keep its character, and make it useful for years ahead.
This process is not just about paint or polish—it’s about respecting the past while making something unique for your space.
People often worry they might “ruin” an antique. That’s a valid concern. But with thoughtful steps, you can update furniture without losing its value or sentimental meaning. Whether it’s a family heirloom or a flea market find, these strategies will help you refresh your furniture safely and creatively.
Let’s explore how to update antique furniture, from the first inspection to the final details.
Understanding Antique Furniture Before You Update
Before you start any changes, it’s important to understand what makes your piece special. Not all old furniture is valuable, but some items can be worth thousands of dollars—or have deep personal meaning. Spend time learning about your furniture. Look for maker’s marks, labels, or unique hardware.
These details can help you learn about the age, origin, and style.
If you suspect your piece is valuable, consider getting a professional appraisal before making big changes. Sometimes, even a simple paint job can lower the value. But if your main goal is beauty and function—not investment—feel free to express your creativity.
It’s also helpful to study the construction methods. Antique furniture often uses hand-cut dovetail joints, solid wood panels, or traditional joinery. These features can increase both value and strength. In contrast, mass-produced pieces from later years might use plywood or machine-cut joints, which are less valuable but still worth updating for their style or function.
Common Types Of Antiques
- Victorian (1837–1901): Decorative, often dark woods, ornate details.
- Mid-century Modern (1940s–1960s): Clean lines, minimal hardware.
- Art Deco (1920s–1930s): Geometric shapes, metallic accents.
- Colonial (1600s–1800s): Simple lines, sturdy construction.
Knowing the style helps you choose the right materials and finishes. For instance, a Colonial piece might look best with a natural wax finish, while Art Deco furniture often shines with glossy surfaces and bold colors. This not only brings out the original beauty but also respects the era and craftsmanship.
Planning Your Project: Key Decisions
Every update starts with a plan. Ask yourself:
- What is your main goal—restoration (making it look like new) or refinishing (changing color/finish)?
- Do you want to keep the original look, or make it modern?
- How will the piece be used in your home?
Make a list of changes you want. For example, you might want to:
- Change the color
- Add new hardware (handles, knobs)
- Repair damage
- Update upholstery
Set a realistic budget. Antiques often require special products and tools, which can cost more than you expect.
Think about how much time you can spend. Some projects, like painting a chair, take only a day. Others, such as repairing deep scratches or reupholstering a sofa, can stretch over several weekends. Factor in drying times for glues, stains, or paint, which may be longer than you first imagine.
A practical tip: Write down every step before you begin, and gather all materials in advance. This keeps you focused and prevents last-minute trips to the hardware store.
Tools And Materials You’ll Need
Having the right tools makes the work easier and safer. Here’s what you’ll need for most projects:
- Screwdrivers (flat and Phillips)
- Sandpaper (various grits, 80 to 320)
- Wood glue and clamps
- Putty knife
- Paintbrushes and foam rollers
- Wood filler
- Finishing products (stain, paint, wax, or varnish)
- Protective gear (mask, gloves, goggles)
- Drop cloths to protect your workspace
For upholstery, you may need a staple gun, fabric scissors, and new padding.
Don’t overlook small items like tack cloths, which help remove dust before finishing, or painter’s tape, which can protect details you don’t want to paint. Investing in high-quality brushes or rollers leads to smoother finishes and fewer brush marks.
If your furniture has intricate carvings, consider using a set of small detail brushes or even cotton swabs for applying finishes in tight spaces. Sometimes, a hairdryer can help remove old wax or soften glue for repairs.
Step-by-step: How To Update Antique Furniture
Each piece is unique, but these steps will guide you through a safe and effective update.
1. Inspect And Document
Start by carefully checking the furniture. Look for:
- Loose joints or wobbly legs
- Cracks, chips, or missing pieces
- Water damage or stains
- Signs of insect damage
Take clear photos from all angles. This helps you remember the original condition and can be helpful if you need advice later.
If your piece is valuable, documenting each step also creates a record of your restoration process. This can help future owners understand what was changed or preserved.
2. Clean Thoroughly
Dirt, grease, and old polish can hide damage and make new finishes stick poorly. Use a gentle cleaner—like diluted dish soap and warm water. For heavy grime, try mineral spirits (test on a hidden spot first).
Dry the piece completely before moving on.
Sometimes, old wax or polish builds up in carvings or corners. Use a soft toothbrush or cotton swab to reach these tricky spots. Avoid soaking the wood, as too much water can cause swelling or cracks.
3. Make Repairs
Now is the time to fix anything broken or unstable.
- Tighten loose screws or bolts.
- Use wood glue and clamps for cracked joints.
- Fill small holes or dents with wood filler.
- For missing veneer, cut a matching piece and glue it in place.
Let repairs dry fully. Sand smooth as needed.
For deeper repairs, like replacing a broken leg, try to match the original wood type and grain. Sometimes you can find old parts at salvage shops or online. If you must use new wood, stain or paint it to blend with the rest of the piece.
4. Remove Old Finish (if Needed)
If you want to change the color or stain, you’ll need to remove the old finish.
- Use a chemical stripper for thick paint or varnish. Wear gloves and work in a ventilated area.
- For thin finishes, sanding may be enough. Start with coarse paper (80–100 grit), then move to finer grits (180–220).
Be careful not to sand too much. Antique veneers are often thin and can be damaged easily.
If the furniture has fine details or carvings, a small scraper or brass brush helps remove old finish without harming the wood. Always clean off all residue before applying new finishes.
5. Update The Finish
Here’s where you can really change the look. There are several options:
- Stain: Highlights the wood grain. Choose oil-based for a classic look, or water-based for easy cleanup.
- Paint: Great for a bold update. Use a bonding primer for old finishes.
- Wax or Oil: Adds a soft sheen, ideal for rustic pieces.
- Varnish or Polyurethane: For a durable, shiny surface.
Apply in thin, even coats. Let each coat dry, and sand lightly between coats.
Try layering colors or using a colored wax for subtle effects. For example, a dark wax over light paint can bring out carved details, while a whitewash can give a piece a faded, vintage feel.
6. Replace Or Restore Hardware
Old knobs and handles can be polished, painted, or replaced.
- To clean brass, use a mix of lemon juice and baking soda.
- For a modern look, try matte black or brushed nickel hardware.
Keep the original hardware in case you want to restore the piece’s antique value later.
If screws or bolts are missing, try to match the thread size and head style for a seamless look. Sometimes, even a simple swap to glass knobs or decorative backplates can transform the overall feel.
7. Update Upholstery (if Needed)
For chairs or sofas, new fabric makes a huge difference.
- Remove old fabric and padding.
- Replace with new foam or batting.
- Cut and staple new fabric, pulling it tight and even.
Choose durable material that matches your style.
When choosing fabric, consider stain resistance and how much wear the piece will get. Patterns can hide dirt and wear, while solid colors highlight the furniture’s shape. Add trim or decorative tacks for a classic touch.
8. Final Touches
Check for any missed spots or rough edges. Add felt pads under legs to protect your floors. Stand back and admire your work—you’ve given new life to a piece of history.
If desired, line drawers or shelves with decorative paper or fabric. Not only does this look nice, but it also protects the wood from spills or scratches.
Tips For Keeping The Antique Value
Some updates can lower a piece’s value. Here’s how to avoid common mistakes:
- Don’t paint over valuable woods like mahogany or walnut unless you’re sure.
- Save original hardware and features, even if you don’t use them.
- Always use reversible methods if you might sell the piece later.
If in doubt, consult an expert before making big changes.
Whenever you modify a collectible item, keep a record of the changes. Store all original parts in a labeled bag or box. This extra care can make a difference if you ever resell or pass the piece on to future generations.
Popular Styles: Modern Ways To Update
Let’s look at some creative ideas for updating antique furniture without losing its spirit.
Painted Two-tone Dressers
Paint the frame a bold color, but leave drawers with their natural wood. This creates contrast and highlights the original woodwork.
For example, a navy blue frame with oak drawers gives a fresh look while keeping some classic elements. This technique works well for dressers, sideboards, or desks.
Distressed Finishes
Gently sand edges and corners after painting for a “lived-in” look. This works especially well for farmhouse or shabby chic styles.
You can add extra depth by using a dark glaze over lighter paint, then wiping off the excess. It settles in crevices, highlighting details.
Stenciling And Decoupage
Add patterns, images, or even maps with stencils or decoupage techniques. Seal with clear varnish for durability.
Try floral motifs for a romantic touch, or geometric patterns for a modern twist. Decoupage is also great for updating drawer fronts or table tops with minimal mess.
Hardware Swaps
Change out old handles for glass, crystal, or geometric shapes. This small change can make a big difference.
Mixing and matching different hardware styles adds personality, especially on multi-drawer pieces.
Metallic Accents
Add gold or silver leaf to legs or trim. This is perfect for Art Deco or Hollywood Regency pieces.
Metallic paint pens can also be used for fine details or to refresh faded inlay work.

Credit: www.dododsondesigns.com
Comparing Antique Vs. Modern Furniture Updates
To understand the differences, here’s a comparison of updating antique furniture versus modern pieces:
| Feature | Antique Furniture | Modern Furniture |
|---|---|---|
| Materials | Solid wood, natural veneers | Engineered wood, laminates |
| Finish Removal | Requires gentle, careful sanding or stripping | Usually easier, less risk of damage |
| Value Impact | Changes may reduce value | Little effect on value |
| Design Flexibility | Best to respect original style | Can be fully transformed |
Antique updates focus on preservation and style harmony, while modern pieces are more about convenience and quick changes.
Mistakes To Avoid When Updating Antiques
Beginners often make these errors:
- Skipping prep work: Cleaning, sanding, and repairing are essential.
- Over-sanding: This can remove details and thin veneers.
- Using harsh chemicals: Some strippers or cleaners can damage old wood.
- Painting valuable woods: This can reduce both beauty and value.
- Throwing away hardware: Original parts may be hard to replace.
- Ignoring safety: Old finishes may contain lead—always wear a mask and gloves.
Two non-obvious insights: Many antique pieces have hidden repairs from the past—look for old glue or mismatched screws. Also, old wood can be more porous than new wood, which means it absorbs stain and finish quickly. Always test on a hidden area first.
Another often-missed detail: Some finishes, like shellac, can be dissolved with alcohol for easy removal, while others need heavier strippers. Knowing the finish type saves time and prevents damage.
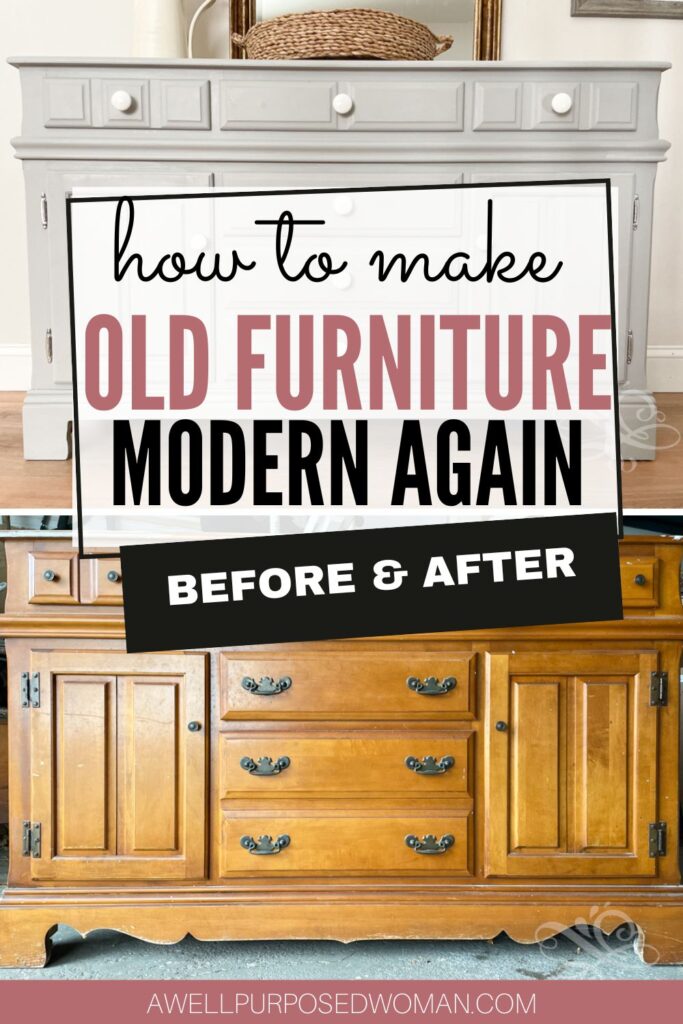
Credit: awellpurposedwoman.com
How To Choose The Right Finish
Different finishes give different results. Here’s a quick guide:
| Finish Type | Best For | Durability | Look |
|---|---|---|---|
| Stain | Natural wood grain | Medium | Warm, classic |
| Paint | Bold colors, full coverage | High (with sealer) | Modern, clean |
| Wax | Soft luster, rustic | Low to Medium | Matte, silky |
| Varnish/Polyurethane | High-traffic pieces | High | Glossy or satin |
Pick a finish that matches both your taste and how the furniture will be used.
If you want an easy-to-repair finish, wax or oil is best—scratches can be fixed with more wax. For dining tables or desks, harder finishes like polyurethane resist spills and marks.
Eco-friendly Ways To Update Antique Furniture
Updating furniture can also be good for the environment. Here’s how:
- Use low-VOC paints and stains to reduce chemicals in your home.
- Reuse or repurpose old wood whenever possible.
- Donate old hardware to local artists or schools.
Choosing eco-friendly products helps protect both your family and the planet.
You can also try homemade cleaners—like vinegar and olive oil for cleaning wood—rather than harsh commercial products. Upcycling leftover fabric scraps for drawer liners or using natural waxes like beeswax are small choices that add up.
Where To Find Inspiration
You don’t have to update antiques alone. Social media and websites like Pinterest, Instagram, and home improvement blogs have thousands of before-and-after photos. Visiting antique shops or flea markets can also give you fresh ideas. If you want to learn more about furniture history or safe restoration, check out resources from the Metropolitan Museum of Art.
Seeing real transformations can help you imagine new possibilities for your own pieces. Join online forums or local classes to exchange tips with others who share your interest.
Budgeting: What Does It Really Cost?
The cost of updating antique furniture can range from very little (just sandpaper and paint) to several hundred dollars (if you need new upholstery or repairs). Here are some average costs:
- Paint and supplies: $30–$60
- New hardware: $20–$50
- Upholstery: $100–$500 (depends on size and fabric)
- Professional repairs: $100–$300
If you do the work yourself, you’ll save money and gain new skills.
Remember to include the value of your time, especially if this is your first project. Sometimes, spending a bit more on high-quality materials leads to a better and longer-lasting result.
When To Call A Professional
Some projects are best left to experts. Call a pro if:
- The piece is very valuable or rare.
- There is major structural damage (broken legs, cracked frames).
- You need to replace intricate veneer or marquetry.
- The finish contains lead paint (common in pre-1978 pieces).
Professionals have tools and experience to protect your furniture’s value.
If you’re unsure, get a quote. Many restorers offer free advice for small questions, or can handle just the tricky parts while you do the rest.
Real-world Example: Updating A 1920s Vanity
Let’s walk through a true story. Maria found a 1920s Art Deco vanity at a yard sale for $70. It had chipped veneer, water stains, and wobbly legs.
Steps Maria took:
- Cleaned the piece gently with mild soap and water.
- Glued and clamped loose joints.
- Carefully removed the old, damaged veneer with a putty knife.
- Sanded the surface, using fine-grit paper to avoid damage.
- Stained the wood with a rich walnut tone.
- Replaced missing hardware with glass knobs but kept the originals in storage.
- Finished with two coats of clear satin polyurethane.
Maria’s vanity now has a modern look, but the curved lines and unique feet keep its Art Deco character. She spent about $90 on supplies.
Another example: Tom updated a mid-century nightstand by painting the sides a soft gray, sanding the drawer fronts to bare wood, and adding brushed brass knobs. The result looked high-end, but the project cost less than $60.
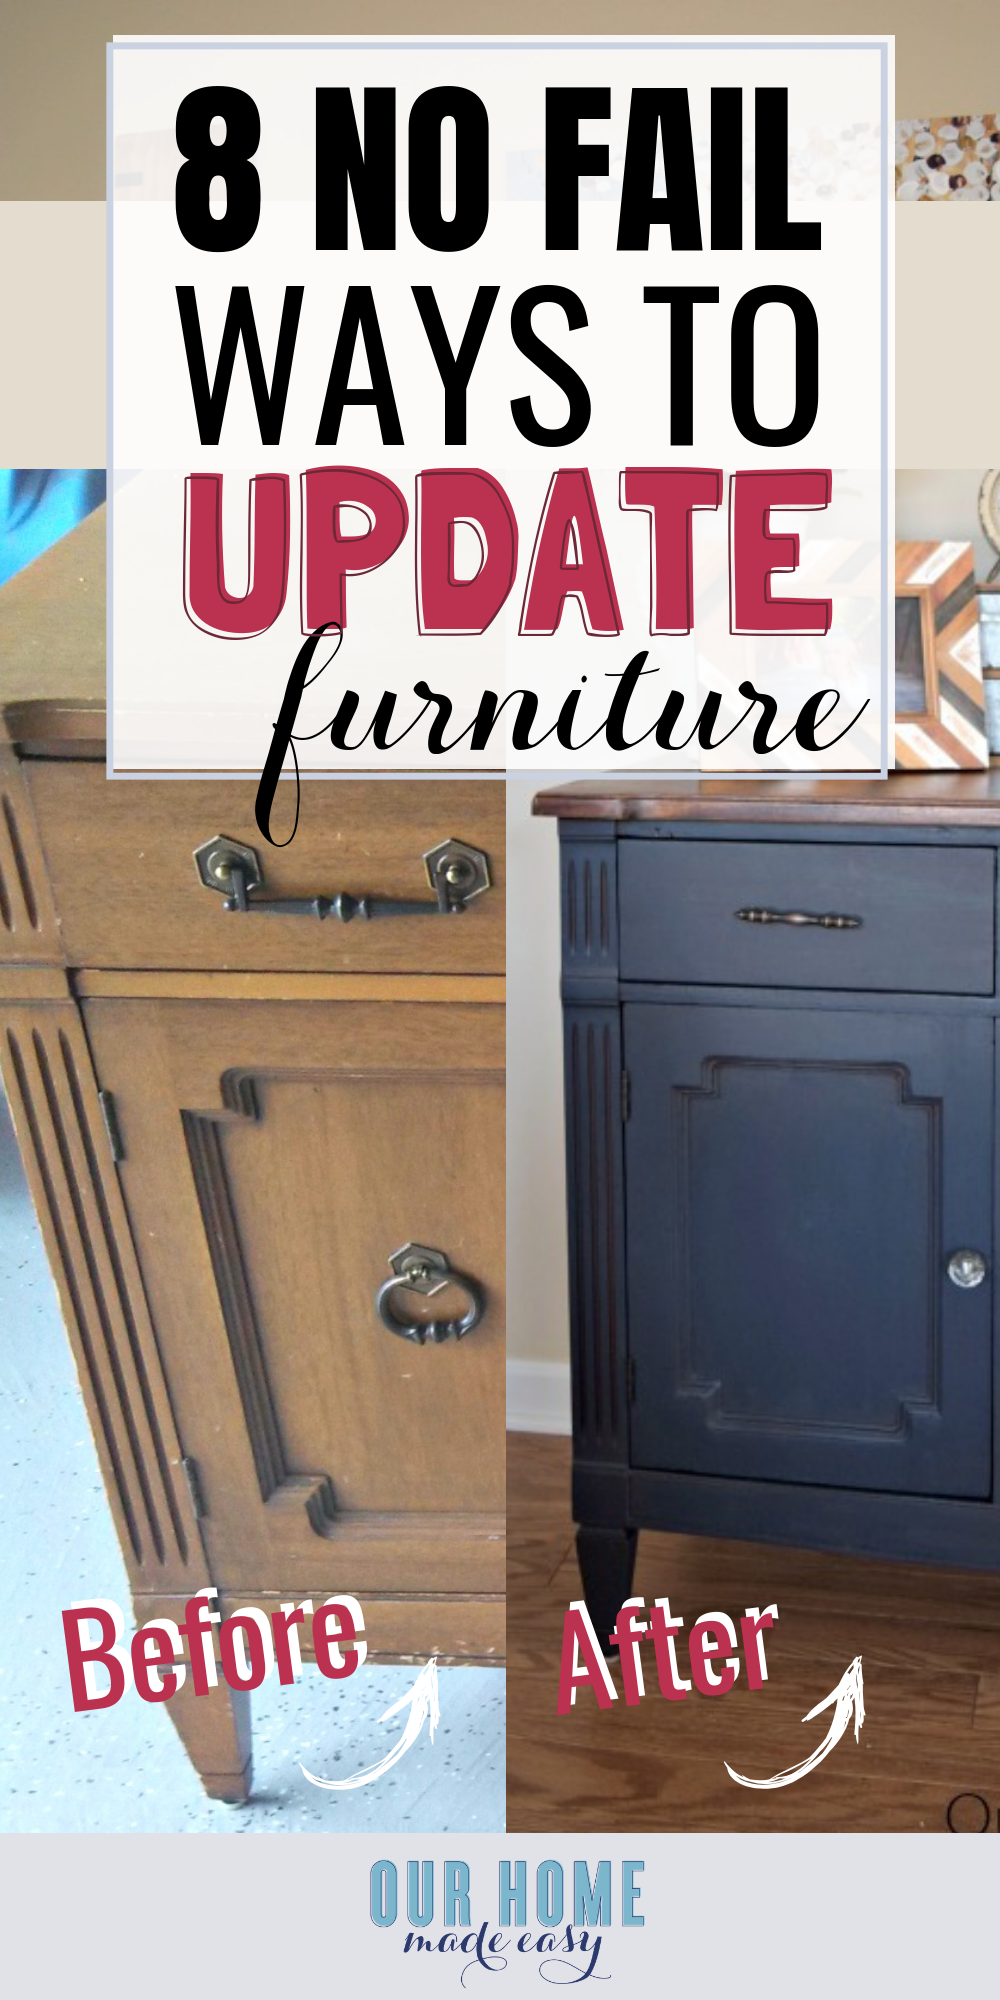
Credit: www.ourhomemadeeasy.com
Safety Tips For Diyers
Working with old furniture comes with some risks. Here’s how to stay safe:
- Always wear a mask when sanding or stripping old finishes.
- Work in a well-ventilated area.
- Keep children and pets away from your workspace.
- Dispose of old paint chips and chemicals properly.
If your piece may contain lead paint, use a test kit before you start. Wear gloves and wash hands after working, especially before eating.
Common Questions From Beginners
Many people wonder if updating antiques is “worth it. ” The answer depends on your goals. If you love the piece and want it to fit your life, it’s always worth it. If you hope to sell for a profit, be careful with big changes.
Another question: “Is it hard?” Some projects are simple, like painting or changing knobs. Others, like repairing broken legs or reupholstering a chair, take more skill. Start small if you’re new, and build your confidence.
One more tip: If you get stuck, search for online video tutorials. Many are step-by-step and easy to follow, even for beginners.
Frequently Asked Questions
How Do I Know If My Antique Furniture Is Valuable?
Look for labels, maker’s marks, or unique details under drawers or on the back. Compare your piece to similar ones online or in antique guides. If it seems rare or high-quality, get a professional appraisal before making changes.
Can I Paint Over Antique Wood?
Yes, but only after cleaning and sanding. Use a bonding primer for best results. Remember, painting can lower the value of some antiques—so think carefully before you start.
What’s The Best Way To Clean Old Hardware?
Soak metal hardware in vinegar or lemon juice for 10–20 minutes, then scrub with a toothbrush. For brass, use a paste of baking soda and lemon juice. Dry fully to prevent rust.
Should I Strip All Old Finishes Before Updating?
Not always. If the finish is in good shape, you can often paint or refinish over it. Test a small area first. If the old finish is cracked, peeling, or sticky, full removal is best.
Where Can I Find More Ideas For Updating Antique Furniture?
Browse websites like Pinterest, Instagram, and home décor blogs. Local antique shops and flea markets can also inspire you. For history and restoration tips, visit the Metropolitan Museum of Art.
Updating antique furniture is about blending the past and present. With patience, care, and creativity, you can create something that tells both your story and the piece’s history. Whether you want to restore, refinish, or completely transform, the process is a rewarding journey that brings new life to old treasures.