Turning an old dresser into a bookshelf is more than just a way to recycle furniture; it’s a creative project that gives new life to something you might otherwise throw away. For many people, a dresser is just a place to store clothes.
But with a bit of imagination, some basic tools, and careful planning, you can transform a tired dresser into a unique bookshelf that adds charm and function to any room. In this guide, you’ll learn everything you need to know—step by step—to successfully turn a dresser into a bookshelf, even if you’re a beginner with little DIY experience.
You’ll find practical advice, safety tips, common mistakes to avoid, and solutions for problems you might not expect. Whether you want to save money, create a custom look, or simply enjoy a hands-on project, this article will guide you from start to finish.
Why Turn A Dresser Into A Bookshelf?
Reusing a dresser as a bookshelf has many benefits. First, it’s eco-friendly. Instead of sending old furniture to a landfill, you’re giving it a second life. Second, it can save you money. Buying a new bookshelf can be expensive, especially for solid wood pieces. Third, a dresser bookshelf is often sturdier than cheap flat-pack options, making it perfect for heavy books.
A dresser’s deep drawers and solid frame provide a strong base for shelving. With some adjustments, you can create open shelves that are perfect for books, baskets, or decor. And because you control the design, you can customize the look and size to fit your space perfectly.
Planning Your Project
Before picking up a screwdriver, spend time planning your project. This is the stage where you can avoid many common problems and ensure you’re happy with the final result.
Assessing The Dresser
Start by looking at your dresser. Is it made of solid wood or particle board? Solid wood is best because it holds screws and nails firmly, and is easier to sand and paint. Particle board can work but is less durable and can crumble if you’re not careful. Check for signs of damage like deep scratches, broken parts, or loose joints. If the dresser is very damaged, it might not be worth the effort.
Ask yourself:
- How tall and wide is the dresser?
- Do you want a tall bookshelf, or a low, wide one?
- Are the drawers easy to remove?
- Do you want to keep any drawers as storage, or remove them all?
Measure the dresser carefully. Write down the height, width, and depth. This helps plan the size and number of shelves you’ll add later.
Gathering Materials And Tools
You don’t need a full workshop to complete this project. Most people have many of the tools already. Here’s what you’ll likely need:
- Screwdriver (manual or electric)
- Hammer
- Pry bar or flat crowbar
- Saw (hand saw or jigsaw)
- Sandpaper (medium and fine grit)
- Wood glue
- Wood screws or finishing nails
- Measuring tape
- Pencil
- Level
- Paintbrushes and rollers
- Paint or wood stain
- Protective gloves and eye protection
Optional but helpful:
- Electric sander (for faster, smoother sanding)
- Wood filler (for repairing holes or dents)
- Drill (for making new holes for shelves)
- Clamps (to hold shelves while glue dries)
You may also need new wood boards for shelves. Home improvement stores can cut boards to size for you, which saves time and effort.
Choosing The Right Design
Decide how you want the finished bookshelf to look. Some people remove all drawers and create open shelves. Others keep one or two drawers at the bottom for hidden storage. You can add extra shelves, back panels, or even decorative moldings.
Look online for inspiration and sketch your ideas before starting.
Preparing The Dresser
Preparation is key to a bookshelf that looks good and lasts. Skipping these steps often leads to problems later.
Emptying And Cleaning
Remove everything from the dresser. Take out all drawers and set them aside. Wipe down every surface with a damp cloth and mild soap. Dirt, grease, and dust can make paint or glue less effective.
Removing Drawers And Hardware
Most dresser drawers slide out easily. Pull them out as far as possible, then lift the front to release them. If they stick, use a bit of gentle force, but don’t break the frame. Remove all handles, knobs, and drawer slides using a screwdriver.
Save the hardware in case you want to reuse or repurpose it.
Inspecting The Frame
With the drawers out, check the inside of the dresser. Look for any nails, screws, or brackets that could get in the way. Remove or hammer down anything sticking out. If the frame is wobbly, reinforce it by tightening screws or adding wood glue to weak joints.
Repairing Damage
If there are holes, deep scratches, or dents, fill them with wood filler. Let it dry, then sand smooth. Loose corners or split wood can be fixed with wood glue and clamps. Take your time—solid repairs make the bookshelf safer and better-looking.
Modifying The Dresser
Now comes the main transformation. This step can be simple or complex depending on your design.
Removing Drawer Dividers
Many dressers have wooden rails or dividers between drawers. These need to be removed to create open shelves. Use a hammer and pry bar to gently pull them out. Be careful not to damage the dresser’s main frame. If the dividers are glued or nailed, work slowly.
Fill any holes left behind with wood filler.
Deciding Which Drawers To Keep
If you want to keep one or two drawers at the bottom for storage, leave the bottom section as is. This creates a combination bookshelf with a hidden storage area, which is useful for small spaces.
Cutting And Installing Shelves
Measure the inside width and depth where you want to add shelves. Use these measurements to buy or cut new wood boards. Plywood is a popular choice because it’s strong and affordable. For a more upscale look, use hardwood boards.
Here’s a comparison of common shelf materials:
| Material | Pros | Cons |
|---|---|---|
| Plywood | Strong, low cost, easy to paint | Visible edges, needs finishing |
| Solid wood | Attractive grain, very sturdy | More expensive, can warp |
| Particle board | Cheapest, smooth surface | Weak, not for heavy books |
Decide how many shelves you want. Most bookshelves have 10-12 inches between each shelf, but you can adjust for tall books or baskets. Mark shelf positions with a pencil and use a level to keep them straight.
You can attach shelves two main ways:
- Fixed shelves: Screw or nail them directly into the dresser sides. Strongest option but not adjustable.
- Adjustable shelves: Drill small holes at regular intervals and use shelf pins. More flexible, but takes extra time and tools.
Apply wood glue to the shelf edges before attaching, then secure with screws or nails. Wipe away glue that squeezes out. If using nails, set them below the surface and fill with wood filler.
Adding A Back Panel
Some dressers have thin or missing back panels. Adding a sturdy back (like 1/4-inch plywood) strengthens the bookshelf and keeps books from falling out. Cut the panel to size and attach with small nails or a staple gun.
Sanding And Finishing
A smooth finish makes your bookshelf look professional and helps paint or stain stick better.
Sanding Surfaces
Start with medium-grit sandpaper to remove old paint, varnish, or rough spots. Sand in the direction of the wood grain. Switch to fine-grit paper for a silky smooth finish. Don’t forget the shelf edges and corners.
Wipe away all dust with a damp cloth or tack cloth before moving to the next step.
Painting Or Staining
Now you can choose the final look. Paint gives a modern, colorful finish, while stain shows off the wood’s natural beauty. Here’s how they compare:
| Finish Type | Best For | Pros | Cons |
|---|---|---|---|
| Paint | Modern, bold looks | Hides flaws, many colors | Covers wood grain |
| Stain | Classic, natural wood | Shows grain, warm look | Harder to change color later |
If painting, use a primer first. This helps the paint stick and cover old finishes. For both paint and stain, apply thin coats and let each dry completely. Sand lightly between coats for the best result. Finish with a clear sealer for protection, especially if the bookshelf will get heavy use.
Reattaching Hardware (optional)
If you kept any drawers, now is the time to reattach handles or knobs. You can also buy new hardware for a fresh look. For open shelves, consider adding decorative corner brackets or trim.
Assembly And Final Touches
Your bookshelf is taking shape. A few final steps will give it a polished, professional finish.
Securing The Bookshelf
If your bookshelf is tall or narrow, it can tip over. Anchor it to the wall for safety, especially in homes with children or pets. Most hardware stores sell anti-tip kits. Follow the instructions carefully.
Adding Shelf Liners Or Mats
Shelf liners protect the wood from scratches and make it easier to clean. Choose non-slip liners for extra safety, especially for heavy books.
Decorating The Bookshelf
Think about how you want to use your new bookshelf. Arrange books by color or size, add baskets for hidden storage, or display art and plants. This is your chance to express your style.
A few creative ideas:
- Use leftover drawer fronts as wall-mounted shelves.
- Add lighting under shelves for extra flair.
- Attach hooks to the sides for hanging bags or headphones.
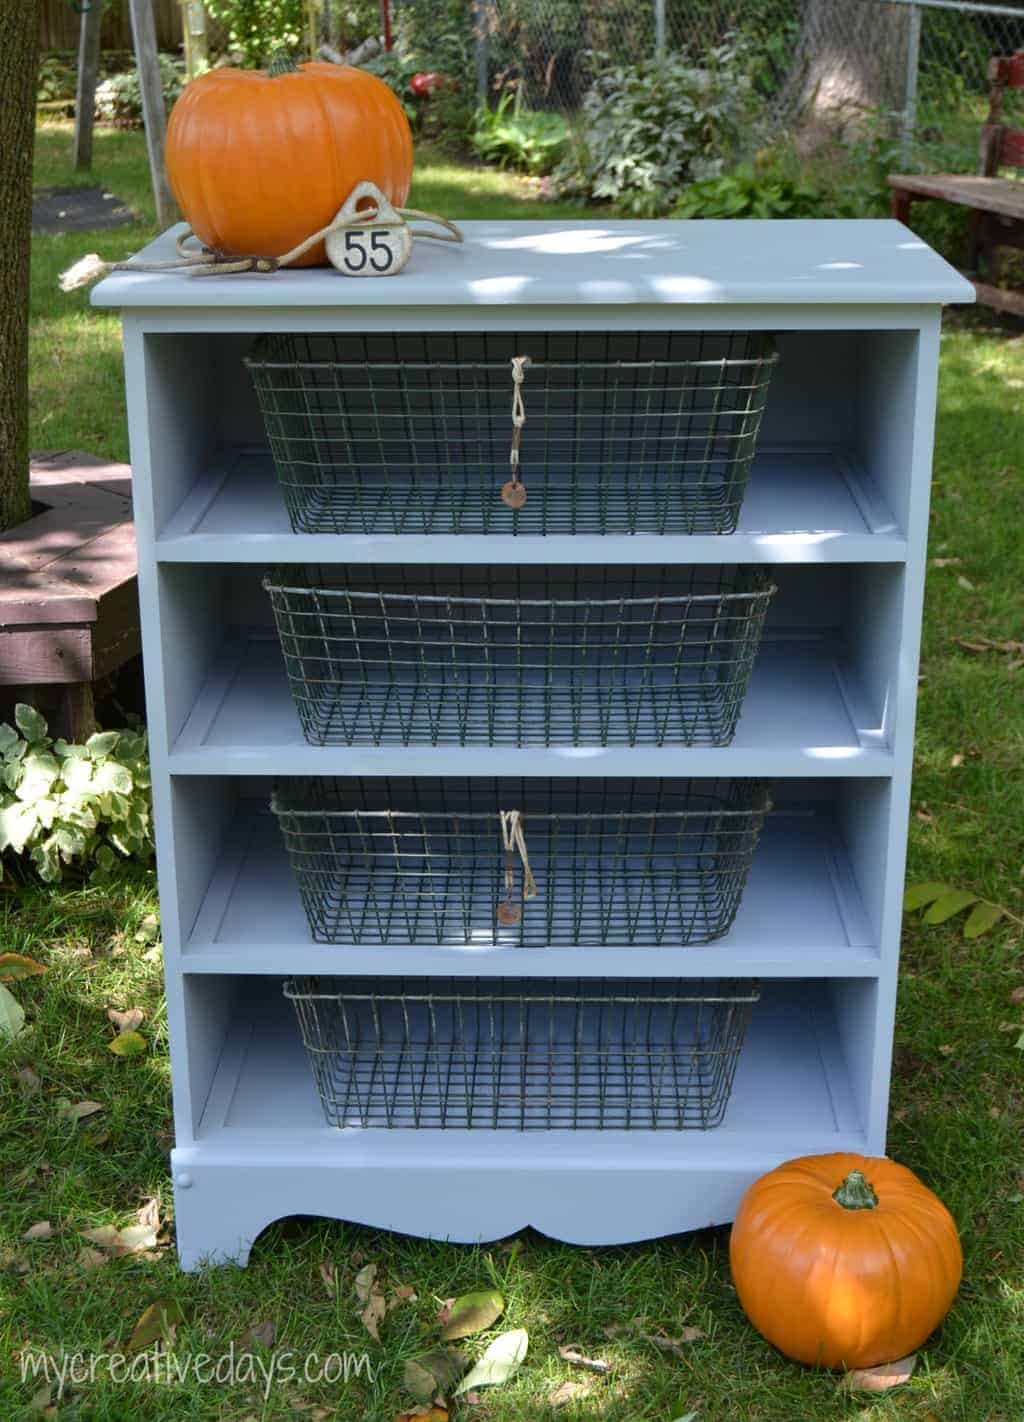
Credit: www.mycreativedays.com
Common Mistakes And How To Avoid Them
Even experienced DIYers make mistakes. Here are some common problems and how to prevent them.
Not Measuring Carefully
One of the easiest mistakes is cutting shelves the wrong size. Always measure twice, cut once. Write down every measurement, and double-check before buying wood.
Skipping Repairs
Ignoring loose joints or cracks can lead to a wobbly bookshelf. Take time to fix all damage before adding shelves or paint.
Rushing The Finish
Paint or stain needs time to dry between coats. Rushing leads to drips, uneven color, or sticky surfaces. Be patient for the best results.
Overloading Shelves
If you use thin or weak wood, shelves can sag or break under heavy books. Stick to strong materials and don’t exceed safe weight limits.
Forgetting Safety
Always wear eye protection and gloves when cutting or sanding wood. Anchor tall bookshelves to the wall to prevent accidents.
Creative Variations And Upgrades
Once you master the basics, you can add extra features to make your bookshelf truly unique.
Open Vs. Closed Backs
An open-back bookshelf feels light and airy, but a closed back is stronger and keeps books from falling out. You can even add a decorative panel, like beadboard or wallpaper, for extra style.
Built-in Lighting
LED strip lights or puck lights can be installed under shelves for a cozy glow. This is especially useful if the bookshelf sits in a dark corner.
Rolling Casters
Add wheels to the bottom of your bookshelf for easy movement. This is a smart idea if you like to rearrange your space often.
Door Fronts
Install glass doors to keep dust off books, or use chicken wire for a farmhouse look. Hinges and simple frames make this a weekend upgrade.
Decorative Molding
Adding crown molding or trim around the top and sides gives your bookshelf a finished, custom-built look.

Credit: redouxinteriors.com
What To Do With Leftover Drawers
Don’t throw away the dresser drawers! They have many potential uses:
- Under-bed storage: Add wheels and slide them under your bed for extra storage.
- Wall shelves: Mount drawer bottoms to the wall for unique shadow boxes.
- Planters: Line with plastic and use as outdoor planters.
- Toy bins: Perfect for organizing children’s rooms.
- Craft supply boxes: Keep art or sewing materials neatly stored.
Repurposing drawers means less waste and more creative storage.
Real-life Examples
Many people have turned old dressers into bookshelves with impressive results. Here are a few examples:
- Sarah, a teacher, transformed a three-drawer dresser into a colorful classroom bookshelf by painting it bright blue and adding extra shelves for picture books.
- Mark, a college student, kept the bottom drawer for hidden snacks and used the upper space for textbooks, adding a corkboard on the side for notes.
- The Martinez family converted a double-wide dresser into a living room bookshelf by removing all drawers, installing adjustable shelves, and staining the wood a rich walnut color.
These stories show that with creativity and effort, anyone can create a unique piece that fits their needs.
How Turning A Dresser Into A Bookshelf Compares To Buying New
You might wonder if all this work is worth it compared to buying a new bookshelf. Here’s a side-by-side look:
| Feature | DIY Dresser Bookshelf | Store-Bought Bookshelf |
|---|---|---|
| Cost | Often under $50 (if you own the dresser) | $50–$300+ |
| Customization | High—paint, stain, shelf placement, size | Limited to available designs |
| Durability | Usually strong (solid wood) | Varies; many are particle board |
| Eco-Friendliness | Reuses materials, less waste | New materials, more packaging |
| Time Required | Several hours to a weekend | Ready to use |
As you can see, turning a dresser into a bookshelf is a cost-effective, customizable, and eco-friendly option, but it does require time and effort.
Tips For Success
Here are two non-obvious insights that can make your project much smoother:
- Test-fit shelves before final installation: Place shelves in the dresser without glue or screws first. This helps catch any fit problems before you commit.
- Label each piece as you remove it: Write a small number or letter on each part and where it came from. This makes reassembly much easier, especially if you take a break or work over several days.
Another tip: If you’re not sure about your design, start with a less visible piece of furniture. Practice makes perfect, and small mistakes are less stressful on a “practice” project.
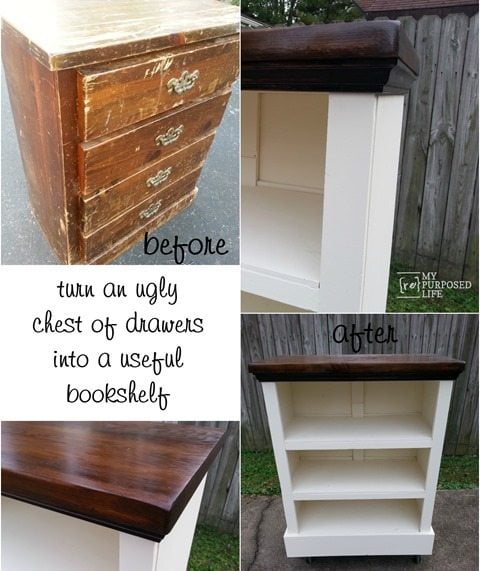
Credit: www.myrepurposedlife.com
Where To Find Inspiration And Help
If you’re stuck for ideas, check sites like Pinterest, Instagram, and YouTube for photos and how-to videos. Many DIYers share their successes and failures, so you can learn from their experience.
For technical questions—like the best screws to use or how to drill shelf pin holes—visit community forums or ask at your local hardware store. Many employees are happy to share advice.
For a deeper dive into upcycling projects, you can check resources like the Wikipedia Upcycling page, which explains the environmental and creative benefits of repurposing furniture.
Frequently Asked Questions
How Long Does It Take To Turn A Dresser Into A Bookshelf?
The project usually takes a full weekend for beginners. The time depends on the size of the dresser, your design, and how much repair or painting is needed. Simple versions with just shelf installation can be done in a day, but painting or staining adds drying time.
What Kind Of Dresser Works Best For This Project?
Solid wood dressers are the best choice because they are sturdy and easy to repair. Avoid dressers made of particle board if you plan to hold heavy books. Tall, narrow dressers make great vertical bookshelves; wide, low dressers are good for media centers or children’s rooms.
Do I Need Power Tools, Or Can I Do This By Hand?
You can complete this project with hand tools, but power tools like an electric sander and drill make it faster and easier. If you don’t own them, consider borrowing from a friend or renting from a hardware store.
Can I Make Adjustable Shelves?
Yes, but it takes extra work. Drill pairs of holes at regular intervals along the inside of the dresser. Use shelf pins to hold the shelves. This lets you change shelf heights as your needs change.
Is It Safe To Use A Dresser Bookshelf For Children’s Rooms?
Yes, if you take safety steps. Always anchor tall bookshelves to the wall to prevent tipping. Avoid sharp corners, and use non-toxic paint or finishes. Keep heavy books on lower shelves and lighter items up high.
Turning a dresser into a bookshelf is a rewarding project that saves money, helps the environment, and gives you a custom piece of furniture you can be proud of. With patience and creativity, you can turn even the most ordinary dresser into a bookshelf that’s both beautiful and useful.