Spraying polyurethane can turn an average woodworking project into a professional-looking piece. A smooth, even finish not only looks great but also protects the surface from moisture, scratches, and everyday wear. While brushing polyurethane is common, spraying offers a flawless result that is hard to match with a brush.
Still, many people hesitate to try spraying because the process seems complicated or messy. In reality, with the right tools, technique, and preparation, anyone can achieve a glass-like finish. This guide will walk you through every step, from choosing the right product to solving common problems, so you can spray polyurethane with confidence.
Understanding Polyurethane
Polyurethane is a clear finish used to protect wood. It comes in two main types: oil-based and water-based. Oil-based polyurethane gives a warm, amber tone to wood and is very durable. It takes longer to dry and has a strong smell. Water-based polyurethane dries faster, has less odor, and stays clear without yellowing over time. Both types can be sprayed, but they have different thinning and cleanup requirements.
Polyurethane forms a hard, protective layer. This layer resists water, chemicals, and abrasion. It’s used on furniture, floors, cabinets, and other wood projects. Because of its toughness and beauty, polyurethane is a top choice for woodworkers.
Some people think polyurethane is all the same, but formulas differ. Fast-drying versions, high-build types, and products made for spraying are all available. Choosing the right product is the first step toward success.
Choosing The Right Polyurethane For Spraying
Not all polyurethane is ideal for spraying. Here’s what to consider when picking your finish:
- Spray-formulated Polyurethane – Some brands make polyurethane designed for spraying. These are already thinned to flow well through a spray gun. They reduce clogging and give a smoother finish.
- Oil-Based vs. Water-Based – Oil-based polyurethane is more forgiving for beginners, but it smells strong and takes longer to dry. Water-based polyurethane dries fast and cleans up with water, making it more convenient for indoor use.
- Sheen Level – Polyurethane comes in gloss, semi-gloss, satin, and matte. Gloss is very shiny, while matte has almost no shine. Your choice depends on the look you want.
- Drying Time – If you need to finish a project quickly, water-based polyurethane is best. It can be recoated in 2 hours, compared to 6-8 hours for oil-based.
- Brand and Quality – Not all products are equal. Minwax, Varathane, and General Finishes are popular brands known for quality.
Here’s a quick comparison of key polyurethane features:
| Type | Dry Time (Touch) | Odor Level | Color Change | Cleanup |
|---|---|---|---|---|
| Oil-Based | 4-8 hours | Strong | Amber tint | Mineral spirits |
| Water-Based | 1-2 hours | Low | Clear | Soap & water |
| Spray Polyurethane | 30 min – 2 hours | Low to moderate | Usually clear | Depends on base |
Many beginners miss that oil-based polyurethane darkens wood, while water-based keeps it light. Also, not all polyurethane labeled “spray” is high quality—check reviews and technical data.
Essential Tools And Equipment
Spraying polyurethane requires more than just the finish. Having the right tools makes the process easier and improves results. Here’s what you need:
- Spray Gun or Sprayer – You can use a HVLP sprayer (high-volume, low-pressure), an airless sprayer, or a compressed air spray gun. HVLP sprayers are most popular for woodworking because they produce less overspray and waste.
- Air Compressor – If your spray gun is pneumatic, you’ll need an air compressor with enough power. Check the CFM (cubic feet per minute) requirements for your gun.
- Personal Protective Equipment (PPE) – Always wear a respirator mask, safety glasses, and gloves. Polyurethane fumes are harmful.
- Strainers – Strain polyurethane before spraying to remove lumps or skin. Even new cans can have debris.
- Mixing Containers – Use clean, solvent-resistant containers to mix and thin your polyurethane.
- Thinner – Some polyurethanes need to be thinned before spraying. Use mineral spirits for oil-based, water for water-based. Check the label for recommendations.
- Stir Sticks – Mix the polyurethane thoroughly before spraying.
- Drop Cloths and Plastic Sheeting – Protect your workspace from overspray.
- Tack Cloths – Remove dust from your project before spraying.
- Cleaning Supplies – Have rags, brushes, or spray gun cleaner ready for cleanup.
- Test Boards – Always test your spray setup on scrap wood before spraying the real project.
Many beginners skip the strainer, but even a small lump can clog your sprayer. Also, don’t forget PPE—polyurethane vapors can irritate eyes and lungs.
Preparing The Workspace
A clean, organized workspace is key for spraying polyurethane. Dust, insects, and poor ventilation can ruin your finish. Here’s how to get ready:
- Ventilation – Spray in a well-ventilated area. Open windows, use fans, or spray outdoors if weather allows. Avoid spraying in high humidity or direct sunlight.
- Dust Control – Clean the area thoroughly. Sweep floors, wipe down surfaces, and let dust settle before spraying. Some people lightly mist the floor with water to trap dust.
- Temperature and Humidity – Ideal temperature is 65–75°F (18–24°C). High humidity slows drying and can cause a cloudy finish. Use a hygrometer to check conditions.
- Lighting – Good lighting lets you see if the finish is even. Use bright, white lights or work near windows during the day.
- Safety – Remove flammable materials. Keep a fire extinguisher nearby, especially with oil-based products.
- Surface Protection – Lay down drop cloths or plastic to catch overspray.
A common mistake is spraying in a garage with the door open on a windy day. Wind blows dust and debris onto your wet finish, ruining your work.

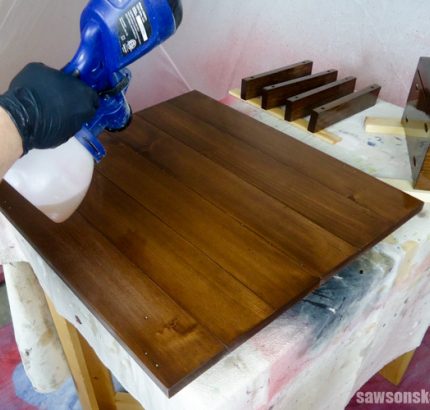
Credit: sawsonskates.com
Surface Preparation: The Key To A Smooth Finish
Spraying polyurethane on a poorly prepared surface leads to disappointment. Proper prep makes the finish look like glass. Follow these steps:
- Sand the Wood – Start with 120-grit sandpaper. Move up to 180 or 220-grit for the final pass. Sand with the grain, not against it.
- Remove Dust – After sanding, vacuum the surface, then wipe with a tack cloth to remove fine dust.
- Fill Holes and Imperfections – Use wood filler for dents and cracks. Sand flush after it dries.
- Clean Again – Even fingerprints or oils can affect the finish. Wipe with a damp cloth, then let dry.
- Test for Compatibility – If the wood has stain or dye, test a small area with your polyurethane. Some stains react badly with water-based finishes.
- Seal Soft Woods (Optional) – For pine or soft woods, consider a sanding sealer. This prevents uneven absorption.
Many people skip the tack cloth, but even tiny dust specks can show under clear polyurethane. Also, sanding too rough (e. g. , 80-grit) leaves scratches that the finish highlights.
Thinning Polyurethane For Spraying
Most polyurethane is too thick to spray right from the can. Thinning helps it flow smoothly and prevents orange peel (bumpy texture). Here’s how to thin it correctly:
Oil-based Polyurethane
- Thin with mineral spirits.
- Start by adding 10% thinner (e.g., 9 parts poly to 1 part mineral spirits). For HVLP sprayers, you may need up to 20%.
- Mix thoroughly. If it sprays unevenly, add a bit more thinner.
- Never use water to thin oil-based polyurethane.
Water-based Polyurethane
- Thin with distilled water.
- Add 5–10% water and mix well.
- Too much water can weaken the finish, so don’t exceed 20%.
Pre-thinned Spray Polyurethane
Some products are labeled “ready to spray” and don’t need thinning. Always read the manufacturer’s instructions.
A useful tip: strain the finish after thinning to catch any lumps. Beginners often forget this, leading to clogged spray guns.
Setting Up The Sprayer
Proper sprayer setup is critical for a smooth finish. Each tool is a bit different, but these steps cover most situations:
- Assemble the Sprayer – Follow the manual for your specific model.
- Choose the Right Nozzle Size – For polyurethane, a 1.3–1.5 mm nozzle works well for HVLP guns. Too small and it clogs; too large and you get runs.
- Adjust Air Pressure – Start with 20–25 psi for HVLP. Too much pressure wastes finish and causes overspray.
- Strain the Finish – Pour the thinned polyurethane through a paint strainer into the sprayer’s cup.
- Test Spray Pattern – Use scrap wood or cardboard. Adjust fluid and air controls until you get a fine, even mist.
- Practice Spraying – Try a few passes before starting on your project. Check for runs, dry spray, or uneven coverage.
If your sprayer spits or sprays blobs, it’s often because the finish is too thick or the nozzle is dirty. Always clean the gun before and after use.
Spraying Technique: Step-by-step
Great spraying is all about technique. Here’s how to apply polyurethane like a pro:
- Hold the Gun Properly – Keep the sprayer 6–10 inches from the surface. Hold it perpendicular—don’t angle it.
- Move Steadily – Start moving the gun before pulling the trigger. Keep a steady, even pace. Don’t stop in one spot or you’ll get runs.
- Overlap Passes – Each pass should overlap the previous by 50%. This ensures even coverage.
- Release Trigger After Each Pass – Stop spraying at the end of each stroke, then start again for the next pass.
- Thin Coats – Apply several light coats instead of one heavy coat. Thick layers run and take longer to dry.
- Watch for Sags and Runs – If you see a run, tilt the piece or use a brush to smooth it out quickly.
- Change Angles for Details – For edges or corners, adjust your wrist to keep the spray even.
- Let Each Coat Dry – Follow the label for drying times. Water-based dries in 1–2 hours; oil-based needs 6–8 hours or more.
- Sand Between Coats – After each coat dries, sand lightly with 320-grit paper to remove dust nibs and help adhesion. Clean off dust before the next coat.
- Repeat for 2–4 Coats – Most projects need at least two coats. For tabletops or floors, three or four coats give best protection.
Spraying too close causes runs; too far causes rough, dry spray. Practice on scrap wood first to find the right distance and speed.
Here’s a quick reference for spraying distances and drying times:
| Sprayer Type | Ideal Distance | Typical Dry Time (per coat) |
|---|---|---|
| HVLP | 6–8 inches | 1–2 hours (water-based) |
| Airless | 10–12 inches | 1–2 hours (water-based) |
| Aerosol Can | 8–12 inches | 30 min – 1 hour |

Credit: www.amazon.com
Safety Precautions When Spraying Polyurethane
Polyurethane contains chemicals that can harm your health if you’re not careful. Here’s how to protect yourself:
- Wear a Respirator – Not just a dust mask. Use a respirator rated for organic vapors.
- Ventilate the Area – Open windows and use fans to move fumes outside.
- Wear Gloves and Eye Protection – Prevents skin and eye irritation.
- Avoid Sparks and Flames – Oil-based polyurethane is flammable.
- Read the Label – Some products need special handling.
- Store Leftovers Safely – Keep polyurethane in sealed containers away from kids and pets.
Never spray near a water heater, pilot light, or open flame. Fumes can ignite even if you don’t see a spark.
Troubleshooting Common Spraying Problems
Even experienced woodworkers run into problems when spraying polyurethane. Here’s how to solve the most frequent issues:
Orange Peel Texture
This is a bumpy, dimpled surface that looks like an orange’s skin. Causes:
- Finish too thick: Thin with more solvent.
- Spraying too far from surface: Move closer.
- Air pressure too low: Increase psi on your sprayer.
Runs And Sags
Long drips or thick areas. Causes:
- Spraying too close: Back up a few inches.
- Moving too slowly: Speed up your passes.
- Coat too heavy: Apply lighter coats.
Dust Or Bubbles
Dust nibs or tiny bubbles in the finish. Causes:
- Dirty workspace: Clean before spraying.
- High humidity: Wait for drier weather or use a dehumidifier.
- Shaking the can: Stir gently instead.
Clogged Spray Gun
Finish won’t spray, or comes out in spurts. Causes:
- Unstrained finish: Always strain before filling the gun.
- Dried polyurethane in nozzle: Clean gun after each use.
Cloudy Or Blushed Finish
Milky or hazy look, often with water-based polyurethane. Causes:
- High humidity: Wait for better conditions.
- Too many coats too quickly: Let each layer dry fully.
One insight many miss: sometimes problems come from the wood, not the spray. For example, oily woods like teak need special prep, or the finish won’t stick.
Cleaning Up After Spraying
Cleaning your tools and workspace is as important as the spraying itself. Here’s how to do it right:
- Clean the Spray Gun Immediately – Don’t let polyurethane dry inside. Flush with the recommended solvent (mineral spirits for oil-based, water for water-based).
- Disassemble and Scrub – Remove the nozzle, needle, and cup. Use a brush to clean every part.
- Wipe Down Surfaces – Clean up overspray with the same solvent used for thinning.
- Dispose of Waste Properly – Don’t pour solvents down the drain. Check local disposal rules.
- Store Leftover Polyurethane – Seal the can tightly. Store in a cool, dry place.
If you skip cleaning the spray gun, the next time you use it, it may not work at all. Many beginners ruin their sprayer this way.
Advanced Tips For A Professional Finish
For those who want to go beyond basics, here are expert tips for spraying polyurethane:
- Warm the Polyurethane – Placing the can in warm water (not hot) before spraying helps it flow smoother.
- Use a Fine Filter – Even after straining, a fine mesh filter removes tiny particles.
- Final Rubdown – After the last coat dries for 2 days, rub with 400-grit sandpaper or a synthetic pad for a silky finish.
- Buff with Paste Wax – For a soft sheen, apply paste wax and buff with a soft cloth.
- Mix Small Batches – Only mix what you’ll use in a session; leftover thinned polyurethane doesn’t store well.
- Maintain Humidity Control – Use a dehumidifier in your spray room if you live in a damp climate.
One advanced trick: use a light to “rake” across the surface at a low angle. This reveals flaws that are hard to see head-on.
When To Use Aerosol Spray Polyurethane
Canned aerosol polyurethane is available at most hardware stores. While not as customizable as a spray gun, it’s useful for:
- Small Projects – Picture frames, jewelry boxes, or trim.
- Touch-ups – Fixing a small area on a larger piece.
- Difficult Shapes – Carvings or spindles where a brush won’t reach.
Aerosol cans spray a very fine mist but contain less polyurethane, so more coats are needed for durability. Shake well and spray lightly to avoid drips.
Comparing Spraying Vs. Brushing Polyurethane
Some people wonder if spraying is worth the extra setup. Here’s a side-by-side look:
| Spraying | Brushing |
|---|---|
| Very smooth finish, no brush marks | Possible brush marks and streaks |
| Faster for large or detailed surfaces | Slower; best for flat, small areas |
| More prep and cleanup needed | Less equipment needed |
| More control over thin, even coats | Easy to apply thick coats (risk of runs) |
| More waste (overspray) | Efficient use of product |
Spraying is best for large, flat items or complex shapes. Brushing works well on small, simple pieces or when you want to avoid equipment cleanup.
Common Myths About Spraying Polyurethane
A lot of advice about spraying polyurethane is outdated or wrong. Let’s clear up a few myths:
- Myth: Spraying is only for professionals. Truth: With practice and the right tools, anyone can do it.
- Myth: Water-based isn’t as durable as oil-based. Truth: Modern water-based polyurethanes are just as tough for most uses.
- Myth: You can spray any polyurethane with no thinning. Truth: Most need to be thinned for best results.
- Myth: Spraying is always faster. Truth: Setup and cleanup take time; for small projects, brushing may be quicker.
- Myth: One thick coat is enough. Truth: Multiple thin coats give a better finish and stronger protection.
Understanding these facts saves time, money, and frustration.
Frequently Asked Questions
How Many Coats Of Sprayed Polyurethane Are Needed?
Most wood projects need 2–4 thin coats of sprayed polyurethane. For high-wear surfaces like tables or floors, use three or four coats. Lightly sand between coats for best adhesion and smoothness.
Can You Spray Polyurethane Without Thinning It?
Some spray-formulated polyurethanes don’t need thinning, but most regular products do. Thinning helps prevent runs and orange peel. Check the label and test on scrap before starting your main project.
How Long Does Sprayed Polyurethane Take To Dry?
Water-based polyurethane dries in 1–2 hours per coat. Oil-based takes 6–8 hours. Drying time depends on temperature, humidity, and coat thickness. Wait until it’s not tacky before sanding or recoating.
Is Spraying Polyurethane Safe Indoors?
It can be, if you use proper ventilation and wear a respirator. Open windows, use fans, and avoid flames. Never spray in small, unventilated spaces. Always follow safety instructions on the product label.
What Is The Best Way To Avoid Dust In The Finish?
Clean the workspace well, use tack cloths, and let dust settle before spraying. Some woodworkers lightly mist the floor with water to trap dust. Sand lightly between coats to remove any dust nibs.
Spraying polyurethane takes patience and practice, but the results are worth it. With the right tools, preparation, and technique, even beginners can achieve a finish that rivals the best professionals. For more technical details on polyurethane and finishing, visit the Wikipedia page on Polyurethane.
A flawless finish is within your reach. Take your time, follow each step, and soon your woodworking projects will shine with durable, beautiful protection.
Credit: www.homeright.com