Refinishing terrazzo floors can bring back their original beauty and shine. Many people choose terrazzo for its durability and unique look, but over time, these floors can lose their luster. Cracks, dullness, and stains are common problems. The good news is, most terrazzo floors can be refinished at home with the right tools, products, and careful steps.
This guide will walk you through every stage of the process, from preparation to polishing and sealing, with practical tips to make your terrazzo floors look stunning again.
Understanding Terrazzo Floors
Terrazzo is a type of flooring made from chips of marble, quartz, granite, or glass set in cement or epoxy. After installation, the surface is ground and polished to a smooth finish. Terrazzo was popular in the mid-1900s and is found in many homes, schools, and public buildings. Its speckled appearance and toughness make it a favorite for high-traffic areas.
The beauty of terrazzo is its versatility. The chips can be arranged in different patterns and colors, letting designers create unique looks. Some terrazzo floors include borders, medallions, or custom designs. Epoxy terrazzo is more modern and often used in commercial buildings, while cement-based terrazzo is common in older homes.
However, terrazzo is not indestructible. It can become scratched, stained, or lose its shine over time. Foot traffic, moving furniture, and spills all take a toll. Refinishing is more than just cleaning; it means grinding, polishing, and sometimes repairing the floor to restore its original look.
Unlike wood floors, terrazzo can be refinished many times, making it a long-lasting investment if cared for properly.
When Should You Refinish Terrazzo Floors?
You may be wondering if your terrazzo floor really needs refinishing. Here are some signs:
- The surface looks dull and does not shine, even after cleaning.
- There are visible scratches, etches, or scuff marks.
- Chips or cracks have appeared in the surface.
- Stains do not come off with normal cleaning.
- The color looks faded or uneven.
If you see one or more of these issues, refinishing is likely needed. Regular cleaning will not bring back the original beauty of terrazzo if the surface is damaged. Professional refinishing can be expensive, so many homeowners choose to do it themselves.
Sometimes, terrazzo floors are covered by old carpets or tiles. If you’ve just uncovered terrazzo and see glue stains, holes, or deep scratches, it’s a good idea to refinish before using the floor. Even if the floor is not badly damaged, a light polish and new sealer can make it look years younger.
Another sign to watch for is how water behaves on the floor. If you pour a little water and it soaks in right away, the sealer has worn off. This leaves terrazzo open to stains and makes cleaning harder. Refinishing and sealing will protect the floor.
Tools And Materials Needed
Refinishing terrazzo floors requires some special tools and products. Here’s what you’ll need:
- Floor grinder or polisher (rent from hardware stores)
- Diamond polishing pads (various grits: 30, 50, 100, 200, 400, 800, 1500, 3000)
- Vacuum cleaner (with HEPA filter if possible)
- Mop and buckets
- PH-neutral floor cleaner
- Epoxy or cement patch kit (for filling cracks or chips)
- Putty knife or trowel
- Protective gear (gloves, goggles, dust mask)
- Sealer (penetrating or topical, made for terrazzo)
- Soft cloths or microfiber pads
If your floor has deep stains or old wax, you may also need a wax stripper and a scraper.
Renting a floor grinder is usually the most cost-effective way for DIYers. Make sure you get the right pads for terrazzo, as not all diamond pads are the same. Some are made for concrete or marble and may not give the best results on terrazzo.
A HEPA vacuum is helpful because fine terrazzo dust can be hard to remove with a regular vacuum. If you don’t have one, sweep carefully and use damp cloths to catch extra dust.
When choosing a sealer, check that it is recommended for terrazzo. Some stone sealers can leave a residue or not bond well. Microfiber pads are best for applying sealer because they spread it evenly and don’t leave lint.
Step-by-step Guide To Refinishing Terrazzo Floors
Let’s break down the full process so you can get professional results at home.
1. Clear And Clean The Floor
Start by removing all furniture, rugs, and objects from the floor. Sweep or vacuum to remove loose dust and debris. Next, mop the floor with a pH-neutral cleaner and warm water. This removes dirt and any sticky residue. Do not use strong chemicals or acidic cleaners, as they can damage terrazzo.
Tip: If your terrazzo has wax build-up, use a wax remover before the next steps. Always rinse the floor thoroughly after using any chemicals.
If there are old adhesives (from carpet or tile), use a scraper or a specialized adhesive remover. Test a small area first to make sure it doesn’t damage the terrazzo. Removing all residue is important—leftover glue or wax will clog grinder pads and affect the finish.
2. Inspect And Repair Damage
Look closely for cracks, chips, or holes. These must be repaired before grinding and polishing. For small chips, use a terrazzo patch kit (epoxy or cement-based) that matches your floor’s color.
- Mix the patch compound as directed.
- Use a putty knife to fill cracks or holes.
- Smooth the surface and let it cure fully (usually 24 hours).
Larger cracks or broken sections may need professional repair. Do not rush this step; proper repairs ensure the floor will look even after polishing.
When patching, try to blend the color and size of the chips with the surrounding terrazzo. Some patch kits come with colored aggregates you can mix in. If your floor has decorative patterns, take photos and match them as closely as possible.
After repairs dry, lightly sand the patched areas with fine sandpaper to level them. This makes sure patches don’t stand out after grinding and polishing.
3. Grinding The Surface
Grinding removes the top damaged layer and evens out the floor. Rent a floor grinder with diamond pads. Start with a coarse grit (30 or 50) for deep scratches or stains.
- Attach the pad and add water to the floor (wet grinding reduces dust).
- Move the grinder in slow, overlapping passes.
- Vacuum up the slurry (wet dust) after each pass.
- Repeat with finer grits: 100, 200, and 400.
Each pass should remove scratches from the previous grit. Grinding too quickly or skipping grits can leave scratches. Take your time.
For corners and edges, use a hand-held grinder with matching pads. These areas are easy to miss but will look dull if skipped. Change the grinding direction between passes to catch all scratches. It’s helpful to mark your progress on the floor with chalk lines.
Grinding is noisy and takes patience. If you have never used a floor grinder, practice in a closet or hidden area. Always keep the pads wet and check them often for wear.
4. Polishing For Shine
After grinding, the floor will look smooth but dull. Polishing restores the shine. Switch to finer diamond pads (800, 1500, and 3000 grit).
- Continue wet polishing with each pad in order.
- Clean up between grits to avoid scratches.
The higher the grit, the more gloss you’ll see. For a high-gloss finish, use a terrazzo polishing compound with a buffing pad at the end.
Take your time with the final polishing steps. Rushing here can leave swirl marks or uneven shine. Use a microfiber cloth to check the gloss level as you go. If you see hazy areas, repeat the last pad.
For a satin or matte finish, stop at a lower grit. If you want a very reflective surface, use a polishing powder or cream designed for terrazzo. These products react with the stone to bring out extra luster.
5. Cleaning Up
After polishing, remove all dust and slurry with a wet vacuum or mop. Let the floor dry completely. Any remaining debris can get trapped under sealer and ruin the finish.
Use several clean mops and buckets to avoid spreading fine dust. For best results, wipe the floor with a damp microfiber pad after vacuuming. Make sure the room is well-ventilated so the floor dries quickly and evenly.
Check the floor under bright light to be sure all residue is gone. Even a thin film can affect how the sealer bonds.
6. Sealing The Floor
Sealing is essential. It protects the terrazzo from stains and makes cleaning easier. There are two main types of sealers:
- Penetrating sealers: Soak into the floor, do not change the look, and offer good stain resistance.
- Topical sealers: Form a thin layer on top, adding extra shine but may need more maintenance.
Apply sealer as directed (usually with a mop or soft cloth). Avoid heavy coats—thin, even layers work best. Let the sealer dry fully (often 24 hours) before walking on the floor.
Table: Types of Terrazzo Sealers and Their Features
| Type | Appearance | Protection Level | Maintenance |
|---|---|---|---|
| Penetrating | Natural look | Good (stain resistant) | Low |
| Topical | Glossy or satin | Excellent (surface barrier) | May need reapplication |
For most homes, a penetrating sealer is best. It doesn’t change the look and offers easy cleaning. Topical sealers give more shine but can show scratches faster. If you want a “wet look,” choose a high-quality topical sealer and follow the label closely.
Some terrazzo floors need two coats of sealer. Wait for the first coat to dry, then apply a second thin coat. Test the floor in a corner before sealing the whole space.
7. Final Buffing (optional)
For extra shine, buff the dry, sealed floor with a high-speed buffer and a soft pad. This is optional but gives a mirror-like finish.
Important: Wait at least 48 hours before replacing furniture or rugs. Heavy items can damage fresh sealer.
Buffing can also remove any streaks left from sealer application. Use a clean pad and move the buffer slowly. Check often for pad buildup—replace pads if they get sticky.
If you use rugs, pick ones with breathable backings. Plastic or rubber mats can trap moisture and damage the finish.
Common Problems And Solutions
Refinishing terrazzo can sometimes reveal issues you didn’t expect. Here’s how to handle common challenges:
Deep Stains That Don’t Come Out
Some stains (like rust or oil) may go deeper than surface grinding can reach. In these cases, try a poultice made for terrazzo or consult a professional. Never use bleach or acids.
Poultices are special pastes that draw out stains. Apply according to the manufacturer’s instructions and cover with plastic. After a day or two, remove and check the result. Sometimes, several applications are needed.
Uneven Color
If parts of your terrazzo look darker or lighter, it may be due to old repairs, moisture, or uneven grinding. Consistent grinding and sealing can help, but very old floors may have color differences that are hard to remove.
In some cases, uneven color is a sign of moisture under the floor. Use a moisture meter or the plastic sheet test mentioned earlier. If you find moisture, address it before sealing.
Chips And Pits After Grinding
Sometimes, small pits appear after grinding. Use a terrazzo repair kit to fill them, then polish again with a fine pad for a smooth finish.
For tiny holes, a cement-based grout can be used. Wipe away extra grout with a damp sponge before it dries. Always let repairs cure completely before polishing.
Sealer Problems
If the floor looks cloudy after sealing, it might be from applying too much sealer or not letting layers dry. Remove excess with a damp cloth and buff again.
If problems persist, you may need to strip the sealer and start over. Always read the sealer label for correct drying times and application tips.
How Long Does Refinishing Take?
Refinishing a terrazzo floor usually takes 2-3 days for a typical room (about 200-300 square feet):
- Cleaning and repairs: 1 day
- Grinding and polishing: 1 day
- Sealing and curing: 1 day
Add more time if there are major repairs or multiple rooms. Most of the work is in the preparation and waiting for products to dry.
Larger spaces or floors with heavy damage may take longer, especially if you need to move furniture back and forth. It’s best to plan for a weekend or more if you are working alone.
Credit: www.turningithome.com
Cost Of Diy Vs. Professional Refinishing
Many homeowners refinish terrazzo floors themselves to save money. Here’s a quick comparison:
| Option | Cost per 200 sq ft | Time Needed | Skill Required |
|---|---|---|---|
| DIY | $300 – $700 | 2-3 days | Moderate |
| Professional | $1,000 – $3,000 | 1-2 days | None |
DIY is more affordable but takes time and effort. Renting equipment and buying supplies is cheaper than hiring a pro, but mistakes can be costly. Professional refinishers have experience with repairs and can handle unexpected problems.
Pro Tip: If your floor has major cracks or historic value, consider getting professional advice before starting.
Many professionals also offer warranties. If you’re worried about long-term results or have a large area, this can be worth the extra cost. DIY is best for handy homeowners with patience and time to learn.
Maintenance After Refinishing
To keep your terrazzo looking beautiful after refinishing, follow these steps:
- Clean with a pH-neutral cleaner regularly.
- Avoid abrasive pads and harsh chemicals.
- Wipe up spills quickly to prevent stains.
- Reseal the floor every 1-3 years, depending on traffic and sealer type.
- Use rugs in high-traffic areas and felt pads under furniture.
Table: Common Maintenance Tasks and Frequency
| Task | How Often | Why |
|---|---|---|
| Sweep or vacuum | Daily | Remove grit that can scratch |
| Mop with pH-neutral cleaner | Weekly | Remove dirt and keep shine |
| Reseal | 1-3 years | Protect from stains and wear |
Avoid using steam mops or high-pressure cleaners. These can force water into cracks and weaken the floor over time. For sticky spots, use a damp microfiber cloth with a little cleaner.
If you notice the shine fading or water soaking in faster, it’s time to reseal. This is usually much quicker than a full refinish.
Two Non-obvious Insights For Beginners
Many guides miss these two important points:
- Terrazzo can hide old repairs under the surface. When you grind away the top layer, mismatched colors or patterns may appear. Always test a small area before doing the whole floor.
- Moisture matters. Terrazzo is porous, especially older cement-based types. If there’s a moisture problem in the subfloor, sealers may not bond well, leading to cloudy spots or peeling. Check for moisture by taping a plastic sheet to the floor overnight—if water appears underneath, fix the moisture issue first.
A third insight is that temperature and humidity affect sealer drying times. If you work in a humid or cold room, drying can take longer. Always follow the manufacturer’s recommendations, and don’t rush the process.
Mistakes To Avoid
- Skipping grits during grinding. It’s tempting to jump to fine pads, but this leaves scratches.
- Using acidic or bleach-based cleaners. These will etch and dull terrazzo.
- Applying thick layers of sealer. This leads to a cloudy, uneven finish.
- Not letting repairs or sealer dry fully before the next step.
- Over-buffing with a dry pad, which can burn the surface.
Another common mistake is not protecting nearby walls and baseboards. Use painter’s tape and plastic sheeting to avoid splashes from grinders and chemicals.
Environmental And Safety Tips
Grinding terrazzo creates dust and slurry. Always wear goggles, a dust mask, and gloves. Wet grinding reduces airborne dust, but clean up all residue quickly to prevent slips. Dispose of waste properly—cement slurry can block drains.
Many modern terrazzo sealers are low-VOC (volatile organic compounds), but always ventilate the area and follow label safety instructions.
If you have pets or small children, keep them out of the work area until all products are dry and the floor is safe to walk on. Store chemicals and tools out of reach.
Can I Refinish Terrazzo Over Old Tiles Or Concrete?
Some people find terrazzo installed as a thin layer over old tiles or concrete. The process is similar, but be careful: grinding too deep may expose the subfloor or loosen the terrazzo. If you’re unsure, consult an expert.
Floors with a very thin terrazzo layer can chip or crack during grinding. Always check the thickness at a closet or edge before starting. If your terrazzo is less than 1/4 inch thick, use only light polishing.

Credit: www.reddit.com
When To Call A Professional
DIY refinishing works for most homeowners, but some situations need help:
- Large cracks or structural damage
- Very old or valuable terrazzo (historic properties)
- Floors with heavy stains or deep pitting
- Problems with moisture or improper installation
A professional can match colors, repair inlays, and use industrial tools for a perfect finish.
If your terrazzo includes unique artwork or rare stone, professionals may have access to materials and techniques not available to homeowners.
Recommended Products And Resources
When choosing supplies, look for brands made for terrazzo or natural stone. Examples include:
- Diamond polishing pads: WerkMaster, Diamabrush
- Sealers: Miracle Sealants, StoneTech
- Patch kits: Rust-Oleum Terrazzo Patch, Ardex
Always read reviews and follow the product instructions. For more detailed information, visit the Wikipedia Terrazzo page.
You can also contact local stone or tile stores for advice on products that work well with your type of terrazzo.
Credit: www.themjacompany.com
Frequently Asked Questions
How Often Should Terrazzo Floors Be Refinished?
Most terrazzo floors need full refinishing every 5-10 years, depending on foot traffic and care. High-traffic public spaces may need more frequent maintenance. Light polishing and resealing can be done more often to maintain shine.
Can I Refinish Terrazzo Without Special Machines?
Manual refinishing is possible for small areas using hand-held polishers and diamond pads, but it’s very hard work and gives uneven results on large floors. Renting a floor polisher or grinder is recommended for best results and less time.
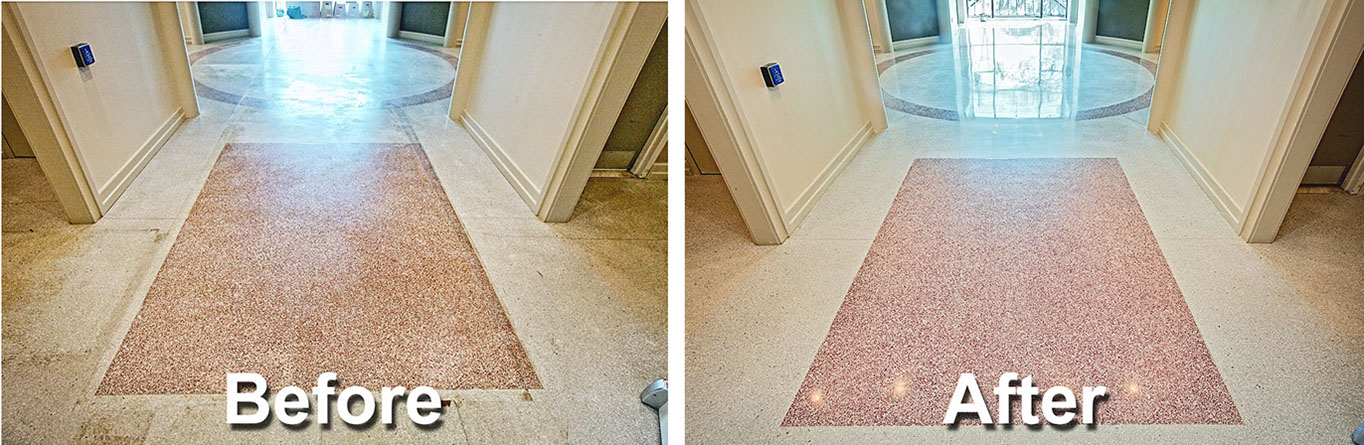
Will Refinishing Remove All Stains And Scratches?
Refinishing will remove most surface stains and scratches. Deep stains or gouges may remain, especially if they’ve penetrated the terrazzo chips or base. Some color differences or old repairs may still be visible after polishing.
Is Terrazzo Refinishing Dusty Or Messy?
Wet grinding keeps dust low, but there will still be a fine slurry to clean up. Use tarps to protect walls and doorways. Always wear protective gear. Dry grinding creates more dust and should be avoided in homes.
What’s The Difference Between Terrazzo And Marble Floors?
Terrazzo is made from many small chips (marble, glass, or stone) mixed in cement or epoxy, then polished. Marble floors are cut from solid stone slabs. Terrazzo is usually tougher and more stain-resistant, but both need regular care and proper products.
Restoring terrazzo floors can be challenging but very rewarding. With careful steps, the right tools, and patience, you can bring back the bright, elegant finish that makes terrazzo special. Whether you do it yourself or call a professional, understanding the process helps you keep your floors beautiful for years to come.