Building a cedar chest is more than just a woodworking project; it’s creating a piece of furniture that often becomes a family treasure. Many people use cedar chests for storing blankets, keepsakes, or seasonal clothing because of cedar’s natural aroma and its power to repel insects.
If you enjoy working with your hands and want to make something both useful and beautiful, learning how to make a cedar chest can be a rewarding experience. This guide walks you through every step, from planning and selecting materials to adding finishing touches that make your chest stand out.
Why Build A Cedar Chest?
There’s a special satisfaction in building something that lasts. Cedar chests are known for their durability, classic look, and protective qualities. Cedar wood naturally resists rot and insects, which is why it has been used for centuries to store valuable items. Besides its practical benefits, a homemade cedar chest lets you design the size, style, and finish to fit your needs. It can also be a thoughtful gift, often passed down through generations.
Many beginners think building a chest is too difficult or requires expensive tools. But with careful planning and patience, even someone new to woodworking can succeed. Most mistakes come from rushing or not preparing enough, so taking time at each stage is key.
Planning Your Cedar Chest Project
Before cutting any wood, it’s important to make a clear plan. This step is often skipped, but it can save you time and money later.
Choosing The Right Size
First, decide how big you want your chest. A standard cedar chest is about 48 inches long, 20 inches wide, and 20 inches tall. However, you can adjust these dimensions to fit your space or storage needs. Ask yourself:
- What will you store in the chest?
- Where will you place it?
- Do you want the chest to double as a bench?
Draw a simple sketch or use free software like SketchUp to visualize your design. This helps you spot problems before you start building.
Tools And Materials Checklist
Having the right tools and materials ready makes the process smoother. Here’s a list of the basics you’ll need:
Tools:
- Table saw or circular saw
- Miter saw
- Power drill
- Tape measure
- Wood clamps
- Orbital sander or sanding block
- Hammer or nail gun
- Chisel (for detail work)
- Safety glasses and hearing protection
Materials:
- 3/4-inch thick aromatic cedar boards (for sides, top, bottom, and ends)
- 1/4-inch cedar plywood (for the bottom panel)
- Wood glue
- 1 1/4-inch wood screws
- Hinges (piano hinge or two standard hinges)
- Lid support (to prevent slamming)
- Handles (optional)
- Wood finish or clear varnish
Buying quality cedar is important. Avoid boards with large knots or cracks, as they can weaken your chest or make assembly harder.
Budgeting And Time Planning
A standard-sized cedar chest usually needs about 18-22 board feet of cedar. Costs vary by region, but expect to spend between $180 and $350 for good quality wood. Hardware and finish add another $30–$50.
Building time depends on your skill and available tools. For beginners, plan for two weekends (about 10–12 hours total). More experienced builders may finish faster, but don’t rush—accuracy matters more than speed.
Step-by-step Guide: How To Make A Cedar Chest
This section breaks down the process into clear, manageable steps. Read all steps before starting.
Cutting The Wood
Start by measuring and marking all your pieces carefully. Double-check each measurement—this avoids waste and ensures a snug fit.
Common pieces for a 48″ x 20″ x 20″ chest:
- Two side panels: 48″ x 20″
- Two end panels: 18 1/2″ x 20″ (to fit between the side panels)
- Bottom panel: 46 1/2″ x 18 1/2″
- Lid: 48″ x 20″
Use a table saw for long, straight cuts. For best results, clamp a guide to your saw or use a fence. If you don’t own a table saw, most home centers will cut wood to your measurements for a small fee.
Non-obvious insight: Always cut the bottom panel slightly smaller than the chest’s internal size. Wood expands and contracts with humidity. A loose fit prevents splitting later.
Assembling The Frame
Lay out the side and end panels on a flat surface. Dry-fit (assemble without glue) to make sure everything lines up.
- Apply wood glue to the edges of the end panels.
- Position end panels between the side panels to create a rectangle.
- Clamp the corners tightly.
- Drill pilot holes and drive in wood screws, spacing them every 6–8 inches.
Double-check that the frame is square by measuring the diagonals—they should match. If not, adjust the clamps before the glue dries.
Pro tip: Use a carpenter’s square or measure from corner to corner. Small errors here become big problems when you add the lid.
Installing The Bottom Panel
Slide the 1/4-inch cedar plywood panel into the bottom. Some prefer to glue and screw the panel in place for extra strength, while others use a floating panel (no glue) to allow for wood movement.
- If gluing, run a thin bead of wood glue around the inside edge, then set the panel.
- Secure with small screws or brads every 6–8 inches.
Non-obvious insight: Floating panels reduce the risk of cracks, especially in dry climates.
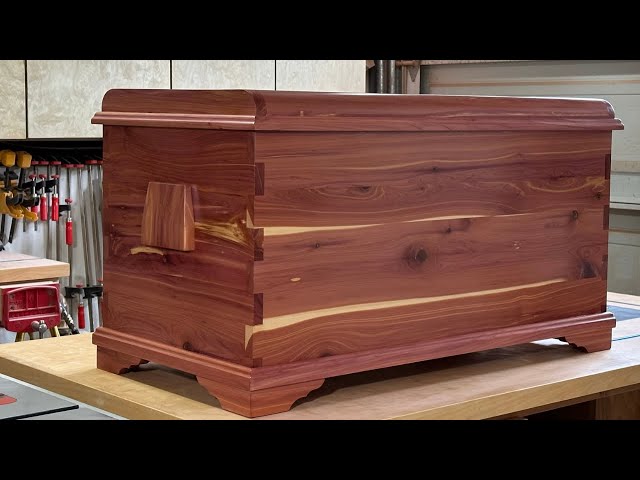
Building And Attaching The Lid
The lid is often the most visible part of the chest. For a simple design, use a single cedar board or glue several boards edge-to-edge. If you want a decorative touch, frame the lid with mitered trim.
- Glue boards together, clamp, and let dry overnight.
- Sand the surface smooth, paying attention to glue lines.
- Attach the lid using a piano hinge or two strong hinges. Pre-drill holes to prevent splitting.
If your lid is heavy, install a lid support or soft-close hinge. This protects fingers from getting pinched and prevents the lid from slamming shut.
Sanding And Surface Prep
Start with 80-grit sandpaper to smooth joints and edges. Move to finer grits (120, then 220) for a silky finish. Always sand in the direction of the wood grain. Wipe with a damp cloth to remove dust.
Round over sharp edges slightly with sandpaper or a router for a softer, safer feel.
Adding Handles And Hardware
Handles are optional but useful if you plan to move the chest often. Choose hardware that matches your style—antique brass for a classic look, or brushed nickel for something modern. Position handles at least 2–3 inches from the top to avoid stress on the lid.
Attach handles with screws from the inside, using washers to spread the load.
Finishing The Chest
Some people leave cedar unfinished to keep its scent strong. If you want a smoother feel or extra protection, use a clear, water-based varnish. Oil-based finishes can dull the aroma.
Apply finish in thin, even coats with a brush or rag. Let dry between coats, and sand lightly with 320-grit paper after each coat for a flawless surface.
Caution: Don’t finish the inside if you want to keep the cedar smell.
Letting The Chest Cure
Give your chest at least 48 hours to cure before putting anything inside. This ensures the finish (if used) is fully dry and won’t transfer to stored items.
Design Variations And Custom Touches
Building your own cedar chest means you can personalize it. Here are some ideas to make your chest unique:
Adding Decorative Trim
Use molding or edge trim to give the chest a more refined look. Simple cove or ogee molding on the lid and base can transform the style.
Carving Or Inlay Work
If you’re comfortable with hand tools, try adding simple carvings or inlaying a contrasting wood strip into the lid. Practice on scrap wood first to perfect your technique.
Upholstered Top
To use your chest as a bench, add foam and fabric to the lid. Attach with a staple gun and finish the edges with decorative nails or piping.
Feet Or Casters
Lifting the chest off the ground with wooden feet or metal casters makes it easier to clean underneath and adds visual interest. Pre-made feet can be screwed into the bottom corners.

Credit: www.mycarpentry.com
Cedar Chest Safety And Maintenance
Proper use and care will keep your cedar chest looking good for decades.
Avoiding Common Hazards
- Install a soft-close lid support to prevent sudden slams.
- Keep the chest away from direct sunlight to avoid fading.
- Use only gentle cleaners—harsh chemicals can damage the wood or remove the aroma.
Maintaining The Cedar Aroma
Over time, the cedar scent can fade. To refresh it, lightly sand the inside surfaces with fine-grit sandpaper. This exposes new wood and restores the aroma.
Non-obvious tip: Place a small dish of water inside the chest for a day if the wood seems dry. Cedar’s scent is stronger when it’s not too dry.
Protecting Contents
Don’t store plastic or rubber items directly on the wood, as they can react and stain. Use cloth bags for delicate items. Always let the finish cure fully before storing textiles to avoid odor transfer.
Troubleshooting And Fixes
Not everything always goes to plan. Here’s how to solve common cedar chest building issues:
Gaps In Joints
If you find small gaps after assembly, fill them with a mix of sawdust and wood glue. Let it dry, then sand smooth.
Lid Doesn’t Fit
Check if the chest is out of square. Loosen screws, adjust with clamps, and retighten. For small misalignments, plane or sand the lid edge until it fits.
Squeaky Hinges
Rub a small amount of paraffin wax or dry bar soap onto the hinges. Avoid using oil, as it can attract dust.
Finish Problems
If the finish looks cloudy, sand lightly and apply another thin coat. Always work in a dust-free area to avoid trapped particles.
Cedar Vs. Other Woods For Chests
How does cedar compare with other popular woods for storage chests? Here’s a quick look:
| Wood Type | Durability | Insect Resistance | Cost | Aroma |
|---|---|---|---|---|
| Cedar | High | Excellent | Medium | Strong |
| Pine | Medium | Poor | Low | None |
| Oak | Very High | Good | High | None |
| Cherry | High | Fair | High | None |
Cedar’s natural insect resistance and pleasant scent make it a top choice for storage, especially for items like blankets and clothing.
Sample Cedar Chest Project Timeline
To help you organize your work, here’s a suggested timeline for building a cedar chest:
| Day | Tasks |
|---|---|
| 1 | Buy materials, review plans, cut main panels |
| 2 | Assemble frame, glue and screw panels |
| 3 | Fit bottom panel, build and glue up lid |
| 4 | Sand, fit hinges and hardware, test lid |
| 5 | Apply finish (if desired), final assembly |
| 6–7 | Allow finish to cure, inspect, and use |
This timeline assumes you have weekends or evenings free. Adjust as needed for your own pace.
Cost Breakdown For A Cedar Chest
Knowing the costs helps you plan and avoid surprises. Here’s an average estimate for a standard chest:
| Item | Estimated Cost (USD) |
|---|---|
| Cedar Boards (18–22 board feet) | $150–$240 |
| Cedar Plywood (1/4″, 4×8′) | $30–$40 |
| Hinges and Hardware | $20–$30 |
| Lid Support | $10–$20 |
| Finish (optional) | $10–$20 |
| Total | $220–$350 |
Prices vary by location and wood quality, but this gives you a starting point.
Common Mistakes And How To Avoid Them
Many first-time builders make the same avoidable errors. Knowing these can help you succeed on your first try.
- Ignoring wood movement: Wood expands and contracts with humidity. Always leave small gaps for floating panels and never glue every surface.
- Skipping the dry-fit: Assemble your chest without glue first. This lets you check fit and make adjustments.
- Using too much glue: Excess glue can squeeze out and stain the wood, especially on visible joints.
- Not pre-drilling holes: Cedar is soft but can split easily. Pre-drill for all screws and hardware.
- Rushing the finish: Give each coat time to dry. Rushing leads to uneven surfaces and trapped dust.
A careful, patient approach produces the best results.
Advanced Features For Experienced Builders
If you’ve built basic chests before, you may want to try more advanced joinery or features:
Dovetail Joints
Dovetail joints are strong and attractive but require practice. They hold the chest together without visible screws and are often seen in high-end furniture.
Secret Compartments
Add a hidden tray or false bottom for valuables. This increases the chest’s usefulness and can be a fun surprise.
Cedar Lining In Other Chests
If you like other woods for appearance, line the inside with thin cedar panels. This gives the same aroma and protection benefits.
Cedar Chest As A Family Heirloom
A cedar chest often becomes more than just a storage box. Many families use them to store wedding dresses, old photos, or important keepsakes. Adding a personalized touch, such as a wood-burned name or date, can make the chest even more meaningful.
If you want your chest to last for generations, use strong joinery and high-quality hardware. Share your build story with your family. These details make the chest special and help its story live on.
Credit: www.youtube.com
Environmental And Ethical Sourcing Of Cedar
Cedar is a renewable resource, but it’s important to choose wood from responsible sources. Look for suppliers with certifications like FSC (Forest Stewardship Council). This helps protect forests and ensures your chest is eco-friendly.
For more about sustainable wood sourcing, see the Forest Stewardship Council.
Frequently Asked Questions
What Is The Best Type Of Cedar For A Chest?
Aromatic Eastern Red Cedar is the most popular choice because of its strong scent and insect-repelling qualities. Other types, like Western Red Cedar, work too but have a milder aroma.
Can I Build A Cedar Chest Without Power Tools?
Yes, but it takes more time and effort. Hand saws, chisels, and hand drills can do the job, but your cuts and joints may be less precise. Consider having wood pre-cut at your local lumberyard if you lack power tools.
How Do I Keep The Cedar Smell Strong Inside The Chest?
Over time, the scent fades as the wood’s surface ages. Lightly sand the inside every couple of years to refresh the aroma. Don’t finish or seal the interior, as this blocks the natural oils.
Is It Safe To Store All Types Of Fabric In A Cedar Chest?
Most natural fabrics (cotton, wool, linen) do well in cedar chests. However, some delicate items may react to cedar oils. Place a cotton sheet or muslin liner between the wood and your items for extra protection.
How Can I Move A Heavy Cedar Chest Safely?
Remove all contents first. If possible, lift the chest with two people using the handles. For very heavy chests, add felt pads or casters to the bottom to protect floors and make moving easier.
Building a cedar chest is a project that combines woodworking, creativity, and tradition. With patience and care, you’ll have a beautiful and useful piece that can be enjoyed for years—or even generations—to come.

Credit: amishhandcrafted.com