Sistering a floor joist might sound like a task only for professional carpenters, but it’s a skill many homeowners and DIY enthusiasts can learn. Floors should feel solid and safe, but over time, joists can weaken from moisture, rot, overloading, or poor construction.
A bouncy, sagging, or cracked floor is not just annoying—it can be a serious safety risk. Sistering is a practical, effective way to reinforce floor joists without rebuilding the entire structure. This article will walk you through every aspect of how to sister a floor joist, from understanding why and when it’s needed, to choosing the right materials, safety tips, common mistakes, and step-by-step instructions for a long-lasting repair.
What Is Sistering A Floor Joist?
Sistering means attaching a new joist—or a strong length of lumber—directly to an existing, weakened floor joist. The new joist is fixed alongside the old one, sharing the load and restoring strength to the floor. This technique is often used in both old homes and newer constructions where extra support is needed.
Sistering doesn’t mean replacing the original joist. Instead, you make the old and new joists work together. The process can fix issues like:
- Sagging or uneven floors
- Cracks or splits in joists
- Bounciness underfoot
- Water or termite damage
A common misconception is that sistering is a temporary fix. Done correctly, it can last as long as the original joists, especially if you address the root cause of the damage.
When And Why You Should Sister A Floor Joist
It’s important to know when sistering is necessary and when other repairs might be better. Here’s how to decide:
Signs Your Joist Needs Sistering
- Visible cracks or splits along the length of the joist
- Joist rot from moisture or insect damage
- Sagging floors—noticeable dips or unevenness
- Bouncy floors that move under weight
- Notched or drilled joists that have lost strength
If you see these signs, sistering is a strong option, especially if the problem is limited to one or a few joists.
When Not To Sister
There are cases when sistering may not be the answer:
- If the joist is severely rotted or completely broken, full replacement is often safer.
- If the building’s foundation is shifting, focus on the foundation first.
- For widespread water or termite damage, a structural engineer should assess the problem.
A non-obvious insight: Many people overlook the importance of fixing the cause of the damage before sistering. For example, if a leak caused rot, repair the leak first. Otherwise, the new joist will also be at risk.
Tools And Materials Needed
Having the right tools and materials makes the job safer and easier. Here’s what you’ll need for most sistering projects:
Tools
- Circular saw or reciprocating saw
- Hammer or impact driver
- Pry bar
- Tape measure
- Carpenter’s square
- Level
- Drill with wood bits
- Wrenches and sockets (if using bolts)
- Safety glasses and gloves
- Utility knife
Materials
- Lumber: Usually the same size and type as the existing joist (often 2×8, 2×10, or 2×12)
- Construction adhesive
- Galvanized nails or structural screws (3” minimum)
- Lag bolts or carriage bolts (for maximum strength, optional)
- Joist hangers (if sistering the full length)
- Shims (for leveling)
- Jack post or temporary support (if raising sagging joists)
- Wood preservative (for repairing rot)
A practical tip: Always buy straight, dry lumber for sistering. Warped or wet wood can make the repair less effective.
Types Of Sistering
There are several ways to sister a floor joist, depending on the damage and the structure’s needs. Understanding the options helps you pick the right method.
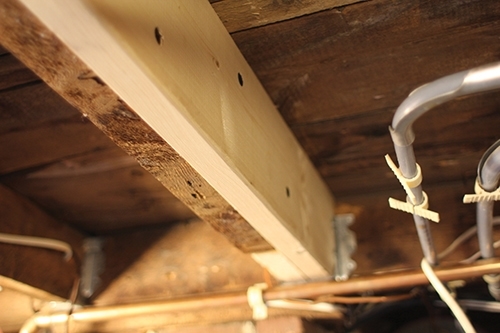
Full-length Sistering
This means attaching a new joist that runs the entire span of the old joist, from one support wall or beam to the other. It offers maximum strength and is best for serious damage or when the entire joist is weak.
Partial-length Sistering
Sometimes, damage is limited to the middle or end of the joist. Here, you can use a new joist that covers just the damaged area plus at least 3 feet beyond each end of the damage. Overlapping the good wood is key for solid support.
Double Or Triple Sistering
For heavy loads or severe damage, you might add two or three sister joists. This is common in areas that will hold extra weight, like under a large bathtub or heavy appliance.
Steel Plate Sistering
Instead of wood, you can use a steel plate bolted to the side of the joist. Steel is thinner and can add great strength in tight spaces, but installation is more complex.
A non-obvious insight: Partial sistering saves money and labor, but only works if the surrounding wood is solid. If in doubt, go with full-length sistering.
Credit: extremehowto.com
Planning And Preparation
Before you start, good planning is essential. Rushing in can lead to mistakes that are hard to fix later.
Inspection
Start by inspecting the joists under your floor. Remove any insulation or blocking in the way. Use a flashlight to check for rot, cracks, or insect damage. Tap with a hammer—soft, spongy sounds mean rot.
Measuring
Measure the length, width, and height of the damaged joist. Make sure you have enough clearance to slide in the new joist. Check for pipes, wires, or ducts that might block access.
Load Calculations
If you are adding extra weight above (like a new tile floor or heavy tub), make sure your repair will handle the load. The International Residential Code recommends using the same size and species of lumber as the original joist for most repairs.
Getting Permits
Some cities require a permit to alter floor joists. Check with your local building department. Skipping permits can lead to problems when selling your home.
Safety First
Sistering joists often means working in tight, dusty spaces. Wear a mask, gloves, and goggles. Make sure the area is well ventilated.
A practical tip: If the floor is badly sagging, support it temporarily with a jack post or adjustable column before starting the repair.
Step-by-step Guide: How To Sister A Floor Joist
Now, let’s get into the details of actually sistering a floor joist. Every step matters for a safe, lasting repair.
1. Clear The Area
Remove any insulation, wiring, or plumbing near the joist. You may need to temporarily disconnect pipes or wires. Sweep the area clean so nothing gets trapped between the old and new joist.
2. Support The Floor
Before removing or jacking up a sagging joist, add temporary support under the floor nearby. Use a jack post and a scrap 2×6 or 2×8 plank to spread the load. Slowly raise the jack—no more than ⅛ inch per day—to avoid cracking walls or floors above.
3. Cut The Sister Joist
Using your measurements, cut the sister joist to the right length. For full-length repairs, it should match the original joist end-to-end. For partial repairs, make sure it extends at least 3 feet past the damaged area on each side.
4. Apply Construction Adhesive
Run a generous bead of heavy-duty construction adhesive along the face of the old joist. This helps bond the joists and reduces squeaks.
5. Position The Sister Joist
Slide the new joist alongside the old one. Use shims to fill any gaps and ensure a tight fit. The joist should be level and flush at the top with the old joist. Use a carpenter’s square to check.
6. Fasten The Sister Joist
Secure the new joist with galvanized nails or structural screws (3 inches or longer) every 16 inches, staggered along the length. For added strength, use lag bolts or carriage bolts—drill holes every 2 feet and tighten with washers and nuts.
Here’s a quick comparison of fasteners:
| Fastener Type | Strength | Ease of Use | Cost |
|---|---|---|---|
| Nails | Medium | Easy | Low |
| Structural Screws | High | Medium | Medium |
| Lag Bolts | Very High | Hard | High |
7. Attach Joist Hangers (if Needed)
If the new joist reaches all the way to a wall or beam, use metal joist hangers to support the ends. Fasten these with approved nails or screws.
8. Double Check Level And Fit
Use a level to make sure the floor above is now flat. Tap the sister joist with a hammer to eliminate gaps. Add more screws or bolts if needed.
9. Remove Temporary Supports
Once you’re sure the joist is secure, slowly remove the jack post or temporary supports. Watch for any movement in the floor above.
10. Restore Insulation And Utilities
Replace any insulation, wiring, or plumbing you moved. Check for leaks or loose connections before closing up the floor or ceiling.
Common Mistakes And How To Avoid Them
Even experienced DIYers make mistakes with floor joist repairs. Here’s how to avoid the most common errors:
- Not addressing the cause of damage: Always fix leaks, pests, or overloading before sistering.
- Using the wrong size lumber: The new joist must match the old one in size and type.
- Loose fastening: Use enough screws, nails, or bolts—skipping fasteners leads to squeaks and weak support.
- Gaps between joists: Shim tightly for full contact.
- Not extending far enough: Always overlap good wood by at least 3 feet on each side of the damage.
- Ignoring code requirements: Check your local building codes for fastener type, lumber size, and permits.
- Rushing support removal: Remove temporary support slowly to avoid damaging the floor above.
A non-obvious insight: Many people use regular wood screws, but structural screws (like Simpson Strong-Tie or GRK) are much stronger and designed for this purpose.
How To Sister Joists In Difficult Situations
Not all repairs are straightforward. Sometimes, obstacles like pipes, wires, or limited access make sistering tricky.
Dealing With Pipes And Wires
If pipes or wires block the joist:
- Move them if possible (turn off power or water first).
- If not, cut notches in the new joist only as a last resort, and follow code limits for notch size (usually no deeper than 1/6 of the joist height).
- Use steel plates for extra strength if notching is required.
Tight Spaces
In crawlspaces or basements with little room, use shorter sections of lumber, overlapped in a staggered pattern. Bolt these together for continuous strength.
Working Around Ducts
If ducts are in the way, try using two shorter sister joists, one on each side of the duct, overlapping as much as possible.
Joists With Severe Rot
If rot is deep, remove the affected wood and treat the area with a wood preservative. Sistering will only work if there’s enough solid wood left to support the new joist.
Credit: www.reddit.com
Cost And Time Estimates
Understanding the cost and time helps you plan and avoid surprises.
Cost Breakdown
- Lumber: $10–$30 per joist (depending on size and length)
- Fasteners: $10–$20 per joist
- Joist hangers: $5–$10 each
- Construction adhesive: $5–$10 per tube
- Temporary supports/jack: $20–$40 (rent or buy)
Professional labor (if you hire a contractor) can be $200–$400 per joist.
Typical Timeline
- Inspection and prep: 1–2 hours
- Cutting and fitting joist: 1 hour
- Fastening and finishing: 1–2 hours per joist
A DIYer can usually sister one joist in a half-day, or a weekend for multiple joists.
Comparing Sistering With Other Repair Methods
Sistering is not the only way to fix a bad floor joist. Here’s how it stacks up against other common repairs.
| Repair Method | Strength | Cost | Difficulty | When to Use |
|---|---|---|---|---|
| Sistering | High | Medium | Medium | Most cases with partial damage |
| Full Replacement | Very High | High | High | Severe rot or breaks |
| Steel Plate Reinforcement | Very High | High | High | Tight spaces, heavy loads |
| Adding Support Posts | Medium | Medium | Medium | Minor sagging, easy access below |
A practical tip: Sistering is often the best mix of strength, cost, and ease—especially for DIYers.
How To Prevent Future Joist Problems
After repairing your joists, it’s wise to take steps to keep them in good shape for years to come.
Control Moisture
Most joist rot is due to moisture. Make sure your basement or crawlspace is dry. Use a vapor barrier, fix leaks, and install a dehumidifier if needed.
Watch For Termites
Inspect your wood framing at least once a year. Look for mud tubes, sawdust, or soft wood. If you see signs, call a pest professional right away.
Avoid Overloading
Don’t add heavy items (like a grand piano or large aquarium) without checking that the floor can support the load. Consider sistering more joists if you plan to remodel.
Regular Inspection
Every year, look under your floors for new cracks, sagging, or bounciness. Early action can prevent bigger repairs later.
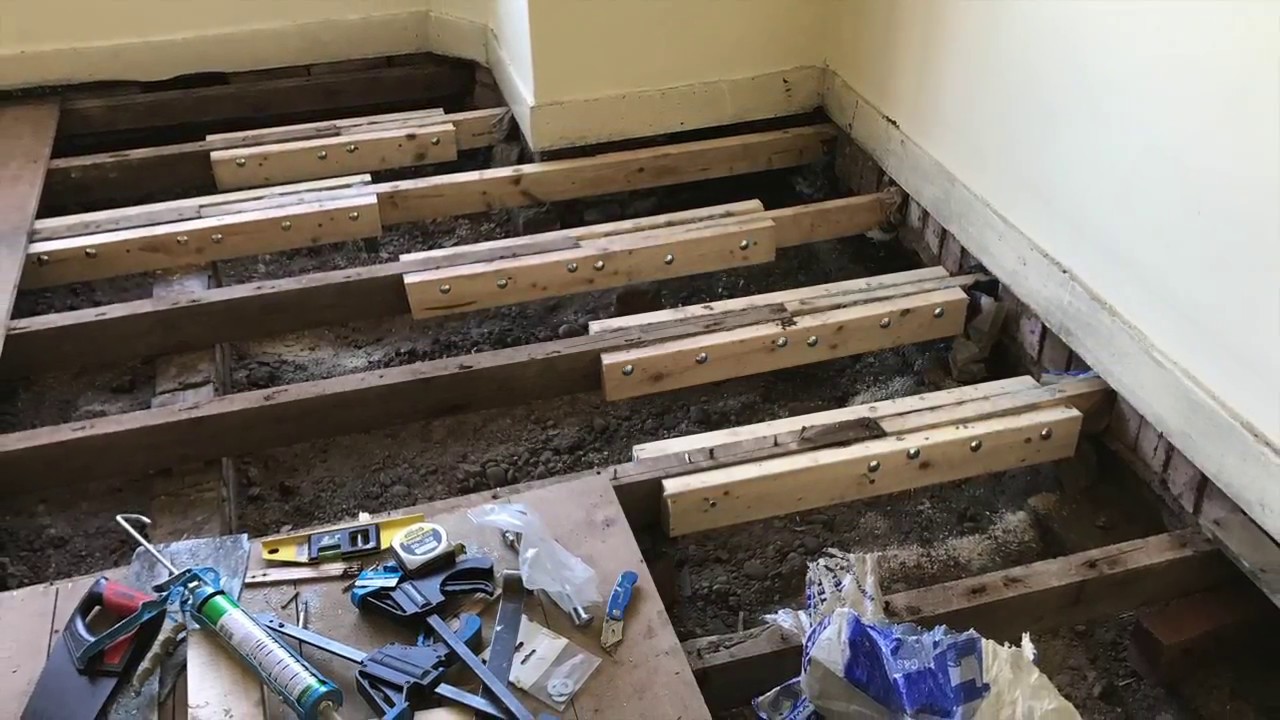
Real-life Example: Sistering A Floor Joist In An Old Home
Let’s look at a practical example. Sarah bought a 1920s house with a bouncy living room floor. When she opened the basement ceiling, she found several old 2×8 joists with cracks and some surface rot from an old leak.
She decided to sister the damaged joists with new 2x8s. She followed these steps:
- Measured and cut three new 12-foot 2x8s
- Treated the old wood with a preservative
- Applied construction adhesive
- Shimmed and screwed the new joists tightly alongside the old
- Used jack posts to lift the sagging area before fastening
- Replaced insulation and patched the ceiling
The result? The floor was firm and level. The total cost was under $250 for materials. This repair added years of life to her home and made the living space feel safe.
Credit: www.youtube.com
Frequently Asked Questions
What Type Of Lumber Should I Use For Sistering A Joist?
Use the same size and species as the existing joist, usually a grade marked “#2 or better.” For example, if your joists are 2×10 Southern Yellow Pine, use the same for the sister. Using a different type or size can cause uneven floors.
Can I Sister A Joist With Plywood Or Engineered Lumber?
Yes, but with some rules. Engineered lumber like LVL (laminated veneer lumber) can be used for extra strength in tight spaces. Plywood is less common, but if used, it should be at least ¾ inch thick, cut to match the joist height, and glued and screwed securely. Always check with your local code or a structural engineer if in doubt.
How Do I Know If I Need To Replace Rather Than Sister A Joist?
Replace the joist if it is severely rotted, broken, or missing large sections. Sistering only works if there is enough solid wood for the new joist to attach to. If over half the joist is gone, replacement is safer.
Is Sistering A Joist A Diy Job Or Should I Hire A Professional?
Many homeowners with basic tools can handle simple sistering. However, if you have complex problems (like structural shifts, severe rot, or heavy loads), it’s wise to consult a professional or a structural engineer. Permits may also require licensed work.
Where Can I Find Official Building Code Rules For Sistering Joists?
The International Residential Code (IRC) sets most US standards. Local building departments may have extra rules. You can check the latest IRC at International Code Council.
Sistering a floor joist is a practical, cost-effective way to restore strength to your home’s floors. With the right tools, materials, and careful planning, you can do a repair that lasts for decades. If you’re unsure about any part of the process, don’t hesitate to seek expert advice—your safety and your home’s value are worth it.