A ceiling medallion is more than just a decorative accent—it’s a statement piece that draws the eye upward, adding style and character to any room. When painted well, a ceiling medallion can transform a plain ceiling into a work of art.
But painting one isn’t as simple as grabbing a brush and a can of paint. To get a professional result, you need to understand the materials, tools, and techniques that work best. This guide walks you through every step, from planning to the final touches, helping you avoid common mistakes and achieve a stunning finish even if you’re new to DIY home projects.
Why Paint A Ceiling Medallion?
Many people ask, “Why not just buy a pre-finished medallion?” There are good reasons to paint your own. First, custom color gives you the chance to match or complement your room’s décor exactly. Second, many medallions are sold plain white or in a basic primer, so painting is required for a finished look. Third, a painted medallion highlights the details—shadows and highlights pop, and the overall effect feels intentional and refined.
A painted ceiling medallion can also increase the perceived value of your home. According to a 2023 interior design survey, homes with classic decorative features like medallions and crown molding are often valued up to 5% higher by buyers.
Choosing Your Ceiling Medallion
Before you paint, you need the right medallion. There are three main types:
| Material | Pros | Cons |
|---|---|---|
| Polyurethane | Lightweight, easy to handle, resists cracking | Not as rigid as plaster, can flex if mishandled |
| Plaster | Very detailed, classic look | Heavy, brittle, harder to install |
| Wood | Natural grain, can be stained or painted | More expensive, sensitive to humidity |
Most DIYers choose polyurethane because it’s easy to work with and affordable. Measure the space around your light fixture or ceiling fan to choose a medallion that’s proportional—usually, a medallion should be about 1/5 to 1/6 the length of the room.
Non-obvious Insight
Many beginners forget to check the center hole size. Make sure it matches the diameter of your light fixture’s canopy. If it’s too small, you’ll need to enlarge it, which risks damaging the medallion.
Selecting Paint And Finishing Products
Paint choice makes a big difference in durability and appearance.
Paint Types
- Latex (Acrylic) Paint: Easy to use, quick-drying, low odor, best for most medallions.
- Oil-based Paint: Very durable, but slower drying and more difficult to clean up.
- Spray Paint: Good for even coverage but can be messy indoors.
Sheen
- Satin or Semi-gloss: Adds subtle shine and makes details pop.
- Matte/Flat: Soft look, hides imperfections but can be hard to clean.
Color
White is traditional, but don’t be afraid to use color. Metallics like gold, silver, or bronze can add drama, especially on ornate designs. For a classic look, use white with gold accents; for modern rooms, try bold color contrasts.
Primers
Always use a primer if your medallion is bare polyurethane, plaster, or wood. This helps paint stick and blocks stains.
Protective Topcoat
Especially for medallions in kitchens or bathrooms, a clear topcoat (like polyurethane) adds durability. Make sure it’s compatible with your paint type.
Table: Paint Choices For Medallions
| Paint Type | Best For | Notes |
|---|---|---|
| Latex | Most medallions | Dries fast, easy cleanup |
| Oil-based | High-traffic rooms | More durable, longer drying |
| Spray paint | Quick, even coats | Use outdoors or with protection |
Gathering Your Tools And Supplies
Having the right tools makes the project easier and the results better. Here’s what you’ll need:
- Drop cloths or plastic sheeting
- Painter’s tape
- Fine-grit sandpaper (220–320 grit)
- Tack cloth for dust removal
- Quality paintbrushes (small angled, detail, and artist’s brushes)
- Mini foam roller (for smooth surfaces)
- Primer
- Paint (your color choice)
- Topcoat (optional)
- Small containers for mixing paint/accent colors
- Step ladder
- Gloves
- Safety goggles (if sanding or using spray paint)
Pro Tip
Don’t use old, frayed brushes—they leave streaks and bristles behind. Investing in good brushes makes a huge difference, especially for fine details.
Preparing The Medallion For Painting
Proper prep is the secret to a flawless finish.
Inspect For Damage
Examine your medallion for chips, cracks, or mold lines. Fill any small holes or dents with lightweight spackle or wood filler (for wood medallions). Let dry, then sand smooth.
Clean The Surface
Dirt, oils, and dust will prevent paint from sticking. Wipe the medallion with a damp cloth. For stubborn grime, use mild dish soap and water. Let it dry completely.
Sanding
Lightly sand the surface with fine-grit sandpaper. This helps the primer and paint adhere. Be gentle, especially with plaster or ornate designs—don’t sand away details.
Remove Dust
After sanding, use a tack cloth to remove all dust. This step is often skipped by beginners, but dust can ruin a smooth finish.
Priming
Apply a thin, even coat of primer using a mini roller or brush. For deep crevices, use a small detail brush. Let the primer dry according to the manufacturer’s instructions—usually 1–2 hours.
Common Mistake
Skipping primer can cause paint to peel, especially on polyurethane. Even “paint and primer in one” products don’t bond as well on plastics.
Planning Your Color Scheme And Design
A ceiling medallion offers endless creative options. Will you paint it all one color or highlight details with accent shades? Here are some approaches:
- Monochrome: One color, often white or off-white. Clean and classic, works in any room.
- Contrast: Paint the medallion a different color than the ceiling. For example, a navy medallion on a white ceiling.
- Accents: Use gold, silver, or another metallic on raised sections for elegance.
- Ombre: Blend colors from the center outward for a modern look.
- Patterned: Use stencils or freehand designs for a unique touch.
Visualizing
Test your colors on a piece of cardboard or on the medallion’s back before committing. Lighting changes everything—what looks good in the can may look different on your ceiling.
Non-obvious Insight
Most people ignore the room’s lighting temperature. Warm lights make colors look more yellow; cool LEDs can make whites appear blue. Choose paint samples and check them under your actual room lighting.

Credit: vivaciousvictorian.com
Painting Techniques For The Best Results
Patience is key for a pro-quality finish. Rushing leads to drips and uneven color.
Step-by-step Painting
- Base Coat: Use a mini roller or wide brush for the large, flat areas. Apply paint in thin, even coats. Don’t try to cover in one pass—two or three light coats are better than one thick one.
- Detail Work: Use a small brush or artist’s brush for raised patterns and edges. For metallic accents, dip just the tip of the brush and lightly drag over the details.
- Let Each Layer Dry: Follow the paint manufacturer’s drying times. Usually, 1–2 hours between coats for latex, 6–8 for oil-based.
- Apply Additional Coats: Most medallions need at least two coats for even coverage, sometimes three for dark or bright colors.
- Accent Colors: If using multiple colors, always start with the lightest color, then add darker or metallic details. This keeps mistakes easy to cover.
- Clean Edges: If painting the medallion after it’s installed, use painter’s tape to protect the ceiling.
Advanced Tips
- For a subtle antique effect, apply a glaze (a mix of paint and clear medium) and wipe it back from raised areas.
- Dry brushing (using very little paint on a brush) highlights details without flooding crevices.
- If using spray paint, keep the can 8–12 inches away and move in steady passes.
Table: Brush Vs. Roller Vs. Spray
| Tool | Best Use | Pros | Cons |
|---|---|---|---|
| Brush | Details, edges, raised patterns | Precise, good for small areas | Slower, may leave brush marks |
| Mini Roller | Large, flat areas | Even coverage, fast | Hard to reach deep crevices |
| Spray Paint | Even finish, complex shapes | No brush marks, fast | Messy, requires prep and ventilation |
Drying, Curing, And Applying Topcoat
Let the painted medallion dry in a dust-free area. Even after the paint feels dry to the touch, it may need up to 7 days to fully cure, especially in humid environments.
Protective Topcoat
For high-moisture rooms or to add subtle shine, apply a clear water-based polyurethane topcoat. Use a clean brush and light coats. Avoid oil-based topcoats over latex paint—they can yellow with time.
Handling
Don’t handle or install the medallion until the paint and topcoat are fully dry. Fingerprints or smudges are hard to fix once the medallion is in place.
Installing The Painted Medallion
You can paint the medallion before or after installation, but painting first is usually easier and neater.
Steps For Installation
- Turn Off Power: If installing around a light fixture or fan, turn off electricity at the breaker.
- Mark the Center: Use a pencil to mark the medallion’s position on the ceiling.
- Apply Adhesive: Use construction adhesive on the back of the medallion. For heavy plaster medallions, add screws for extra support.
- Position and Press: Carefully align the medallion and press it against the ceiling.
- Secure: Hold in place for the adhesive’s set time (usually 1–2 minutes). For large medallions, use temporary supports like painter’s tape or a T-brace.
- Seal Edges: Fill any gaps between the medallion and ceiling with caulk. Smooth with a damp finger for a clean look.
- Reinstall Fixture: Once the adhesive is dry, reinstall the light or fan. Restore power.
Non-obvious Insight
If using screws to secure the medallion, countersink them just below the surface. Fill with spackle, sand, and touch up with paint for an invisible repair.
Troubleshooting And Fixing Common Problems
Even careful painters run into issues. Here’s how to solve them:
Paint Drips Or Runs
If you see drips, wait until dry, then sand gently and repaint. Don’t try to wipe wet drips—they’ll smear.
Uneven Color
Usually caused by thin spots or poor mixing. Apply a thin second coat, making sure to stir paint well before use.
Brush Marks
Use a mini foam roller for flat areas and finish each brushstroke in the same direction. If marks remain, lightly sand and add a final thin coat.
Bleed-through Stains
If yellow or brown stains appear, especially on wood or plaster, use a stain-blocking primer before repainting.
Damage During Installation
Touch up any chips or scratches with a small brush. Keep a little extra paint for repairs.
Creative Ideas For Highlighting Ceiling Medallions
A painted medallion doesn’t have to blend in—it can become the room’s focal point. Here are some creative ideas:
- Paint the medallion to match the wall color for a unified look.
- Use metallic paints to mimic antique finishes (try layering silver, gold, or bronze).
- Add a thin line of contrasting color around the medallion’s edge.
- Paint the inside circle one color and the outer ring another for a “target” effect.
- Use stencils to add patterns, like leaves or geometric shapes, to the medallion’s surface.
Example
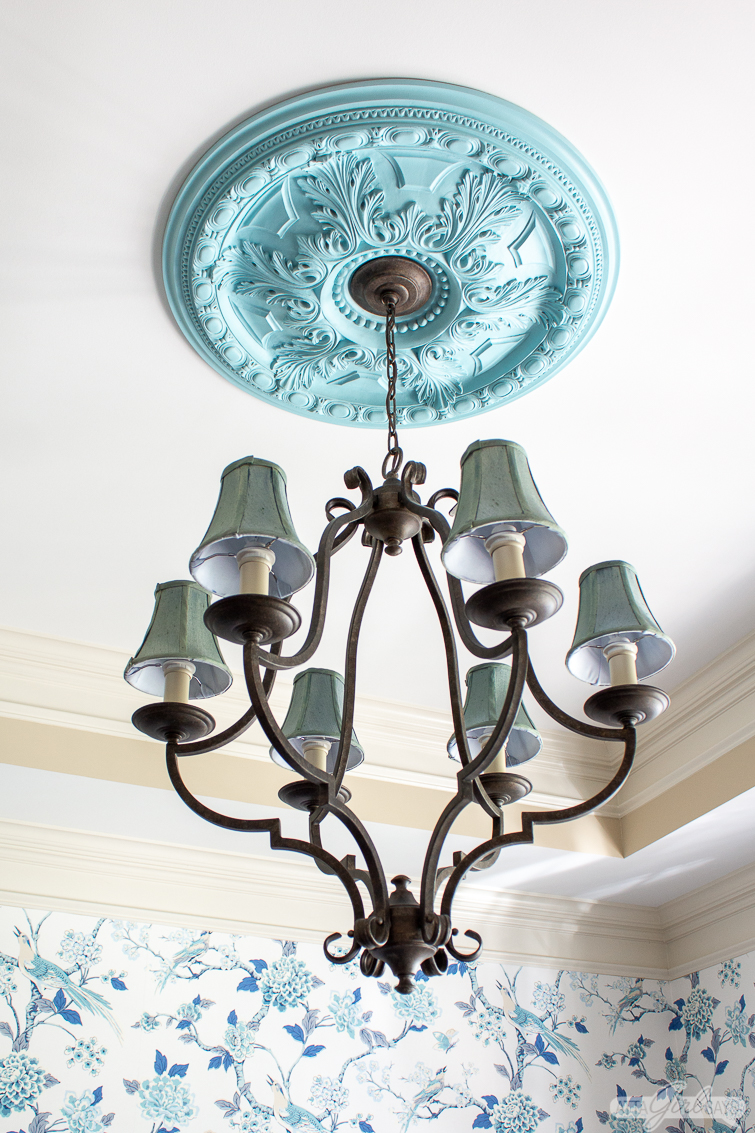
In a Victorian dining room, a white medallion with gold-accented leaves and a deep green center creates a luxurious effect. In a modern loft, a jet-black medallion on a white ceiling adds boldness.
Maintenance And Cleaning
Once installed, a painted medallion needs little care, but a few practices keep it looking new:
- Dust with a soft microfiber cloth every few months.
- For stains, gently wipe with a damp cloth; avoid harsh chemicals.
- Check yearly for cracks or peeling, especially in humid rooms.
If you need to repaint, lightly sand, clean, and apply a fresh coat—no need to remove the medallion.
Credit: www.attagirlsays.com
Cost And Time Considerations
Painting a ceiling medallion is affordable and can be completed in a weekend.
Typical Costs
- Medallion: $20–$150 (polyurethane), $50–$500 (plaster or wood)
- Paint/primer/topcoat: $15–$40
- Brushes and supplies: $10–$30
Total: $45–$220 for most DIY projects.
Time Required
- Prep: 1–2 hours
- Priming: 1 hour (plus drying)
- Painting: 2–4 hours (spread over coats)
- Drying/curing: 1–7 days
- Installation: 1–2 hours
Plan for about one weekend start to finish, plus drying time.
Safety Tips
- Always turn off power at the breaker before working near electrical fixtures.
- Use a sturdy ladder and have a helper if possible.
- Wear gloves and goggles when sanding or using spray paint.
- Paint and adhesives can have fumes—work in a ventilated area.

Credit: destashio.wordpress.com
When To Hire A Pro
While most people can paint and install a medallion, consider hiring a professional if:
- The ceiling is very high or hard to reach.
- The medallion is large, heavy, or valuable.
- Electrical work feels unsafe.
- You want a complex, multi-color or faux finish.
A pro painter or handyman can handle installation quickly and safely.
Additional Resources
For more on ceiling medallion history, styles, and installation, visit the Wikipedia page on ceiling medallions.
Frequently Asked Questions
How Do I Choose The Right Size Medallion For My Room?
The medallion should be proportional to your ceiling and light fixture. A good rule: medallion diameter should be 1/5 to 1/6 the length of the room. For example, in a 12×15 ft room, a 24–30 inch medallion looks balanced.
Can I Paint A Medallion While It’s Already Installed On The Ceiling?
Yes, but it’s harder to get clean edges and avoid mess. Use painter’s tape to protect the ceiling and work slowly with small brushes. If possible, paint before installation for the best result.
What Kind Of Paint Should I Use For A Ceiling Medallion?
Use latex (acrylic) paint for most situations. It’s easy to use, dries fast, and has low odor. For bathrooms or kitchens, choose a paint with a satin or semi-gloss finish for easy cleaning.
How Do I Add Metallic Accents Without Making A Mess?
Use a small artist’s brush and gently “dry brush” metallic paint onto raised details. Practice on a piece of cardboard first. Less is more—build up color slowly to avoid mistakes.
Is It Okay To Use Spray Paint Indoors For Medallions?
Spray paint gives a smooth finish but should only be used in well-ventilated areas. Protect walls and floors, and wear a mask. When in doubt, spray outdoors and let the medallion dry fully before bringing inside.
A painted ceiling medallion can turn an ordinary ceiling into a showcase. With careful preparation, the right materials, and creative touches, you’ll enjoy a result that reflects your style for years to come.