
Removing staples from a floor can seem simple at first. But when you start the project, you’ll quickly realize it’s more challenging than just pulling out a few metal pieces. Old staples are often stuck deep in the wood, hidden under flooring, or even covered by paint and debris. Sometimes, pulling staples out the wrong way damages your floors, leaving ugly scratches or even splinters. This guide will help you avoid those problems. You’ll learn everything you need: the right tools, step-by-step methods, safety tips, and ways to protect your floor’s surface. Whether you’re preparing for a new floor installation, refinishing hardwood, or just cleaning up after carpet removal, these tips will help you finish the job cleanly and safely.
Why Remove Staples From The Floor?
Staples often remain after removing old carpet, padding, or underlayment. Leaving them in place can cause several problems. First, flooring staples stick up and create hazards. You or your family could step on one, risking cuts or puncture wounds. Second, new flooring materials won’t sit flat if staples are still in the subfloor. This can cause squeaks, uneven surfaces, or even damage to your new investment. Finally, leftover staples can scratch or tear tools and materials during installation.
Removing all staples is a key part of floor preparation. Skipping this step can make the rest of your project much harder and more expensive.
Understanding Different Types Of Staples And Floors
Not all staples are the same, and neither are all floors. The type of staple you’re dealing with will change your removal strategy.
Common Floor Staples
- Carpet staples: Usually thin and short, used to hold down carpet padding.
- Underlayment staples: Often longer and thicker, they secure plywood or foam under layers.
- Construction staples: Heavy-duty and deeply embedded, sometimes used for subflooring.
Different Floor Types
- Hardwood: Most sensitive to damage from tools. Staples are often deeply embedded.
- Plywood subfloor: More forgiving but can splinter easily.
- Concrete: Staples are rare, but sometimes metal fasteners are left after carpet strips.
Knowing what you’re working with helps you choose the right tool and method.
Essential Tools For Removing Staples From Floor
Having the right tools makes the job faster and reduces damage risk. Here are the most effective tools for staple removal, each with pros and cons.
| Tool | Best For | Advantages | Potential Risks |
|---|---|---|---|
| Pliers (needle-nose or regular) | All staple types | Control, precision | Can dent wood if used carelessly |
| Flathead screwdriver | Loosening staples | Easy to find, versatile | May gouge wood |
| Staple puller (cat’s paw) | Many staples at once | Speeds up work | Requires practice to avoid damage |
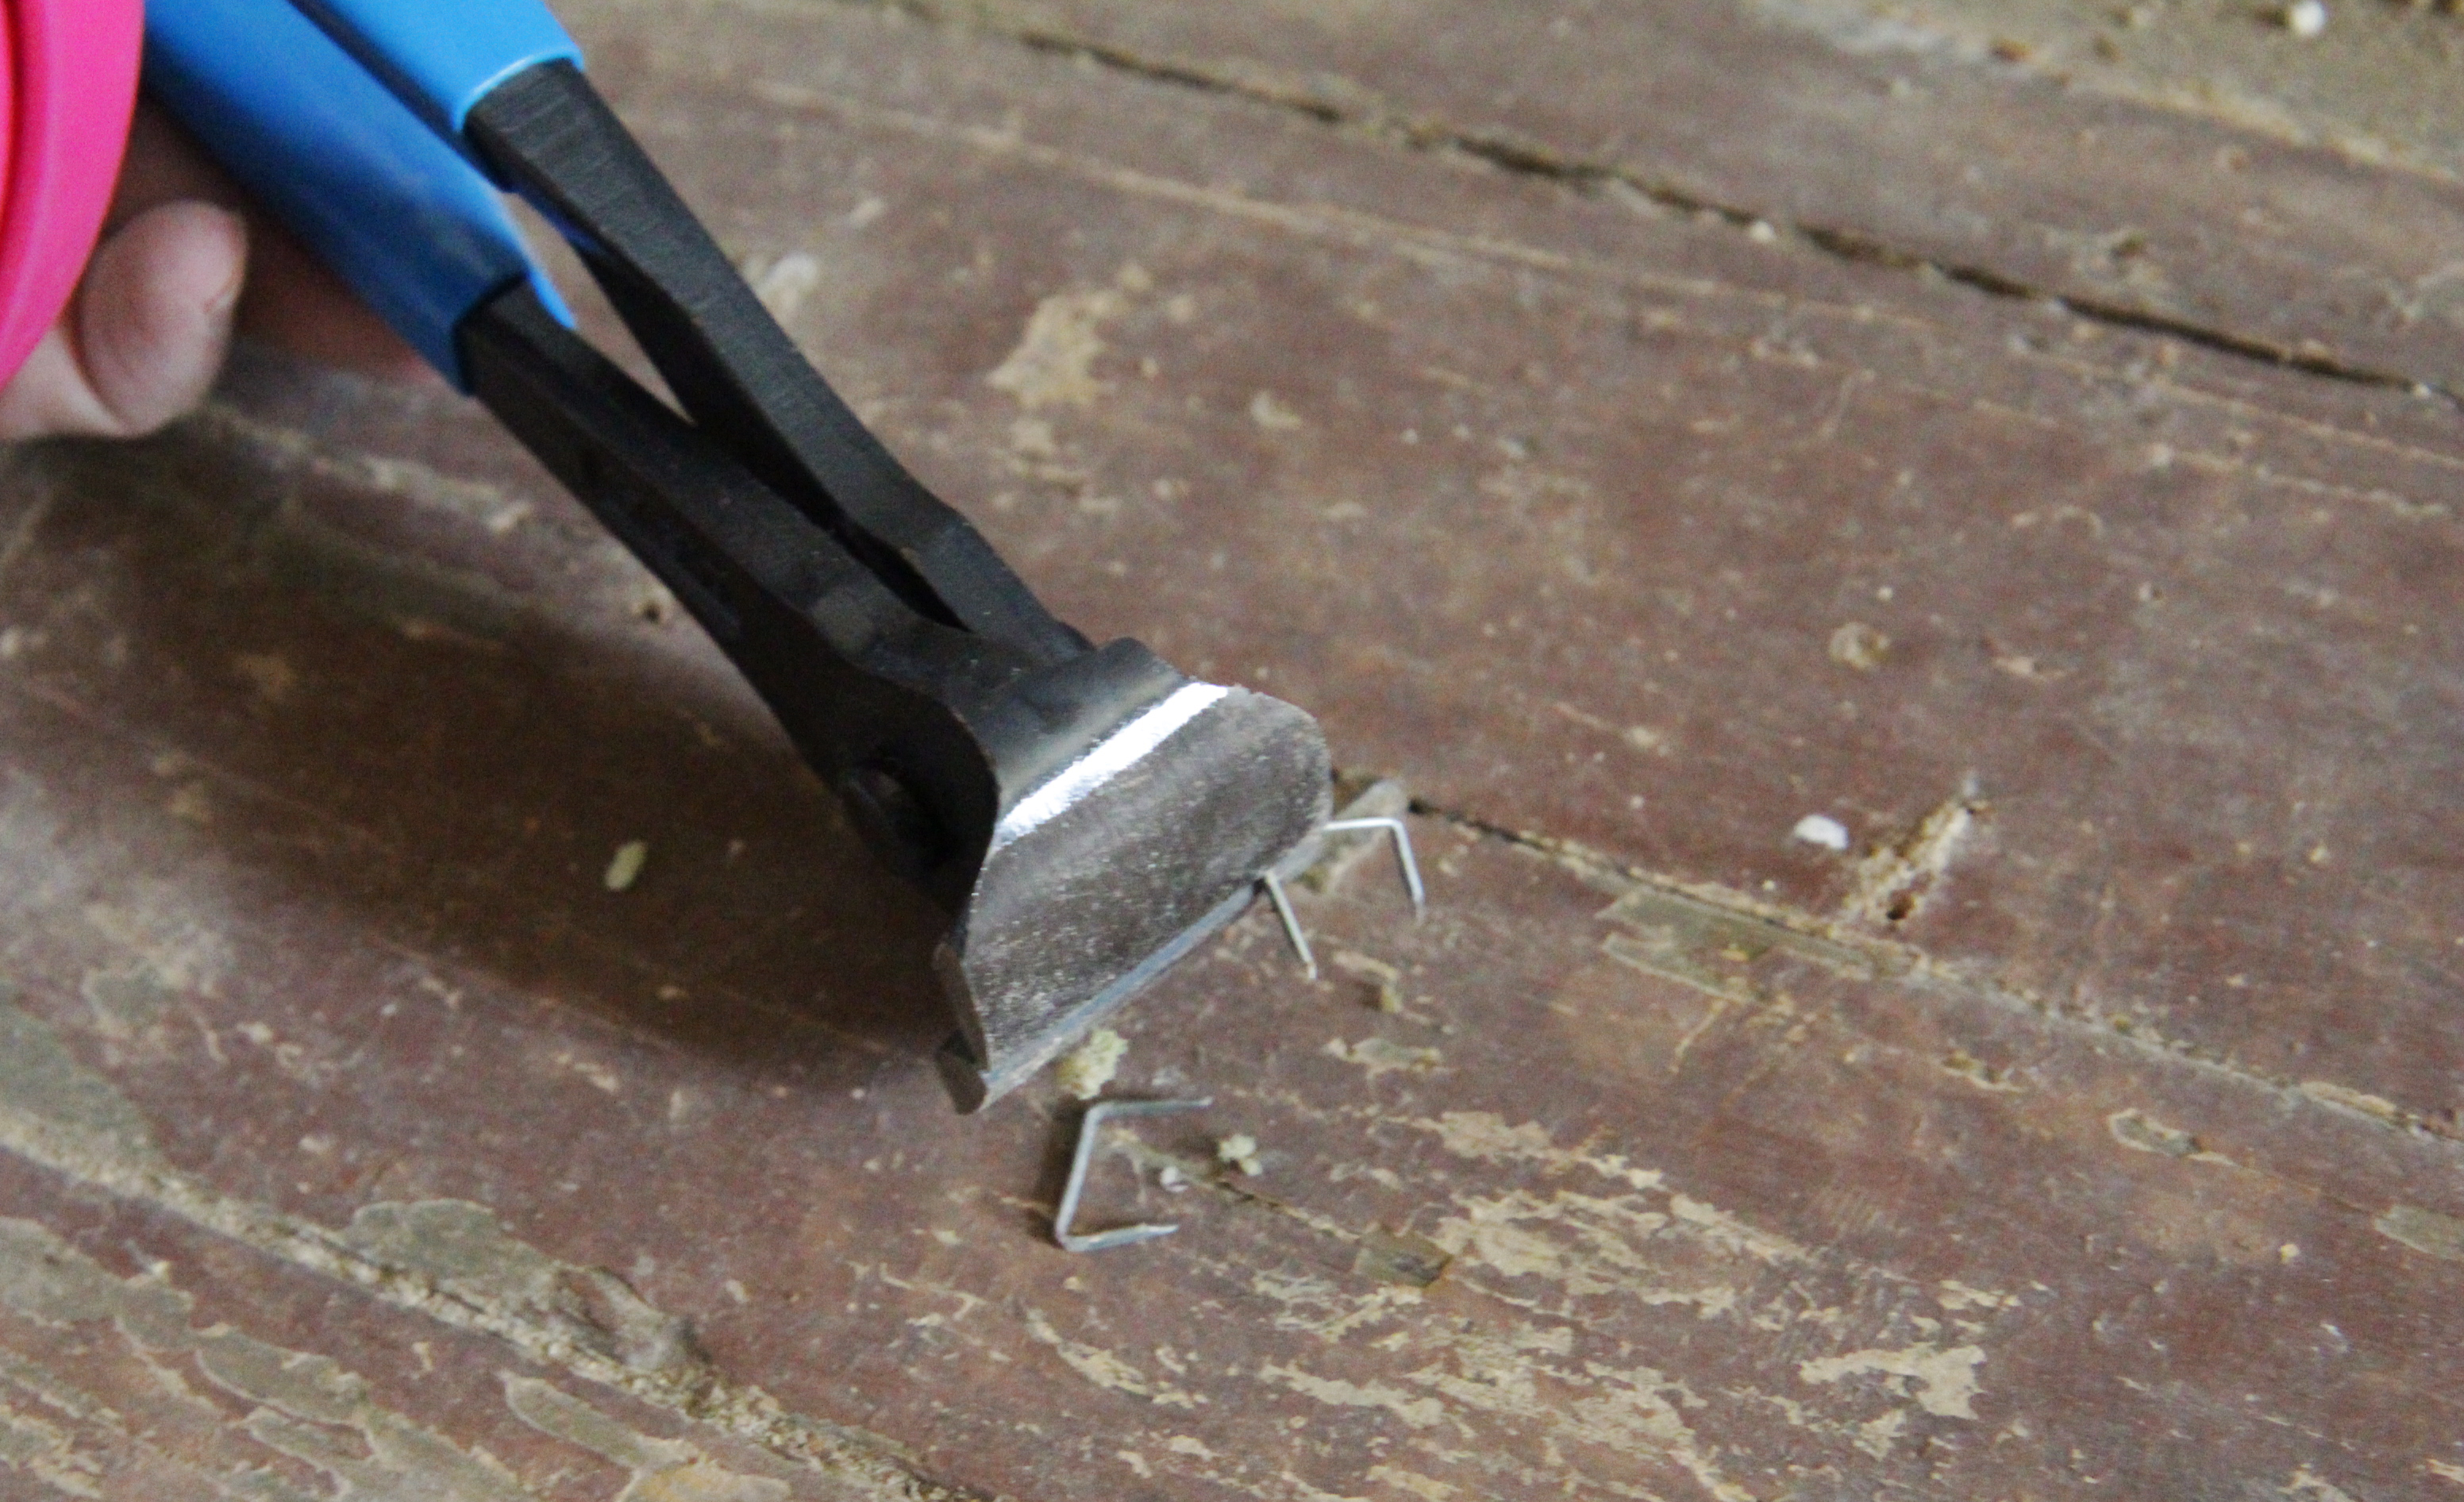
| Diagonal cutters (dikes) | Cutting and pulling | Can snip stubborn staples | May break off staple, leaving piece inside |
| Painter’s 5-in-1 tool | Wide, flat staples | Multi-use, good leverage | May scratch finished surfaces |
You don’t need every tool on this list, but having at least two (for example, pliers and a flathead screwdriver) is recommended for most jobs.
Safety First: Protect Yourself And Your Floor
Staple removal is not without risks. You’ll be dealing with sharp metal, old wood, and sometimes hidden debris. Here’s how to stay safe:
- Wear gloves. Thick work gloves protect against cuts and splinters.
- Use eye protection. Staples can snap or fly out unexpectedly.
- Knee pads or a kneeling mat. You’ll spend time on your knees, especially for large rooms.
- Keep a magnet handy. Sweeping a magnet over the floor after removal helps collect stray staples.
- Inspect your tools. Make sure pliers and cutters are sharp and not rusty.
It’s easy to get a small cut or poke if you rush or skip safety steps. Take your time, and check your work area often for hazards.
How To Remove Staples From Floor: Step-by-step
Let’s go through the process in detail, from start to finish.
Step 1: Prepare The Area
Clear the room of furniture and debris. Sweep or vacuum first. This gives you a clear view of all staples and prevents tools from slipping. If you’re working on a hardwood floor, lay down a soft mat or old towel to kneel on and protect the surface.
Step 2: Identify All Staples
Walk slowly around the room. Use a flashlight at a low angle to spot staples that may be flush with the floor or hidden by shadows. Mark problem areas with painter’s tape if the room is large.
Step 3: Loosen The Staples
Start with a flathead screwdriver or 5-in-1 tool. Gently slide the edge under the staple. Wiggle back and forth until you lift the staple slightly, just enough to grab it. Avoid prying too hard, which can gouge the wood.
Step 4: Pull Out The Staples
Grip the staple with needle-nose pliers or diagonal cutters. Pull straight up, not at an angle. If you pull sideways, you risk splintering the floor or breaking the staple. For very stubborn staples, rock gently while pulling or use a staple puller.
Step 5: Handle Broken Staples
Sometimes, a staple breaks, leaving part stuck in the wood. Don’t panic. Use a diagonal cutter to grasp the exposed piece. If it’s flush, gently tap a flathead screwdriver under one side, then try pulling again. Avoid digging deeply, which can worsen the damage.
Step 6: Collect And Dispose Of Staples
Keep a small container or cup nearby to drop removed staples into. Don’t leave them on the floor, as they’re a hazard. After you finish, sweep or vacuum the area, then run a magnet over the floor to catch any missed pieces.
Step 7: Inspect And Repair The Floor
After all staples are out, check for scratches or small gouges. Fill any minor holes with wood filler, let dry, and sand smooth. For plywood subfloors, minor splinters are usually not a big issue if you’re covering with new flooring, but for exposed hardwood, take extra care to patch and finish as needed.
Removing Staples From Different Floor Materials
Different floors require slightly different approaches to avoid damage.
Removing Staples From Hardwood Floors
Work slowly. Hardwood is easily scratched or dented. Use a thin, flat tool under each staple and always pull straight up. When staples are especially stubborn, try heating the area with a hairdryer to soften any adhesive. Never use excessive force—if a staple won’t budge, better to snip it flush and cover with filler than to gouge the wood.
Removing Staples From Plywood Subfloors
You can be a bit more aggressive, but avoid deep prying which can splinter the subfloor. If a staple breaks off below the surface, it’s usually fine to leave it as long as it’s flush and won’t interfere with new flooring.
Removing Staples From Concrete
Concrete is tough, but use only metal tools that won’t break or chip. Sometimes, you’ll find nails or tack strips instead of staples. Use a pry bar or heavy-duty pliers to remove these.
Tips For Removing Large Numbers Of Staples
If you’re working on a whole house or big room, efficiency matters. Here’s how to speed up your work without sacrificing safety or quality:
- Work in sections. Focus on a small area at a time, then move on.
- Use two tools. Loosen with a screwdriver, pull with pliers. This rhythm keeps you moving.
- Take breaks. Removing hundreds of staples is tiring. Fatigue leads to mistakes—and injuries.
- Enlist help. Having one person loosen and another pull can cut project time in half.
- Use a headlamp. Frees your hands and helps spot hidden staples in dim corners.
If you’re using power tools, such as a rotary tool with a cutting wheel, be extremely careful. While they can cut staples flush quickly, they also carry risk of damaging the floor if you slip.
How Long Does Staple Removal Take?
The time needed depends on the staple density and room size. On average:
- Small bedroom (100 sq ft): 1–2 hours
- Living room (300 sq ft): 3–5 hours
- Whole house (1000 sq ft): 8–16 hours
If staples are deeply embedded or rusty, add 25–50% more time. Working with a partner can speed up the process. Don’t rush—accidents and mistakes take longer to fix than doing the job carefully.
Credit: www.reddit.com
Common Mistakes To Avoid
Beginner mistakes can lead to damaged floors or wasted time. Here are the most frequent errors, and how to avoid them:
- Using too much force. This often gouges wood or breaks staples.
- Pulling at the wrong angle. Always pull staples straight up to avoid splintering.
- Skipping staples. Missing even a few can cause problems later with new flooring.
- Not checking for broken pieces. Run a magnet to catch hidden metal.
- Ignoring safety. Cuts and eye injuries are common—always wear gloves and goggles.
One non-obvious insight: Moisture can make removal harder. If the area is damp, staples may be rusted and grip more tightly. In this case, let the floor dry out before starting, or apply a small amount of penetrating oil to stubborn staples and wait a few minutes before pulling.
Comparing Manual Vs. Power Tool Methods
Some people wonder if using power tools is faster or safer than manual removal. Here’s a quick comparison:
| Method | Speed | Floor Damage Risk | Best For |
|---|---|---|---|
| Manual (pliers, screwdriver) | Slow-medium | Low (if careful) | Hardwood, small jobs |
| Power tool (oscillating tool, rotary cutter) | Fast | High (if inexperienced) | Plywood subfloors, large jobs |
| Staple remover hand tool | Medium | Medium | All floors, moderate jobs |
For most DIYers, manual removal is safest, especially on visible floors.

Credit: www.youtube.com
How To Protect Your Floor After Removing Staples
Once you’ve pulled all the staples, you might find small scratches or holes. Here’s how to make your floor look great again:
- Clean thoroughly. Vacuum and run a magnet to pick up all debris.
- Fill holes. Use wood filler for hardwood, or floor-leveling compound for plywood. Match the color if the wood will be exposed.
- Sand gently. Smooth the surface with fine sandpaper, but avoid over-sanding which can create dips.
- Finish or seal. If you plan to leave the floor exposed, apply a sealant or finish to protect the surface and hide minor marks.
If you’re covering the floor with new material, minor imperfections are usually fine. But for visible wood, take the extra time to repair and refinish as needed.
When To Call A Professional
Most staple removal is a DIY task, but some situations call for expert help:
- Historic or valuable hardwood: If you’re worried about damaging expensive wood, hire a pro.
- Extremely large areas: Pros have specialized tools and can finish faster.
- Hazardous materials: If the floor has signs of mold, asbestos, or lead paint, don’t disturb it—call a specialist.
Professional floor installers often include staple removal in their prep work. If you’re unsure, get a quote before starting.
Real-life Example: What Can Go Wrong?
Sarah bought a 1960s house and wanted to refinish the original hardwood. After pulling up old carpet, she found hundreds of tiny staples. She used a pry bar and pliers, but worked quickly to finish. In her hurry, she gouged deep scratches in the wood and broke off several staples below the surface.
When sanding later, the sander hit a hidden staple and broke the sanding pad.
The lesson: rushing can cause more work. Take your time, use the right tools, and check your work as you go.
Environmentally Friendly Disposal Of Removed Staples
When you finish, you’ll have a cup or bucket full of old staples. Don’t just toss them in the trash. Metal staples can be recycled—empty them into your household metal recycling bin. If your area doesn’t take small metal scraps, collect them in a larger can and drop off at a recycling center when full.
This keeps metal out of landfills and is better for the environment.
Costs Involved In Staple Removal
If you do it yourself, staple removal is cheap. Most basic tools cost under $20. If you hire a professional, costs can range from $0. 50 to $1. 50 per square foot, depending on floor type and staple density. For a 300 sq ft room, expect to pay $150–$450 for pro removal.
Weigh this cost against your time and the risk of damaging the floor.
Alternatives To Manual Staple Removal
If staple removal seems overwhelming, consider these alternatives:
- Covering with new underlayment: If staples are flush and won’t interfere, sometimes you can install new flooring over them (check manufacturer guidelines).
- Staple dissolving chemicals: Rare, but some adhesive removers may help loosen old staples—always test in a small area first.
- Power scraping tools: These attach to drills or rotary tools and can speed up the job but require practice to avoid damage.
For most homeowners, manual removal is safest and most reliable.
Non-obvious Tips For Easier Staple Removal
Here are two advanced tips most beginners miss:
- Slightly twist staples before pulling. After loosening, a gentle twist with pliers often breaks the staple’s grip on the wood, making it come out cleaner and reducing splintering.
- Use a thin putty knife under tools. Place a metal putty knife between your tool and the floor. This spreads out pressure and protects the surface from scratches or dents.
Taking a little extra care here can save hours of repair work later.
Frequently Asked Questions
What Is The Fastest Way To Remove Staples From A Floor?
The fastest method combines loosening with a flat tool, then pulling with needle-nose pliers, working in small sections. For large areas or plywood subfloors, a staple puller tool can speed up the process. Power tools are fastest but risk damaging finished floors.
Can I Install New Flooring Over Staples?
Not recommended. Staples left behind can cause uneven surfaces, squeaks, or damage to the new flooring. Always remove all staples before installing new material, unless the manufacturer specifically allows for staples to remain.
What If Staples Break Off Below The Surface?
If a staple breaks off and the end is flush with or below the floor, try to remove it with a diagonal cutter. If that fails and the floor will be covered, it’s usually safe to leave. For visible hardwood, fill and finish the spot to prevent future problems.
Are There Special Tools For Staple Removal?
Yes. Specialty staple pullers (sometimes called “cat’s paw” or “tack pullers”) are designed for this task and reduce damage. They’re available at hardware stores and online. Diagonal cutters and painter’s tools also work well.
Where Can I Learn More About Staple And Fastener Removal?
For more detailed information, visit the Staple remover Wikipedia page, which explains different tool types and their uses.
Removing staples from a floor is a job that requires patience, care, and the right tools. Take your time, follow the steps in this guide, and you’ll set the stage for a beautiful, smooth new floor—without costly mistakes or hidden hazards.
Your future self (and your feet!) Will thank you.
Credit: www.kellbot.com