Removing old flooring adhesive is a project that many homeowners face when updating their spaces. Whether you’re pulling up carpet, vinyl, tile, or engineered wood, the sticky residue left behind can be tough to deal with. If you don’t remove it properly, new flooring may not lay flat or stick well, and leftover glue can attract dirt and moisture, causing future problems.
The process may look simple, but each adhesive type and subfloor brings its own challenges. Understanding the right methods and tools is key to a clean, smooth finish and long-lasting results.
People sometimes rush this step or choose shortcuts that create more work later. In this guide, you’ll learn how to identify your adhesive, pick the best removal technique, and avoid mistakes that waste time or damage your floor. Whether you’re a DIY enthusiast or a first-timer, you’ll find clear steps, expert tips, and practical advice.
Let’s walk through everything you need to know to remove flooring adhesive effectively.
Understanding Flooring Adhesive
Before you start scraping, it helps to know what kind of flooring adhesive you’re dealing with. Different adhesives respond to different removal methods, and using the wrong approach can make the job much harder.
Common Types Of Adhesive
- Cutback Adhesive – This is a black, tar-like glue often used under vinyl and asbestos tiles in older homes. It is stubborn and may contain hazardous materials.
- Latex-Based Adhesive – Usually yellow or beige, this water-based glue is common under vinyl and carpet.
- Pressure-Sensitive Adhesive – Found under peel-and-stick tiles or planks, it remains tacky and can be reactivated with heat.
- Epoxy or Urethane Adhesive – These are strong, used for wood or engineered floors, and resist water and chemicals.
- Mastic – This thick, sticky glue is often used under ceramic tile.
Why Does Adhesive Matter?
The wrong removal process can leave sticky patches, damage your subfloor, or even release toxic dust. For example, cutback adhesive may contain asbestos if installed before the 1980s. Always test if you suspect hazardous material—never sand or scrape old black adhesive without proper safety steps.
Safety Precautions Before You Begin
Removing adhesive is messy and sometimes risky. Here’s what you should do to protect yourself and your home:
- Wear protective gear: Always use gloves, goggles, and a dust mask, especially if scraping or using chemicals.
- Ventilate the area: Open windows and use fans to blow fumes outside. Chemical removers can create strong odors.
- Test for asbestos: If the adhesive is black and from before 1980, have a sample tested before scraping.
- Protect nearby surfaces: Tape plastic or drop cloths over vents, walls, and furniture to prevent splatters.
- Keep children and pets away: Many adhesive removers and dusts are harmful if inhaled or touched.
Tools And Materials You Will Need
Depending on your method, you’ll need a mix of manual and power tools, plus some cleaning supplies. Here’s a comprehensive list to cover most situations:
- Floor scraper or putty knife (wide blade)
- Utility knife (for cutting carpet or vinyl)
- Heat gun or hair dryer (for softening adhesive)
- Chemical adhesive remover (read product label)
- Bucket and sponge
- Old towels or rags
- Protective gloves, goggles, and mask
- Shop vacuum (for dust)
- Plastic sheeting or drop cloth
- Mop and mild detergent
- Stiff bristle brush
For large or stubborn jobs, you may consider renting a floor buffer or oscillating multi-tool.
Step-by-step Guide: Manual Removal Methods
Many adhesives can be removed with elbow grease and the right technique. Manual removal is safer for your subfloor and avoids chemical exposure.
1. Scraping
Start with a wide floor scraper or stiff putty knife. Hold the blade at a low angle and push forward to lift adhesive from the subfloor. Work in small sections, applying steady pressure. Replace blades if they become dull.
Tips:
- Dampen the adhesive with warm water to soften latex-based or mastic glues.
- For thick patches, score the adhesive with a utility knife before scraping.
- Use a smaller blade for corners and edges.
2. Using Heat
Pressure-sensitive adhesives and some vinyl glues can be softened with heat. Use a heat gun or a strong hair dryer to warm the adhesive until it turns soft and sticky. Scrape while the glue is still warm, working quickly before it cools.
Safety Note:
Keep the heat gun moving to avoid scorching the subfloor. Always follow the tool’s safety instructions.
3. Sanding
Use this method only on concrete or plywood subfloors, never on old black cutback adhesive (risk of asbestos). A floor buffer with a sanding disc can grind away the last bits of glue. Vacuum dust frequently to prevent buildup.
Pro Tip:
Use coarse sandpaper (40–60 grit) for initial passes, then finer grit to finish.
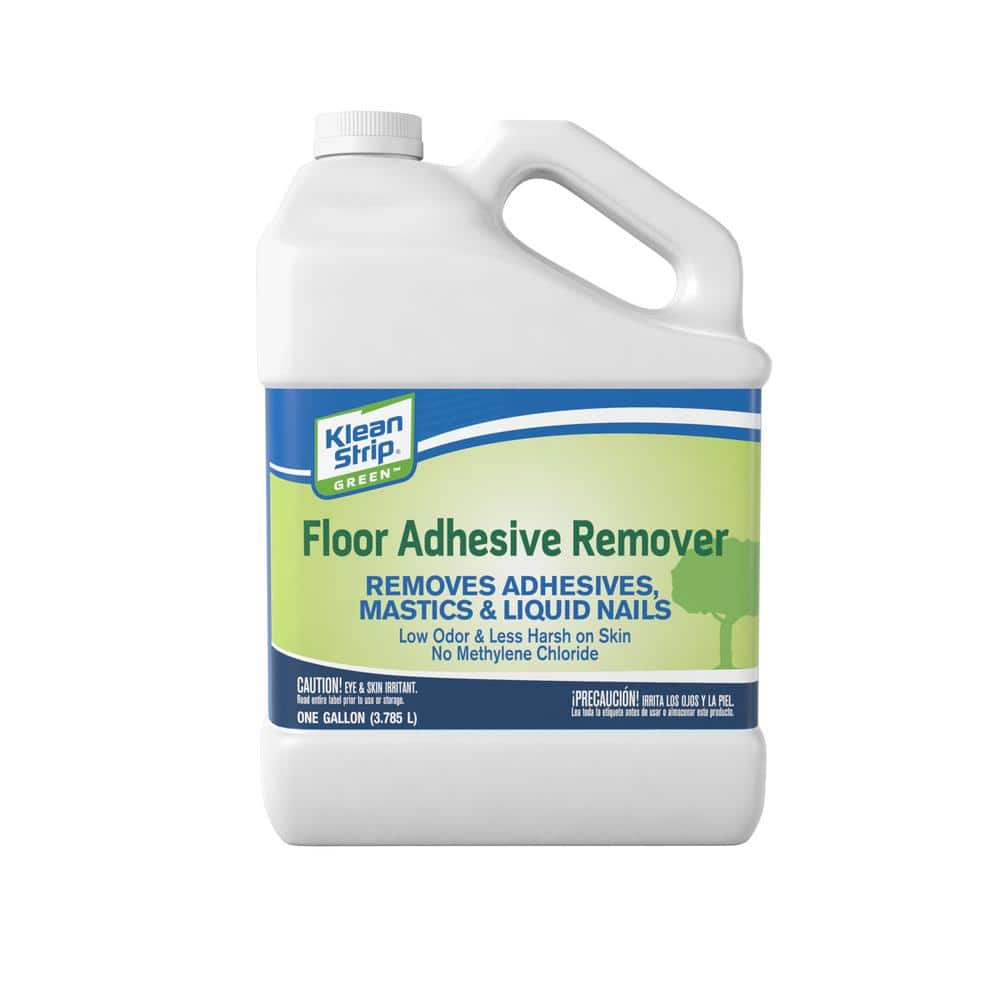
Step-by-step Guide: Chemical Removal Methods
Some adhesives, especially urethane and old mastic, resist manual scraping. Chemical removers can help—but require care.
1. Choosing The Right Chemical Remover
Pick a product designed for your adhesive type. For example, soy-based gels are safer for indoor use and less toxic than solvent-based removers.
Popular Options:
- Citrus-based gel removers (safer, mild odor)
- Soy-based adhesive removers
- Solvent-based removers (strong, fast, but require good ventilation)
Always read the manufacturer’s instructions and test on a small area first.
2. Applying The Remover
- Pour or spread the remover over the adhesive, following label instructions.
- Let it soak for the recommended time (usually 15–60 minutes).
- The adhesive should bubble or soften visibly.
- Scrape with a putty knife or floor scraper, wiping off sticky residue as you go.
3. Cleaning Up
After removal, wipe the floor with clean water and mild soap to remove any chemical traces. Rinse well and let dry completely before installing new flooring.
Safety Reminder:
Store all chemicals away from children and pets. Dispose of waste according to local rules.
Removing Flooring Adhesive From Different Subfloors
Your approach will vary depending on whether your subfloor is concrete, plywood, or tile.
Concrete Subfloors
Concrete is tough and can handle scraping, sanding, and most chemical removers. For thick adhesive, use a floor buffer with a wire brush attachment. Avoid using too much water, as moisture can soak into concrete and delay new flooring installation.
Plywood Subfloors
Be gentle—plywood is softer and can gouge easily. Stick with manual scraping and gentle chemical removers. Avoid harsh solvents that can damage the wood or leave a residue that prevents new flooring glue from bonding.
Tile Subfloors
If removing adhesive from tile to refinish or reuse, test chemicals first to avoid etching the glaze. Scrape gently, and use plastic tools to avoid scratching.
Comparing Removal Methods
Here’s a side-by-side look at the effectiveness, safety, and cost of different adhesive removal methods:
| Method | Best For | Pros | Cons |
|---|---|---|---|
| Scraping | Most adhesives | Low cost, no chemicals | Labor-intensive, slow |
| Heat Gun | Pressure-sensitive, vinyl glue | Effective for small areas | Risk of burns, slower on large floors |
| Chemical Remover | Stubborn or thick adhesive | Fast, minimal effort | Fumes, need safety gear |
| Sanding | Concrete, plywood | Removes last traces | Dusty, not for asbestos glue |
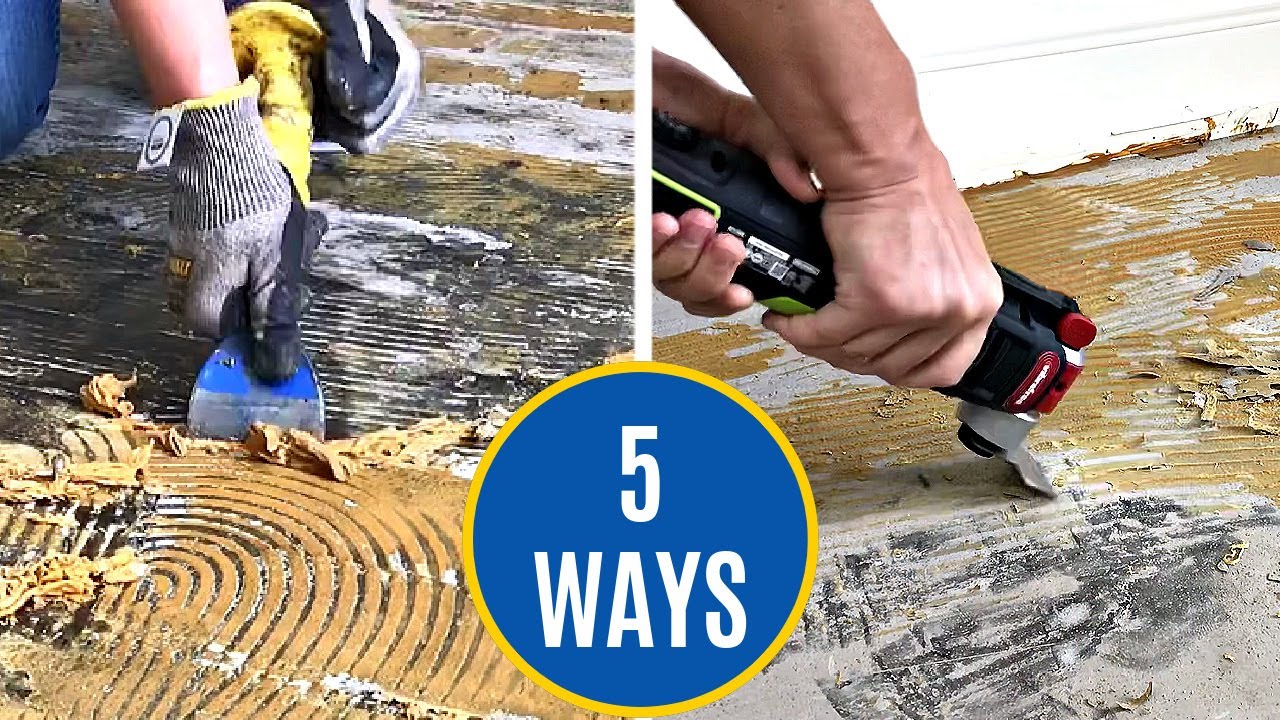
Advanced Removal: Power Tools And Specialty Equipment
For big jobs or tough adhesives, manual tools might not be enough. Here’s when to consider renting or buying power equipment.
Floor Buffers
A floor buffer with a wire brush or sanding pad can remove thick glue from concrete quickly. This tool is heavy but speeds up the process, especially for large rooms.
Oscillating Multi-tool
Equipped with a scraper or carbide blade, this tool vibrates quickly to slice under stubborn glue. It works well for edges and corners where larger scrapers can’t reach.
Adhesive Removal Machines
Some rental stores offer machines designed specifically for removing glue. These are best for large commercial jobs or when dealing with thick, tar-like adhesives.
Efficiency Comparison
Here’s a quick look at how these advanced tools stack up:
| Tool | Speed | Best Use | Cost |
|---|---|---|---|
| Floor Buffer | Fast | Large, open spaces | Rental $30–$60/day |
| Multi-Tool | Medium | Edges, small rooms | $50–$150 purchase |
| Removal Machine | Very Fast | Industrial/commercial | Rental $100+/day |
Credit: www.randrmagonline.com
Mistakes To Avoid
Removing flooring adhesive can be frustrating. Here are common pitfalls—and how to avoid them:
- Skipping protective gear – Even “safe” adhesives can irritate skin and eyes. Always wear gloves and goggles.
- Mixing chemicals – Never combine different adhesive removers. Mixing can release dangerous fumes.
- Using too much water – Especially on wood subfloors, excess water can cause warping and mold.
- Not testing a small area first – Some removers or scraping tools can damage your subfloor. Always test before tackling the whole floor.
- Ignoring ventilation – Chemical fumes can be harmful. Always open windows and, if possible, use fans to direct air outside.
- Rushing the soaking time – Let chemical removers work for the full time suggested on the label. Scraping too soon means more work.
- Sanding suspected asbestos adhesive – If you don’t know the adhesive type and age, get it tested before sanding. Asbestos dust is dangerous and regulated.
- Installing new flooring before the surface is dry and clean – Residual moisture or debris under new flooring can cause bonding problems or mold.
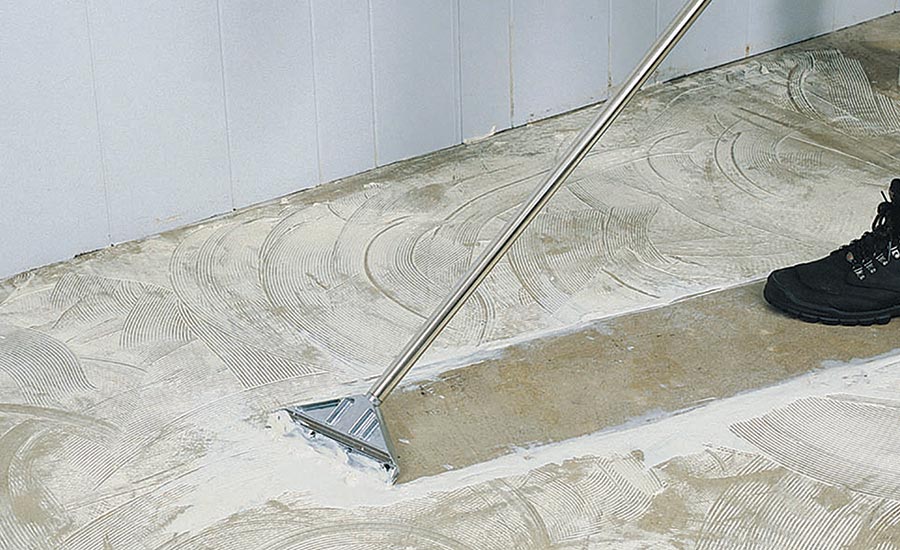
Cleaning Up And Preparing For New Flooring
After you remove the adhesive, proper cleaning is essential. Here’s what to do next:
- Sweep or vacuum all dust and debris.
- Mop the floor with warm water and mild detergent. Rinse well.
- Let the floor dry completely—this may take 24–48 hours, depending on humidity and subfloor type.
- Inspect the surface for any sticky spots or gouges. Fill holes with patching compound and sand smooth.
- Check for levelness. Uneven floors can cause problems for many flooring types, especially laminate and engineered wood.
Credit: www.homedepot.com
Realistic Timelines And Labor
How long will this take? It depends on the room size, adhesive type, and tools you use. Here are typical time estimates:
| Room Size | Manual Scraping | Chemical Removal | Power Tools |
|---|---|---|---|
| Small Room (100 sq ft) | 4–6 hours | 2–4 hours | 1–2 hours |
| Medium Room (200 sq ft) | 8–12 hours | 4–6 hours | 2–4 hours |
| Large Room (400 sq ft) | 16–24 hours | 6–10 hours | 4–6 hours |
Plan for breaks, especially if scraping by hand. Adhesive removal is hard work, but patience pays off.
Environmentally Friendly Removal Options
If you want to avoid harsh chemicals, there are greener ways to remove adhesive:
- Soy-based removers are biodegradable and less toxic, though they can be slower.
- Citrus-based gels use natural solvents and are safer for indoor air quality.
- For small areas, vinegar and water can soften some latex-based glues, though it’s not as powerful as commercial removers.
Always dispose of removed adhesive and used chemicals at approved recycling or hazardous waste centers.
Credit: www.youtube.com
Professional Help: When To Call An Expert
Some adhesive removal jobs are best left to professionals:
- If you suspect asbestos in old adhesive or tiles, call a certified abatement company.
- Commercial spaces or very large rooms often require industrial equipment and trained crews.
- If you have allergies, respiratory issues, or limited mobility, professionals have the right protective gear and tools.
Professional removal can be expensive—often $2–$5 per square foot—but may save time and prevent health risks.
Two Insights Beginners Miss
- Even invisible adhesive residue can cause future flooring to fail. Tiny amounts of sticky residue may not show up, but they can prevent new flooring from sticking, or cause vinyl to bubble over time. Always do a final wipe with a clean rag and water before installing new flooring.
- Not all adhesives react to water and chemicals the same way. For example, old mastic softens with water, but urethane becomes more stubborn. Always identify your adhesive type before choosing your removal approach. Guessing can waste time, damage your floor, or expose you to unnecessary risks.
Frequently Asked Questions
How Do I Know If My Adhesive Contains Asbestos?
If your adhesive is black (cutback) and was installed before 1980, there’s a chance it contains asbestos. Do not sand or aggressively scrape it. Instead, contact an asbestos testing lab for a sample test. More information is available at the EPA Asbestos page.
What Is The Safest Chemical Remover For Indoor Use?
Soy-based and citrus-based adhesive removers are generally safer, producing less odor and fewer harmful fumes. Always use gloves and ventilate the area, even with “green” products.
Can I Install New Flooring Over Old Adhesive?
It’s not recommended. Most new flooring needs a clean, smooth, and dry surface for proper bonding. Leaving old adhesive can cause unevenness, poor adhesion, or damage over time.
How Do I Remove Adhesive From Wood Subfloors Without Damaging Them?
Use a wide putty knife and gentle scraping. Avoid water and harsh chemicals. For stubborn spots, try a small amount of soy-based remover, and wipe quickly to prevent soaking the wood.
What Should I Do With Adhesive Waste And Used Chemicals?
Collect all adhesive scraps and chemical-soaked rags in a sealed container. Take them to your local hazardous waste disposal facility. Never pour leftover chemicals down the drain.
Removing flooring adhesive takes time and effort, but with the right knowledge and tools, you can achieve a clean surface ready for new flooring. Take each step carefully, protect your health, and don’t rush the process. The results—a smooth, trouble-free new floor—are worth the work.