Epoxy flooring is popular for garages, basements, showrooms, and even kitchens. It gives a hard, shiny, and durable surface that resists stains and is easy to clean. But the secret to a long-lasting epoxy floor is not just the epoxy itself—it’s all about how you prep the floor before you pour. If you skip or rush the preparation, your epoxy can peel, bubble, or fail in just a few months. This guide walks you through every step of the process, including materials, tools, and tips most beginners miss. If you want a floor that looks great for years, start here.
Why Proper Floor Prep Matters
Many people believe that applying epoxy is just about cleaning and pouring. In reality, surface preparation is over 70% of the job. Concrete is porous, and hidden dust, oil, or old coatings can prevent epoxy from sticking properly. Even tiny mistakes during prep can cause issues like:
- Peeling: Epoxy detaches from the floor in sheets.
- Blisters and bubbles: Air or moisture trapped below the surface.
- Uneven color or texture: Bad adhesion or incomplete cleaning.
According to industry experts, most epoxy failures are due to poor prep—not the product itself. Spending time here saves you money and effort later. A well-prepared floor is more resistant to heavy traffic, chemicals, and changes in temperature. Even if you use the highest quality epoxy, skipping steps in prep means you might need to redo the floor much sooner than expected.
Imagine spending hours and money, only to see your new floor crack or lose its shine in a few months. That’s why prep matters more than the brand or color you choose.
What You’ll Need Before You Start
Preparation takes more than just a broom. Having the right tools and materials ready will make the job smoother and safer. If you’re working in a large area, consider renting some equipment. This not only saves your energy, but also makes the job more efficient.
Essential Tools
- Shop vacuum: For dust and debris.
- Stiff-bristle broom: Helps with sweeping out larger particles.
- Floor grinder or buffer: For large areas or tough surfaces.
- Concrete degreaser: Removes oil and grease.
- Protective gear: Gloves, goggles, and mask.
- Pressure washer (optional): For deep cleaning.
For smaller spaces, you might manage with just a broom and vacuum. But for garages and showrooms, a grinder or buffer is almost essential. These tools ensure the surface is rough enough for the epoxy to bond.
Materials
- Patch compound or crack filler: Repairs cracks or holes.
- Concrete etcher: Opens up the surface for better bonding.
- Plastic sheeting: To test for moisture or protect walls.
- Painter’s tape: For masking off edges.
- Buckets and mops: For cleaning and rinsing.
Many people forget to buy crack filler or a moisture test kit. These are crucial for a strong, even finish. For more advanced repairs, consider two-part epoxy fillers, which cure harder and resist movement.
Non-obvious insight: Have extra cleaning supplies on hand. After grinding or etching, you might need to repeat cleaning, especially if dust keeps appearing. This can catch beginners off guard.
Credit: brewfloors.com
Assessing The Concrete Surface
Before touching any tools, take time to inspect your floor. Not every concrete slab is the same, and some need extra work. A careful assessment now prevents surprises later.
Check For Moisture
Moisture in the concrete is one of the top reasons epoxy fails. Even if the surface looks dry, vapor from below can push the coating off.
How to Test for Moisture:
- Cut a piece of plastic sheeting (about 2×2 feet).
- Tape all sides tightly to the concrete.
- Leave it for 24-48 hours.
- Check for condensation or a dark spot under the plastic.
If you find moisture, you need to solve this before applying epoxy. Options include installing a vapor barrier or choosing a different flooring. Sometimes, using a moisture-blocking primer can help, but if moisture levels are high, you might need professional advice.
Example: In older homes, basements often have unseen moisture. Even if you don’t see water, humidity from below can cause the epoxy to bubble weeks after installation. It’s far better to catch this early.
Identify Cracks And Damage
Small cracks are common, but they must be repaired. Larger cracks, spalling (flaking concrete), or movement may require professional help.
- Hairline cracks: Use a concrete patch or filler.
- Wider cracks (>1/8 inch): These need special epoxy fillers or may need to be widened and cleaned before filling.
- Pitted or uneven spots: Patch and level for a smooth finish.
If you notice cracks that run across the whole floor or seem to widen over time, consult a professional. These may be signs of structural movement.
Old Coatings And Adhesives
If your floor has paint, sealer, or glue from previous flooring, these must be removed. Epoxy will not stick to these surfaces. Scrape, grind, or use a chemical stripper as needed. Paint and sealers can be stubborn, so patience is key.
Sometimes repeated grinding or stripping is necessary.
Non-obvious insight: Even “invisible” residues, like wax or floor polish, can block epoxy adhesion. If you’re unsure what’s on your floor, do a small test patch with water—if it beads up, there’s likely a coating present.
Cleaning The Surface: The Right Way
Even if your floor looks “clean,” microscopic dust or oil can ruin adhesion. Cleaning is more than just sweeping.
Removing Dust And Debris
Start with a broom, then use a shop vacuum to remove all fine particles. Pay special attention to corners and expansion joints. These areas tend to collect dust, which is easy to miss.
Degreasing
Garage and basement floors often have oil or grease stains. Use a concrete degreaser—not regular soap. Scrub with a stiff brush, rinse with water, and repeat if stains remain. Some degreasers require a waiting period to work effectively, so read instructions carefully.
Example: If you recently worked on your car, even the smallest oil drop can spread and create a slippery spot. Always double-check for stains, especially in parking areas.
Deep Cleaning With Pressure Washer
For best results, use a pressure washer to blast away deep dirt. Let the floor dry completely (usually 24-48 hours) before moving on. If you live in a humid climate, drying might take longer.
Non-obvious insight: Even tiny amounts of car tire residue can affect epoxy adhesion. Always degrease areas where cars are parked, not just visible stains. Tire marks may look harmless, but they contain oils that can cause the epoxy to lift.
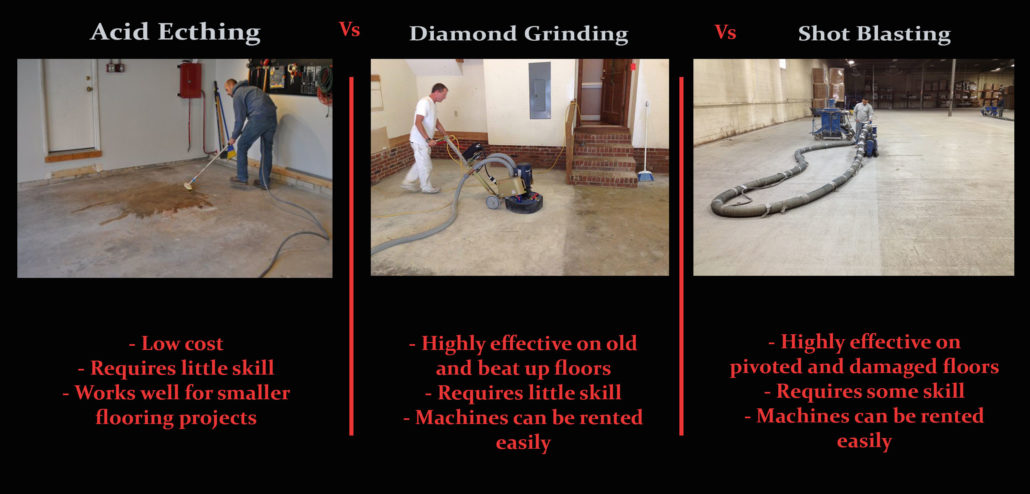
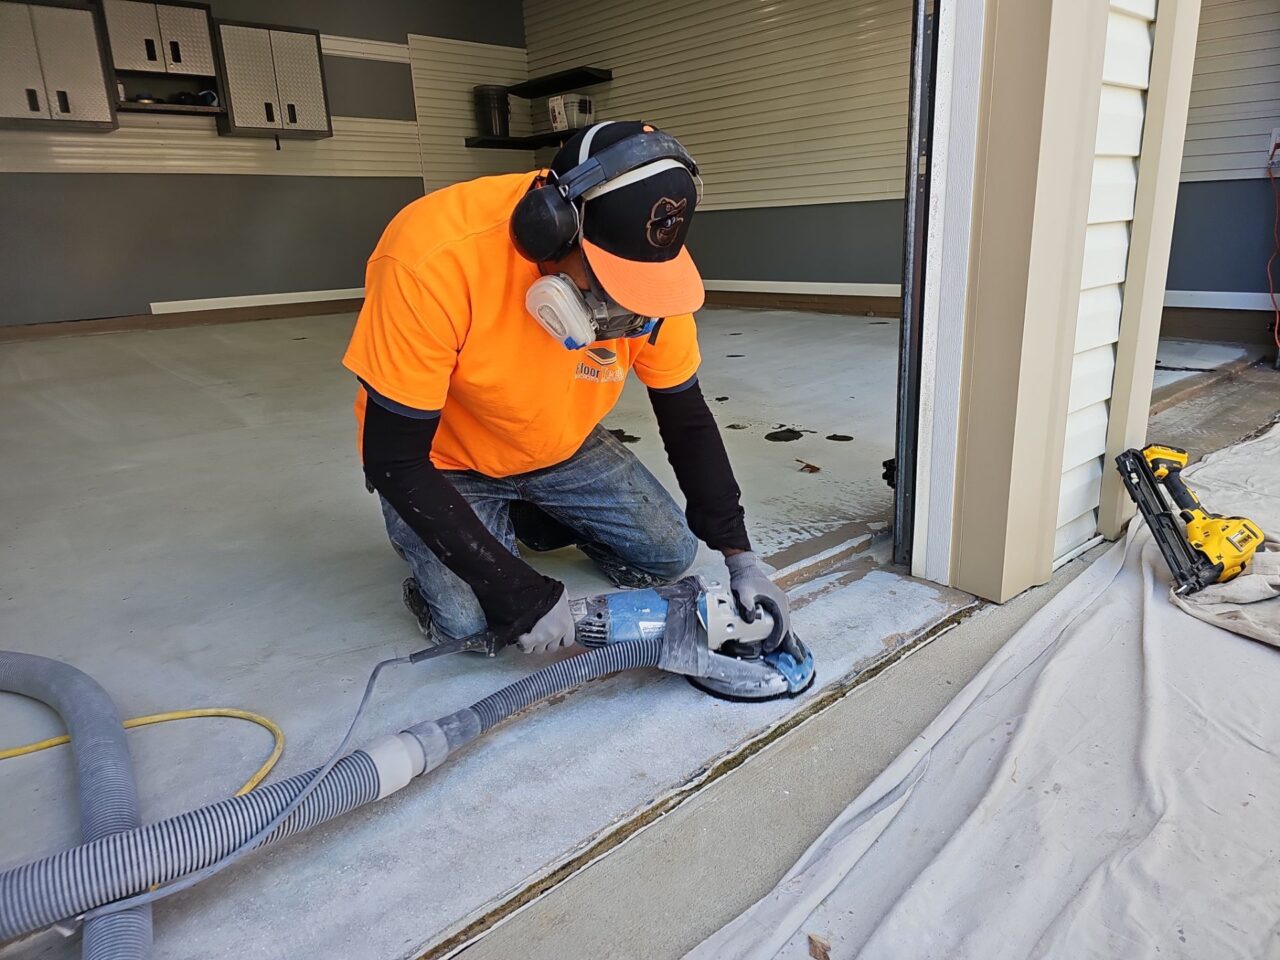
Grinding Or Etching: Creating The Perfect Profile
Epoxy needs a rough, porous surface to grip. Smooth or sealed concrete must be “opened up. ” This step is crucial for both appearance and durability.
Mechanical Grinding
A floor grinder with a diamond or carbide head is the gold standard for large areas. This process creates a uniform texture, called a “profile.” For most epoxies, you want a profile similar to 100-120 grit sandpaper.
- Pros: Best adhesion, removes old coatings, fast for big spaces.
- Cons: Noisy, creates dust, may require rental equipment.
If grinding, use a vacuum attachment if possible. This reduces airborne dust, which can settle back onto the floor and create cleaning headaches.
Example: For a home garage, renting a grinder for a day is usually enough. For commercial spaces, industrial grinders may be needed.
Acid Etching
For small or DIY projects, acid etching is common. A mild acid solution (often muriatic or citric) reacts with the surface, making it porous.
How to Etch:
- Wear gloves, goggles, and mask.
- Mix etcher with water as directed.
- Pour onto floor in sections.
- Scrub with a stiff broom.
- Let it bubble for 10-15 minutes.
- Rinse thoroughly, several times, to remove all acid.
- Let the floor dry at least 24 hours.
Warning: Acid etching does not remove oil or old coatings. Always clean and degrease first. Improper rinsing can leave acid residue, which interferes with epoxy curing.
Comparison: Grinding Vs Etching
Here’s how grinding and acid etching compare for prepping your floor:
| Method | Best For | Pros | Cons |
|---|---|---|---|
| Grinding | Large, coated, or very smooth floors | Superior adhesion, removes old coatings | Messy, equipment rental needed |
| Etching | Small, uncoated, or lightly stained floors | Low cost, DIY-friendly | Less effective on tough stains, not for sealed concrete |
Pro tip: For best results, professionals often use both methods—grind problem spots and etch the rest. This hybrid approach ensures the whole floor is ready, even if some areas need extra attention.
Repairing Cracks, Holes, And Joints
A smooth, stable surface is key. Epoxy will not hide or fix cracks, holes, or rough spots. Every imperfection can show through the glossy finish.
Steps To Patch And Repair
- Clean the damaged area with a wire brush and vacuum.
- For cracks: Use a concrete crack filler or two-part epoxy patch. Press it deep into the crack with a putty knife.
- For holes or pits: Fill with a patching compound. Smooth flush with the surface.
- Let it cure fully (follow manufacturer’s times).
- Sand any high spots for a flat finish.
Do not rush this stage. Even small holes can cause visible dips or air pockets in your final floor.
Example: If your floor has old expansion joints, inspect them for crumbling edges. Clean and fill only as needed; don’t overfill.
What About Control Joints?
Control or expansion joints are intentional lines in concrete to control cracking. Do not fill these with regular patch—use a flexible joint filler if you want to seal them.
Non-obvious insight: Filling control joints with hard epoxy can cause your floor to crack again as concrete moves. Use a flexible sealant made for joints. This lets the floor expand and contract without damaging the epoxy.
Final Cleaning And Dust Removal
After grinding, etching, and repairs, clean again. Every bit of dust must be removed.
- Vacuum the entire floor, including corners and joints.
- Damp mop to pick up remaining fine dust.
- Allow the floor to dry fully. Even a little moisture can ruin your epoxy.
Pro tip: Run your bare hand across the floor. If you pick up dust, keep cleaning. Sometimes it takes several passes before the floor is truly dust-free.
Example: After sanding repairs, dust can settle hours later. Wait, then check again before starting the next step.
Testing For Surface Readiness
Think the floor is ready? Test before applying your expensive epoxy.
The “tape Test”
- Press a piece of duct tape firmly onto the concrete.
- Rip it off quickly.
- Check for dust, grit, or debris on the tape.
If you find much residue, repeat cleaning and vacuuming. A truly clean and rough surface is the secret to great adhesion.
Moisture Test (again)
If you pressure washed, mopped, or etched, repeat the plastic sheeting moisture test. Applying epoxy to a damp floor is a recipe for disaster.
Non-obvious insight: Sometimes, after acid etching and rinsing, moisture hides in cracks or low spots. Use a fan or heater to speed up drying if humidity is high.
Masking And Protecting Surroundings
Epoxy is sticky and permanent. Protect walls, doors, and anything you don’t want coated.
- Mask off edges with painter’s tape.
- Cover walls up to 12 inches with plastic or cardboard.
- Move all furniture and objects out of the room.
Tip: Epoxy can splash or drip, so cover more than you think you need. Don’t forget to protect door thresholds and nearby fixtures.
Choosing The Right Epoxy System
Not all epoxies are the same. Water-based, solvent-based, and 100% solids each require different prep and have different tolerances for moisture or surface roughness.
Types Of Epoxy
| Type | Durability | VOC (Fumes) | Surface Prep Needed |
|---|---|---|---|
| Water-based | Lower | Low | Standard cleaning, light etch |
| Solvent-based | Medium | Medium | Thorough degrease, etch or grind |
| 100% solids | High | None | Best surface—grind and patch |
Non-obvious insight: 100% solids epoxy is thick and unforgiving. Any floor flaw will show through, so prep must be perfect. For water-based epoxy, small imperfections are less visible, but durability is lower.
Example: If you’re coating a commercial kitchen, choose a high-solids product and invest more time in surface prep.
Credit: epoxycolorado.com
Common Mistakes And How To Avoid Them
Many DIYers rush or skip steps, leading to costly re-dos. Here are the most common errors and how to avoid them:
- Skipping moisture test: Leads to peeling and bubbles.
- Not removing old coatings: Epoxy won’t stick to paint or sealers.
- Poor cleaning: Even invisible dust can cause failure.
- Uneven repairs: Dips and humps show in the final result.
- Applying epoxy to wet surface: Causes cloudiness, poor bond.
- Using wrong epoxy for the surface: Some need more aggressive prep.
Pro tip: Take photos of each stage. This helps track your progress and spot missed areas. It also helps if you need to ask for advice or warranty support later.
Example: Many beginners forget to mask off doorways, leading to accidental spills on carpet or tile. Always double-check before mixing epoxy.
Step-by-step Summary: Floor Prep For Epoxy
Let’s put it all together into one clear workflow.
- Remove all items from the room.
- Inspect for cracks, moisture, old coatings.
- Degrease and clean thoroughly.
- Grind or etch for surface profile.
- Patch cracks and holes, let cure.
- Vacuum and mop to remove all dust.
- Test for moisture and dust.
- Mask off edges and protect walls.
- Choose the right epoxy for your floor and prep.
- Double-check surface before mixing epoxy.
If you’re unsure at any step, stop and review. Rushing is the biggest cause of poor results.
Timing And Weather Considerations
Epoxy prep and application are sensitive to temperature and humidity. Ideal conditions:
- Temperature: 60-85°F (16-29°C).
- Humidity: Below 85%.
If it’s too cold, epoxy may not cure. High humidity can cause blushing or a cloudy finish. Always check the manufacturer’s recommendations for your product. If your garage is unheated, plan for a warmer season.
Example: Applying epoxy during rainy weather can increase drying times and risk moisture under the coating. Choose a dry week if possible.
When To Hire A Professional
If your floor has major cracks, moisture problems, or old coatings that won’t budge, consider hiring a pro. Professionals have industrial grinders, dust control, and experience with tough jobs. It’s an investment, but sometimes the only way to guarantee a lasting finish.
Professionals can also handle large commercial spaces, or floors with heavy use. They can diagnose hidden issues and use advanced primers or sealers where needed.
Example: Real-life Floor Prep Timeline
Here’s what a typical 2-car garage (about 400 square feet) might look like:
| Task | Time Needed | Notes |
|---|---|---|
| Clear space & inspect | 2 hours | Move all items, check for cracks and stains |
| Degreasing & cleaning | 2-3 hours | Scrub, rinse, dry overnight |
| Grinding/Etching | 3-4 hours | Rent grinder or use acid, let dry |
| Repairs | 2-4 hours (plus cure time) | Patch cracks, let cure per product |
| Final vacuum & mop | 1 hour | Dust check, repeat if needed |
| Masking & prep | 1 hour | Cover walls, tape edges |
Total: At least 2-3 days, not counting drying/curing times. If weather is damp or repairs are extensive, add extra time.
Example: For a basement with heavy stains, allow extra drying time. Always build in a buffer to avoid rushing.
Safety And Environmental Precautions
Always wear gloves, goggles, and a mask when using chemicals or grinders. Work in a well-ventilated area. Never mix chemicals or pour acids down drains without following local rules.
Some degreasers and etchers are hazardous. Dispose of rinse water properly. Read all safety sheets before starting. Children and pets should stay away from the work area until all chemicals are cleaned up.
Non-obvious insight: Protect your skin from acid and epoxy. Even minor splashes can cause irritation or burns. Keep a bucket of clean water nearby for emergencies.
Credit: floortechconcretecoatings.com
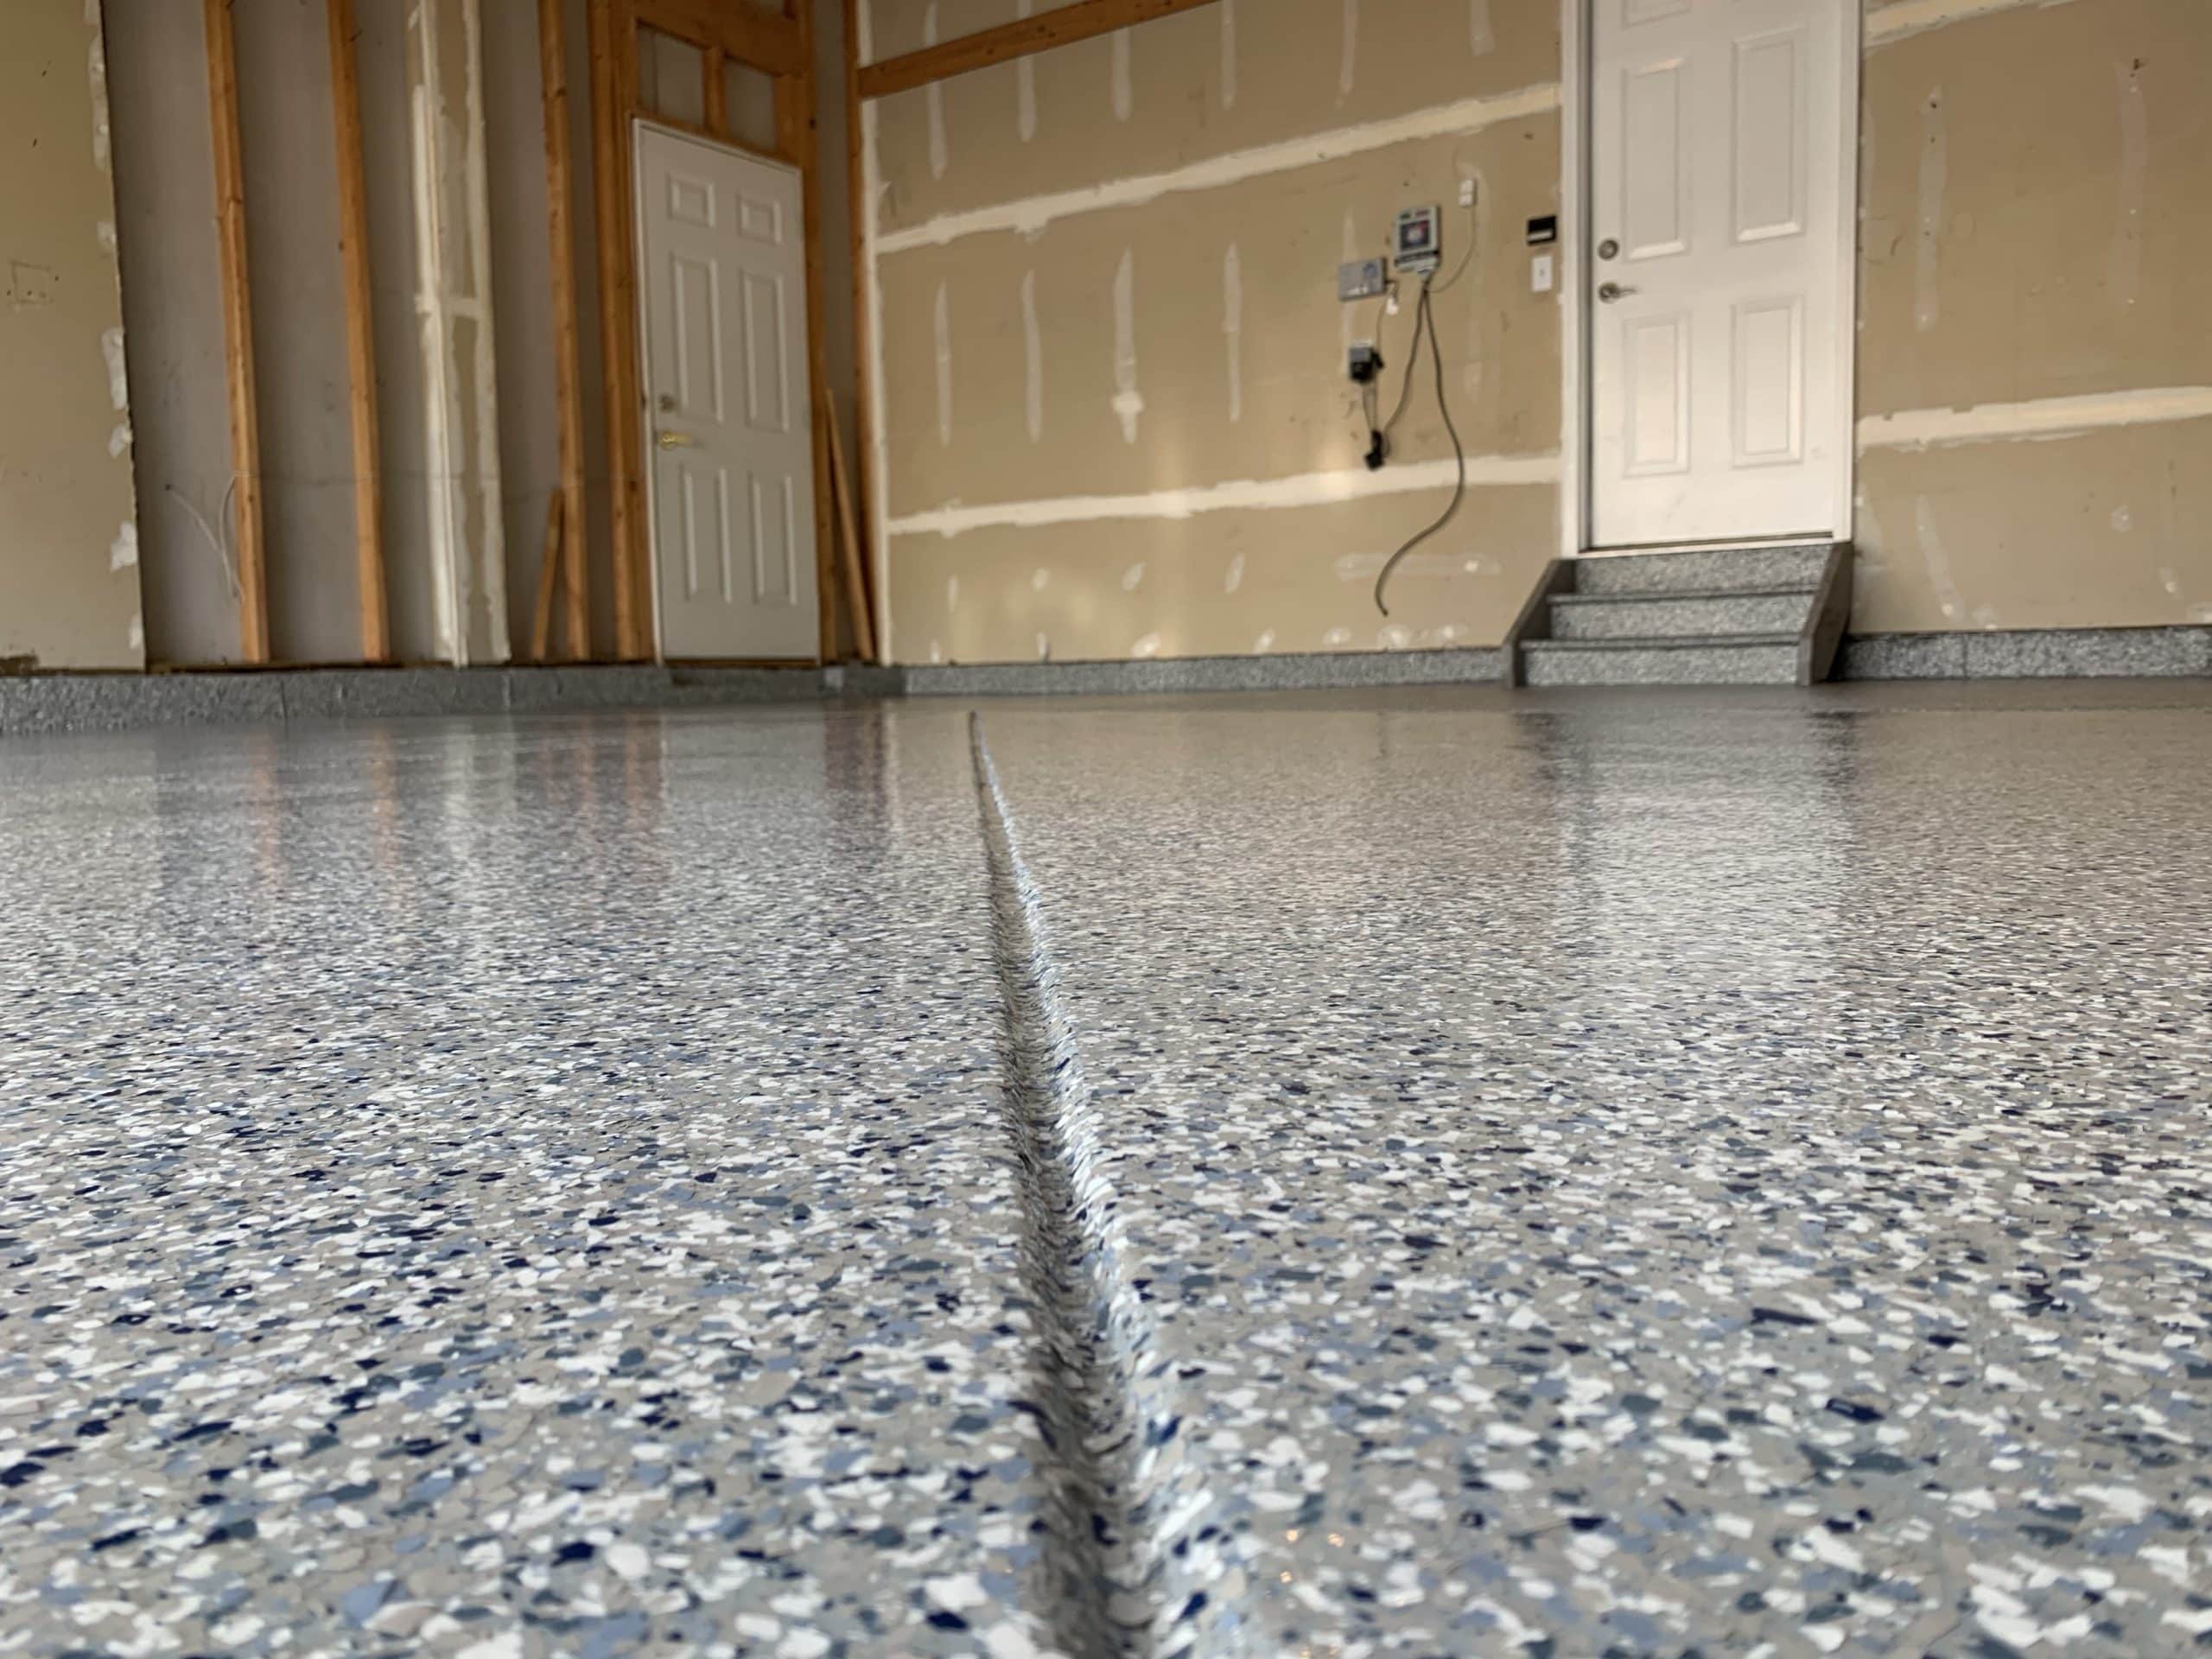
What To Expect: The Results Of Good Prep
A well-prepped floor gives you:
- Smooth, glassy look
- No bubbles, peeling, or flaking
- Easy to clean and maintain
- Longer-lasting finish (often 10+ years with proper care)
Skipping prep might save a day, but costs much more in repairs or a total redo. Epoxy floors that are properly prepped can handle heavy vehicles, foot traffic, and cleaning chemicals with ease.
Example: In showrooms, good prep means your floor stays shiny and professional, attracting customers and lasting for years.
Where To Learn More
For deeper technical information, the Concrete Network offers in-depth resources on epoxy floor prep, tools, and troubleshooting.
Frequently Asked Questions
How Long Does It Take To Prep A Floor For Epoxy?
It usually takes 2-3 full days to prep a garage floor, including cleaning, drying, repairs, and masking. Large cracks, heavy stains, or poor weather can add extra days. Rushing this stage almost always leads to problems.
Can I Epoxy Over Painted Or Sealed Concrete?
No, epoxy will not stick properly to paint or sealers. You must remove all coatings by grinding, sanding, or using a chemical stripper until you reach bare, clean concrete.
What Happens If I Skip The Moisture Test?
If moisture is present, epoxy can bubble, peel, or discolor. Moisture is the top cause of epoxy floor failure. Always test with plastic sheeting before starting.
Do I Have To Use A Grinder, Or Is Acid Etching Enough?
For most DIY jobs, acid etching is enough if your concrete is not too smooth or coated. Grinding is better for very smooth, hard, or previously coated floors. Many pros use both for best results.
Can I Prep And Epoxy My Floor In One Day?
It’s not recommended. Cleaning, etching, and repairs all need drying or curing time. Rushing can trap moisture or dust, leading to poor results. Always let the floor dry completely between steps.
—
A successful epoxy floor starts with thorough, careful preparation. Every step you take here builds the foundation for a beautiful, long-lasting surface. It may be the least exciting part, but it’s the most important. Follow these steps, and you’ll enjoy a floor that looks great and lasts for years—without costly surprises.