Installing a storm door chain may seem like a small project, but it can make a big difference in the life of your door. Many homeowners overlook this simple addition, but a storm door chain protects your door from wind damage, prevents slamming, and extends the life of both the door and the hinges.
If you’ve ever had your storm door fly open during a storm and bend backward or slam into your house, you know how important this small part can be. Learning how to install a storm door chain is a practical skill that saves you money and avoids frustration in the future.
This guide will walk you through every step of installing a storm door chain. You’ll find out what tools you need, how to measure and mark accurately, and which mistakes to avoid. Even if you’re new to DIY projects, you’ll finish with a solid understanding and a well-protected door.
What Is A Storm Door Chain And Why It Matters
A storm door chain—sometimes called a wind chain or wind chain stop—is a simple device that attaches between your storm door and the door frame. Its job is to catch the door before it opens too far, especially during strong wind. This small part can prevent expensive damage. Many people don’t realize that without a chain, one strong gust can bend hinges, crack glass, or even pull the door off its frame.
Most storm door chains include a spring, a chain, and mounting brackets. Some chains have a plastic cover to reduce noise. The chain acts as a limit, allowing the door to open wide enough for comfortable use but not so wide that wind or sudden movement causes damage.
Key benefits:
- Protects door and frame from wind
- Reduces slamming noise
- Prolongs door hardware life
If you live in an area with frequent wind, or if children or pets often swing the door open quickly, a storm door chain is almost essential.
Tools And Materials Needed
Before you start, gather all the tools and materials. Having everything ready will help the installation go smoothly and prevent trips to the hardware store in the middle of your project.
You will need:
- Storm door chain kit (includes chain, spring, brackets, screws)
- Drill with drill bits (usually 1/8-inch for pilot holes)
- Screwdriver (Phillips and/or flathead, depending on screws)
- Tape measure
- Pencil or marker for marking holes
- Level (optional, but helpful for neat installation)
- Safety glasses (always a good idea when drilling)
- Step ladder (if your door is tall or you need better access)
Pro tip: Many storm door chain kits include all the screws and hardware you’ll need, but it’s smart to check the package before you begin. Sometimes, the screws provided are too short for older wood frames, or you may need different anchors for metal or masonry frames.
Choosing The Right Storm Door Chain Kit
There are many types and brands of storm door chains. Most look similar but can have important differences. Here’s what to check before you buy:
Material
- Steel: Most chains are made of steel, which is strong and durable.
- Stainless steel: Best for coastal or humid areas to prevent rust.
- Brass or zinc-plated: Resists corrosion but may not be as strong as full stainless.
Chain Length
Standard chains fit most doors, but if you have an unusually wide or thick door, measure before buying. The chain should allow the door to open about 80°–90° without stretching.
Spring Quality
A good spring absorbs some force from the wind and softens the door’s stop. Cheaper kits sometimes include weak springs that can stretch out or break quickly.
Noise Dampening
Some premium kits include a plastic or rubber cover for the chain. This reduces metal-on-metal noise when the chain catches. If noise is a concern, look for a kit with this feature.
Compatibility
Check if your storm door is wood, metal, or vinyl. Most chains work on all types, but mounting screws and anchors may vary.
Table: Typical Features In Storm Door Chain Kits
| Feature | Basic Kit | Premium Kit |
|---|---|---|
| Material | Zinc-plated steel | Stainless steel |
| Spring included | Yes (light duty) | Yes (heavy duty) |
| Noise Dampening | No | Plastic or rubber cover |
| Mounting Screws | Basic wood screws | Includes metal/vinyl anchors |
| Price Range | $5–$8 | $10–$20 |
Non-obvious insight: Not all “universal” chains truly fit every door—older storm doors may require longer or stronger chains. Always measure the distance from the hinge edge to the spot where you want the chain mounted.
Preparing Your Door And Work Area
A little preparation makes installation much easier and safer. First, choose a day with mild weather if possible. You’ll likely have the door open for several minutes, and drilling into cold or wet wood can cause splitting.
Steps for preparation:
- Open your storm door fully and block it open (use a wedge, heavy object, or ask someone to hold it).
- Inspect the area where the chain will attach, both on the door and the frame. Remove any dirt or loose paint.
- If you’re replacing an old chain, remove it and fill any old screw holes with wood filler or caulk.
Safety tip: Wear safety glasses while drilling. Even a small wood or metal shaving can cause eye injury.
Practical tip: Some people install two chains—one at the top and one at the bottom—for extra protection on heavy or double storm doors. For most homes, one chain at the top is enough.
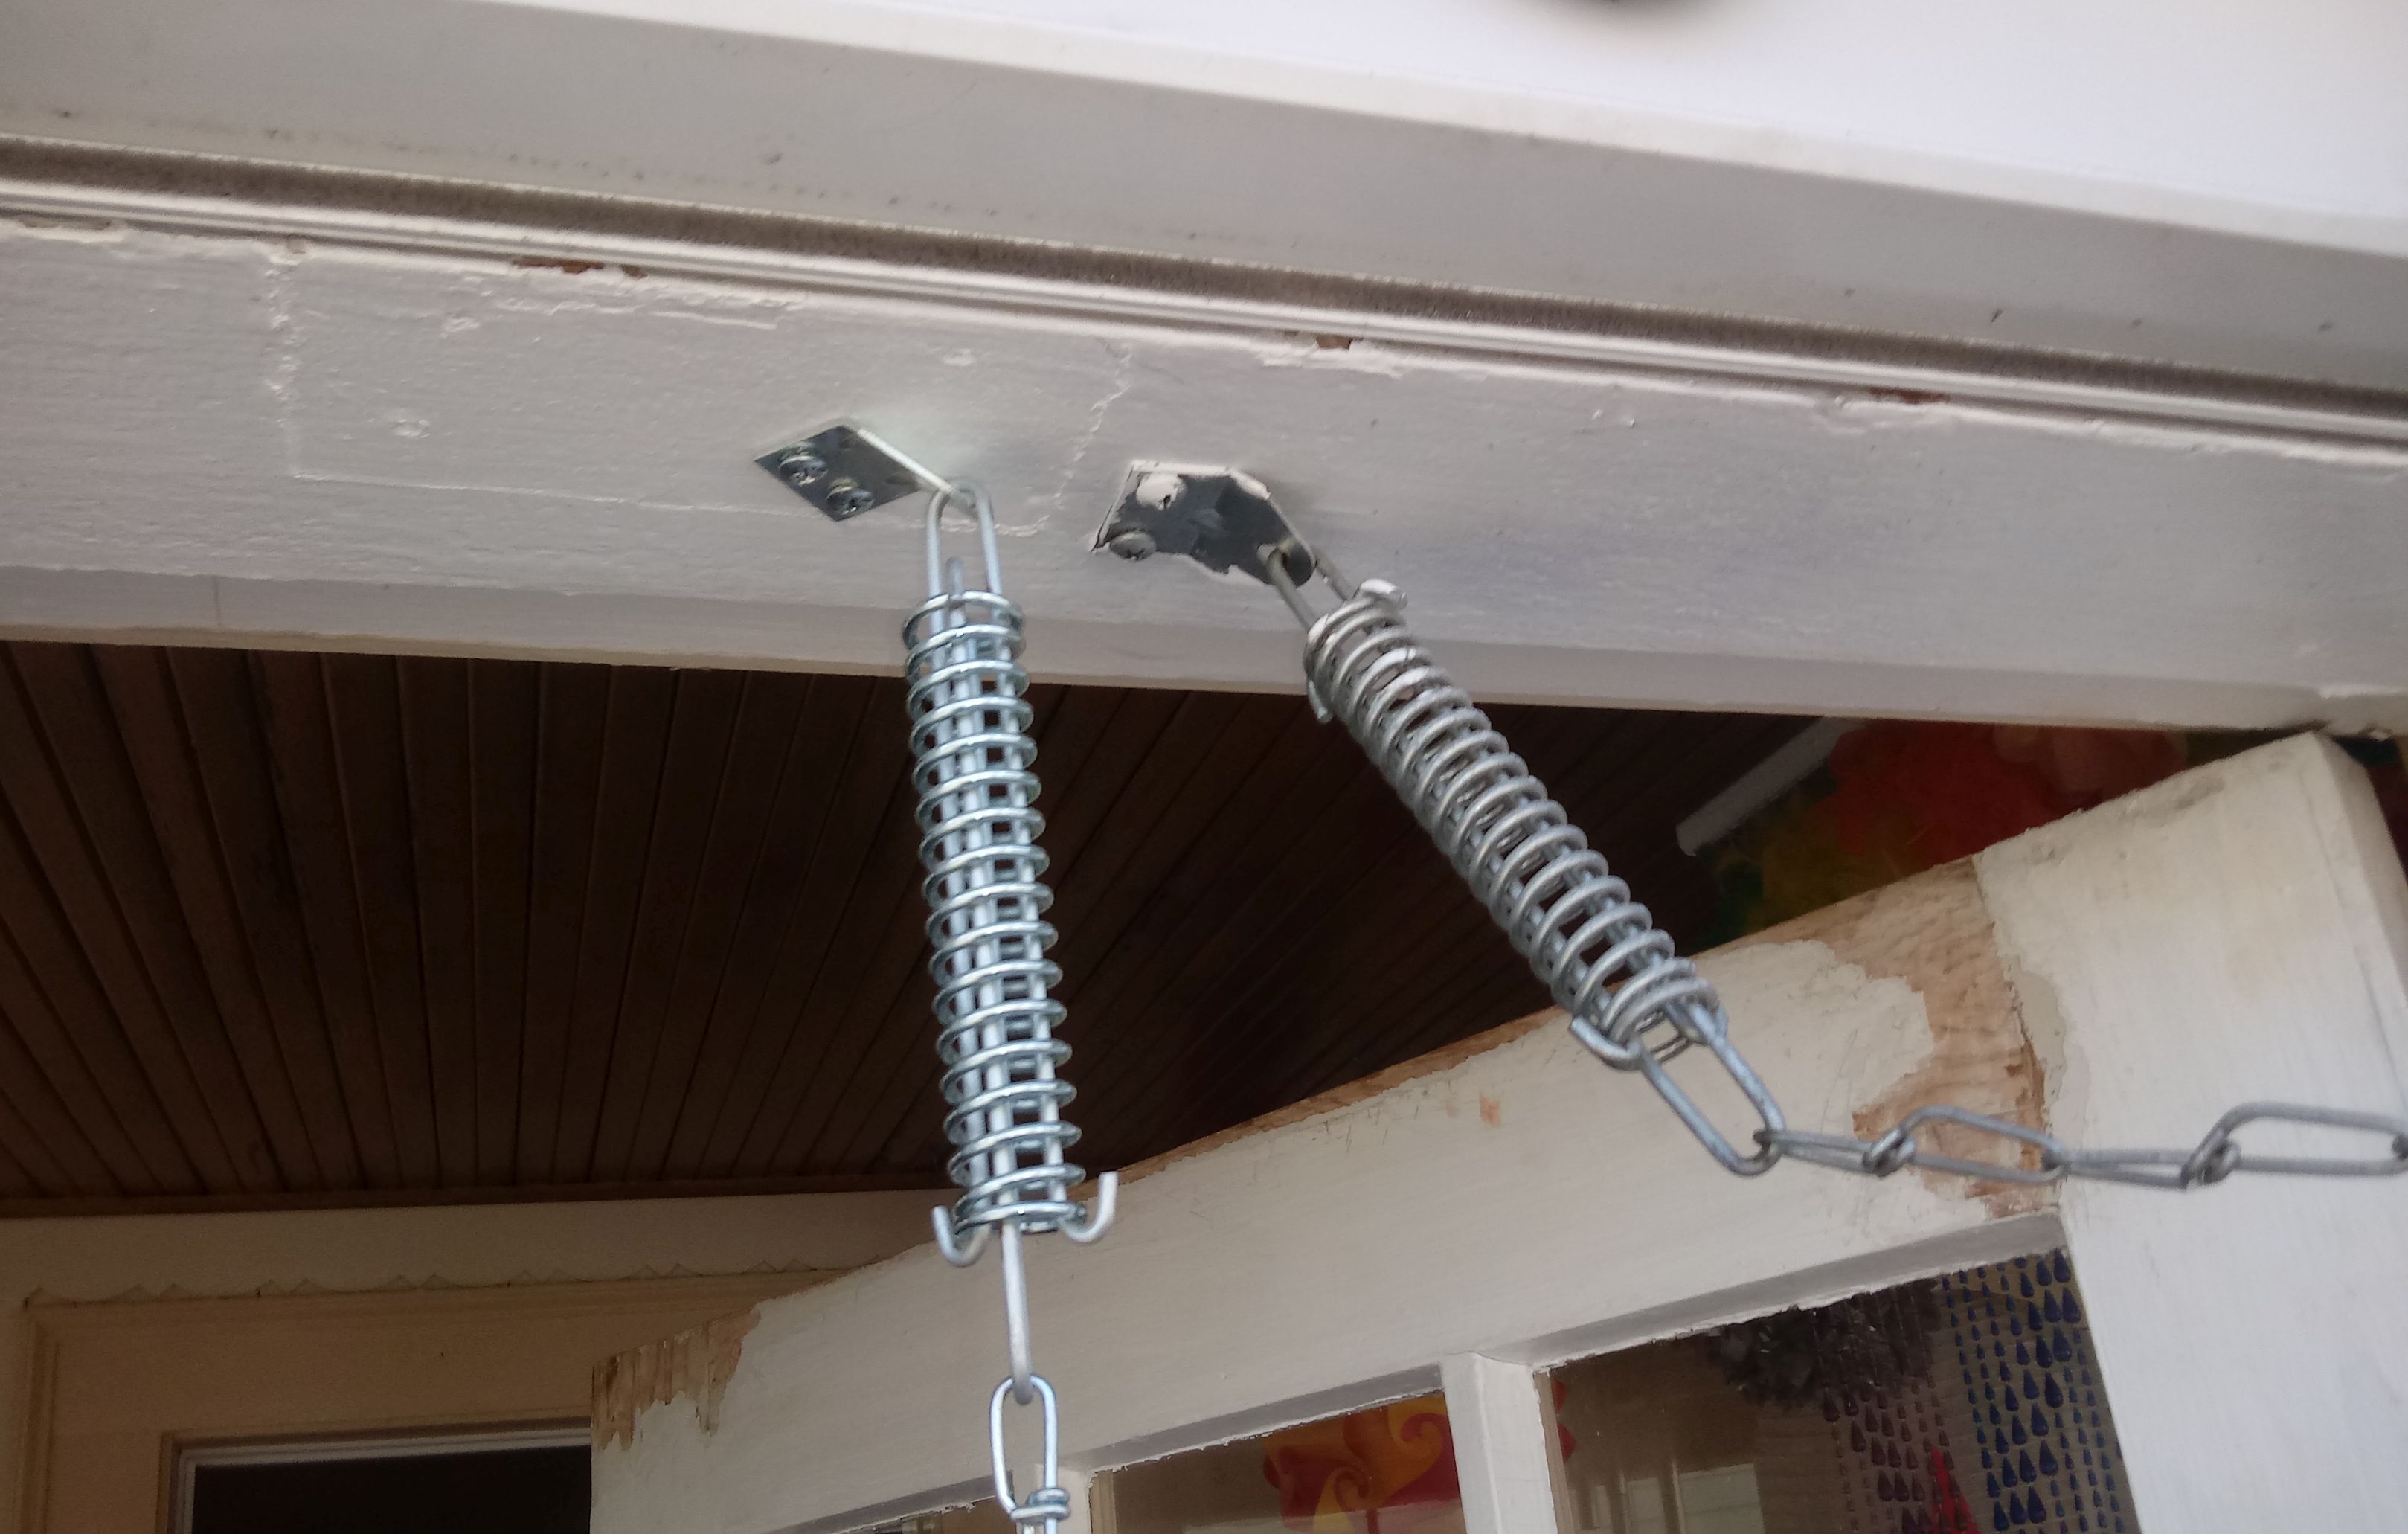
Credit: justinlocke.com
Finding The Best Mounting Position
Choosing the right spot for your storm door chain is important. Placing it too high, too low, or too close to the edge can reduce its effectiveness or cause the door to bind.
Guidelines For Positioning:
- The chain bracket on the door frame should be placed about 6–8 inches above the top edge of the door.
- The chain bracket on the storm door should be mounted near the top edge, about 2–3 inches from the hinge side.
Why these positions?
- Too close to the hinge: The chain won’t limit the door’s swing enough.
- Too far from the hinge: The force on the chain increases, risking damage to the door.
- Too high or too low: Can interfere with door closers, handles, or glass panels.
Non-obvious insight: Before drilling, open and close the door slowly while holding the chain in place to check for obstructions (like door closers or decorative trim). This quick test can prevent mistakes that require patching holes later.
Marking And Drilling Pilot Holes
Accurate marking and drilling are key for a strong and neat installation. Here’s how to do it right.
- Hold the frame bracket (the part that attaches to the stationary door frame) about 6–8 inches above the top of the door.
- With the door open to about 80°, hold the chain up so it is taut but not stretched.
- Mark the screw holes for the frame bracket with a pencil.
- Repeat this process for the door bracket, which attaches to the top of the storm door about 2–3 inches from the hinge.
- Use a tape measure to double-check both marks are level and straight.
Drilling pilot holes:
- Use a drill bit that’s slightly smaller than your screws. For most kits, a 1/8-inch bit is perfect.
- Drill pilot holes at the marked spots. This prevents wood from splitting and makes screw installation easier.
Example: If your storm door frame is made of metal, use a metal drill bit. For vinyl or composite, check if your kit includes special anchors.
Installing The Frame Bracket
With your pilot holes drilled, you’re ready to install the first bracket. This bracket holds one end of the chain and is fixed to the house frame.
- Align the frame bracket over the pilot holes.
- Insert the screws and tighten them with a screwdriver (or drill with low torque).
- Make sure the bracket is straight and firmly attached.
Tip: Do not overtighten screws, especially in older wood frames, as this can strip the hole or crack the wood.
Attaching The Chain And Spring
Most storm door chains include a spring at one end. The spring helps absorb shock and reduces sudden stops. Proper installation of the spring is important for performance.
Which end gets the spring?
- The spring connects to the door bracket (moving part of the door).
- The solid end connects to the frame bracket.
Step-by-step:
- Attach the chain’s solid end to the frame bracket using the included pin or clip.
- Thread the spring onto the other end of the chain.
- Attach the spring to the door bracket with the included pin or clip.
Practical example: If your kit has a plastic or rubber noise cover, slide it over the chain before attaching both ends. This is much easier than trying to add it after installation.
Installing The Door Bracket
The door bracket holds the spring end of the chain to the storm door itself.
- Align the door bracket with your pilot holes, about 2–3 inches from the hinge side.
- Attach with screws, again being careful not to overtighten.
- Check that the bracket is flush and stable.
Common mistake: Placing the door bracket too close to the edge can weaken the attachment and may cause the screws to pull out over time.
Testing The Chain
Before finishing, test your installation to make sure everything works smoothly.
- Open the storm door slowly until the chain stops it.
- Check that the door opens wide enough for comfortable use but not so wide that it risks hitting the wall or bending backward.
- Close the door and listen for rattling or scraping. If the chain is too loose, adjust the bracket positions.
Practical tip: If you hear loud metal-on-metal noise, consider adding a felt pad or rubber bumper to the chain or bracket.
Table: Common Installation Problems and Solutions
| Problem | Likely Cause | Solution |
|---|---|---|
| Door doesn’t open fully | Chain installed too short | Move door bracket farther from hinge |
| Chain rattles | Loose brackets or missing cover | Tighten screws, add noise cover |
| Screws won’t hold | Old or damaged wood | Use longer screws or wood filler |
| Chain breaks under wind | Cheap spring or chain | Upgrade to heavy-duty kit |
Final Adjustments And Maintenance
Once your chain is installed and tested, a few small adjustments can make it work better and last longer.
Adjusting Chain Tension
- If the door opens too far, move the door bracket closer to the hinge.
- If the chain feels too tight, move the bracket farther from the hinge.
- Some kits include a turnbuckle for fine adjustment. Use pliers to turn and set the perfect tension.
Lubricating The Chain
A drop of light oil on the chain and spring will keep them moving smoothly and prevent rust. Do this once or twice a year.
Checking For Wear
Every few months, check the chain and brackets for signs of wear:
- Look for stretching, rust, or cracked mounting points.
- Tighten any loose screws.
Non-obvious insight: Many people ignore their storm door chain until it fails. Checking it during regular door cleaning helps avoid surprise repairs later.
Common Mistakes To Avoid
Even experienced DIYers make mistakes when installing storm door chains. Here are the most common issues and how to avoid them:
- Mounting too close to the edge: This makes the connection weak. Always leave at least 2 inches from the door edge.
- Skipping pilot holes: Without pilot holes, screws can split wood or strip out of metal.
- Using the wrong screws: Use the screws provided in the kit or select ones that match your door’s material.
- Not testing before final tightening: Always check the chain’s function before tightening all screws.
- Forgetting the noise cover: If your kit includes a cover, install it before attaching both ends.
- Ignoring the spring direction: The spring should always be on the moving part (the door), not the frame.

Credit: www.youtube.com
When To Replace A Storm Door Chain
Storm door chains are strong but not indestructible. Over time, heavy wind, rust, or repeated use can weaken them.
Signs it’s time to replace:
- The chain is visibly stretched or bent.
- The spring no longer returns to shape.
- The brackets are pulling away from the door or frame.
- You hear new rattling or see rust.
Estimated lifespan: A good-quality chain can last 5–10 years with normal use. In high-wind areas, check annually.
Comparing Storm Door Chain Brands
There are several popular brands for storm door chains. Here’s a quick comparison of three common options found in US hardware stores.
| Brand | Material | Price Range | Special Features | Warranty |
|---|---|---|---|---|
| Prime-Line | Zinc-plated steel | $6–$9 | Plastic chain cover | 1 year |
| Wright Products | Stainless steel | $10–$15 | Heavy-duty spring | 2 years |
| National Hardware | Zinc-plated steel | $7–$12 | Multiple finishes | 1 year |
Note: Pricing and features may change over time. Always check reviews and current specs when buying.
For more in-depth comparisons and storm door chain reviews, you can visit the Family Handyman website.
Practical Tips For A Long-lasting Installation
- Use weather-resistant hardware: Even if your door is covered, moisture can cause rust.
- Paint exposed screws: Touch up with exterior paint to prevent corrosion.
- Check after major storms: After strong winds, inspect the chain for stress or damage.
- Educate family members: Teach children not to swing or hang on the storm door, as this adds stress to the chain.
Environmental And Safety Considerations
Installing a storm door chain isn’t just about convenience. It also improves safety and energy efficiency.
- Safety: Prevents doors from swinging into people or pets during gusty weather.
- Energy savings: By keeping the storm door aligned, you reduce air leaks and drafts.
- Noise reduction: A well-installed chain reduces slamming noise, making your home quieter.
Pro tip: If you have pets or small children, consider a chain with a soft-close feature or a shock absorber.
Credit: www.swisco.com
Frequently Asked Questions
How Do I Know If My Door Needs A Storm Door Chain?
If your storm door often swings open hard or you live in a windy area, a chain is recommended. Even in mild climates, it helps prevent accidental damage and prolongs the life of your door.
Can I Install A Storm Door Chain On A Metal Or Vinyl Door?
Yes, you can. Use the correct screws and, if needed, wall anchors for metal or vinyl. Most kits include hardware for different materials. Always drill pilot holes to avoid cracking or stripping.
What Should I Do If My Chain Keeps Breaking?
Chains usually break from repeated high stress or if the spring is too weak. Upgrade to a heavy-duty kit and check your installation position. Avoid letting the door slam open in strong winds.
Is It Possible To Repair A Storm Door Chain Or Should I Replace It?
Small parts like springs or covers can sometimes be replaced, but if the chain is stretched, rusted, or the brackets are damaged, it’s best to replace the whole kit for safety and reliability.
How Often Should I Check Or Maintain My Storm Door Chain?
Check your chain every 3–6 months, especially after strong winds or storms. Lubricate moving parts and tighten screws as needed. Regular checks help prevent surprise failures.
Installing a storm door chain is a simple project that pays off for years. With the right tools, careful planning, and a little attention to detail, you’ll have a safer, quieter, and longer-lasting storm door. Whether you’re a first-time DIYer or an experienced homeowner, this upgrade is one of the easiest ways to protect your investment and enjoy peace of mind every time the wind blows.