Painting metal furniture with a brush is a practical way to give old pieces a fresh look or protect them from rust. Many people feel nervous about painting metal because it seems tricky, but with the right steps, anyone can do it—even if you have never painted before.
Whether you want to update a rusty garden chair or a faded metal table, painting with a brush is a budget-friendly solution. This guide will walk you through everything you need to know, from choosing the best paint to avoiding common mistakes.
You’ll get tips that even some experienced DIYers miss. By the end, you’ll feel confident to tackle your own project and create results you’ll be proud of.
Why Paint Metal Furniture With A Brush?
Painting metal furniture has many benefits, especially when you use a brush. Spray painting is popular, but brushing gives you more control. You can reach tight corners and save money on materials. Brushing also lets you work indoors or outside, so you don’t need a special spray booth or mask for overspray.
With a brush, you have more time to fix drips or smooth out rough patches before the paint dries. This is important for beginners. Brushing can also create a beautiful, thick finish that protects the metal for years.
Tools And Materials You Will Need
Getting the right tools and materials makes the job easier and helps your paint last longer. Here’s what you’ll need:
- Wire brush or sanding block (for cleaning)
- Medium-grit sandpaper (120–180 grit)
- Fine-grit sandpaper (220–320 grit)
- Drop cloth or old sheets (to protect the floor)
- Rubber gloves (protect your hands)
- Safety goggles (for sanding or wire brushing)
- Clean rags (for dust and spills)
- Mineral spirits or degreaser (for cleaning metal)
- Painter’s tape (for areas you don’t want to paint)
- Primer for metal (rust-inhibiting)
- Enamel or acrylic paint (made for metal)
- High-quality paintbrushes (1–2 inches wide, synthetic bristles)
- Small detail brush (for corners)
- Paint tray or container
- Paint stir stick
- Mask (if working with strong chemicals)
Choosing the right primer and paint is important. Look for products labeled “for metal” or “rust-inhibiting. ” Don’t use regular wall paint, as it won’t stick well and will chip quickly.

Credit: flowyline.com
Preparing Metal Furniture For Painting
Good preparation is the key to a smooth, long-lasting finish. Many beginners skip or rush this step, and their paint often peels or looks uneven later. Take your time here.
Cleaning The Surface
Start by removing any cushions or parts you don’t want to paint. Use a wire brush or sanding block to scrub off loose rust, dirt, and old paint. Pay special attention to joints and corners, where rust often hides.
After brushing, wipe the furniture with a clean rag dipped in mineral spirits or a metal degreaser. This removes grease and dust that can stop paint from sticking. Let the piece dry completely.
Sanding
Sanding is not just for wood—metal needs it, too. Use medium-grit sandpaper (120–180 grit) to rough up shiny surfaces. This helps the primer grip the metal. For smooth metal, light sanding is enough. For rusty or pitted areas, sand until the surface feels even.
After sanding, switch to fine-grit sandpaper (220–320 grit) for a final pass. This will help the paint look smoother.
Wipe away all dust with a tack cloth or damp rag. Even small dust particles can cause bumps in your finish.
Repairing Damage
Check for dents, holes, or deep rust spots. For small dents, you can use a metal filler or epoxy putty. Follow the instructions on the package, then sand smooth once it’s dry. If the rust is deep and the metal flakes away, it may not be safe to use the furniture.
Taping And Protecting
Cover any parts you don’t want painted with painter’s tape—like feet, hinges, or screws. Lay a drop cloth under the furniture to protect your floor or grass.
Choosing The Right Paint And Primer
Not all paints work on metal. Choosing the right type will make your finish last much longer.
Types Of Primer
Rust-inhibiting primer is best for outdoor or old metal furniture. It stops rust from forming under your paint. For new or indoor furniture, a regular metal primer works well.
Some primers come in spray cans, but for brush painting, look for liquid primer in a can.
Types Of Paint
Enamel paint is a top choice. It dries hard, resists scratches, and stands up to weather. You can buy it in gloss, semi-gloss, or satin finishes. Acrylic paint also works but is usually less durable for outdoor use.
Oil-based enamel gives a strong, shiny finish but takes longer to dry and has a strong smell. Water-based enamel is easier to clean up and dries faster, but may not last as long outside.
Here’s a quick comparison:
| Paint Type | Dry Time | Durability | Best For |
|---|---|---|---|
| Oil-based enamel | 8–24 hours | Very high | Outdoor furniture |
| Water-based enamel | 1–4 hours | Medium-high | Indoor pieces |
| Acrylic paint | 1–2 hours | Medium | Decorative items |
Choose your paint based on where the furniture will live and how much wear it will get.
Step-by-step Guide: How To Paint Metal Furniture With A Brush
Painting metal furniture is not just about putting on color. It’s a process. Here’s how to do it right:
1. Set Up Your Workspace
Find a well-ventilated area. Outdoors is best, but a garage with the door open works, too. Lay down a drop cloth. Make sure your furniture is dry and clean.
2. Apply Primer
Stir your primer well. Dip your brush about one-third of the way into the primer—don’t overload it.
Paint a thin, even coat over all metal surfaces. Use long, smooth strokes, always brushing in the same direction. Pay special attention to corners and welds, as these spots rust first.
For tricky areas or ornate designs, use a small detail brush.
Let the primer dry as the label suggests—usually 2–4 hours. Don’t rush this step.
3. Sand Lightly Between Coats
Once the primer is dry, gently sand the surface with fine-grit sandpaper (320 grit). This removes any brush marks or dust. Wipe with a tack cloth after sanding.
4. Apply The First Coat Of Paint
Stir your paint thoroughly. Use a clean brush, and dip it only a third of the way into the paint.
Apply the paint in thin, even coats. Thick coats can drip and take longer to dry. Brush in the same direction for a smooth finish.
Let the first coat dry completely—at least as long as the label says.
5. Check For Drips And Missed Spots
After the first coat dries, check carefully for drips, streaks, or missed spots. Sand any rough areas gently.
6. Apply A Second (or Third) Coat
Most metal furniture needs two coats for even coverage. Sometimes, if the old color was very dark or bright, you may need a third coat.
Repeat the process: brush on a thin layer, let it dry, sand lightly if needed, and wipe dust before the next coat.
7. Remove Tape And Clean Up
Once the final coat is dry, carefully peel off any painter’s tape. Clean your brushes with mineral spirits (for oil-based paints) or water (for water-based paints).
Let the furniture cure for a few days before heavy use, especially if it will live outdoors.
Tips For A Smooth, Professional Finish
Even experienced painters sometimes struggle with brush marks or uneven color. Here are some tips to get great results:
- Use high-quality brushes. Cheap brushes shed bristles and leave streaks.
- Don’t overload your brush. Too much paint causes drips.
- Work in long, even strokes. Try to go from edge to edge without stopping.
- Keep a wet edge. Always blend fresh paint into the edge of the last stroke.
- Sand lightly between coats. This removes small bumps and creates a very smooth finish.
- Choose the right weather. For outdoor painting, avoid humid or very cold days. Moisture slows drying and can cause problems.
Common Mistakes And How To Avoid Them
Many beginners make mistakes that ruin their hard work. Here’s what to watch out for:
Skipping Primer
Skipping primer is a top mistake. Without primer, paint may peel, bubble, or rust quickly. Always use a primer made for metal.
Painting Over Rust
Painting over rust does not stop it—it only hides it. Rust will grow under your paint and cause it to flake off. Remove all rust before you start.
Using The Wrong Paint
Don’t use wall or craft paint. These types don’t stick well to metal and chip easily. Always choose enamel or metal-specific paint.
Painting In Bad Weather
If you paint outside on a rainy or very humid day, moisture can get trapped and ruin your finish. Always check the weather first.
Thick Paint Layers
Applying paint too thickly causes drips and long drying times. Thin, even coats always look better.
Not Letting Paint Cure
Even when paint feels dry, it may need more time to harden. Wait several days before placing heavy objects or cushions on painted furniture.
How Long Does It Take To Paint Metal Furniture?
The time needed depends on the size of your furniture, the paint you use, and the weather.
- Preparation: 1–2 hours (cleaning, sanding, taping)
- Priming: 30 minutes to 1 hour (plus drying time)
- Painting: 1–2 hours per coat
- Drying between coats: 2–24 hours (check your paint label)
- Final cure: 2–7 days before heavy use
In total, plan on a weekend for the whole process, especially if you need multiple coats and the weather is cool.
Maintenance: Keeping Your Painted Metal Furniture Looking New
Once your furniture is painted, a little care will keep it looking good for years.
- Clean with a soft cloth and mild soap—no harsh chemicals.
- Touch up chips or scratches quickly to stop rust from starting.
- For outdoor furniture, store inside in winter or cover with a waterproof cover.
- Avoid dragging furniture across rough surfaces, which can scratch the finish.
Regular care will save you time and money in the long run.
Comparing Brush Painting Vs. Spray Painting
Some people wonder if spray painting is easier or better than using a brush. Both have pros and cons.
| Method | Pros | Cons |
|---|---|---|
| Brush painting | Great control, low waste, easy touch-ups, works indoors | Slower, may show brush marks, needs good technique |
| Spray painting | Fast, smooth finish, covers complex shapes easily | Needs more prep, can be messy, not ideal indoors, more expensive |
For beginners or small projects, brush painting is often safer and cheaper. For large, simple shapes, spray painting can be faster.

Credit: inmyownstyle.com
Safety Tips When Painting Metal Furniture
Working with paints and primers means using chemicals. Here’s how to stay safe:
- Always work in a well-ventilated area.
- Wear gloves and safety goggles during sanding and painting.
- Don’t eat or drink while painting.
- Wash hands after handling paint or solvents.
- Keep paint and tools away from children and pets.
If you feel dizzy or get a headache, move to fresh air right away.
Non-obvious Insights For Better Results
Many guides miss these small but important details:
- Temperature matters: Paint dries best between 60–80°F (15–27°C). Too cold or too hot can cause cracking or slow drying.
- Stir paint often: Pigments settle at the bottom. Stir every 20–30 minutes for even color.
- Label your brushes: If using more than one color, label each brush with tape to avoid mixing.
- Check for loose screws: Painting over moving parts can glue them shut. Tighten or mask moving parts first.
- Test on a small area: Before painting the whole piece, test your primer and paint on a hidden spot. This helps you catch problems like poor adhesion or color mismatch early.
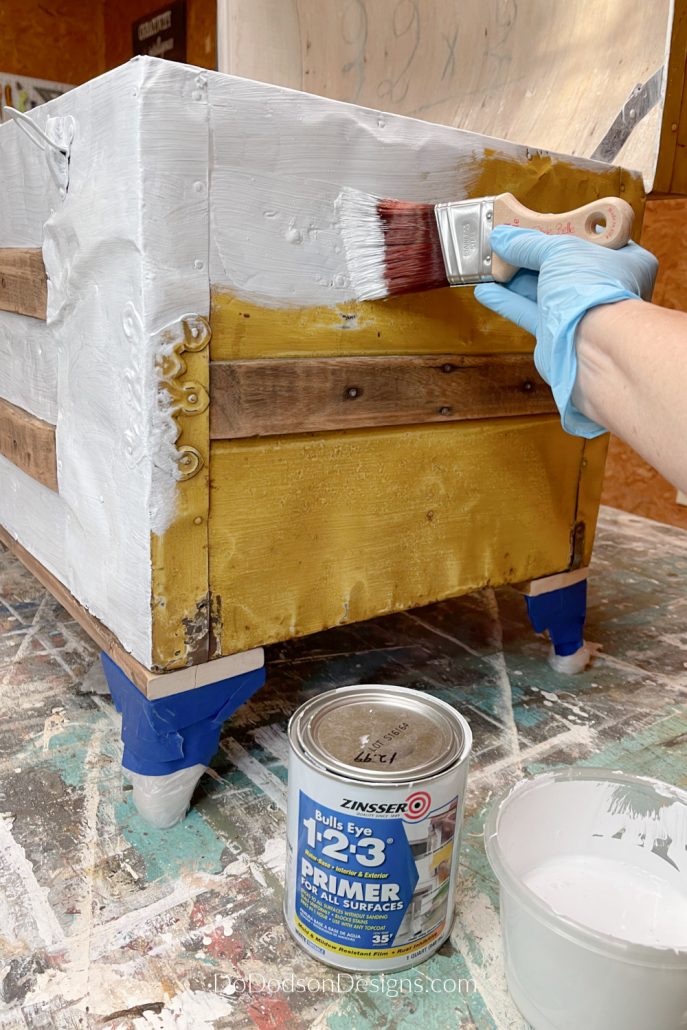
Credit: www.dododsondesigns.com
Real-world Example: Painting A Rusty Outdoor Chair
Let’s look at a simple example. Maria had a rusty metal patio chair she wanted to save. She followed these steps:
- Cleaned off loose rust and dirt with a wire brush.
- Sanded the surface smooth, then wiped with mineral spirits.
- Used painter’s tape to cover the plastic feet.
- Applied a rust-inhibiting primer with a 2-inch brush.
- After drying, sanded lightly and wiped off dust.
- Painted two thin coats of outdoor enamel, letting each dry fully.
- Waited three days before putting the chair outside.
A year later, her chair still looks bright and has no new rust. She spent less than $25 on materials—much cheaper than buying a new chair.
Environmental Tips: Eco-friendly Painting
Painting can create waste and fumes. Here’s how to be greener:
- Choose low-VOC (volatile organic compounds) paints and primers.
- Clean brushes with water if using water-based paints.
- Reuse drop cloths and containers.
- Dispose of leftover paint at a recycling center—never pour down the drain.
- Store leftover paint in a sealed can for future touch-ups.
Troubleshooting: Fixing Problems After Painting
Even with care, you might find issues after painting. Here’s how to solve them:
Peeling Paint
If paint peels, the surface was probably dirty or oily. Scrape off loose paint, sand, clean, and repaint the area.
Bubbles Or Blisters
This often means moisture was trapped. Sand the bubbles flat, clean, and repaint in dry weather.
Uneven Color
If you see streaks or uneven color, add another thin coat. Make sure to stir paint well and use a clean brush.
Sticky Finish
If the paint stays sticky for days, it may be too humid or the paint was too thick. Give it more time, or use a fan to help drying.
Advanced Tips For Durable Results
Want your paint job to last even longer? Try these expert tips:
- After the final coat, add a clear sealer made for metal. This gives extra protection from sun and rain.
- For outdoor furniture, reapply a clear protective coat every two years.
- Store paint cans upside down for a tighter seal—this keeps paint fresh for touch-ups.
- If painting over old paint, always test for lead paint on very old furniture (pre-1978). Lead is dangerous; seek professional help if you find it.
- For very smooth finishes, use a foam brush for the last coat. This can reduce brush marks.
Cost Breakdown: How Much Will It Cost?
Painting metal furniture is budget-friendly. Here’s a typical cost for a single chair:
| Item | Estimated Cost |
|---|---|
| Primer (small can) | $8 |
| Paint (small can) | $10 |
| Brushes | $6 |
| Sandpaper | $4 |
| Other materials (rags, tape) | $3 |
| Total | $31 |
You can reuse many of these items on more than one piece, making future projects even cheaper.
Where To Find More Help
If you want detailed information about paint types or metal care, check out resources from organizations like the This Old House. They offer in-depth guides, videos, and expert advice.
Frequently Asked Questions
How Long Should I Wait Between Coats When Painting Metal Furniture?
Wait at least as long as the paint can says—usually 2–4 hours for water-based paints and up to 24 hours for oil-based. Cooler or more humid weather may need longer. If the surface feels tacky, wait more time before the next coat.
Can I Paint Over Old Paint On Metal Furniture?
Yes, but only if the old paint is smooth, not peeling, and well attached. Sand the old paint to dull the surface, clean it, and prime before painting. If the old paint is chipping or bubbling, remove it completely.
What’s The Best Way To Remove Rust Before Painting?
Use a wire brush or sandpaper to scrub off loose rust. For heavy rust, a rust dissolver gel can help. Always clean and dry the area before priming and painting.
Is It Safe To Paint Metal Furniture Indoors?
Yes, if you use water-based paints and work in a well-ventilated area. Avoid oil-based paints indoors unless you have strong ventilation, as the fumes are strong. Protect floors and nearby objects with a drop cloth.
How Do I Prevent Brush Marks On Metal Furniture?
Use a high-quality brush with synthetic bristles, apply thin coats, and always brush in the same direction. Sand lightly between coats and stir paint often to keep it smooth.
Painting metal furniture with a brush is a skill anyone can learn. With good preparation, the right materials, and a bit of patience, you can create a strong, beautiful finish that protects your furniture and brings new life to your space.
Take your time, follow these steps, and enjoy the transformation—your old metal pieces will look better than ever.