Building a roof overhang over an exterior door is a smart upgrade for any home. Not only does it protect your doorway from rain, snow, and sun, but it also adds curb appeal and helps extend the life of your door and entryway.
Many homeowners want to tackle this project but feel unsure about the process, the materials needed, or the potential challenges. Whether you’re an experienced DIYer or just getting started, understanding the entire process from planning to finishing is essential. Let’s break down every step, tip, and choice you’ll face so you can confidently create a sturdy, attractive roof overhang for your exterior door.
Why Add A Roof Overhang Over An Exterior Door?
A roof overhang, sometimes called an entry awning or door canopy, is more than a decorative feature. It serves several practical purposes:
- Weather Protection: Shields your door from rain, snow, and harsh sun, helping prevent water damage, fading, and warping.
- Energy Efficiency: Reduces heat entering your home in summer and limits cold drafts in winter.
- Improved Entry Safety: Keeps the area in front of your door drier, reducing the risk of slipping.
- Enhances Appearance: Adds character and value to your home’s exterior.
- Extends Door Lifespan: Protects your door and trim from rot, mold, and fading.
Many homeowners overlook the impact of overhangs on energy efficiency and long-term maintenance savings. Even a small canopy can make a significant difference.
Planning Your Roof Overhang Project
Planning is the most important part of building a roof overhang. Rushing into construction without a plan can lead to costly mistakes, code violations, or a structure that doesn’t last.
Assessing Your Needs
First, think about why you want the overhang. Is it mainly for rain protection, or do you need shade from the sun? Do you want a simple look, or are you after a more detailed design? Your goals will influence the size, style, and materials.
Measuring And Sizing
Measure your door’s width and height. Most overhangs should extend at least 12–24 inches beyond each side of the door and cover about 2–4 feet out from the wall. For double doors or doors with sidelights, you’ll need a wider and possibly deeper overhang.
Checking Local Codes And Permits
Many cities require permits for any structure attached to your home. Check with your local building department for rules on:
- Maximum projection from the wall
- Height above the door
- Required materials and construction methods
- Snow and wind load requirements
Skipping permits can lead to fines or forced removal later.
Choosing The Right Design
There are several common overhang styles:
- Shed Roof: Slopes in one direction, simple and effective.
- Gable Roof: Peaks in the center, matches many home designs.
- Flat Roof: Horizontal, modern look, but not ideal for heavy rain/snow.
- Arched or Curved Roof: Decorative, more complex to build.
Your home’s architecture, rooflines, and personal taste should guide your choice.
Budgeting
Costs can range from $200 for a simple DIY wood overhang to $2,000 or more for custom metal or tile canopies. Consider material costs, tools, hardware, and possible professional help.
Common Beginner Oversights
- Underestimating the weight and wind loads
- Not accounting for water drainage
- Choosing materials that don’t match the house
- Placing the overhang too high or too low
Tip: Always sketch your design and measure twice before buying materials.
Choosing Materials For Your Roof Overhang
Your material choices will affect the look, durability, and maintenance needs of your overhang. Here are the main options:
| Material | Appearance | Durability | Maintenance | Cost (per sq. ft.) |
|---|---|---|---|---|
| Pressure-treated wood | Traditional, can be painted or stained | Good with sealing | Medium (re-sealing every 2-3 years) | $2–$5 |
| Cedar or Redwood | Natural, warm look | Very good, rot-resistant | Low to medium | $6–$12 |
| Metal (aluminum/steel) | Modern, sleek | Excellent | Low | $7–$15 |
| Composite/PVC | Similar to wood, various colors | Excellent | Very low | $8–$16 |
| Polycarbonate panels | Translucent, lightweight | Good | Low | $5–$10 |
| Shingles (asphalt/wood) | Matches main roof | Good | Medium | $3–$7 |
| Clay or concrete tiles | Classic, heavy | Excellent | Low | $10–$20 |
Pro insight: Many beginners choose pressure-treated wood for the frame but forget to select a roofing material that matches their home’s main roof. For best results, the overhang roof should either match or complement your house roof.
Fasteners And Hardware
Use only galvanized or stainless steel fasteners for outdoor projects. They resist rust and extend the life of your overhang.
Finishing Materials
Consider exterior paint, stain, or sealant to protect wood. For metal, powder coating can add color and rust resistance.
Tools And Supplies You Will Need
Being prepared saves time and frustration. Here’s a checklist for most overhang projects:
- Tape measure and pencil
- Level and square
- Circular saw or miter saw
- Drill/driver and drill bits
- Hammer
- Ladder or scaffolding
- Stud finder
- Wrenches or socket set
- Safety glasses and gloves
- Exterior screws or lag bolts
- Flashing tape or metal flashing
- Roofing material (shingles, panels, etc.)
- Framing lumber (2×4, 2×6, etc.)
- Joist hangers and metal brackets
- Caulk or sealant
Some projects may require specialty tools like a jigsaw (for curved roofs) or a nail gun for roofing.
Tip: Renting larger tools (like a miter saw) can be cost-effective if you don’t already own them.
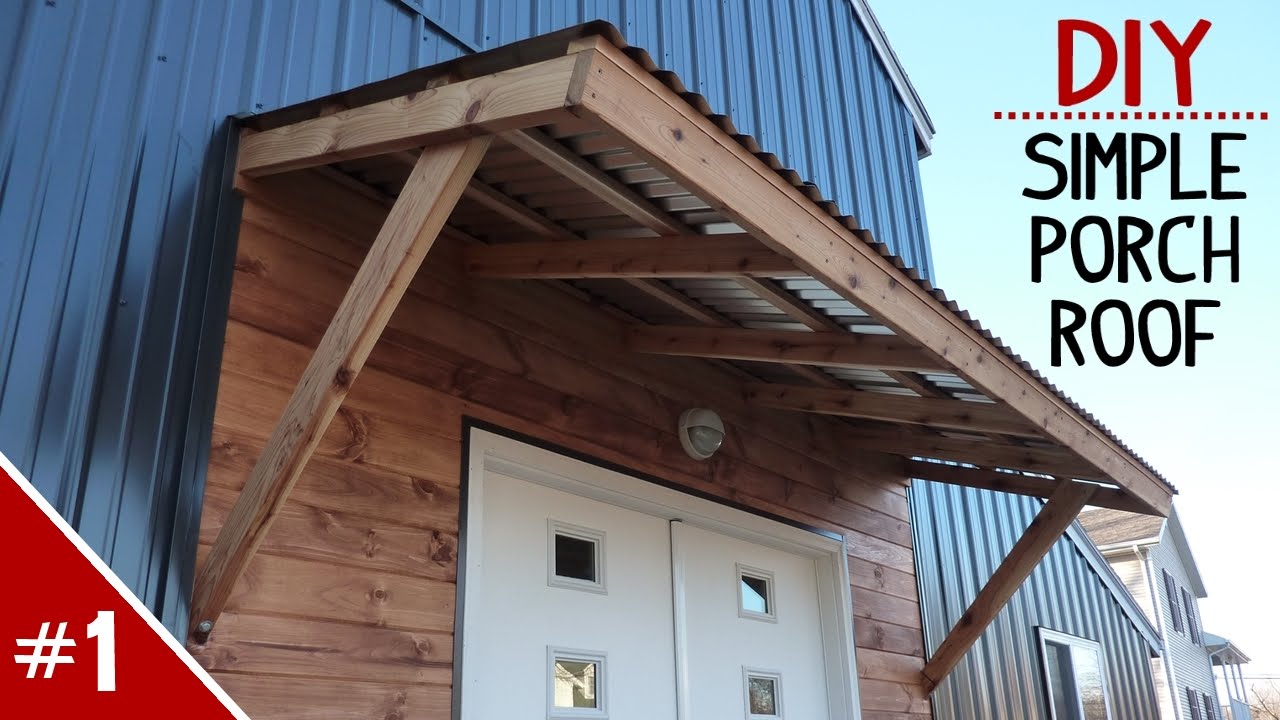
Step-by-step Guide: How To Build A Roof Overhang Over An Exterior Door
Let’s walk through the process from start to finish. This guide is for a typical shed-style overhang, which is the most popular choice for DIYers.
1. Prepare The Area
Clear any furniture or plants near the door. Protect the ground and your door with drop cloths. Make sure your ladder is stable.
2. Locate Wall Studs And Mark The Ledger
Use a stud finder to locate the studs above your door. Mark their positions. The ledger board (horizontal support) must be attached to studs for strength.
Mark the height for the bottom of the ledger: usually 6–12 inches above the door frame for enough slope and headroom.
3. Install The Ledger Board
Cut a pressure-treated 2×6 (or larger, depending on span) to the width of your overhang. Pre-drill holes and attach the ledger to the wall using lag bolts driven into the studs. Use a level to ensure it’s straight.
Add flashing tape or metal flashing above the ledger to keep water out of the wall.
4. Prepare And Attach The Side Supports
Cut two side supports (2×4 or 2×6), angled downward to create a slope of at least 1/4 inch per foot for drainage. For example, for a 3-foot projection, the outer end should be about 1 inch lower than the wall end.
Attach the side supports to the wall using metal brackets or lag bolts. Make sure they are level side-to-side.
5. Build And Install The Front Beam
Cut a front beam (matching your ledger) to the same length. Attach it to the ends of the side supports with metal brackets or wood screws.
6. Add Rafters
For overhangs wider than 4 feet, add one or more rafters between the ledger and front beam for support. Space rafters 16–24 inches apart. Use joist hangers or metal brackets for secure attachment.
7. Install Roof Sheathing
Cut exterior-grade plywood or OSB to cover the frame. Attach it to the rafters and beams using exterior screws or nails.
8. Add Roofing Material
Install your chosen roofing (shingles, metal panels, polycarbonate, etc. ) According to the manufacturer’s instructions. Overlap each layer to prevent leaks.
For shingles, start from the bottom and work up. For metal or polycarbonate, use special screws with rubber washers to prevent water entry.
9. Install Drip Edge And Flashing
At the edges, add a drip edge to direct water away from the structure. Where the overhang meets the wall, install step flashing under the siding and over the roof to prevent leaks.
10. Seal Joints And Paint/finish
Apply caulk or sealant to all joints, especially where the overhang meets the wall. Finish wood with exterior paint or stain for protection.
11. Add Optional Supports
If your overhang is deep or heavy, add brackets or posts under the front edge for extra support. Decorative corbels can also add style.
12. Inspect Your Work
Check all fasteners, levelness, and weatherproofing. Test the overhang by spraying water to check for leaks.
Beginner tip: Don’t skip the flashing and caulking steps. Most leaks in overhangs come from poor flashing, not the roof itself.
Comparing Overhang Types For Exterior Doors
Different overhang designs offer unique benefits and challenges. Here’s a comparison of three common types:
| Type | Best For | Difficulty | Pros | Cons |
|---|---|---|---|---|
| Shed Roof | Most homes, simple designs | Easy | Simple, budget-friendly, good for rain | Less decorative, may not match all styles |
| Gable Roof | Traditional homes | Medium | Attractive, good snow shedding | More complex framing, higher cost |
| Flat Roof | Modern homes, minimal look | Easy | Simple, contemporary | Poor drainage, not for heavy snow/rain areas |
For most DIYers, the shed style is the best starting point. Gable roofs require more skill and careful waterproofing.

Credit: www.youtube.com
Mistakes To Avoid When Building A Roof Overhang
Even experienced builders make mistakes. Here are common pitfalls and how to avoid them:
- Ignoring Local Codes: Always check for permits and follow local rules.
- Poor Slope: Too little slope causes water pooling and leaks. Aim for at least 1/4 inch per foot.
- Weak Attachment: Attaching to siding instead of wall studs is unsafe. Always fasten to framing.
- Skipping Flashing: Water will find its way behind the overhang without proper flashing.
- Undersized Supports: Use lumber strong enough to support the weight, especially if adding heavy roofing.
- Wrong Fasteners: Indoor screws rust quickly outdoors. Use galvanized or stainless steel only.
- Inconsistent Finish: Paint or stain all visible wood for a uniform, weatherproof look.
- Not Considering Gutters: Large overhangs may need a small gutter to manage runoff.
Advanced tip: For wide or heavy overhangs, consult a structural engineer. Overhangs can become dangerous if not properly supported.
Customizing Your Roof Overhang For Style And Function
A basic overhang does its job, but you can personalize it to fit your home’s character and your needs.
Decorative Brackets And Corbels
Adding wood or metal brackets under the overhang gives extra support and style. Corbels can be simple or ornate, matching traditional or modern looks.
Lighting
Install outdoor-rated lights under the overhang for safety and convenience. Motion-sensor lights are a popular choice.
Gutters And Rain Chains
A small gutter can help direct rainwater away from your entry. Rain chains offer a decorative alternative for draining water.
Skylights Or Clear Panels
If your entryway is dark, use polycarbonate panels or a small skylight to let in natural light while still providing shelter.
Paint And Trim
Coordinate the overhang’s color with your door or window trim. Adding crown molding or decorative fascia can create a finished, professional look.
Green Or Living Roofs
Some homeowners install sedum mats or other low-maintenance plants on top for a “living roof.” This adds insulation and visual interest but requires waterproofing.
Hidden advantage: A thoughtfully designed overhang can improve your home’s resale value by boosting both curb appeal and energy efficiency.

Credit: joyfulderivatives.com
When To Call A Professional
Building a small overhang is within reach for most handy homeowners. But call a pro if:
- Your overhang is more than 4 feet deep or spans more than 8 feet wide
- Your home’s exterior is brick, stone, or stucco (special anchors needed)
- You want electric lighting or complex roofing
- You need structural engineering for heavy materials
- You’re uncomfortable working at heights
A professional can also help match the overhang to your home’s architecture for a seamless look.
Maintenance Tips For Long-lasting Protection
A well-built overhang will last decades with basic upkeep. Here’s how to keep it in top shape:
- Inspect annually for loose fasteners, cracked caulk, or peeling paint
- Clean gutters or roof panels to prevent clogs and leaks
- Re-seal wood every 2–3 years, or as recommended by the finish manufacturer
- Check flashing after heavy storms to ensure no water intrusion
- Remove snow buildup promptly in winter climates
Unexpected tip: Trim back trees or shrubs near your overhang to reduce leaf buildup and prevent moisture problems.
Cost Breakdown: Diy Vs. Professional Installation
Building your own overhang can save money, but there are hidden costs and time factors to consider.
| Expense | DIY Cost (Typical) | Professional Cost (Typical) |
|---|---|---|
| Materials (wood, roofing, hardware) | $200–$600 | Included in total |
| Tools (purchase/rent) | $50–$200 | Included |
| Labor | $0 (your time) | $500–$2,000 |
| Permits | $30–$100 | $30–$100 |
| Total | $280–$900 | $800–$2,500 |
Hidden cost: If you make mistakes or need to redo work, your costs can rise. Always budget a little extra for unexpected expenses.
Real-world Example
Imagine you have a standard 36-inch wide front door and want a 6-foot wide, 3-foot deep shed-style overhang using pressure-treated wood with asphalt shingles. Here’s a rough step-by-step outline:
- Measure and mark a ledger 10 inches above the door frame.
- Cut and attach a 2×6 ledger, using flashing to protect your siding.
- Cut two 2×4 side supports, sloped to give a 1-inch drop over 3 feet.
- Attach a 2×6 front beam.
- Add two 2×4 rafters between ledger and beam.
- Cover with 1/2-inch exterior plywood, then install asphalt shingles.
- Install drip edge and caulk seams.
- Paint visible wood to match your trim.
This project would likely cost $250–$400 in materials and take a weekend for an experienced DIYer.
Credit: www.youtube.com
Additional Resources
For detailed building codes and advanced framing advice, the WoodWorks Building Codes Resource is a trusted source.
Frequently Asked Questions
How Much Roof Overhang Do I Need Over An Exterior Door?
A good rule is to extend the overhang at least 12–24 inches beyond each side of the door, and 2–4 feet out from the wall. This offers enough protection from rain and sun. For doors with sidelights or double doors, go wider.
Do I Need A Permit To Build A Roof Overhang?
In most areas, yes. Any structure attached to your home—especially one that changes its appearance or affects water runoff—usually requires a permit. Check with your local building department before starting.
Can I Attach An Overhang To Brick Or Stucco Exteriors?
Yes, but you’ll need special masonry anchors or bolts. Attaching to just the surface isn’t strong enough. It’s best to anchor through the brick or stucco into the wall framing behind.
What’s The Best Roofing Material For A Small Overhang?
Asphalt shingles are popular for matching most home roofs, but metal panels or polycarbonate are good for modern or lightweight designs. Always match or complement your home’s existing style.
How Long Does It Take To Build An Overhang Over A Door?
For a basic shed-style overhang, most DIYers can finish in one to two days, depending on experience and weather. More complex styles or larger overhangs may take several days.
Building a roof overhang over your exterior door is a rewarding project that offers protection, beauty, and value to your home. With careful planning, the right materials, and attention to detail, you can create a lasting improvement that welcomes guests and shields your entry for years to come.