Painting distressed white wood is a creative way to give furniture or decor a charming, vintage look. Many people love this style because it feels warm, timeless, and fits in many home designs—like farmhouse, shabby chic, and cottage styles. But while the final effect looks simple, getting it right is all about using the right materials and following each step carefully.
If you skip steps or rush, the finish can look fake or messy instead of authentically aged. This guide will help you paint distressed white wood like a pro, even if you’re a beginner or have never painted furniture before.
You’ll learn the most important techniques, get practical advice from real-life experience, and see how to avoid common mistakes. Whether you want to refresh an old dresser, update kitchen cabinets, or create a unique DIY sign, this article covers everything you need.
You’ll also discover non-obvious tips that most tutorials miss, plus helpful tables and a thorough FAQ section. Let’s dive in and turn your wood project into something special.
What Is Distressed White Wood?
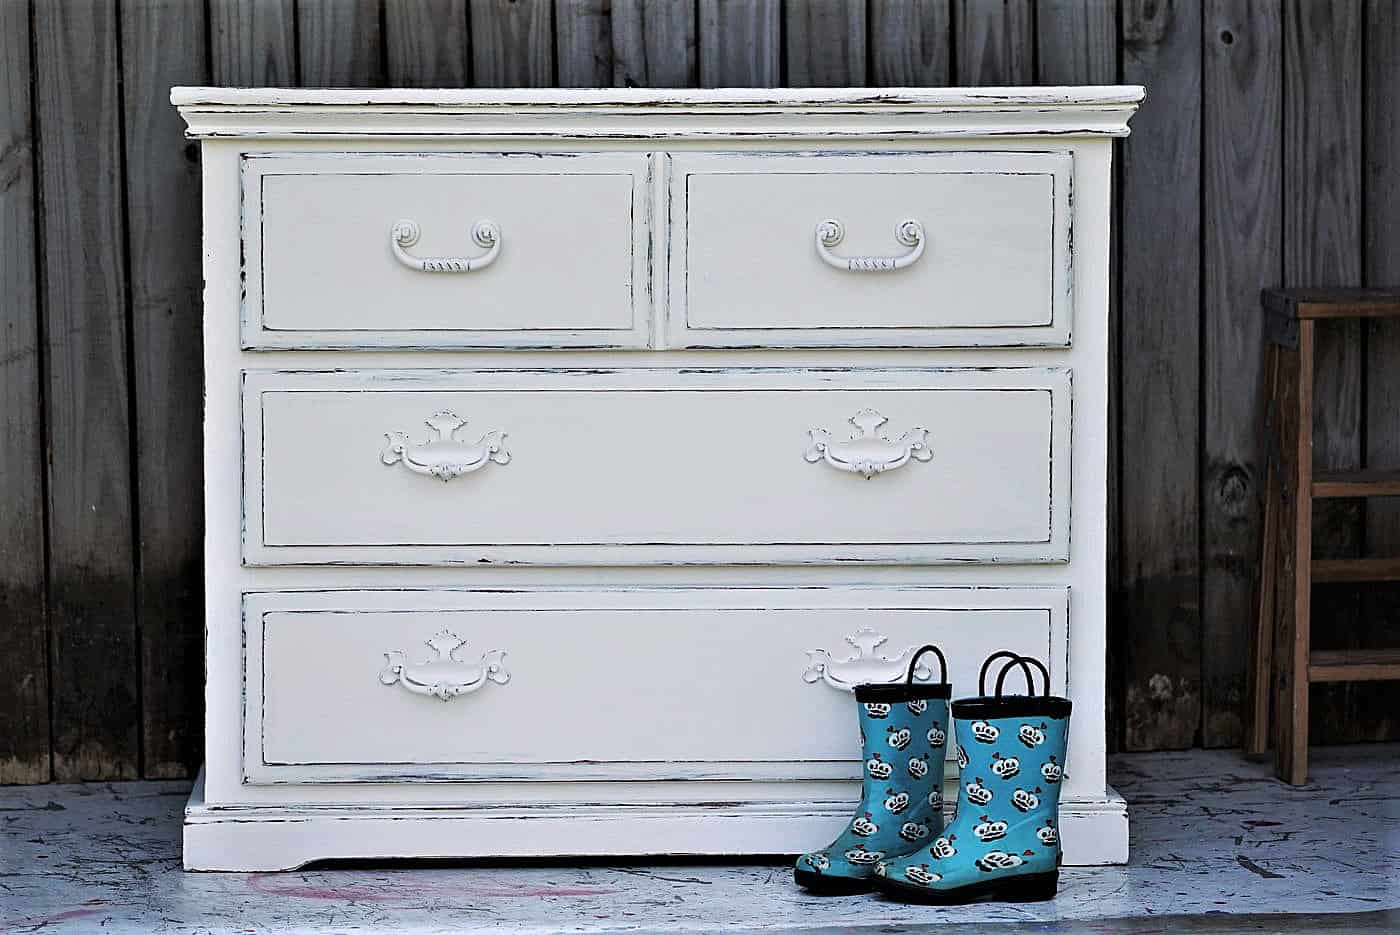
Distressed white wood is wood painted white and then purposely aged or weathered. This technique makes new wood look old, with areas where the paint is chipped, sanded, or faded. The result is a soft, lived-in look that adds character to furniture, walls, or decor.
The main idea is to mimic the natural wear that happens over many years. Instead of waiting for time to do its work, you use tools and paint to create the effect in just a few hours or days. People love distressed white wood because it feels unique—no two pieces are exactly the same.
Some popular uses:
- Kitchen cabinets
- Coffee tables
- Picture frames
- Bedside tables
- Wall panels
The distressed look fits well in homes that want a cozy, relaxed feeling. It can also soften modern spaces by adding a touch of history and texture.
Why Choose The Distressed White Look?
Choosing distressed white wood for your home or projects offers several benefits. Here are the main reasons people love this style:
- Timeless Style: It never really goes out of fashion. White wood looks clean, but distressing adds warmth and personality.
- Hides Imperfections: Small dents, scratches, or marks in your wood actually enhance the effect. You don’t need perfect materials.
- Customizable: You can make it as subtle or bold as you want—lightly worn or very aged.
- Affordable Makeover: Instead of buying new furniture, you can update old pieces for a fraction of the cost.
- Easy to Maintain: New scratches or chips blend in, so you don’t have to worry about keeping the surface perfect.
- Works in Many Spaces: Distressed white wood fits in kitchens, bedrooms, living rooms, and even outdoors (with proper sealing).
One non-obvious advantage: If you’re painting furniture with kids or pets around, the distressed finish is forgiving. New marks usually just add to the charm.
Essential Materials And Tools
To paint distressed white wood, you’ll need some basic tools and supplies. Choosing the right materials makes a big difference in your final result and how easy the process feels.
Basic supplies:
- Quality wood piece (furniture, panel, etc.)
- Medium-grit sandpaper (120–150 grit)
- Fine-grit sandpaper (220 grit)
- Clean, lint-free rags or tack cloth
- Painter’s tape
- Drop cloth or newspaper (to protect floors)
- Paintbrushes (synthetic or natural bristle)
- Small foam roller (optional)
- Primer (if needed)
- White paint (latex, chalk, or milk paint)
- Wax or polyurethane topcoat
- Gloves
Optional for advanced effects:
- Steel wool
- Wood stain (if you want brown or gray to show under the white)
- Candle or clear wax (for resist method)
- Screwdriver (to remove hardware)
- Stencil or stamps (for added details)
Paint choices matter a lot. Chalk paint is popular for distressing because it dries matte, sticks to most surfaces, and sands easily. Latex paint is good for durability but needs a primer. Milk paint gives a more rustic, uneven finish and can naturally chip.
Don’t skip the drop cloth and tape. Messy floors or painted hardware can ruin your project.
Planning Your Distressed White Wood Project
Before you start, it’s smart to plan your project. This saves time, money, and stress later on.
1. Choose Your Wood Piece
Old, solid wood furniture works best. Avoid pieces with peeling veneer or lots of loose joints. If you’re buying new wood, softer woods like pine distress more easily than hardwoods like oak.
2. Decide On The Level Of Distress
Light distressing means just a few worn edges. Heavy distressing looks more aged. Look at photos online or in magazines to decide which style you prefer.
3. Pick Your Paint And Finish
Think about how durable you need the finish to be. For a kitchen table, a washable latex is better. For a decorative shelf, chalk paint is easier.
4. Set Up A Workspace
Work in a well-ventilated area. Outdoors or in a garage is best. Lay down your drop cloth, and tape off any parts you don’t want painted.
5. Test On A Scrap Piece
If you’ve never distressed wood before, practice on a small piece first. Try different sanding techniques or layering colors to see what you like.
Non-obvious tip: Take a photo of your piece before you start. You can compare before and after, and it’s easier to spot areas you might want to distress more or less.
Prepping The Wood Surface
Preparation is the most important step. If you rush or skip this part, the paint can peel or look uneven later.
Cleaning
Wipe down your wood with a damp rag to remove dust and grease. If the piece is very dirty, use mild soap and water, then let it dry completely. For sticky residue, a little vinegar on a cloth works well.
Repairing
Check for loose knobs, nails, or screws. Tighten or remove hardware. Fill any big holes or dents with wood filler. Let it dry, then sand smooth.
Sanding
Lightly sand the whole surface with medium-grit sandpaper. This helps the paint stick. If there’s old paint or varnish, sand until the surface feels dull, not shiny. Wipe off dust with a tack cloth.
Pro tip: Don’t oversand edges if you want to distress them later. Leave some roughness so the paint wears away naturally.
Priming
If your wood is dark or has stains, use a good stain-blocking primer. This prevents old colors from bleeding through the white paint. For raw or very smooth wood, primer helps the paint grip better.
- For chalk or milk paint on old wood, primer is often optional.
- For latex paint on new wood, primer is usually needed.
Let the primer dry fully (check the can for timing).
Choosing The Right Paint And Finish
Not all white paints are the same. The type of paint you choose changes how easy it is to distress and how the final piece looks.
Chalk Paint
Chalk paint is a favorite for beginners. It’s easy to apply, covers well, and dries quickly. The matte finish sands easily, which is perfect for distressing. You usually need to seal it with wax or polyurethane.
Milk Paint
Milk paint is more rustic. It can chip and crack naturally, especially on glossy or unfinished wood. This creates a very authentic, old look. You can mix colors or let the base wood show through.
Latex Paint
Latex paint is durable and washable. It’s good for pieces that get heavy use, like tables or cabinets. Latex takes a bit more sanding and usually needs a primer, but it’s easy to find in any hardware store.
Comparing Paint Types
See the table below for a quick overview:
| Paint Type | Best For | Distressing Difficulty | Finish | Sealing Needed? |
|---|---|---|---|---|
| Chalk Paint | Beginners, quick projects | Easy | Matte | Yes |
| Milk Paint | Rustic, uneven looks | Very easy | Matte to rustic | Yes |
| Latex Paint | Durable, high-use items | Medium | Satin to glossy | Optional |
Non-obvious insight: If you want a layered look, you can use two colors—paint a dark color first, let it dry, then add white on top. When you distress, the dark color peeks through, adding depth.
Painting The Base Coat
The base coat is the color that shows through when you distress the top white layer. Many people use brown, gray, or even blue for a subtle effect.
1. Apply The Base Color
Use a brush or roller to paint the wood. Work in thin, even coats. Let each coat dry before adding another.
2. Let It Dry Completely
Drying times vary. Chalk and milk paint dry in 30–60 minutes; latex can take 2–4 hours.
3. Optional: Add Texture
For extra age, dab the surface with a dry brush or crumpled rag while the paint is still tacky. This creates small, random marks that look like natural wear.
You can skip the base coat if you want the natural wood to show through under the white.
How To Apply The White Top Coat
Now it’s time to apply your main white paint. This is the most visible layer, so take your time.
1. Stir The Paint Well
White paint can separate in the can. Mix it until the color is even.
2. Use Smooth, Even Strokes
Brush or roll the paint in the direction of the wood grain. Avoid thick, drippy coats.
3. Thin Layers Are Better
Two thin coats look smoother than one thick coat. Let the first coat dry, then add the second.
4. Don’t Worry About Full Coverage
If some base color peeks through, that adds to the effect. You want some unevenness for a natural look.
5. Let The Paint Cure
Wait at least 24 hours before distressing. Paint that’s too soft can smudge instead of chipping cleanly.
Pro tip: If you want a very smooth look, lightly sand between coats with fine-grit sandpaper.

Credit: www.woodcraftblueprint.com
Techniques For Distressing White Wood
There are several ways to distress painted wood. Each gives a slightly different look. You can combine techniques for the most realistic effect.
Sanding
This is the most common method.
- Use fine or medium sandpaper (150–220 grit).
- Focus on edges, corners, and raised details—these areas wear naturally.
- Sand lightly in random spots on flat surfaces for an aged look.
- Wipe off dust with a clean cloth.
Wet Distressing
This works best with chalk or milk paint.
- Dampen a rag with water.
- Rub gently over areas you want to distress.
- The paint softens and comes off in a more blended, natural way.
Wax Or Candle Resist
Before painting the top coat, rub a candle or clear wax on areas you want to distress.
- Paint over the wax as usual.
- When dry, sand or scrape those areas—the paint won’t stick well over wax, so it peels easily.
Chipping
For a very aged look, use a putty knife or even a credit card to gently scrape paint off after it dries. This creates bigger chips and flakes.
Layering Colors
Paint one color, let it dry, then add white on top. When you distress, both colors show through, adding depth.
Comparison Of Distressing Methods
Here’s a quick look at the main methods:
| Method | Best For | Difficulty | Look Achieved |
|---|---|---|---|
| Sanding | Most projects | Easy | Subtle wear |
| Wet Distressing | Chalk/milk paint | Medium | Blended, soft edges |
| Wax/Candle Resist | Layered looks | Medium | Pronounced chips |
| Chipping | Rustic, old wood | Advanced | Heavy flakes |
Non-obvious tip: Avoid distressing every edge the same way—real wear is random. Step back often to check your progress.
Sealing And Protecting The Finish
After distressing, the surface is more fragile. Sealing helps protect your work and makes it easier to clean.
Choosing A Topcoat
- Wax (soft, matte): Best for chalk or milk paint. Buffs to a soft shine. Needs reapplying every year or two.
- Polyurethane (durable, washable): Good for tables, cabinets, or outdoor pieces. Available in matte, satin, or gloss.
- Polycrylic (water-based): Dries clear, doesn’t yellow. Great for white finishes.
How To Apply
- Use a clean brush or rag.
- Apply in thin, even layers.
- Let each layer dry before adding more (usually 2–3 coats for best protection).
Protecting Distressed Wood
- Avoid harsh cleaners—just use a damp cloth.
- Place felt pads under heavy objects to avoid new scratches (unless you want more distressing! ).
- For outdoor use, choose a topcoat rated for exterior wood.
Pro tip: Polyurethane can slightly yellow over time, especially on white paint. For the purest white, use water-based polycrylic.
Common Mistakes And How To Avoid Them
Many people make small errors that ruin the distressed look or make the project harder than it should be. Here are the most common mistakes and how to fix them:
1. Skipping Prep Work
Dirty or glossy wood makes paint peel. Always clean and sand first.
2. Too Much Distressing
If you sand every edge the same, the finish looks fake. Distress in random spots and step back often.
3. Using The Wrong Paint
Glossy or enamel paints are hard to distress. Chalk or milk paint is much easier for beginners.
4. Not Letting Paint Dry
Rushing the process leads to smudges or chips that flake off too much.
5. Applying Thick Paint Layers
Thick coats take longer to dry and can crack or peel off. Use thin, even layers.
6. Skipping The Topcoat
Unsealed paint absorbs stains and gets dirty fast. Always seal for long-lasting results.
7. Distressing After Sealing
Distress before adding the protective finish, not after.
Advanced tip: If you mess up, don’t panic. You can always paint over mistakes and try again—distressed finishes are very forgiving.
Creative Ideas For Distressed White Wood Projects
Once you know the basics, you can use this technique on many different items. Here are some creative ideas to inspire you:
- Farmhouse table: Paint legs white, distress, and leave the top stained wood.
- Kitchen cabinets: Add subtle distressing to edges and corners.
- Picture frames: Use the wax resist method for a layered look.
- Wall signs: Distress lettering and edges for a vintage shop sign effect.
- Bookshelves: Paint the outside white, distress, and use a bold color inside.
- Garden boxes: Protect with exterior sealer for outdoor use.
- Headboards: Combine white with gray or blue for a coastal look.
You can also combine stencils, stamps, or transfers for unique designs. Add new hardware in black, bronze, or glass to complete the vintage look.
Caring For Distressed White Wood
Maintaining your finished piece is easy, but a little care goes a long way.
- Dust regularly with a soft, dry cloth.
- Avoid harsh chemicals—just use water or gentle soap.
- Touch up chips with a small brush and leftover paint.
- Reapply wax every year if you used a wax finish.
- Protect from water—distressed wood is more porous, so wipe up spills quickly.
Non-obvious tip: If you want to add more distressing later, just sand lightly and reseal. The style is flexible and easy to update.
Troubleshooting Problems
Even with careful work, problems can happen. Here’s how to handle the most common issues:
Paint Peeling Or Bubbling
- Check if the surface was clean and sanded before painting.
- Remove loose paint, sand smooth, and repaint.
Stains Bleeding Through
- Use a stain-blocking primer and repaint the affected area.
Uneven Distressing
- If some spots look too bare, repaint and distress again.
- Blend with a damp rag or fine steel wool for a softer look.
Yellowing Finish
- Use water-based polycrylic instead of oil-based polyurethane for topcoating white paint.
Too Much Gloss
- Sand lightly with fine sandpaper to reduce shine, then reseal with a matte finish.
Don’t be afraid to experiment—distressed finishes are meant to look imperfect.

Credit: www.justthewoods.com
Real-world Examples And Inspiration
Many popular home décor brands and DIYers use distressed white wood. Here are some notable examples:
- Joanna Gaines (HGTV’s Fixer Upper): Famous for using distressed white shiplap and cabinets.
- Restoration Hardware: Sells high-end, distressed white wood tables and decor.
- IKEA hacks: DIYers often paint IKEA pine furniture in distressed white for a custom look.
On social media, you’ll find thousands of before-and-after photos by searching hashtags like #distressedwood or #farmhousedecor. Pinterest is a great place to see different levels of distressing and color combinations.
For more ideas and in-depth tutorials, the Family Handyman website has helpful guides.
Cost And Time Estimates
Distressing wood is budget-friendly, but costs can vary by project size. Here’s a general comparison:
| Project Type | Estimated Cost | Time Required | Skill Level |
|---|---|---|---|
| Small decor (frames, signs) | $15–$30 | 2–4 hours | Beginner |
| Medium furniture (chairs, side tables) | $30–$60 | 1 day | Beginner–Intermediate |
| Large furniture (dressers, cabinets) | $50–$120 | 2–3 days | Intermediate |
These costs include paint, sandpaper, brushes, and sealer. If you already own some supplies, the price goes down.
Time-saving tip: If you’re doing multiple pieces, paint them together—batching saves drying time.
Credit: petticoatjunktion.com
Safety Tips For Painting And Distressing
Safety is important, especially when sanding or using strong products.
- Ventilate: Always work in a well-ventilated area to avoid fumes.
- Wear a mask: Sanding produces dust. A simple dust mask helps protect your lungs.
- Gloves: Protect your hands from paint and chemicals.
- Eye protection: Especially when sanding or scraping.
Dispose of old paint and rags safely. Some products are flammable—read labels and follow local disposal rules.
Frequently Asked Questions
What Kind Of Wood Is Best For Distressing?
Softer woods like pine, cedar, or fir are easiest to distress because they sand and chip more easily. Hardwoods like oak or maple work too but require more effort. Old, solid wood furniture usually gives the best results.
Can I Distress Laminate Or Veneer Furniture?
Yes, but it takes extra prep. Lightly sand the surface to help paint stick, and always use a bonding primer. Avoid heavy distressing, as thin veneers can peel off. Focus on light sanding at corners.
How Do I Stop White Paint From Turning Yellow?
Use water-based polycrylic as your topcoat. Oil-based polyurethanes often yellow over time, especially in sunlight. Also, choose high-quality, non-yellowing paints designed for furniture.
What If I Over-distress My Project?
You can easily fix it. Just repaint the area with your base or white color, let it dry, and distress again—this time more gently. The layered look often makes the finish even better.
Is Sealing Necessary For All Distressed Wood Projects?
Sealing is highly recommended. It protects the paint from dirt, stains, and moisture. For pieces that get heavy use, a durable topcoat is essential. Decorative pieces might only need a light wax.
Distressed white wood adds personality and warmth to any space. With the right tools, a little patience, and these expert tips, you can create beautiful, lasting projects that look like they’ve been loved for years. Enjoy the process—every brushstroke and sanded edge makes your piece truly one of a kind.