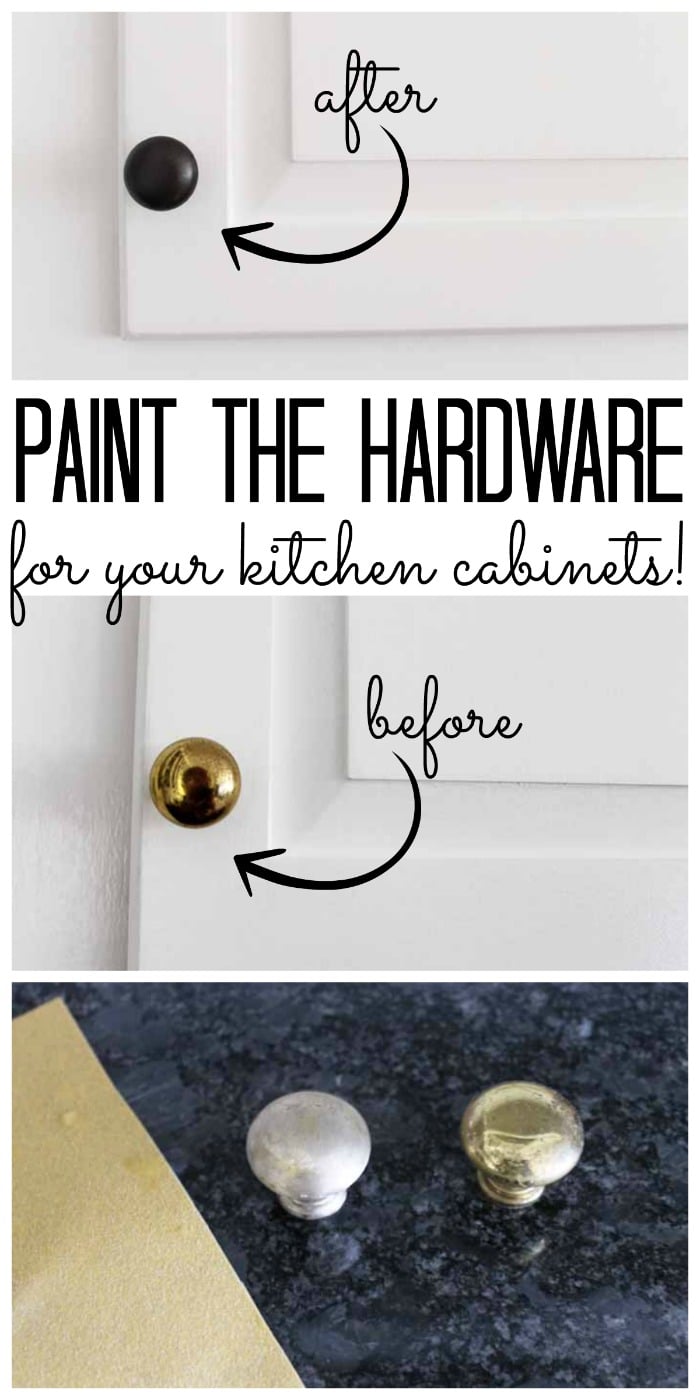
Painting cabinet handles can change the entire look of your kitchen or furniture for a fraction of the cost of buying new hardware. Many homeowners and DIY fans overlook the impact of small details like cabinet handles. But with a fresh coat of paint, these little pieces can add style, color, or even a vintage touch to your space. If you’re thinking about updating your cabinets, learning how to paint cabinet handles is a simple project that brings a big reward.
You don’t need to be a pro or have special skills. All you need is the right paint, a few basic tools, and some patience. This guide will walk you through every step, from choosing the right materials to applying the finishing touches.
Along the way, you’ll get tips, real-life examples, and answers to common questions. Whether you want a modern matte black, shiny gold, or a fun pop of color, you’ll learn how to get a durable, professional-looking finish that lasts.
Why Paint Cabinet Handles?
Many people wonder if it’s worth painting old hardware instead of replacing it. The answer is often yes—especially if you’re on a budget or want to personalize your space. Here’s why painting cabinet handles is a smart choice:
- Cost Savings: New handles can cost $3–$15 each. If you have 20 cabinets, that adds up fast. Paint, sandpaper, and primer are much cheaper.
- Customization: You can choose any color, finish, or style you like. Want brushed nickel, matte black, or even a neon look? Paint gives you endless options.
- Sustainability: Reusing existing hardware reduces waste. It’s better for the environment than throwing out metal or plastic handles.
- Quick Update: Painting is much faster than shopping for, ordering, and installing new hardware.
- Preserves Unique Handles: If you have vintage or custom handles, painting lets you keep their shape and character.
Many people who paint their handles say the cabinets suddenly look like new. In fact, a recent survey found that 36% of homeowners who painted their cabinet hardware were happier with their kitchen’s appearance afterward.
Types Of Cabinet Handles You Can Paint
Not all handles are the same. The material and shape of your handles affect how you prepare and paint them. Here are common types:
- Metal Handles: The most common—usually aluminum, brass, or steel. These hold paint well if prepped correctly.
- Wood Handles: Less common, but popular for rustic or vintage cabinets. Easy to sand and prime.
- Plastic Handles: Found in budget cabinets. Require special primer for good paint adhesion.
- Ceramic Handles: Sometimes found on older cabinets. Painting is possible but needs careful prep.
- Glass Handles: Usually not recommended for painting, as paint may not stick well.
Which Handles Are Best For Painting?
Handles with a smooth, simple surface are easier to paint evenly. Ornate or detailed handles can be painted, but you’ll need to use spray paint and be extra careful with coverage.

Credit: www.youtube.com
Tools And Materials Needed
Before starting, gather all your materials. Having everything ready makes the job easier and faster. Here’s what you’ll need:
- Screwdriver: For removing handles from cabinets.
- Sandpaper (220 or 320 grit): To roughen the surface for better paint adhesion.
- Degreaser or soap: For cleaning off oils and dirt.
- Painter’s tape: To protect screw threads or other areas.
- Drop cloth or old newspaper: To protect your workspace.
- Primer: Crucial for metal and plastic handles.
- Spray paint or brush-on paint: Choose a type made for the handle material.
- Clear sealer (optional): For extra durability.
- Disposable gloves: To keep hands clean.
Optional Extras
- Small paintbrushes: For touch-ups or detailed handles.
- Toothpicks or skewers: For propping up handles while painting.
- Mask: To avoid breathing fumes from spray paint.
Pro Tip: Investing in a high-quality primer and paint can make the difference between a finish that chips in a month and one that lasts for years.
Choosing The Right Paint And Primer
Picking the right paint is key to a long-lasting result. Not all paints work well on hardware, so read labels and choose carefully.
Best Paint Types For Handles
- Spray Paint: Gives the smoothest finish, especially on metal or detailed handles. Look for brands made for metal surfaces.
- Acrylic Enamel: Good for wood or plastic handles. Dries hard and resists chipping.
- Oil-Based Paint: Very durable, but takes longer to dry and has a strong smell.
Primer Selection
- Self-etching Primer: Best for metal handles, as it bonds tightly to the surface.
- Plastic Primer: Needed for plastic handles. Regular primer won’t stick well.
- Stain-Blocking Primer: For wood handles, helps prevent oils from coming through.
Paint Finish Choices
- Matte: Modern, hides fingerprints but can show scuffs.
- Satin/Semi-Gloss: Most popular for hardware, balances shine and durability.
- Gloss: Very shiny, easy to clean, but shows scratches.
Here is a quick comparison of paint types for cabinet handles:
| Paint Type | Best For | Pros | Cons |
|---|---|---|---|
| Spray Paint | Metal, detailed handles | Smooth, even finish; fast application | Needs ventilation; more overspray risk |
| Acrylic Enamel | Wood, plastic | Good coverage; dries fast | May need several coats |
| Oil-Based | Metal, wood | Very durable; smooth finish | Slow drying; strong odor |
Preparing Cabinet Handles For Painting
Most paint problems happen because of poor prep. Take your time with these steps for the best results.
1. Remove Handles From Cabinets
Use a screwdriver to take off each handle. Place the screws in a bowl or bag so you don’t lose them. Painting handles while they’re attached is a common mistake—it leads to drips, uneven coverage, and mess on your cabinets.
2. Clean Thoroughly
Handles collect oils from hands, cooking grease, and dust. Wash them in warm, soapy water or use a degreaser. Rinse well and let dry completely. Even a little grease can keep paint from sticking.
3. Sand The Surface
Lightly sand each handle with 220 or 320 grit sandpaper. This roughens the surface, helping the primer and paint stick better. For detailed handles, fold the sandpaper or use a sanding sponge to get into crevices. Wipe off dust with a damp cloth.
4. Tape Off Areas
If there are parts you don’t want painted (like screw threads), cover them with painter’s tape. This keeps paint out of important spots.
5. Set Up A Painting Station
Lay out a drop cloth or old newspaper in a well-ventilated area. Place handles on top, making sure they don’t touch each other. You can use toothpicks or skewers stuck into a cardboard box to hold handles upright, which prevents the paint from sticking to the surface.
Non-Obvious Insight: Avoid painting on humid or rainy days. High humidity can cause paint to dry slowly or bubble.
Priming The Handles
Priming is not optional for most handles. It helps paint stick and prevents chipping.
- Shake the primer can well.
- Hold the can 6–8 inches from the handle and spray in light, even coats.
- Let the primer dry according to the label (usually 30–60 minutes).
- Check for drips or uneven spots and lightly sand if needed.
If you’re using a brush-on primer, use a small brush and apply a thin, even layer. Let dry fully before painting.
Painting Cabinet Handles
Now comes the fun part—adding color or a new finish.
Spray Painting
Spray paint gives the most even finish, especially on metal or detailed handles.
- Shake the can for 1–2 minutes.
- Spray in light, steady passes, starting and ending off the handle to avoid drips.
- Apply 2–3 thin coats, letting each dry for 15–30 minutes.
- Turn handles between coats to cover all sides.
Brush-on Painting
If you prefer, use a high-quality brush and apply thin, even layers of paint. This method is best for flat or simple handles. Let each coat dry before adding the next.
Drying And Curing
Don’t rush. Paint may feel dry to the touch in 1–2 hours, but full curing (hardening) can take 1–2 days. Place handles in a dust-free area and don’t touch them until fully cured.
Advanced Tip: For a super-smooth finish, lightly sand between coats with extra-fine sandpaper (400 grit), then wipe clean.
Applying A Clear Sealer (optional)
A clear sealer adds extra protection against scratches and chips. Spray or brush on a thin coat after the paint is fully dry. Choose a sealer made for your paint type (acrylic, enamel, etc.).
- Let sealer dry fully before handling.
- One coat is usually enough, but add a second for high-use kitchens.
Reattaching Handles To Cabinets
Once handles are fully dry and cured, carefully remove any painter’s tape. Reattach the handles to the cabinets with a screwdriver. Avoid overtightening—this can chip the new paint.
If you get tiny scratches during installation, touch up with a small brush.
How Long Will Painted Handles Last?
With the right prep and paint, painted handles can last several years. High-traffic areas may show wear sooner, but many people find the finish holds up for 2–4 years before needing a touch-up.
Here’s a quick look at durability based on handle material and paint type:
| Handle Material | Paint Type | Expected Lifespan |
|---|---|---|
| Metal | Spray enamel | 3–4 years |
| Wood | Acrylic | 2–3 years |
| Plastic | Plastic spray paint | 1–2 years |
| Brass | Oil-based paint | 4+ years |
Creative Ideas For Painted Cabinet Handles
Painting doesn’t have to mean just black or white. Here are some creative ideas:
- Two-Tone Handles: Paint the base one color and the handle another for a modern look.
- Metallic Finishes: Use gold, silver, or bronze spray paint for a high-end feel.
- Distressed Look: Sand edges lightly after painting for a vintage effect.
- Stencil Designs: Add small patterns or designs with a stencil and contrasting color.
- Ombre Effect: Blend two colors for a unique gradient.
Non-Obvious Insight: If you want a true “factory” look, consider using an automotive spray paint. These are made for metal and are extremely tough.
Common Mistakes And How To Avoid Them
Even careful DIYers make mistakes. Here’s how to avoid the most common ones:
- Skipping Primer: Leads to easy chipping and peeling.
- Painting Dirty Handles: Grease or dust stops paint from sticking.
- Thick Paint Layers: Causes drips and uneven finish. Always use thin coats.
- Rushing Dry Time: Touching or installing handles too soon leads to fingerprints or smudges.
- Not Sealing: In high-use kitchens, a clear sealer adds years to your finish.
- Painting in Humidity: Causes paint to bubble or dry slowly.
If you do make a mistake, let the paint dry, sand it smooth, and repaint as needed.
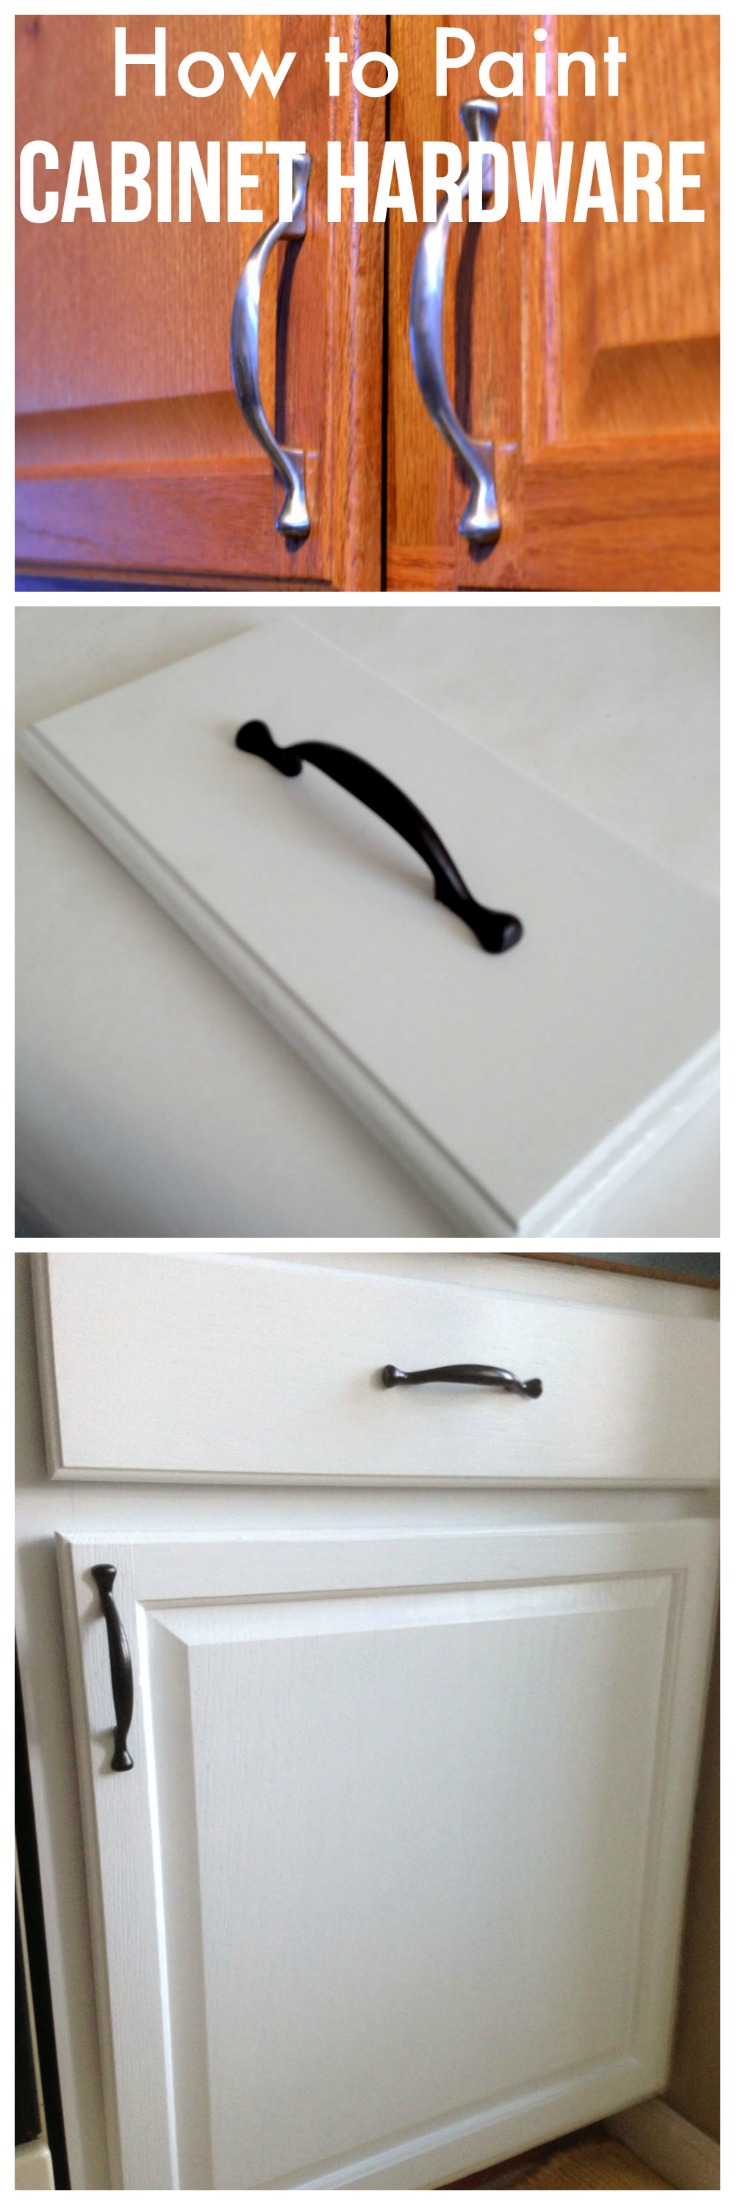
Real-life Example: Transforming A Kitchen On A Budget
Maria, a homeowner in Austin, Texas, wanted a new look for her kitchen but didn’t have the budget for a full remodel. She chose to paint her old brass handles matte black. Here’s how she did it:
- Removed 24 handles and cleaned them with degreaser.
- Sanded and primed with a self-etching primer.
- Spray painted with two coats of matte black enamel.
- Finished with a clear sealer for extra durability.
The whole project took one weekend and cost under $40. Maria says her kitchen now looks “modern and expensive,” and the handles still look great after a year of daily use.
When To Replace Instead Of Paint
While painting works for most handles, there are times when replacement is better:
- Handles are broken or bent
- Deep rust or corrosion
- Severely chipped or pitted surfaces
- You want a completely new shape or size
If your handles are in good shape, painting is almost always worth a try before buying new ones.
Credit: www.thecountrychiccottage.net
Environmental Impact And Safety Tips
Painting handles is more eco-friendly than replacing them, but it’s still important to work safely:
- Paint in a well-ventilated area or outdoors.
- Wear a mask when spraying paint or primer.
- Dispose of paint cans and used materials according to local rules.
- Keep paint and chemicals away from children and pets.
For more about safe paint disposal, visit the EPA’s paint management page.
Maintenance Tips For Painted Handles
To keep your newly painted handles looking fresh:
- Wipe gently with a damp cloth for cleaning. Avoid harsh chemicals.
- Don’t use abrasive sponges, which can scratch the paint.
- Tighten screws if handles become loose, but avoid chipping the paint.
- Touch up small chips with leftover paint and a tiny brush.
With these simple steps, your handles can look great for years.
Cost Breakdown: Diy Vs. Buying New Handles
How much can you really save? Here’s a quick cost comparison for painting versus buying new handles for a kitchen with 20 cabinets:
| Expense | Painting Handles | Buying New Handles |
|---|---|---|
| Handles | $0 (reuse) | $60–$300 |
| Paint & Supplies | $20–$40 | $0 |
| Total Cost | $20–$40 | $60–$300 |
Key Takeaway: Painting is much cheaper, especially for a big kitchen or unique handles.
Troubleshooting: Fixing Common Painting Problems
If you notice issues after painting, here’s what to do:
- Drips or Runs: Wait for the paint to dry, sand smooth, and repaint.
- Bubbles or Blisters: Caused by humidity. Sand and repaint on a dry day.
- Paint Peeling: Usually due to poor cleaning or skipping primer. Remove loose paint, clean, prime, and repaint.
- Uneven Coverage: Add another light coat and let dry fully.
Most problems can be fixed with patience and a little extra work.
Credit: createandbabble.com
Frequently Asked Questions
How Do I Know If My Handles Can Be Painted?
If your handles are made of metal, wood, or plastic and are not broken or severely corroded, they can almost always be painted. Glass handles are trickier and usually not recommended.
What’s The Best Paint For Metal Handles?
Spray enamel or oil-based spray paint designed for metal gives the most durable, smooth finish. Always use a self-etching primer first.
Can I Paint Handles Without Removing Them From The Cabinets?
It’s possible but not recommended. Removing handles lets you clean, sand, and paint all sides evenly and avoids mess on your cabinets.
How Long Should I Wait Before Reattaching Painted Handles?
Wait at least 24 hours for the paint to dry to the touch, but 48–72 hours is safer to avoid marks or chips during installation.
Do I Really Need A Clear Topcoat?
A clear sealer is optional but recommended for kitchens or bathrooms, where handles get a lot of use. It helps protect your new finish from scratches, water, and grease.
Giving your cabinet handles a fresh coat of paint is one of the easiest ways to update your space. With the right preparation and materials, you can achieve a professional look that lasts. Whether you want to save money, express your style, or just try a quick DIY project, painting your hardware is a satisfying, high-impact upgrade. Take your time, follow the steps, and enjoy your new, refreshed cabinets for years to come.